
Related Manuals for Sony LBT-SH2000


Summary of Contents for Sony LBT-SH2000
- Page 1 4-273-674-81(1) Mini HI-FI Operating Instructions Component System Manual de instrucciones LBT-SH2000...
-
Page 2: Important Safety Instructions
To reduce the risk of fire or electric shock, do the space provided below. Refer to them not expose this apparatus to rain or moisture. whenever you call upon your Sony dealer To reduce the risk of fire, do not cover the regarding this product. - Page 3 9) Do not defeat the safety purpose of the The following FCC polarized or grounding-type plug. A statement applies only to polarized plug has two blades with one the version of this model wider than the other. A grounding type manufactured for sale in plug has two blades and a third the U.S.A.
- Page 4 License and Trademark Notice • “WALKMAN” and “WALKMAN” logo are registered trademarks of Sony Corporation. • MPEG Layer-3 audio coding technology and patents licensed from Fraunhofer IIS and Thomson. • Windows Media is either a registered trademark or trademark of Microsoft Corporation in the United States and/or other countries.
-
Page 5: Table Of Contents
Table of Contents Guide to parts and controls ..6 Other Operations Singing along ......22 Getting Started Changing the lighting pattern Hooking up the system on the speakers ......22 securely ........10 Using the timers ......23 Positioning the speakers.....12 Changing the display.... -
Page 6: Guide To Parts And Controls
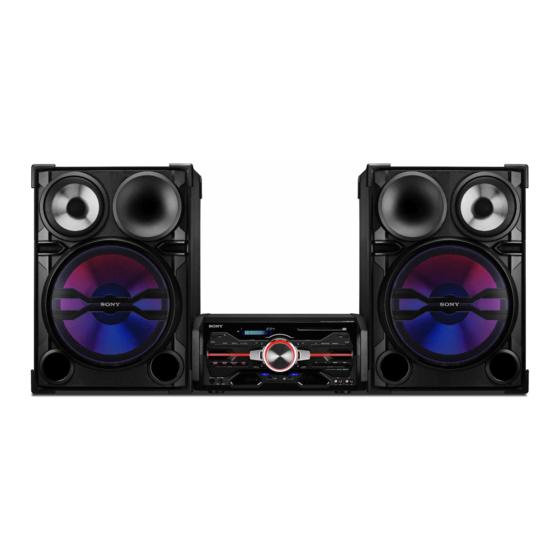
Guide to parts and controls This manual mainly explains operations using the unit, but the same operations can also be performed using the buttons on the remote control having the same or similar names. Unit – Front view qf qd qs qa –... - Page 7 Remote control RM-SCU37B Unit: VOLUME/DJ CONTROL Adjust the volume. Adjust the DJ EFFECT level (page 22). You cannot use this knob to adjust the volume when the DJ EFFECT is BAND activated. Remote control: VOLUME +/–* Adjust the volume. * The VOLUME + button has a tactile dot. Use the tactile dot as a reference when operating the system.
- Page 8 Unit: NX (play/pause) A (PLAY) port Remote control: N (play), Connect an optional USB device. X (pause) A indicator Start or pause playback. To resume playback of the USB device, press NX or N. MIC IN jack Connect a microphone. x (stop) MIC LEVEL Stop playback.
- Page 9 REPEAT/FM MODE Listen to a disc, a USB device, a single track or file repeatedly (page 14, 20). Select the FM reception mode (monaural or stereo) (page 14). CLEAR Delete the last step from the program list. TUNER MEMORY (page 15) Preset the radio station.
-
Page 10: Getting Started
Getting Started Hooking up the system securely ANTENNA FM/AM SPEAKERS SPEAKERS GAME DVD/SAT HIGH CHANNEL LOW CHANNEL LED SPEAKER IMPEDANCE USE 4 Ω IMPEDANCE USE 4 Ω A Antennas C DVD/SAT L/R jacks Find a location and an orientation that Use an audio cord (not supplied) to provide good reception, and then set up connect to the audio output jacks of an... -
Page 11: Inserting Batteries
E Speakers Inserting batteries The speaker connectors are color-coded with their respective speaker terminals on Insert the two supplied R6 (size AA) the unit. batteries, matching the polarities shown HIGH CHANNEL below. White Notes • Do not mix an old battery with a new one or LOW CHANNEL mix different types of batteries. -
Page 12: Positioning The Speakers
Positioning the Disc speakers Playing an AUDIO CD/ To obtain optimum performance from the MP3 disc system, we recommend you to place the speakers as shown below. Press CD. A Unit Insert a disc with the label side B Speaker (left) C Speaker (right) facing up. -
Page 13: Using Play Mode
When playback is stopped, Using play mode press PLAY MODE repeatedly until “PGM” lights up in the Playing in original order display panel. (Normal Play) For USB function: Press PLAY MODE on the remote control Press USB repeatedly to select the repeatedly when playback is stopped. -
Page 14: Tuner
To delete the last step from the Tuner program list Press CLEAR on the remote control when Listening to the radio playback is stopped. Notes Use the buttons on the remote control to • (CD function only) The program list remains perform this operation. -
Page 15: Receiving Rds Broadcasts
Press TUNER/BAND repeatedly to Receiving RDS select AM band. broadcasts Press "/1 to turn off the system. While holding down ENTER, press This system allows you to use Radio Data "/1. System (RDS), which enables radio stations to send additional information “AM 9K STEP”... -
Page 16: Usb Device
Check the websites below for the stopped. information about compatible USB devices. Press to select “USB MEM <http://www.sony.com/shelfsupport> SEL”, then press ENTER. Note on the maximum number of Press to select the memory audio files and folders on a USB you want, then press ENTER. - Page 17 Press ENTER. Transferring music from a disc Transferring starts when “DON’T You can easily transfer all the music on a REMOVE” appears in the display disc to a USB device (CD-USB panel. Synchronized Transfer). You can also For CD-USB Synchronized transfer a single track or MP3 file during Transfer: playback (REC1 Transferring).
- Page 18 To create a new MP3 file For USB A-USB B REC1 Transferring: Press REC TO USB B. “NEW TRACK” appears in the display Select the audio file you want to panel. transfer, then start playback. If you press REC TO USB B again after a Press REC TO USB B.
-
Page 19: Playing A File
® Analog Transferring • When transferring music to a Walkman using “Media Manager for WALKMAN”, be Transferring Folder name File name sure to transfer in MP3 format. source ® • When connecting a Walkman to the system, “TUFM0001”* “TRACK001”* be sure to connect after the display “Creating Library”... - Page 20 Playing in random order (Shuffle Press to select the audio file you want, then press ENTER or Play) Press PLAY MODE repeatedly when The selected file starts playback. playback is stopped. • ALL USB SHUF: shuffle all USB To erase audio files or folders from devices •...
-
Page 21: Sound Adjustment
Creating your own Sound Adjustment sound effect Adjusting the sound You can raise or lower the levels of specific frequency ranges and then store Do this the setting in the memory as “USER EQ”. Reinforce the Press GROOVE bass and create repeatedly. -
Page 22: Creating A Party Atmosphere (Dj Effect)
Creating a party Other Operations atmosphere Singing along (DJ EFFECT) You can sing along with any audio source Press the following button to that played back on this system. select the effect type. Turn MIC LEVEL to MIN to • FLANGER: Create a deep flanging reduce the microphone volume effect that is similar to the roar of a jet plane. -
Page 23: Using The Timers
For Recording Timer: Using the timers Tune to the preset radio station (page 15). The system offers three timer functions. Press CLOCK/TIMER SET. You cannot activate both the Play Timer and the Recording Timer at the same time. Press ./> repeatedly to If you use either with the Sleep Timer, the select “PLAY SET”... -
Page 24: Changing The Display
Changing the illumination Changing the display pattern around VOLUME/ Changing the display mode DJ CONTROL knob Press OPTIONS. Press DISPLAY on the remote control repeatedly while the Press repeatedly to select system is turned off. “ILLUM”, then press ENTER. Press repeatedly to select Demonstration the illumination pattern you... -
Page 25: Using Optional Equipment
Note Additional Information The elapsed playing time of an audio file encoded using a VBR (variable bit rate) is not displayed correctly. Playable discs • AUDIO CD Using optional • CD-R/CD-RW – audio data equipment – MP3 files that conforms to ISO9660 Level 1/Level 2, or Joliet (expansion Connect an optional equipment format). -
Page 26: Troubleshooting
Compact Disc (CD) standard, playback If the problem persist, consult your on this product is not guaranteed. nearest Sony dealer. Music discs encoded with copyright Note that if service personnel changes protection technologies some parts during repair, these parts may be retained. - Page 27 The system does not eject the disc • Remove the obstacles between the and “LOCKED” appears. remote control and the unit. • Consult your nearest Sony dealer or • Move the remote control closer to the local authorized Sony service facility. unit.
- Page 28 The sound skips. • If the transferring and erase operations are repeated multiple times, the file • Wipe the disc clean (page 31). structure within the USB device • Reload the disc. becomes fragmented. Refer to the • Move the unit to place without vibration operating instructions supplied with the (e.g., on top of a stable stand).
- Page 29 USB device. If this • USB device formatted with file systems display pattern persists, contact your other than FAT16 or FAT32 are nearest Sony dealer. unsupported.* • In case multiple partitions exist in USB Erroneous display. device that is being used, files may not •...
-
Page 30: Messages
• Connect a commercially available All of the programmed steps have been external antenna. erased. • Consult your nearest Sony dealer if the supplied AM antenna has come off the NOT IN USE plastic stand. You have pressed a button that the •... -
Page 31: Precautions
USB device READING The system is reading information of the DATA ERROR USB device. Some buttons are not You tried to play back a file that is not available. playable. REC ERROR DEVICE ERROR Transferring did not start, stopped The USB device could not be recognized partway, or otherwise could not be or an unknown device is connected. -
Page 32: Specifications
On safety Specifications • Completely disconnect the power cord (mains lead) from the wall outlet (mains) if it is not going to be used for an extended period of AUDIO POWER SPECIFICATIONS time. When unplugging the unit, always grip the plug. Never pull the cord itself. POWER OUTPUT AND TOTAL •... - Page 33 Speaker Sampling frequencies MP3 (MPEG 1 Audio Layer-3): Speaker system 32 kHz/44.1 kHz/48 kHz 3-way, Bass reflex WMA: 44.1 kHz Speaker unit AAC: 44.1 kHz Subwoofer: 380 mm (15 in), cone type Transfer speed Woofer: 200 mm (8 in), cone type Full-Speed Tweeter: 25 mm (1 in), horn type Supported USB device...
-
Page 34: Instrucciones De Seguridad Importantes
Registre esos números en el espacio descubierto, como velas encendidas, sobre el suministrado a continuación. Menciónelos aparato. siempre que llame al distribuidor Sony Para reducir el riesgo de incendios o respecto a este producto. descargas eléctricas, no exponga el aparato a goteos o salpicaduras, ni coloque recipientes Núm. - Page 35 8) No lo instale junto a ninguna fuente de 14) Solicite todas las reparaciones a personal calor como radiadores, salidas de aire de servicio cualificado. Las reparaciones caliente, estufas ni ningún otro aparato son necesarias cuando el aparato ha que produzca calor (incluídos sufrido cualquier tipo de daños, como amplificadores).
- Page 36 Clase B, según lo que indica la “WALKMAN” son marcas comerciales Sección 15 de las disposiciones de la FCC. registradas de Sony Corporation. Esos límites están diseñados para • Tecnología de codificación de audio proporcionar una protección razonable...
- Page 37 Índice Guía de piezas y controles ...6 Otras operaciones Cantando sobre el audio.... 23 Procedimientos Cambio del patrón de iluminación iniciales en los altavoces ......23 Conexión del sistema de forma Uso de los temporizadores ..24 segura .........10 Cambio de la pantalla....25 Posición de los altavoces ...12 Uso de equipos opcionales ..
-
Page 38: Guía De Piezas Y Controles
Guía de piezas y controles Este manual explica principalmente las operaciones disponibles desde la unidad, pero las mismas operaciones se pueden realizar utilizando los botones del mando a distancia que tienen los mismos nombres o similares. Unidad – Vista frontal qf qd qs qa –... - Page 39 Mando a distancia RM-SCU37B Unidad: TUNING +/– Mando a distancia: +/– (sintonización) Sintonice la emisora que desee. Unidad: VOLUME/DJ CONTROL BAND Ajuste el volumen. Ajuste el nivel de DJ EFFECT (página 23). No es posible usar esta rueda para ajustar el volumen cuando DJ EFFECT está...
- Page 40 Unidad: NX (reproducir/pausa) Puerto B (PLAY/REC) Mando a distancia: N (reproducir), Conecta y transfiere a un dispositivo USB opcional. X (pausa) Iniciar o introducir una pausa en la Indicador reproducción. Se ilumina en rojo cuando se transfiere al Para reanudar la reproducción del dispositivo USB opcional conectado.
- Page 41 ENTER Introduzca los ajustes. CLOCK/TIMER SELECT (página 25) CLOCK/TIMER SET (página 12, 24) Ajuste el reloj y los temporizadores. REPEAT/FM MODE Escuche un disco, un dispositivo USB, un archivo o una pista individual varias veces (página 14, 21). Seleccione el modo de recepción FM (monoaural o estéreo) (página 14).
-
Page 42: Procedimientos Iniciales
Procedimientos iniciales Conexión del sistema de forma segura ANTENNA FM/AM SPEAKERS SPEAKERS GAME DVD/SAT HIGH CHANNEL LOW CHANNEL LED SPEAKER IMPEDANCE USE 4 Ω IMPEDANCE USE 4 Ω A Antenas C Tomas DVD/SAT L/R Busque una ubicación y una orientación Utilice un cable de audio (no que ofrezcan una buena recepción y, a suministrado) para realizar la conexión a... - Page 43 E Altavoz Inserción de las pilas Los conectores del altavoz están codificados con un color con los Inserte las dos pilas R6 (tamaño AA) terminales del altavoz respectivos en la suministradas de acuerdo con la polaridad unidad. que se muestra en la ilustración. HIGH CHANNEL Blanco Rojo...
-
Page 44: Posición De Los Altavoces
Posición de los Disco altavoces Reproducción de un Para que el rendimiento del sistema se disco AUDIO CD/MP3 óptimo, recomendamos que coloque los altavoces tal y como se muestra más Pulse CD. abajo. Inserte un disco con la etiqueta A Unidad B Altavoz (izquierdo) hacia arriba. -
Page 45: Uso Del Modo De Reproducción
Creación de su propio Uso del modo de programa (Reproducción reproducción programada) Reproducción en el orden Puede crear un programa de hasta 25 pasos en el orden que desee que se original (Reproducción reproduzcan. normal) Utilice los botones del mando a distancia para realizar esta operación. -
Page 46: Sintonizador
Repita los pasos 3 a 5 para Sintonizador programar más pistas o archivos. Para escuchar la radio Pulse N para comenzar la Utilice los botones del mando a distancia reproducción programada. para realizar esta operación. Para cancelar la reproducción Pulse TUNER/BAND varias programada veces para seleccionar la banda Cuando la reproducción se detenga, pulse... -
Page 47: Recepción De Emisiones Rds
Para cambiar el intervalo de Para sintonizar una emisora sintonización de AM presintonizada El ajuste predeterminado para el intervalo Pulse TUNING MODE varias veces hasta de sintonización de AM es 9 kHz (o que la indicación “PRESET” se ilumine 10 kHz en algunas zonas). No puede en el visor. -
Page 48: Dispositivo Usb
Consulte los sitios web que se facilitan a “USB B”. continuación para obtener información sobre los dispositivos USB compatibles. Pulse OPTIONS cuando la <http://www.sony.com/shelfsupport> reproducción se detenga. Nota sobre el número máximo de Pulse para seleccionar “USB carpetas y archivos de audio MEM SEL”... - Page 49 Notas Pulse CD. • Cuando transfiera a partir de un AUDIO CD, las pistas se transferirán como archivos MP3 Inserte el disco que desea de 128 kbps. Cuando transfiera a partir de un transferir. disco MP3, los archivos MP3 se transferirán con la misma velocidad de transferencia que Para la transferencia los archivos MP3 originales.
- Page 50 Transferencia de audio Transferencia de música de un analógico (Transferencia dispositivo USB analógica) Puede transferir fácilmente archivos de audio desde un dispositivo USB a otro Puede transferir sonido de fuentes dispositivo USB (transferencia analógicas (al margen de las funciones sincronizada a alta velocidad de USB A a CD y USB) a un dispositivo USB.
- Page 51 Transferencia analógica Pulse ENTER. Fuente de Nombre de Nombre de La transferencia se inicia cuando transferencia carpeta archivo “DON’T REMOVE” aparece en el “TUFM0001”* “TRACK001”* visor. “TUAM0001”* Para la transferencia “EXPC0001”* sincronizada a alta velocidad de Televisor “EXTV0001”* USB A a USB B: DVD/SAT “EXDS0001”* Cuando se haya completado la...
-
Page 52: Reproducción De Un Archivo
• Si una carpeta o archivo que está intentando Pulse NX. transferir ya existe en el dispositivo USB con el mismo nombre, se añade un número Los archivos de audio se reproducen secuencial después del nombre sin por orden alfabético. sobrescribir la carpeta o el archivo original. - Page 53 Notas sobre el dispositivo USB Uso del modo de reproducción • El orden de reproducción para el sistema puede ser distinto del orden de reproducción Utilice los botones del mando a distancia del reproductor de música digital conectado. • Asegúrese de apagar el sistema antes de para realizar esta operación.
-
Page 54: Ajuste Del Sonido
Creación de su propio Ajuste del sonido efecto de sonido Ajuste del sonido Puede aumentar o reducir los niveles para intervalos de frecuencias específicos y, a Para Haga esto continuación, almacenar el ajuste en la Reforzar el nivel Pulse GROOVE varias memoria como “USER EQ”. -
Page 55: Creación De Un Ambiente De Fiesta (Dj Effect)
Creación de un Otras operaciones ambiente de fiesta Cantando sobre el (DJ EFFECT) audio Pulse el botón que se indica a Puede cantar con cualquier fuente de continuación para seleccionar el audio que haya reproducido música en el tipo de efecto. sistema. -
Page 56: Uso De Los Temporizadores
Pulse varias veces para Temporizador de seleccionar el patrón de reproducción/Temporizador de iluminación de los altavoces que grabación desea y, a continuación, pulse ENTER. Asegúrese de que ha ajustado el reloj. Para apagar la iluminación, seleccione Utilice el botón del mando a distancia “PATTERN OFF”. -
Page 57: Cambio De La Pantalla
Pulse ./> varias veces Cambio de la pantalla para seleccionar la fuente de sonido que desea y, a Cambio del modo de pantalla continuación, pulse ENTER. Para el temporizador de Pulse DISPLAY en el mando a grabación: distancia varias veces mientras el Conecte un dispositivo USB sistema está... - Page 58 Cambio del patrón de Visualización de información iluminación alrededor de la en el visor rueda VOLUME/DJ CONTROL Pulse DISPLAY en el mando a distancia varias veces mientras el Pulse OPTIONS. sistema está encendido. Pulse varias veces para Puede ver la información que se indica a seleccionar “ILLUM”...
-
Page 59: Uso De Equipos Opcionales
Uso de equipos Información adicional opcionales Discos reproducibles Conecte un equipo opcional • AUDIO CD (página 10). • CD-R/CD-RW – datos de audio Gire la rueda VOLUME en el – Archivos MP3 que cumplen con el sentido contrario al de las estándar ISO9660 nivel 1/nivel 2 o agujas del reloj para reducir el Joliet (formato ampliado). -
Page 60: Solución De Problemas
Compact Disc (CD), no es Si el problema continúa, póngase en seguro que se pueda reproducir en este contacto con el distribuidor de Sony más producto. cercano. Discos de música codificados con Tenga en cuenta que si el personal del servicio técnico cambia algunas piezas... - Page 61 El sistema no expulsa el disco y ajuste la hora correcta (página 24). aparece la indicación “LOCKED”. • Cancele la función del temporizador • Consulte con el distribuidor Sony o el para desconexión (página 24). servicio técnico autorizado Sony más cercano.
- Page 62 Aparecen otros caracteres como “_”. cancelar la transferencia y, a continuación, pulse Z EJECT para expulsar el disco. Dispositivo USB • Consulte con el distribuidor Sony más cercano. La transferencia da error. • Está utilizando un dispositivo USB no La reproducción no se inicia.
- Page 63 USB. Si compruebe si “USB A” o “USB B” se este patrón de pantalla persiste, póngase iluminan en el visor. en contacto con el distribuidor Sony más cercano. Hay ruido, saltos o sonido distorsionado. Pantalla con mensaje erróneo.
- Page 64 • Conecte una antena externa disponible (página 21). en el mercado. El archivo de audio no se puede • Consulte con el distribuidor Sony más reproducir. cercano si la antena de AM se ha salido • Los archivos MP3 en formato MP3 del soporte de plástico.
-
Page 65: Mensajes
UNLOCK Mensajes La función de prevención de robo del disco está desactivada. Disco/Temporizador Dispositivo USB CANNOT PLAY DATA ERROR Ha insertado un disco que no se puede Ha intentado reproducir un archivo que no reproducir en el sistema. se puede reproducir. NO DISC DEVICE ERROR No hay ningún disco en la ranura para... -
Page 66: Precauciones
PROTECTED Notas sobre discos El dispositivo USB está protegido contra • Antes de reproducirlos, limpie el disco con un trapo desde el centro hacia el borde. escritura. • No limpie discos con disolventes, como PUSH STOP diluyente o limpiadores disponibles en el Ha intentado realizar una operación que mercado o spray antiestático para LP de solo se puede realizar cuando la... -
Page 67: Especificaciones
Sección del amplificador Acumulación de calor • La acumulación de calor en la unidad durante Los siguientes elementos se han medido con su funcionamiento es normal y no debe ser una ca de 120 V, 60 Hz causa de alarma. Salida de potencia (nominal): •... - Page 68 Sección de reproductor de discos Altavoz Sistema Sistema de altavoces Disco compacto y sistema de audio 3 vías, reflector de graves digital Altavoz Propiedades de diodo láser Altavoz de graves: 380 mm Duración de la emisión: Continua (15 pulgadas), tipo cónico Salida de láser*: Menos de 44,6 W Altavoz de graves: 200 mm * Esta salida es la medida del valor en...
- Page 72 ©2012 Sony Corporation Printed in Malaysia...