Table of Contents

Related Manuals for Dell 3100cn


Summary of Contents for Dell 3100cn
- Page 1 Dell™ Laser Printer 3100cn Owner’s Manual Look Inside For: • Loading Paper • Setting Up for Local and Network Printing • Using Your Printer • Maintenance • Contacting Dell w w w . d e l l . c o m / s u p p l i e s | s u p p o r t . d e l l . c o m...
- Page 2 Order Toner Cartridges Dell™ toner cartridges are available only through Dell. You can order toner cartridges online at www.dell.com/supplies or by phone. 877-INK-2-YOU Algeria Contact your distributor. Argentina Contact your distributor. Australia 1300 030 290 Austria 08 20-24 05 30 35 Belgium 02.713 1590...
-
Page 3: Dell™ Laser Printer 3100Cn
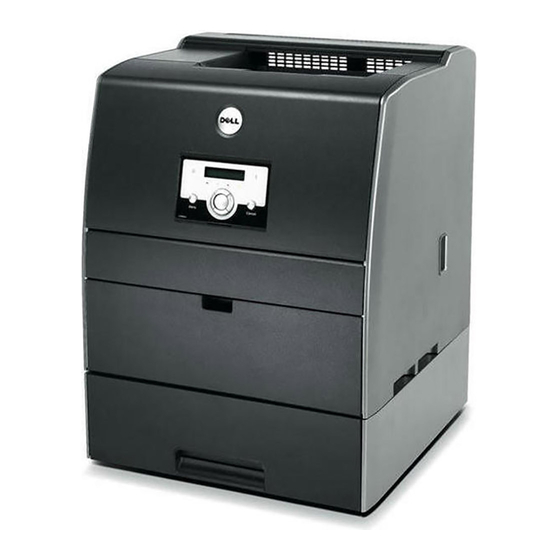
Dell™ Laser Printer 3100cn Center output tray Operator panel Multipurpose feeder Standard 250-sheet tray module (A4/Letter cassette) Power switch For details on the optional duplex module, 250-sheet tray module, 500-sheet tray module, and other additional options, see the Power cable connector... - Page 4 Other trademarks and trade names may be used in this document to refer to either the entities claiming the marks and names of their products. Dell Inc. disclaims any proprietary interest in trademarks and trade names other than its own.
-
Page 5: Table Of Contents
Contents Dell™ Laser Printer 3100cn ...3 1 Loading Paper ...11 Loading the Standard Tray ...12 Loading the Multipurpose Feeder ...15 Loading Envelopes ...17 2 Setting Up for Local Printing ...19 Installing Printer Drivers ...20 Connecting the Printer to the Computer Before Inserting the Drivers and Utilities CD ...20... - Page 6 Canceling a Job From the Desktop ...37 Software Overview ...37 Printing Status Window ...37 Status Window ...37 Status Monitor Console ...37 Dell Supplies Management System ...38 User Setup Disk Creating Tool ...38 Software Update ...38 6 Maintenance ... 39 Replacing the Drum Cartridge ...40 Removing the Used Drum Cartridge ...40...
- Page 7 U.S. Terms and Conditions of Sale ...69 Limited Warranties and Return Policy ...71 Limited Warranty for Dell-Branded Hardware Products (U.S. Only) ...71 Total Satisfaction Return Policy (U.S. Only) ...75 Limited Warranty Terms for Dell-Branded Hardware Products (Canada Only) ...75 Total Satisfaction Return Policy (Canada Only) ...78 Dell Software and Peripherals (Canada Only) ...79...
- Page 9 Refer service or repairs, other than those described in the operating instructions, to a professional service person. • This product is designed to meet safety standards with the use of specific Dell-authorized components. The safety features of some parts may not always be obvious. Dell disclaims liability associated with use of non-Dell-authorized components.
-
Page 11: Loading Paper
Section 1 Loading Paper Loading the Standard Tray Loading the Multipurpose Feeder Loading Envelopes Loading Paper... -
Page 12: Loading The Standard Tray
Loading the Standard Tray Load the print media used for the majority of your print jobs in the standard 250-sheet tray module. Remove the tray. Slide the width guides to the edge of the tray. The width guides should be fully extended. Loading Paper... - Page 13 Squeeze the length guide and slide it to the edge of the tray. Before loading the print media, flex the sheets back and forth, and then fan them. Straighten the edges of the stack on a level surface. Place the print media into the tray with the recommended print side face up. NOTE: Do not exceed the maximum fill line in the tray.
- Page 14 Slide the width guides and length guide until they rest lightly against the edge of the print media stack. Insert the tray. If you load any print media into the tray, configure the Paper Type and Paper Size settings for that tray. Loading Paper...
-
Page 15: Loading The Multipurpose Feeder
Loading the Multipurpose Feeder In addition to plain paper, the multipurpose feeder can use various other sizes and types of print media such as envelopes and transparencies. Gently pull open the multipurpose feeder cover. Slide the width guides to the edge of the tray. The width guides should be fully extended. Loading Paper... - Page 16 Select print media source, size, and type in your software program and select the print media size and type on the printer operator panel. For tips on recommended print media, solving printing problems, and clearing jams, see the...
-
Page 17: Loading Envelopes
To load envelopes that are under 7.87 inches (220 mm) in width in the multipurpose feeder, insert the envelopes with the flaps open and toward the front of the printer. To load envelopes that are over 7.87 inches (220 mm) in width in the multipurpose feeder, insert the envelopes with the flaps closed and the short-edge of the envelopes facing into the printer. - Page 18 Loading Paper...
-
Page 19: Setting Up For Local Printing
Section 2 Setting Up for Local Printing Installing Printer Drivers Setting Up for Local Printing... -
Page 20: Installing Printer Drivers
A local printer is a printer attached to your computer or a print server using a USB or parallel cable. If your printer is attached to a network and not your computer, see "Setting Up for Network Printing" on page 23. - Page 21 Select either the Typical Installation or Custom Installation checkbox, and then click Next. If you select Custom Installation, you can select the specific software you want to install. The Adobe License Agreement appears, click to accept the agreement and then click Install. When the Congratulations! screen appears, click Finish.
- Page 22 Setting Up for Local Printing...
-
Page 23: Setting Up For Network Printing
Section 3 Setting Up for Network Printing Network Set-Up Setting Up for Network Printing... -
Page 24: Network Set-Up
Network Set-Up NOTE: To use this printer in a UNIX or Linux environment, you need to install a UX Filter or Linux Driver. For more information on how to install and use these, refer to your User’s Guide. NOTE: When using a CD drive in a Linux environment, you need to mount the CD according to your system environment. - Page 25 To launch the Dell Printer Configuration Web Tool, type the network printer IP address in your Web browser, and the printer configuration appears on the screen. Refer to your more information. You can set up the Dell Printer Configuration Web Tool to send you an email when the printer needs supplies or intervention. User’s Guide...
- Page 26 To set up email alerts: Launch the Dell Printer Configuration Web Tool. Click E-Mail Alert link. Under Setup E-Mail Lists and Alerts, enter the Primary SMTP Gateway, the Reply Address, and enter your email address or the key operator’s email address in the email list box.
-
Page 27: Installing The Printer Driver Or Ppd File On Macintosh Computers
Section 4 Installing the Printer Driver or PPD File on Macintosh Computers Installing the AdobePS Printer Driver (Mac OS 9.x) Installing the PPD File (Mac OS X) Installing the Printer Driver or PPD File on Macintosh Computers... -
Page 28: Installing The Adobeps Printer Driver (Mac Os 9.X)
Installing the AdobePS Printer Driver (Mac OS 9.x) There are two steps to install the printer driver. First, you must use the installer included in the Drivers and Utilities CD to install the printer driver to Macintosh. Then configure the printer driver according to the connection type. -
Page 29: Setting The Printer Driver (For Usb Connection)
Close the Chooser. Setting the Printer Driver (for USB Connection) If the printer is connected to your computer via a USB port, you will have to launch the Desktop Printer Utility and register the printer as a Desktop Printer. Turn on the printer. -
Page 30: Setting The Printer Driver (For Lpr Connection)
NOTE: The Desktop Printer Utility is located in the AdobePS Components folder on your Macintosh HD. If there is no Desktop Printer Utility in the AdobePS Components folder, install Adobe PS 8.8 by using Full Installation. Select AdobePS from the With list box, and select Printer (LPR) in Create Desktop list, then click OK. -
Page 31: Installing The Ppd File (Mac Os X)
Installing the PPD File (Mac OS X) NOTE: The printer driver does not need to be installed on a Mac OS X. It uses a generic PostScript driver that is provided with the OS. Drivers and Utilities Insert the Drivers and Utilities Launch the Double-click the Mac OS X folder, and then double-click the Dell 3100cn Installer icon. -
Page 32: Configure Settings
Select IP Printing from the menu, and type the IP address for the printer being used in Printer’s Address. Select Dell from Printer Model, and confirm Dell Laser Printer 3100cn is selected for the Model Name. If it is not selected, select it. -
Page 33: Using Your Printer
Section 5 Using Your Printer Changing Printer Settings Adjusting the Language Printing a Job Canceling a Job From the Printer Operator Panel Software Overview Using Your Printer... -
Page 34: Changing Printer Settings
You can select menu items and corresponding values from the operator panel. When you first enter the printer menus from the operator panel, you see an asterisk (*) next to a value in the menus. This asterisk indicates the factory default menu setting. These settings are the original printer settings. -
Page 35: Initializing Nvram
If you forget your password, turn off the printer. Then, while holding the Menu button, turn on the printer. This will recover the factory default menu settings. The factory default panel password is 0 0 0 0. Using Your Printer... -
Page 36: Adjusting The Language
Canceling the Job From a Computer Canceling a Job From the Taskbar When you send a job to print, a small printer icon appears in the right corner of the taskbar. Double-click the printer icon. A list of print jobs appears in the printer window. -
Page 37: Canceling A Job From The Desktop
• Select Help to read the online help. • The Status Monitor Console displays the Status Window for local connections, or the Dell Printer Configuration Web Tool for network connections. • To obtain status info on network printers, you must click on the EWS link. -
Page 38: Dell Supplies Management System
• Install in advance the Dell Laser Printer 3100cn printer driver in the computer on which the setup disk is to be created. •... -
Page 39: Maintenance
Section 6 Maintenance Replacing the Drum Cartridge Replacing the Toner Cartridge Maintenance... -
Page 40: Replacing The Drum Cartridge
To order by phone, see "Order Toner Cartridges" on page 2. Dell recommends Dell cartridges for your printer. Dell does not provide warranty coverage for problems caused by using accessories, parts, or components not supplied by Dell. - Page 41 Grab the drum cartridge by the handle, and pull it up and out. CAUTION: Do not touch inside the printer with your hands. Some parts may be hot. Allow time for the printer to cool before attempting to remove parts in this area.
-
Page 42: Installing The New Drum Cartridge
Do not touch the drum at the bottom of the drum cartridge. Holding the drum cartridge by the handle, align the arrows on the drum cartridge with the corresponding arrows on the printer. Guide the cartridge in until it snaps into place. Maintenance... - Page 43 Pull down the lever on the right to lock the drum cartridge in place. Close the top cover. Maintenance...
-
Page 44: Replacing The Cleaning Pad
Replacing the Cleaning Pad Pull out the slide bar that is inside the printer on the right side until it stops. The access window cover slides open. Pull the cleaning rod until the cleaning pad comes out of the printer. - Page 45 Push the two tabs on the cleaning pad inward to remove the pad. Hold the new cleaning pad under the cleaning rod and push it in until it clicks. Push the cleaning rod back to its original position until it stops. Maintenance...
-
Page 46: Replacing The Toner Cartridge
Dell toner cartridge are available only through Dell. You can order more toner online at http://www.dell.com/supplies or by phone. To order by phone, see "Order Toner Cartridges" on page 2. -
Page 47: Removing The Used Toner Cartridge
Grab the notch in the front door and pull forward. The toner cartridge that must be replaced has moved to the front of the printer. Push up the handhold on the right to unlock the cartridge. -
Page 48: Installing The New Toner Cartridge
Hold the toner cartridge with both hands and pull out the cartridge. CAUTION: Do not touch inside the printer with your hands. Some parts may be hot. Installing the New Toner Cartridge Make sure the color of the toner cartridge matches the slot on the toner cartridge carrier. - Page 49 To insert the toner cartridge, face the label on the cartridge to the front and align it with the arrows on the printer. Guide the cartridge until it snaps into place and then push down the handhold to lock the cartridge in place.
- Page 50 If replacing just one toner cartridge, close the front door and you are finished. NOTE: Make sure the toner cartridge is installed correctly. Otherwise, the front door cannot close firmly. Repeat steps 1 through 4 when inserting the remaining cartridges. Maintenance...
- Page 51 Maintenance...
- Page 52 Maintenance...
-
Page 53: Appendix
Section 7 Appendix Technical Assistance Automated Order-Status Service Contacting Dell U.S. Terms and Conditions of Sale Limited Warranties and Return Policy Dell Inc. Ink and Toner Cartridges Limited Warranties Dell™ Software License Agreement Regulatory Appendix... -
Page 54: Technical Assistance
Automated Order-Status Service To check on the status of any Dell™ products that you have ordered, you can go to support.dell.com, or you can call the automated order-status service. A recording prompts you for the information needed to locate and report on your order. See "Contacting Dell" on page 53 for the telephone number to call for your region. -
Page 55: Contacting Dell
Toll-free numbers are for use within the country for which they are listed. When you need to contact Dell, use the electronic addresses, telephone numbers, and codes provided in the following table. If you need assistance in determining which codes to use, contact a local or an international operator. - Page 56 International Access Code Country Code City Code Australia (Sydney) E-mail (Australia): au_tech_support@dell.com International Access Code: 0011 E-mail (New Zealand): nz_tech_support@dell.com Country Code: 61 Home and Small Business City Code: 2 Government and Business Preferred Accounts Division (PAD) For servers and storage...
- Page 57 Customer Technical Support (Penang, Malaysia) Country Code: 673 Customer Service (Penang, Malaysia) Transaction Sales (Penang, Malaysia) Canada (North York, Ontario) Online Order Status: www.dell.ca/ostatus International Access Code: 011 AutoTech (automated technical support) Customer Care (Home Sales/Small Business) Customer Care (med./large business, government) Technical Support (Home Sales/Small Business) Technical Support (med./large bus., government)
- Page 58 Country (City) International Access Code Country Code City Code China (Xiamen) Technical Support website: support.dell.com.cn Country Code: 86 Technical Support E-mail: cn_support@dell.com City Code: 592 Technical Support Fax Technical Support (Dimension™ and Inspiron™) Technical Support (OptiPlex™, Latitude™, and Dell Precision™)
- Page 59 Country (City) International Access Code Country Code City Code Czech Republic (Prague) Website: support.euro.dell.com International Access Code: 00 E-mail: czech_dell@dell.com Country Code: 420 Technical Support City Code: 2 Technical Support Fax Customer Care Customer Care Fax Switchboard Denmark (Copenhagen) Website: support.euro.dell.com...
- Page 60 Country (City) International Access Code Country Code City Code Finland (Helsinki) Website: support.euro.dell.com International Access Code: 990 E-mail: fin_support@dell.com Country Code: 358 E-mail Support (servers): Nordic_support@dell.com City Code: 9 Technical Support Technical Support Fax Relational Customer Care Home/Small Business Customer Care...
- Page 61 Country (City) International Access Code Country Code City Code Germany (Langen) Website: support.euro.dell.com International Access Code: 00 E-mail: tech_support_central_europe@dell.com Country Code: 49 Technical Support City Code: 6103 Home/Small Business Customer Care Global Segment Customer Care Preferred Accounts Customer Care Large Accounts Customer Care...
- Page 62 Country Code City Code Home and Small Business Division India Technical Support Sales Ireland (Cherrywood) Website: support.euro.dell.com International Access Code: 16 E-mail: dell_direct_support@dell.com Country Code: 353 Technical Support City Code: 1 U.K. Technical Support (dial within U.K. only) Home User Customer Care Small Business Customer Care U.K.
- Page 63 Technical Support (Dimension™ and Inspiron™) Technical Support outside of Japan (Dimension and Inspiron) Technical Support (Dell Precision™, OptiPlex™, and Latitude™) Technical Support outside of Japan (Dell Precision, OptiPlex, and Latitude) Technical Support (PDAs, projectors, printers, routers) Technical Support outside of Japan (PDAs,...
- Page 64 Macao Technical Support Country Code: 853 Customer Service (Penang, Malaysia) Transaction Sales Malaysia (Penang) Technical Support (Dell Precision, OptiPlex, and Latitude) International Access Code: 00 Technical Support (Dimension and Inspiron) Country Code: 60 Technical Support (PowerEdge and PowerVault) City Code: 4...
- Page 65 Relational Sales Home/Small Business Sales Fax Relational Sales Fax Switchboard Switchboard Fax New Zealand E-mail (New Zealand): nz_tech_support@dell.com International Access Code: 00 E-mail (Australia): au_tech_support@dell.com Country Code: 64 Technical Support (for desktop and portable computers) Technical Support (for servers and storage)
- Page 66 Country (City) International Access Code Country Code City Code Norway (Lysaker) Website: support.euro.dell.com International Access Code: 00 E-mail Support (portable computers): Country Code: 47 nor_nbk_support@dell.com E-mail Support (desktop computers): nor_support@dell.com E-mail Support (servers): nordic_server_support@dell.com Technical Support Relational Customer Care Home/Small Business Customer Care...
- Page 67 Technical Support (Optiplex, Latitude, and Precision) Country Code: 65 Technical Support (PowerEdge and PowerVault) Customer Service (Penang, Malaysia) Transaction Sales Corporate Sales South Africa (Johannesburg) Website: support.euro.dell.com International Access Code: E-mail: dell_za_support@dell.com 09/091 Gold Queue Country Code: 27 Technical Support City Code: 11...
- Page 68 International Access Code: 00 E-mail: swe_support@dell.com Country Code: 46 E-mail Support for Latitude and Inspiron: Swe-nbk_kats@dell.com City Code: 8 E-mail Support for OptiPlex: Swe_kats@dell.com E-mail Support for Servers: Nordic_server_support@dell.com Technical Support Relational Customer Care Home/Small Business Customer Care Employee Purchase Program (EPP) Support...
- Page 69 Trinidad/Tobago General Support Turks and Caicos Islands General Support U.K. (Bracknell) Website: support.euro.dell.com International Access Code: 00 Customer Care website: support.euro.dell.com/uk/en/ECare/Form/Home.asp Country Code: 44 City Code: 1344 E-mail: dell_direct_support@dell.com Technical Support (Corporate/Preferred Accounts/PAD [1000+ employees]) Technical Support (direct/PAD and general)
- Page 70 Employee Purchase Program (EPP) Customers Dell Sales Dell Outlet Store (Dell refurbished computers) Software and Peripherals Sales Spare Parts Sales Extended Service and Warranty Sales Dell Services for the Deaf, Hard-of-Hearing, or Speech-Impaired U.S. Virgin Islands General Support Venezuela General Support...
- Page 71 Dell is Dell's responsibility. Loss or damage that occurs during shipping by a carrier selected by you is your responsibility. You must notify Dell within 30 days of the date of your invoice or acknowledgement if you believe any part of your purchase is missing, wrong or damaged.
- Page 72 If you are returning all components in an order, you will be credited the full amount paid for the order. At Dell's discretion, credit for partial returns may be less than invoice or individual component prices due to bundled or promotional pricing.
-
Page 73: Limited Warranties And Return Policy
You agree to comply with all applicable laws and regulations of the various states and of the United States. You agree and represent that you are buying only for your own internal use only, and not for resale or export. Dell has separate terms and conditions governing resale of Product by third parties and transactions outside the United States. - Page 74 CONSEQUENTIAL DAMAGES, SO THE ABOVE LIMITATION OR EXCLUSION MAY NOT APPLY TO YOU. How long does this limited warranty last? This limited warranty lasts for the time period indicated on your packing slip or invoice, except for the following Dell- branded hardware: •...
- Page 75 The limited warranty on all Dell-branded products begins on the date of the packing slip or invoice. The warranty period is not extended if we repair or replace a warranted product or any parts. Dell may change the availability of limited warranties, at its discretion, but any changes will not be retroactive.
- Page 76 We are not responsible for lost or corrupted data. What if I purchased a service contract? If your service contract is with Dell, service will be provided to you under the terms of the service agreement. Please refer to that contract for details on how to obtain service.
-
Page 77: Total Satisfaction Return Policy (U.s. Only)
Total Satisfaction return policy for most products that you, the end-user customer, purchase directly from Dell. Under this policy, you may return to Dell products that you purchased directly from Dell for a credit or a refund of the purchase price paid, less shipping and handling and applicable return fees as follows: New Hardware Products and Accessories —... - Page 78 90 days. The limited warranty begins on the date of the packing slip or invoice. The warranty period is not extended if we repair or replace a warranted product or any parts. Dell may change the terms and availability of limited warranties, at its discretion, but any changes will not be retroactive (that is, the warranty terms in place at the time of purchase will apply to your purchase).
- Page 79 What do I do if I need warranty service? Before the warranty expires, please call us at the relevant number listed in the following table. Please also have your Dell Service Tag or order number available. Web Support Individual Home Consumers; Home Office and Small Business...
-
Page 80: Total Satisfaction Return Policy (Canada Only)
Total Satisfaction Return Policy (Canada Only) If you are an end-user customer who bought new products directly from Dell, you may return them to Dell up to 30 days after you receive them for a refund or credit of the product purchase price. If you are an end-user customer who bought reconditioned or refurbished products from Dell, you may return them to Dell within 14 days after the date on the packing slip or invoice for a refund or credit of the product purchase price. -
Page 81: Dell Software And Peripherals (Canada Only)
While Dell offers a wide selection of software and peripheral products, we do not specifically test or guarantee that all of the products we offer work with any or all of the various models of Dell computers, nor do we test or guarantee all of the products we sell on the hundreds of different brands of computers available today. - Page 82 Guarantee will be the end user’s sole and exclusive remedy against Dell or any of its affiliates, and neither Dell nor any of its affiliates shall be liable for loss of profit or contracts, or any other indirect or consequential loss arising from negligence, breach of contract, or howsoever.
-
Page 83: Dell Inc
Dell Inc. warrants to the original purchaser of genuine Dell-branded Toner Cartridges that they will be free from defects in material and workmanship for the life of the cartridge and that for genuine Dell-branded ink cartridges they will be free from defects in material and workmanship for two years beginning on the date of invoice. If this product proves defective in either material or workmanship, it will be replaced without charge during the limited warranty period if returned to Dell. - Page 84 001-877-384-8979; in Puerto Rico, call 1-800-805-7545. In cases in which either the production of the cartridge has been discontinued or the cartridge is not available, Dell reserves the right, at its sole discretion, to choose between replacing it by a similar product or reimbursing you for the purchase cost.
-
Page 85: Dell™ Software License Agreement
Software. Some jurisdictions do not allow limits on the duration of an implied warranty, so this limitation may not apply to you. The entire liability of Dell and its suppliers, and your exclusive remedy, shall be (a) return of the price paid for the Software or (b) replacement of any disk not meeting this warranty that is sent with a return authorization number to Dell, at your cost and risk. -
Page 86: U.s. Government Restricted Rights
This agreement is binding on successors and assigns. Dell agrees and you agree to waive, to the maximum extent permitted by law, any right to a jury trial with respect to the Software or this agreement. - Page 87 • Plug the computer into a different outlet so that the computer and the receiver are on different branch circuits. If necessary, consult a Dell Technical Support representative or an experienced radio/television technician for additional suggestions. User’s Guide For more information, see...
- Page 88 Appendix...
-
Page 89: Index
, 34 connecting the printer locally , 20 Dell contacting , 53 Dell supplies management sys- tem , 38 disable menus from the operator panel , 35 drivers, installing , 20 drum cartridge... - Page 90 , 37 toner re-order , 38 software update , 38 status monitor , 37 supplies, ordering , 2 support contacting Dell , 53 toner cartridge installing , 48 replacing , 46 toner re-order window, using , 38 toner, ordering , 2...