NEC VERSA LX Manual
Hide thumbs
Also See for VERSA LX:
- Service and reference manual (138 pages) ,
- User manual (97 pages) ,
- Product manual (46 pages)
Table of Contents
Advertisement
Quick Links
Advertisement
Table of Contents

Related Manuals for NEC VERSA LX


Summary of Contents for NEC VERSA LX
- Page 2 As an ENERGY star partner, NEC Computers Inc. (NECC) has determined that this product meets the ENERGY star guidelines for energy efficiency. NEC and Versa are registered trademarks of NEC Corporation and/or one or more of its subsidiaries. UltraCare is a service mark of NEC Corporation and/or one or more of its subsidiaries.
-
Page 3: Table Of Contents
Around the Left Side of the System ..........1-11 Around the Right Side of the System ..........1-13 Around the Bottom of the System .............1-15 2 Getting Started Power Sources for Your NEC Versa ...........2-2 Using the AC Adapter ..............2-2 Powering On ................2-4 Using the Main Battery Pack............2-5 Determining Battery Status ............2-6... - Page 4 Introducing the Software ..............2-17 Traveling with your NEC Versa............2-17 Power Connections...............2-18 Checklists ..................2-18 What to Take................2-18 Preparing your NEC Versa for Travel ........2-19 3 Using the Software BIOS Setup..................3-2 How to Enter the BIOS Setup ............3-2 BIOS Setup Utility Main Menu ..........3-3 How to Use BIOS Setup..............3-3...
- Page 5 NEC VersaBay III ................4-9 NEC VersaBay Swapping Utility..........4-10 Installing the NEC VersaBay Swapping Utility......4-10 Using the NEC VersaBay Swapping Utility ......4-10 Removing a Device from the VersaBay III........4-11 Installing a Device in the VersaBay III ........4-13 Customizing Your System with the VersaBay III ......4-15 24X CD-ROM Drive .................4-15...
- Page 6 Serial Devices.................5-4 External Keyboard/Mouse..............5-5 External Bar Code Scanner..............5-7 External Television Connections............5-7 External Audio Options ...............5-9 USB Devices ..................5-10 NEC Versa Dock ................5-11 NEC Versa PortBar ................5-11 PortBar Ports ................5-11 6 Using Multimedia Audio ....................6-2 Recording ..................6-2 Optimizing the Sound Quality ..........6-3 Line-In....................6-4...
- Page 7 Using External Stereo Speakers ..........6-7 MIDI Files ..................6-7 Video ....................6-7 Using Digital Video Files...............6-8 Using Animation Files ..............6-8 Multimedia Applications ..............6-8 7 Solving System Problems Problem Checklist ................7-2 Start-Up Problems ................7-4 Post Error Messages ...............7-4 Using the Product Recovery CD ............7-8 Guidelines for Using the Product Recovery CD ......7-8 Recovery Choices................7-9 Full/Express Restore ..............7-10...
- Page 8 C Frequently Asked Questions External Mouse...................C-2 Display....................C-2 PC Cards.....................C-3 Diskette Drive..................C-5 Booting ....................C-7 Power Management ................C-7 Miscellaneous ...................C-10 Glossary Index viii Contents...
-
Page 9: Using This Guide
LX User's Guide gives you the information you need to maximize the use of your NEC Versa notebook computer. Read this guide to familiarize yourself with the NEC Versa and its features. For specific information see Chapter 1, “Introducing the NEC Versa,” to acquaint yourself with system hardware. -
Page 10: Text Setup
Appendix C, “Frequently Asked Questions,” (FAQs) for a look at questions that users commonly ask and the answers to those questions. Text Setup To make this guide as easy to use as possible, text is set up as follows. Warnings, cautions, and notes have the following format: Warnings alert you to situations that could result in serious personal injury or loss of life. -
Page 11: Related Documents
Related Documents See the following documents for additional information on your NEC Versa notebook computer: The NEC Versa LX Quick Setup sheet helps get your system up and running. The NEC Versa LX Quick Reference card provides an easy-to-carry reference to LED meanings, controls, function key combinations, and NECC help numbers. -
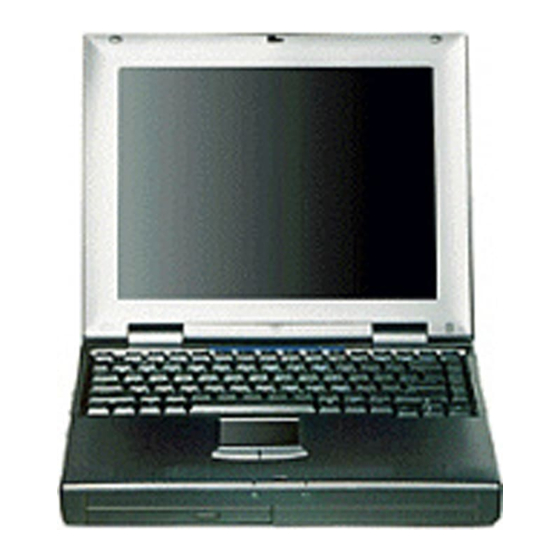
Page 12: Introducing The Nec Versa
Introducing the NEC Versa Getting to Know Your NEC Versa NEC Versa LX Notebook Around the Front of the System Around the Back of the System Around the Left Side of the System Around the Right Side of the System... -
Page 13: Getting To Know Your Nec Versa
Take the online System Tour to get acquainted with the NEC Versa. The System Tour is part of the NEC Help Center. Use the Application and Driver CD for the NEC Versa LX that ships with your system to install the NEC Help Center. -
Page 14: Nec Versa Lx Notebook
NEC Versa LX Notebook The NEC Versa LX notebook computer offers you a portable system filled with exciting resources for home, business or travel. Standard features include a powerful Intel Pentium II 300-PE, 333-MHz or 366-MHz microprocessor with AGP (advanced graphics port) that works together with the latest Peripheral Component Interconnect (PCI) architecture. -
Page 15: Around The Front Of The System
Around the Front of the System The NEC Versa is compact with features on every side. First, look at the front of the NEC Versa. The following sections describe front features, beginning with the liquid crystal display (LCD) panel. LCD Panel Your NEC Versa LX comes with a 1024x768, 64K color LCD panel that you can adjust for a comfortable viewing position. -
Page 16: Status Panel
Status Panel The NEC Versa status panel provides the features shown in the figure. These features are described after the figure. Status panel A – Microphone B – Operating Status LEDs Microphone — A strategically positioned built-in microphone allows you to record monophonic sound directly into your notebook computer. - Page 17 A – IDE/VBIII Devices B – Caps Lock C – Num Lock D – Scroll Lock E – Diskette Drive IDE/VBIII devices — lights when the NEC Versa writes data to or retrieves data from the internal hard disk drive, a SuperDisk drive in the file bay, or a device in the VersaBay III.
-
Page 18: Keyboard Panel And Base Unit
Keyboard Panel and Base Unit The NEC Versa keyboard panel and base unit contain the following features which are described after the figure. Keyboard panel and base unit A – Stereo Speaker B – VersaGlide C – Keyboard D – System Power Status LEDs E – VersaBay III Stereo Speakers —... - Page 19 – Lights yellow (blinks when in Suspend mode) to indicate that battery power is at 8% capacity or less. – Lights amber (blinks when in Suspend mode) to indicate that battery power is at 3% capacity. 1-8 Introducing the NEC Versa...
- Page 20 VersaBay III. NEC VersaBay III™ — A 24X CD-ROM drive, a SuperDisk drive, or a DVD-ROM drive comes installed in the NEC VersaBay III on the front of your system. The VersaBay III lets you add options, including an optional second Li-Ion battery, or an additional hard disk drive.
-
Page 21: Around The Back Of The System
Around the Back of the System You'll find system ports for connecting optional devices (like a printer, a docking station, or an external monitor) on the back of your NEC Versa. These ports are described after the figure. Ports on the back of the system A –... -
Page 22: Around The Left Side Of The System
AC Power Port — Use the power jack to attach the NEC Versa to a DC power source, such as the AC adapter or the optional DC auto adapter. External Monitor (Video) Port — Use this 15-pin port to attach an external monitor to your NEC Versa. - Page 23 Always keep the fan vents unobstructed to allow proper system cooling. IR Port — Use this infrared (IR) port to transfer files between your NEC Versa and an IR-equipped desktop or notebook computer or to print to an IR-capable printer. Note : Your NEC Versa LX ships with the IR port disabled.
-
Page 24: Around The Right Side Of The System
Around the Right Side of the System The right side of the NEC Versa offers the features shown in the following figure. Features are described after the figure. Right side features A – Headphones B – Line In C – External Microphone D – Kensington Lock E –... - Page 25 File Bay — Your NEC Versa ships with a 3.5-inch, 1.44-MB diskette drive or the SuperDisk drive installed in the file bay. Power/Sleep Button — Slide the Power/Sleep button toward the front of the system to power on, power off, and to put the computer into Suspend mode.
-
Page 26: Around The Bottom Of The System
Around the Bottom of the System The bottom of the NEC Versa offers the features shown next. Features are described after the figure. Bottom features A – Height Adjustment Feet B – Battery Bay Release Latch C – VersaBay Release Latch D – VersaBay Release Lock E –... -
Page 27: Getting Started
Getting Started Power Sources for Your NEC Versa System Care Introducing the Software Traveling with your NEC Versa... -
Page 28: Power Sources For Your Nec Versa
Using the AC Adapter Use the AC adapter and power cable that came with your NEC Versa to run your computer on alternating current (AC) power, or to recharge the battery pack. Use the AC adapter whenever a wall outlet is nearby. - Page 29 Connect the AC adapter as follows: 1. Connect the AC adapter cable to the power port on the back of your NEC Versa. 2. Plug one end of the AC power cable into the AC adapter and the other end into a properly grounded 120- or 240-volt wall outlet.
-
Page 30: Powering On
2. Locate the Power/Sleep button and slide it toward the front of the system to turn on system power. For additional information about Power control buttons and power LEDs, refer to Chapter 1, “Introducing the NEC Versa.” 2-4 Getting Started... -
Page 31: Using The Main Battery Pack
The NEC Versa comes with a rechargeable Lithium-Ion (Li-Ion) battery pack. It’s easy to install and remove. Your NEC Versa system provides tools to help you keep track of the main (or an optional) battery’s power level. These include the power status LED described in Chapter 1, and SystemSoft’s PowerProfiler (for... -
Page 32: Determining Battery Status
Determining Battery Status You can determine battery status via the battery gauge LEDs on the front of the Lithium-Ion battery that ships with your NEC Versa LX computer. Lithium-Ion battery A – Battery Gauge LED B – Alignment Groove C – LED Status Button... - Page 33 To check battery status, press the LED status button to illuminate the LEDs. The battery gauge LEDs indicate the following: Battery gauge LEDs Note: If the battery gauge LEDs display a combination other than those depicted in the illustration, recharge the battery overnight. If the problem still persists, contact NECC Technical Support.
-
Page 34: When To Change The Battery
To return the battery to its normal state, try the following: remove and then reinstall the battery reinstall the battery in your NEC Versa and fully recharge the battery (to 100%). When to Change the Battery The following symptoms indicate that battery life is nearing an end. -
Page 35: Replacing The Battery
Replacing the Battery Replace the battery pack installed in your NEC Versa system as follows. Note: Use the batteries in the NEC Versa computer for which they are designed. Also, installing another manufacturer’s battery, or using a combination of very old and new batteries can deteriorate battery and equipment performance. - Page 36 4. Continue to hold the battery release latch as you slide the battery out of the system. Removing the battery 5. Insert the new battery as follows: Locate the alignment groove on the edge of the battery. Locate the alignment groove inside the battery bay. Align the grooves on the battery with the grooves in the bay.
-
Page 37: Battery Precautions
Battery Precautions To prevent accidental battery ignition, rupture, or explosion, adhere to the following precautions. There is a danger of explosion if the battery is incorrectly replaced. Replace only with the same or equivalent type recommended by the manufacturer. Discard used batteries according to the manufacturer’s instructions. -
Page 38: Recharging Battery Precautions
Internal Batteries The twelve-cell Lithium-Ion (Li-Ion) battery provides the main power source in your NEC Versa LX computer. See Appendix B for a list of battery specifications. In addition to this battery, the CMOS battery and bridge battery also provide system power. -
Page 39: Cmos Battery
This memory area contains information on the system’s configuration, for example date, time, drives, and memory. The CMOS battery charges when your NEC Versa is connected to AC power. The CMOS battery may discharge completely if the NEC Versa notebook remains unused for approximately two months. -
Page 40: System Care
System Care The NEC Versa is a durable, dependable system built for extensive use and travel. Follow these guidelines to maintain the condition and performance of your computer. Immediately turn off and unplug the NEC Versa under the following conditions: The power cord is damaged or frayed. -
Page 41: Storage Requirements
Do not use the system in humid or dusty environments. Turn computer power off before cleaning it. Avoid exposing the NEC Versa or AC adapter to extreme changes in temperature or humidity. If it is unavoidable, allow your NEC Versa to adjust to room temperature before use. -
Page 42: Routine Cleaning
Clean or dust your system as follows: Never use harsh solutions, household cleaners, or spray cleaners that contain caustic materials on the NEC Versa computer. These cleaners are usually high in alkalinity which is measured in pH. Using these cleaners can cause the plastic surface to crack or discolor. -
Page 43: Introducing The Software
Follow the quick setup instructions to initialize your operating system and related drivers. Use the Application and Driver CD for the NEC Versa LX that ships with your system to install additional software and online documentation. Refer to Chapter 3, “Using the Software,” for details about using the operating system, software applications and online documentation. -
Page 44: Power Connections
Power Connections With the right accessories, you can run your NEC Versa almost anywhere! Your system self-adjusts to various power sources. The United States, Canada, and most of Central and South America use 120-volt alternating current (AC). Most other countries of the world use 240-volt AC. -
Page 45: Preparing Your Nec Versa For Travel
Insert a fully charged battery to make sure your system is ready to quickly boot up at the airport security check. Fully charge all your batteries. Tape your business card to your NEC Versa, AC adapter, and batteries. Getting Started 2-19... -
Page 46: Using The Software
Using the Software BIOS Setup Windows Introduction NEC Utilities NEC Help Center Software Applications and Drivers... -
Page 47: Bios Setup
BIOS Setup Your NEC Versa LX computer comes with a hardware program called BIOS Setup that allows you to view and set system parameters. BIOS Setup also allows you to set password features that protect your system from unauthorized use. -
Page 48: Bios Setup Utility Main Menu
BIOS Setup Utility Main Menu After you press , the system displays the BIOS Setup Main Menu screen, similar to the following. BIOS Setup Main Menu Use the up and down arrow keys (located on the lower right corner of the keyboard) to toggle through the BIOS Setup menu items. -
Page 49: Looking At Screens
Looking at Screens BIOS setup screens have three areas as shown next. Advanced CMOS Setup Menu Parameters — The left side of the screen. This area lists parameters and their current settings. Available Options and Help — The right side of the screen. This area lists alternate settings and Help text for each parameter. -
Page 50: Using Keys
Using Keys The following table lists the BIOS Setup keys and their functions. BIOS Setup Key Functions Function Moves the cursor between the displayed parameters. PgUp/Pg Toggles through the current parameter settings. For some parameter settings, moves the cursor between the subfields. - Page 51 BIOS Setup Parameters Parameter Default Setting Alternate Setting(s) Standard CMOS Setup Date mm/dd/yyyy System Memory (automatically detected) Time hh/mm/ss Diskette Drive A 1.44 MB, 3.5 Not installed, 1.44 MB Not installed 1.2 MB, 5.25; 1.44 MB, 3.5 Diskette Drive B Internal Auto User Defined, CDROM...
- Page 52 BIOS Setup Parameters Parameter Default Setting Alternate Setting(s) Power Management Setup System Switch Power Button Sleep Button Power Management under AC Power Savings Level Longest Life High Perform/Custom/Off CPU Speed Control 100% 12.5, 25, 50% Hard Disk Timeout 2 minutes 5/30/45 sec;...
- Page 53 BIOS Setup Parameters Parameter Default Setting Alternate Setting(s) 2nd Boot Device CDROM Disabled/1 Fnd IDE/Floppy SuperDsk 3rd Boot Device Floppy Disabled/1 Fnd IDE/SuperDsk CDROM 4th Boot Device Fnd IDE Disabled/Floppy/SuperDsk CD-ROM Try Other Boot Devices IDE Hard Drive Internal VersaBay/DS Internal DS VersaBay IDE Hard Drive VersaBay...
-
Page 54: Bios Setup Menus
When you select the Standard CMOS Setup screen you see System Time and System Date parameters as well as drive parameters. Date — Sets your NEC Versa’s calendar month, day and year. The calendar clock is year 2000-compliant. These settings remain in memory even after you turn off system power. - Page 55 Power Management Setup In the Windows 98 environment, your NEC Versa uses the Advanced Power Management (APM) which enables the operating system to manage the power given to each attached device and to turn off a device when not in use.
- Page 56 Power Management Under AC — Specifies whether to enable power management features when AC power is in use. When AC power is connected to your NEC Versa system, power management is usually disabled. If you enable this parameter, the system automatically activates the power management profile you set, even when AC power is used.
- Page 57 Suspend Option — Specifies either Suspend or Save to File (STF) as the default power management mode. In Suspend, after a specified amount of inactivity, your NEC Versa shuts down all devices as you specified in Power Management Setup or applies default timeouts. All your data is automatically recovered from where you left off when you Resume.
- Page 58 Quick Boot — Specifies whether or not the system performs all tests during system boot. Silent Boot — Specifies whether or not to display the NEC logo during the system boot. Boot Display Device — Specifies the display device(s) for system boot messages.
-
Page 59: Other Bios Setup Options
Once refreshed, your battery is conditioned to recharge to its full capacity. To recharge the battery, connect your NEC Versa to AC power. This process may take up to four hours to complete. Auto Configuration with Defaults — Loads default settings. -
Page 60: Using Bios Setup To Set Power Management
Using the Save to File (STF) Feature STF protects the integrity of your working files. For example, if you are called away from your NEC Versa and Suspend mode is selected with auto Save to File active, your system automatically goes into Suspend mode. - Page 61 PgUp key and select STF. 5. Save the settings and exit BIOS Setup. There are three ways to invoke the NEC Versa’s STF feature, one automatic and two manual. After 30 minutes of inactivity, your NEC Versa automatically invokes STF, provided you have configured STF in the BIOS Setup utility.
-
Page 62: Updating The Bios
Updating the BIOS Use the BIOS Update Diskette to update your NEC Versa system BIOS. Specifically, the BIOS is the code transmitted onto your system’s microprocessor, or central processing unit (CPU). Use the BIOS Setup utility to configure your system’s hardware features. For details about the BIOS Setup utility, see the section earlier in this chapter, “BIOS... -
Page 63: Changing The Switch Settings
A message similar to the following appears: The NEC BIOS Update Utility should not be used to modify the BIOS in a Versa system which is docked. If your Versa is docked, please exit the BIOS Update Utility, power down, and undock your Versa before running the utility. -
Page 64: Windows Introduction
7. Remove the diskette and press any key to continue. The utility updates the BIOS. Power off your computer. The next time you power on your computer, you will have the latest NEC Versa LX computer BIOS revision level. 8. Enter Setup to restore the default parameter settings. -
Page 65: Windows 98
My Briefcase — Provides a mechanism for file synchronization between the NEC Versa and another system. My Documents — Provides you with a convenient place to store documents, graphics, and other files for quick access. -
Page 66: Taskbar Icons
Online Services — Includes setup icons for a variety of online services. Your NEC Versa comes with all the software you need to get started on the most popular services available today. For a fee, online services give you access to the Internet, email, the world wide web, travel information, news reports, and more. -
Page 67: Windows 95
Power Management Properties — Displays your current power source and total remaining battery power. Access Power Management Properties under Start, Settings, Control Panel, Power Management. NEC VersaGlide — Allows you to adjust your VersaGlide (mouse) properties. Also access NEC VersaGlide under Start, Settings, Control Panel, Mouse. - Page 68 Online Services — Includes setup icons for a variety of online services. Your NEC Versa comes with all the software you need to get started on the most popular services available today. For a fee, online services give you access to the Internet, email, the world wide web, travel information, news reports, and more.
-
Page 69: Windows Nt
NEC Customize — Gives you the option to launch the Application and Driver CD, or install the NEC-supplied mouse driver. My Briefcase — Allows easy transfer of files between the NEC Versa and another system. Recycle Bin — Gives you a container in which to put unwanted files. -
Page 70: Service Pack 4
Service Pack 4 Service Pack 4 is a large update to the Windows NT 4.0 operating system. The components included within Service Pack 4 are the latest available from Microsoft. Many software packages include calls to Windows NT to install drivers that are Windows NT specific. As a result, when installing new hardware or software, like a network PC card or a remote access service, parts of Service Pack 4 may be overwritten by the original Windows NT files. -
Page 71: Adding Hardware
Adding Hardware When you add hardware to your NEC Versa LX with Windows NT, a Windows NT Setup screen may appear to inform you that Setup needs to copy some Windows NT files. Setup looks for the files in the location specified in the dialog box. -
Page 72: Using The Nec Customize Utility
3. Click Launch to initiate the selected option. 4. Follow the on-screen instructions to process the selected option. For some of the selected options you are prompted to reboot your system. 5. If necessary, click Exit to close the NEC Customize dialog box. Using the Software 3-27... -
Page 73: Hdprepez Utility
Using HDPREPEZ in Windows 98 or 95 In Windows 98 or 95, run the HDPREPEZ utility if you increase the memory capacity in your NEC Versa beyond the factory installed base memory. Follow these steps to run the HDPREPEZ utility. -
Page 74: Nec Help Center
Software Applications and Drivers A variety of software* applications and drivers are provided on the Application and Driver CD for the NEC Versa LX that ships with your system. Some of the drivers are already installed as part of your operating system environment. -
Page 75: Using The Application And Driver Cd
Using the Application and Driver CD Use the Application and Driver CD to install applications, drivers, utilities, Internet browsers, and the online NEC Help Center. Launching the Application and Driver CD Follow these procedures to launch the Application and Driver CD using NEC Customize. -
Page 76: Installing The Software
Selection Tabs — Located just below the title bar, each tab represents a software category. The selection tabs include applications, drivers, utilities, Internet browsers, and the NEC Online Documentation. Description — Located in the bottom portion of the dialog box, the text describes the selected or highlighted software category or application, driver, etc. -
Page 77: Uninstalling The Nec Help Center
1. Go to Start, Settings, Control Panel, and double click Add/Remove Programs. 2. Use the scroll bar, if necessary, to display the NEC Help Center item. 3. Highlight NEC Help Center and click the Add/Remove button. 4. Select Automatic as the uninstall method and click Next. -
Page 78: Intel Landesk Client Manager
This monitoring function interrupts the auto suspend feature that invokes after 30 minutes of inactivity. If you install Intel’s LANDesk Client Manager the NEC Versa auto suspend feature may become disabled. Using the Software 3-33... -
Page 79: Systemsoft Powerprofiler
To monitor network systems only, run Administration setup, only. If you use the NEC Versa system with the NEC Versa Dock and want to install LANDesk Client/Admin Manager, you must load the applicable software before docking the system. -
Page 80: Systemsoft Cardwizard
Control access each remote system has to your data. Before using Intellisync for infrared transfer, enable the IR port on your NEC Versa. For details about how to enable the IR port, see Chapter 4, “Using the Hardware.” Before using Intellisync for parallel or serial communication, connect the appropriate cable to the appropriate port on the back of your NEC Versa. -
Page 81: Mcafee Virusscan
McAfee VirusScan The McAfee VirusScan software detects, identifies, and disinfects known computer viruses. It checks memory as well as both system and data areas of your disks for virus infections. In most cases, it will eliminate and fully repair infected programs or system areas to their original condition. -
Page 82: Using The Hardware
Using the Hardware LCD Panel Keyboard NEC VersaGlide NEC Versa File Bay SuperDisk Drive NEC VersaBay III 24X CD-ROM Drive DVD-ROM Drive PC Cards IR Port Increasing System Storage and Memory Switch Settings... -
Page 83: Lcd Panel
LCD Panel The LCD panel on your NEC Versa LX notebook is fully adjustable to provide comfortable viewing. To adjust the viewing angle, gently tilt the LCD panel into position. To adjust the panel’s brightness, use the function keys. Fn-F8... - Page 84 Function keys — Twelve function keys, through , are available on the NEC Versa keyboard. These keys work together with the key to activate special functions. Nine keys are preprogrammed with dual functions, seven of which are printed in blue on the key.
- Page 85 — toggles between various power management levels. Beeps Fn-F7 indicate the level chosen as follows: 1 beep 2 beeps Custom 3 beeps Highest Performance 4 beeps Longest Life — increases the LCD panel brightness. Fn-F8 — decreases the LCD panel brightness. Fn-F9 —...
-
Page 86: Nec Versaglide
NEC VersaGlide The NEC VersaGlide is an easy way to control the cursor with your finger. Lightly glide your finger across the NEC VersaGlide and the cursor follows. The NEC VersaGlide provides standard mouse functionality, plus more. -
Page 87: Making Versaglide Adjustments
Making VersaGlide Adjustments The NEC VersaGlide offers a number of options that let you customize how it functions. The options let you control the cursor speed, select button orientation, enable or disable tapping, define auto jumps, enable easy-scrolling, and configure gestures to initiate selected functions by tapping in a designated area of the touchpad. -
Page 88: Versaglide Tips
NEC Versa File Bay The NEC Versa File Bay is the bay located at the rear of the system’s right side. Your NEC Versa ships with a standard 3.5-inch, 1.44-MB diskette drive or a SuperDisk™ drive installed in the bay. -
Page 89: Superdisk Drive
SuperDisk Drive The SuperDisk drive offers many improvements on the standard diskette drive technology, including faster data access, greater reliability, and higher recording capacities. The drive uses the latest laser-servo (LS) technology, which writes to and reads from specially designed 120-MB diskettes as well as standard 720-KB and 1.44-MB diskettes. -
Page 90: Nec Versabay Iii
NEC VersaBay III The NEC VersaBay III is the drive bay located below the VersaGlide at the front left side of the system. Your NEC Versa ships with a 24X CD-ROM drive, SuperDisk drive, or DVD-ROM drive installed in the bay. -
Page 91: Nec Versabay Swapping Utility
VersaBay III devices by allowing you to swap a CD-ROM drive, SuperDisk drive, or DVD-ROM drive in the VersaBay III while your system is in a suspended state. Use the NEC VersaBay Swapping utility to put your system into a suspended state before swapping a device in the Windows 98 or Windows 95 environments. -
Page 92: Removing A Device From The Versabay Iii
The swapping utility only supports the swapping of a CD-ROM drive, SuperDisk drive, DVD-ROM drive, or VersaBay III Battery Pack. Other devices installed in the VersaBay will work properly. However, warm swapping other devices is not supported. Warm swapping other devices can damage the device, the system, or both. - Page 93 1. Use the NEC VersaBay Swapping Utility to put your system into a suspended state or power off the system. 2. Close the LCD panel and turn the system upside down. 3. Locate the VersaBay III release lock and release latch on the bottom of the unit.
-
Page 94: Installing A Device In The Versabay Iii
Your system must be in a suspended state to use the utility, or powered off, before removing or inserting devices in the VersaBay III. 1. Use the NEC VersaBay Swapping Utility to put your system into a suspended state, or power off the system. - Page 95 3. Locate the VersaBay III release lock and release latch on the bottom of the unit. 4. Slide the lock to the unlocked position, if necessary. 5. Slide the latch toward the battery bay and hold it. 6. Align the device in the VersaBay III and push it in until it locks into place.
-
Page 96: Customizing Your System With The Versabay Iii
Customizing Your System with the VersaBay III Customizing your NEC Versa is easy using the VersaBay III. If you find you require additional hard disk space simply remove the standard device and plug in an optional hard disk drive. Your system must be powered off before removing or inserting a hard disk drive in the VersaBay III. -
Page 97: Cd Loading
CD into or remove a CD from the drive. Status LED — lights during data read operations. Do not eject the CD or turn off the NEC Versa when the indicator is lit. CD Loading To insert a CD into the CD-ROM drive, follow these steps. -
Page 98: Cd Care
Note: Some CDs vibrate when playing. This does not affect the CD-ROM drive. CD Care When handling CDs, keep the following guidelines in mind. Always pick up the disc by its edges. Avoid scratching or soiling the side of the disc that has no printing or writing on it. -
Page 99: Dvd-Rom Drive
5. Highlight the appropriate CD-ROM line. 6. Press the properties button at the bottom of the window and select the Settings tab. 7. Proceed as follows: To enable Auto Play, click to add a check mark next to the line “Auto insert notification.”... -
Page 100: Pc Cards
NIC card), and small hard drive storage. Communication Cards You can use both fax/modem and network PC cards with your NEC Versa. Here are some suggestions to help you get the best system performance. -
Page 101: Pc Card Modems
PC Card Modems You can use a PC card modem with your NEC Versa to communicate with others via fax, email, or connect to an online service or bulletin board. -
Page 102: Storage Cards
Storage Cards When you insert a memory or storage card in an NEC notebook computer, it appears as a unique drive as long as the system has an available interrupt for the card. Interface Cards You can connect most Standard Small Computer System Interface (SCSI) devices using the optional NEC PC card-SCSI card. -
Page 103: Inserting A Pc Card
Inserting a PC Card To insert a PC card, follow these steps. 1. Align the card so that the 68-pin connector points towards the slot and the arrow shows on the top face of the card. 2. Slide the card into either slot. (Install Type III cards in the bottom slot, only.) A low tone followed by a high tone lets you know that the card is fully inserted and recognized. -
Page 104: Removing A Card
4. Press the button on the side of the PC card in the slot. IR Port The IR port on the left side of your system lets your NEC Versa LX computer communicate with other devices that also use infrared technology. -
Page 105: Using The Ir Port
Check that the IR port is enabled via the BIOS Setup utility (Windows NT) or the Customize icon (Windows 95). Use the NEC Versa LX Application and Driver CD that ships with your NEC Versa LX system to install the following IR drivers and applications. -
Page 106: Enabling The Ir Port
NEC Customize icon. Follow these steps to enable the IR port. 1. Double click the NEC Customize icon on the Windows desktop. 2. From the display window, select Install IR Setup utility. 3. Click Launch to initiate the IR Setup utility. -
Page 107: Increasing System Storage And Memory
Adding a second hard disk drive is described in the section “Customizing Your System with the VersaBay III.” The hard disk drive is located under the battery bay in your NEC Versa notebook computer. You must remove the system’s main battery before replacing the hard disk drive. - Page 108 3. Slide the battery release latch toward the back of the system and hold firmly. A — Battery Release Latch 4. Continue to hold the battery release latch as you slide the battery out of the system. Removing the battery Using the Hardware 4-27...
- Page 109 5. Remove the disk drive as follows: Remove the screw that secures the hard disk drive. Place your finger in the center notch of the hard drive lever and pull up the lever. Be sure that both sides of the lever are raised. If you encounter any resistance when lifting the lever, carefully loosen both sides of the lever before lifting.
- Page 110 With the lever raised, place your fingers on the inside edge of the lever and on each side of the center notch. Pull the drive toward the open side of the battery bay. Do not apply pressure to the drive surface as you pull. Disconnecting the drive Once the drive is disconnected, use the lever to lift the drive out of the system.
- Page 111 6. Replace the new drive as follows: Holding the drive by its sides, pull up the hard drive lever. Keeping the lever raised, lower the new drive into the drive bay. Lowering the drive into the bay Align the drive connector with the connector in the drive bay. Pressing against the outer edge of the lever, slide the drive toward the connectors and push firmly to secure the connection.
- Page 112 Press down on both sides of the drive lever to lock it into place. Replace the screw to secure the hard disk drive. Securing the drive A – Screw B – Hard disk drive lever C – Hard Disk drive Using the Hardware 4-31...
-
Page 113: Memory Module Installation
Inserting the battery pack Memory Module Installation Your NEC Versa LX computer comes standard with 64 megabytes (MB) of random access memory (RAM), depending on your model. You can increase system memory to a maximum of 256 MB, depending on your model. - Page 114 Only install NECC supplied/approved memory module options to ensure proper functionality of your NEC Versa notebook computer. Contact your NECC dealer for information about available NEC-supplied/approved memory modules. Installing a memory module involves the following procedures. removing the keyboard retainers...
- Page 115 3. Locate the two keyboard retainers, slide each one toward the outside edge of the system and remove. Removing the keyboard retainers 4. Gently lift up the edge of the keyboard nearest the LCD and slide the keyboard toward the LCD screen to release the tabs that secure it. Be careful not to disconnect the keyboard or keyboard cable entirely from the system.
- Page 116 5. Carefully turn over the keyboard and place it face down on the VersaGlide. Be careful not to twist or disconnect the keyboard cable. 6. Locate the connectors and alignment key on the SO-DIMM. SO-DIMM features A – Connectors B – Alignment Key 7.
- Page 117 If you are replacing a SO-DIMM and need to remove one that is already installed, do so as follows: Press the locking tabs away from the sides of the SO-DIMM and hold while gently lifting on the edge of the SO-DIMM. When the edge of the SO-DIMM pops up and is at approximately a 60 degree angle, pull the SO-DIMM from the socket.
-
Page 118: Switch Settings
Switch 1, Password Override Switch — The default setting is “OFF.” If you forget your password and cannot access the data on your NEC Versa, change the setting to “ON” and your current password is erased. -
Page 119: Changing Switch Settings
Switch 5 — BIOS flash enable; Default is “OFF” (disable). Before updating your BIOS, change the setting to “ON.” Switch 6 — Logo select; Default is “OFF” for U.S. Default Switch Settings Changing Switch Settings Use the following steps to change switch settings. 1. - Page 120 3. Locate the two keyboard retainers, slide each one towards the outside edge of the system, and remove them. Removing the keyboard retainers 4. Gently lift up the edge of the keyboard nearest the LCD and slide the keyboard toward the LCD screen to release the tabs that secure it. Be careful not to disconnect the keyboard or keyboard cable entirely from the system.
- Page 121 6. Locate the dip switch block. Using a fine-tipped object, change the appropriate switch to the required setting. See “Switch Settings” for dip switch functions and settings. Never use a pencil to change switch settings. Residue from the pencil can damage the system. Password Override Switch set to On 4-40 Using the Hardware...
- Page 122 Note: The system memory expansion slots are also located underneath the keyboard. Therefore, if you need to install/replace SO-DIMM modules, you might want to do so while the system is already disassembled. 7. Reassemble the system as follows: Lift up the keyboard and align the tabs on the front of it with the grooves in the system.
- Page 123 Switch 1, Password Override Switch — The default setting is “OFF.” If you forget your password and cannot access the data on your NEC Versa, change the setting to “ON” and your current password dissolves.
- Page 124 3. Locate the two keyboard retainers, slide each one towards the outside edge of the system, and remove them. Removing the keyboard retainers 4. Gently lift up the edge of the keyboard nearest the LCD and slide the keyboard toward the LCD screen to release the tabs that secure it. WARNING Be careful not to disconnect the keyboard or keyboard cable entirely from the system.
- Page 125 6. Locate the dip switch block. Using a fine-tipped object, change the appropriate switch to the required setting. See “Switch Settings” for dip switch functions and settings. ! CAUTION Never use a pencil to change switch settings. Residue from the pencil can damage the system. Password Override Switch set to On Note: The system memory expansion slots are...
- Page 126 7. Reassemble the system as follows: Lift up the keyboard and align the tabs on the front of it with the grooves in the system. Reseat the keyboard in its original position. Slide the keyboard retainers back onto the system. Reassembling the system Using the Hardware 4-45...
-
Page 127: Using External Devices
Using External Devices External Monitor Printer External Keyboard/Mouse External Bar Code Scanner External Television Connections External Audio Options USB Devices NEC Versa Dock NEC Versa PortBar... -
Page 128: External Monitor
External Monitor You can add a standard external monitor to your NEC Versa. You need a display signal cable (usually provided with the monitor). One end of the cable must have a 15-pin connector for the system. Follow these steps to connect an external monitor to your NEC Versa. -
Page 129: Printer
Windows control panel. Connect a parallel device to your NEC Versa as follows. 1. Check that power to both the NEC Versa and the device is off. 2. Open the left-most port cover on the back of the system and locate the parallel port. -
Page 130: Serial Devices
Follow these steps to connect a serial device to your NEC Versa. 1. Check that power to both the NEC Versa and the device is off. 2. Open the left-most port cover on the back of the system and locate the serial port. -
Page 131: External Keyboard/Mouse
NEC Versa using the Plug and Play feature. The PS/2 style keyboard and the PS/2 style mouse are warm insertable allowing you to connect the devices while the NEC Versa is powered on. You can continue to use the system keyboard and VersaGlide touchpad while an external keyboard or mouse is connected. - Page 132 Setup section of the BIOS Setup parameters allows you to enable or disable the VersaGlide touchpad. To attach both an external keyboard and a external mouse at the same time, use the optional NEC Y-adapter. For ordering information, contact your NECC dealer. Note: If you purchased this product outside the U.S.
-
Page 133: External Bar Code Scanner
“PS/2 Port Warm Swap.” For details about BIOS settings, refer to Chapter 3, “Using the Software.” External Television Connections Your NEC Versa LX is equipped with two TV out ports that allow you to use a television as an external display device in the Windows 95 environment. - Page 134 VCR. Connect one end of the S-Video cable into the TV Out (S-video) port on your NEC Versa and the other end of the cable into the S-video input jack on your television. 2. Go to Settings, Control Panel, Display Properties, Settings, and place a check in the TV box.
-
Page 135: External Audio Options
Connect audio jacks, like a microphone, headphones, or external speakers to the audio ports as follows. 1. Locate the audio port that you want to use. 2. Plug the jack into the appropriate port on the right side of the NEC Versa. Audio ports A –... -
Page 136: Usb Devices
USB devices called USB hubs can serve as connection ports for other USB peripherals. Only one device needs to be plugged into your NEC Versa. Additional peripherals can be connected in a daisy chain configuration where one device is connected to another in a series. -
Page 137: Nec Versa Dock
NEC Versa PortBar The NEC Versa PortBar™ duplicates the ports found on the back of your NEC Versa LX system. Plus, the PortBar adds a 15-pin MIDI/game port connector. Keep the NEC Versa PortBar in your office connected to peripherals while you take your NEC Versa notebook on the road. - Page 138 AC Adapter Port — Connects to the AC Adapter for AC power operation and battery charging. Note : For details on attaching and disconnecting the PortBar, reference the information sheet that comes with the NEC Versa PortBar. 5-12 Using External Devices...
-
Page 139: Using Multimedia
Using Multimedia Audio Video Multimedia Applications... -
Page 140: Audio
The following procedure describes how to use the Microsoft Sound Recorder to record sound into a file on the NEC Versa. 1. To record from an external device such as a portable CD or tape player, you need a cable with audio jacks on both ends. Set up your... -
Page 141: Optimizing The Sound Quality
Optimizing the Sound Quality To ensure optimal sound quality when using the record and playback features on your NEC Versa be sure to configure the microphone volume control as follows. 1. Right click the sound horn on the right side of the taskbar. -
Page 142: Line-In
1 20dB boost, then click Close. Adjust the microphone volume to remove feedback. You are now ready to record and playback on your NEC Versa notebook computer! Line-In Analog signals come in through the NEC Versa’s Line-In port. The analog signals are converted into digital bits and bytes (digitized) through a converter known as an ADC (analog-to-digital converter). -
Page 143: Microphone
Microphone You can capture and record sounds through the internal microphone on the NEC Versa or through an external microphone that connects to the system through the microphone port. You can record voice-overs for narration, reminders, or special instructions. See “Recording,” explained earlier in this chapter, for details about recording sound with the microphone. -
Page 144: Using Headphones
The NEC Versa headphone port delivers sound at half a watt. Stereo headphones (not shipped with your system) plug in through the headphone jack located on the right side of the NEC Versa. Adjust the volume with the volume control knob on the right side of the system or through the software using the sound horn on the taskbar. -
Page 145: Using External Stereo Speakers
See Chapter 3 for details about disabling power management. Video The NEC Versa LX computer features a dazzling TFT 16 million color high-resolution display for sharp effective visuals on the NEC Versa or on an external CRT monitor. The NEC Versa XGA TFT display has high resolution of 1024 x 768 pixels. -
Page 146: Using Digital Video Files
With commercial video capture hardware and application software, you can plug any video device, including VCRs, televisions, camcorders, and laser disc players into your NEC Versa and record motion graphics to your hard drive. Use a video frame grabber and store a stream of grabbed stills on your hard disk. -
Page 147: Solving System Problems
Solving System Problems Problem Checklist Start-Up Problems Using the Product Recovery CD If You Need Assistance... -
Page 148: Problem Checklist
Problem Checklist First check the items in the following list. If these items don't help, see the table that follows the list. Power is on to the computer. The electrical outlet to which your AC adapter is connected is working. Test the outlet by plugging in a lamp or other electrical device. - Page 149 Troubleshooting Problem What To Do The system does not power on. If you are operating the system with battery power, check that the battery pack is correctly inserted. Attach the AC adapter to recharge the battery. If you have the AC adapter attached, check that you are using a working the electrical outlet.
-
Page 150: Start-Up Problems
LCD or a CRT. The system warns you by beeping. Post Error Messages The NEC Versa LX computer has a built-in checking program that automatically tests its components when you turn the system power on. This diagnostic test is called the Power-On Self-Test (POST). If the system finds a problem during the POST, the system displays an error message or emits a series of beep signals. - Page 151 Post Error Messages Message What To Do Address line is short Error in the address decoding circuitry on the system board. Contact your NECC service representative for service work. C: Drive Error Hard disk drive C: does not respond. Confirm that C: hard disk type in Setup is correct.
- Page 152 Post Error Messages Message What To Do DMA#2 Error Error in the second DMA channel. Contact your NECC service representative for service. FDD Controller Failure The BIOS cannot communicate with the floppy disk controller. Contact your NECC service representative to check all appropriate connections.
- Page 153 If beep codes occur during POST, check the items in the Problem Checklist (at the start of this chapter), verify that all the hardware is set up properly and securely connected, and try rebooting. If you still get a beep code, go to the section “If You Need Assistance” at the end of this chapter.
-
Page 154: Using The Product Recovery Cd
Using the Product Recovery CD If you determine that you need to restore your system to its initial installation state follow the instructions given here. In the Windows NT environment you can use the repair/emergency disk to restore your system to its current state of operation without reverting to its initial installation state. -
Page 155: Recovery Choices
Recovery Choices The Product Recovery CD gives you the following choices. Full — Completely rebuilds your hard disk drive, destroying all existing data in the process. Once you choose this option, you are prompted to confirm your choice. When your choice is confirmed, the recovery proceeds without requiring any intervention or responses on your part. -
Page 156: Full/Express Restore
1. Check the Product Recovery CD title and make sure that it is the correct CD for your NEC Versa computer and operating system. 2. Put the CD into the CD-ROM drive tray, close the drive door, and reboot your computer. - Page 157 5. Choose Full or Express to restore your hard disk drive to its original factory installed state. If you choose Full, the Confirm Your Choice screen appears. Proceed to step 6. If you choose Express, the recovery process begins immediately. A screen with progress bars displays and lets you know the progress of the recovery.
-
Page 158: Partition Restore
Use the Product Recovery CD to perform a partition restore as follows: 1. Check the Product Recovery CD title and make sure that it is the correct CD for your NEC Versa computer and operating system. 2. Put the CD into the CD-ROM drive tray, close the drive door, and reboot your computer. - Page 159 4. In the Restore Choices screen, use the cursor arrows or VersaGlide touchpad to select the type of restore procedure to use. Choose your restore option carefully to prevent losing data and applications installed on your system. If the hard disk is configured with multiple or extended partitions you may have to reinstall some software to restore configuration settings and shared files.
-
Page 160: Windows Nt Recovery Cds
9. Press , click Reboot, or press to reboot your system. Enter Alt-R A series of hardware detection screens display, the system reboots, and the Windows Setup screen appears. Follow the on-screen instructions to set up Windows. You are required to reenter your Microsoft license number. Windows NT Recovery CDs Your Windows NT system ships with two Product Recovery CDs for Microsoft Windows NT. -
Page 161: If You Need Assistance
If You Need Assistance If you have a problem with your computer, first review the checklist and troubleshooting table at the beginning of this chapter. If you still have a problem, see Chapter 8, “Getting Services and Support,” for details about contacting NECC. Note: If you purchased and are using this product outside the U.S. -
Page 162: Getting Services And Support
Getting Services and Support Services and Support Contact Information NECC Web Site NECC FTP Site NECC Support Services Email/Fax to Support Services... -
Page 163: Services And Support Contact Information
Not only do these services provide information about your NEC system, they can also be used to answer your questions and help solve any problems you may have with your system, should that ever be necessary. -
Page 164: Necc Ftp Site
Reseller's area (password accessible). To access NECC’s Home Page, enter the following Internet Uniform Resource Locator (URL) in your browser: http://www.nec-computers.com/ NECC FTP Site Use the Internet to access the NECC FTP (file transfer protocol) site to download various files (video drivers, printer drivers, BIOS updates, and Setup Disk files). -
Page 165: Necc Support Services
NECC Support Services NECC also offers direct technical support through Support Services. (NECC Support Services is for U.S. and Canadian customers only; international customers should contact the local NECC office or dealer for the support and service available in your country.) Direct assistance is available 24 hours a day, 7 days a week. - Page 166 When using the email or fax support service, you should include the following words in the subject field for prompt response from the appropriate technical person: Desktop Monitor Notebook. You should provide as much specific information about your questions as possible. Also, if you are sending a fax, please include your voice telephone number, fax number, model number and system serial number with the question.
-
Page 167: Setting Up A Healthy Work Environment
Setting Up a Healthy Work Environment Making Your Computer Work for You Arrange Your Equipment Adjust Your Chair Adjust Your Input Devices Adjust Your Screen or Monitor Vary Your Workday Pre-Existing Conditions and Psychosocial Factors... -
Page 168: Making Your Computer Work For You
Making Your Computer Work for You Computers are everywhere. More and more people sit at computers for longer periods of time. This appendix explains how to set up your computer to fit your physical needs. This information is based on ergonomics - the science of making the workplace fit the needs of the worker. -
Page 169: Arrange Your Equipment
To reduce your risk of developing these disorders, follow the instructions in this appendix. If you experience discomfort while working at your computer or afterwards, even at night, contact a doctor as soon as possible. Signs of discomfort might include pain, tenderness, swelling, burning, cramping, stiffness, throbbing, weakness, soreness, tingling and/or numbness in the hands, wrists, arms, shoulders, neck, back, and/or legs. -
Page 170: Adjust Your Input Devices
Use the entire seat and backrest to support your body. Tilt the backrest slightly (90° to 105°). The angle formed by your thighs and back should be 90° or more. Your seat depth should allow your lower back to comfortably contact the backrest. -
Page 171: Adjust Your Screen Or Monitor
Adjust the keyboard height so that your elbows are near your body and your forearms are parallel to the floor, with your forearms resting on either armrests or forearm supports, in the manner described previously. If you do not have armrests or forearm supports, your upper arms should hang comfortably at your sides. -
Page 172: Vary Your Workday
Position the screen or external monitor at a 90° angle to windows and other light sources to minimize glare and reflections. Adjust the monitor tilt so that ceiling lights do not reflect on your screen or external monitor. If reflected light makes it hard for you to see your screen or external monitor, use an anti-glare filter. -
Page 173: Pre-Existing Conditions And Psychosocial Factors
Note: For more information on workstation setup, see the American National Standard for Human Factors Engineering of Visual Display Terminal Workstations. ANSI/HFS Standard No. 100-1988. The Human Factors Society, Inc., P.O. Box 1369, Santa Monica, California 90406. Pre-Existing Conditions and Psychosocial Factors Pre-existing conditions that may cause or make some people more susceptible to musculoskeletal disorders include the following:... -
Page 174: Specifications
Specifications System Components Memory Map Interrupt Controllers... -
Page 175: System Components
System Components The following system component specifications are standard except where noted. System Processor Intel Pentium II — 300-PE, 333-MHz, 366-MHz; all with AGP (Advanced Graphics Port) Architecture 64-bit Peripheral Component Interconnect (PCI) Random Access Memory Standard Main Memory 64-MB SDRAM SO-DIMM Optional Expansion —... - Page 176 External Keyboard/External Mouse — 1 port, PS/2, 6-pin MiniDin; exclusionary use or both supported with optional Y-cable adapter Expansion — 1 port, 240-pin for optional NEC Versa Dock and optional NEC Versa PortBar Microphone — 1 port, 3-pin, Mini Pin Jack Stereo Headphones —...
- Page 177 PC Card Slots Two 32-bit card slots for two Type II PC cards or one Type III PC card, 5 V or 3.3 V interface 32-bit CardBus support LCD Panel The LCD panel varies, depending on the model. 13.3-inch or high resolution active matrix Thin Film Transistor (TFT), Extended Graphics Array (XGA) color display Resolution —...
- Page 178 Interleave 1:1 Controller — NS PC97338VJG SuperDisk™ Drive Formatted Capacity: Optical diskette — 120 MB High Density floppy diskette — 1.44 MB Double Density floppy diskette — 720 KB Data Transfer Rate 120-MB: 680 KB/S (max.) 1.44-MB: 150 KB/S (max.) 720-KB: 75 KB/S (max.) Track to track seek rate 120-MB: 20ms (typ)
- Page 179 Data transfer rate 16.6 MB/sec (PIO mode4/DMA mode2) 33.3 MB/sec (ultra DMA) Media data rates — 88.0 bit/sec – 118.0 bit/sec Mean Time Between Errors (MTBF) — 300,000 hours 24X-speed CD-ROM Drive Type — 5-inch CD-ROM Pack Average Data Transfer Rates 2550 KB/second (mode 1) 2907 KB/ second (mode2) Read Rate —...
- Page 180 Depth — 6.19 in. (158 mm) Height — 0.72 in. (18.5 mm) Weight NEC Versa 5.65 lb (2.57 kg) to 5.83 lb (2.65 kg) without primary battery or VersaBay III device installed 7.7 lb (3.5 kg) to 7.9 lb (3.59 kg)
- Page 181 Battery Pack — 1.12 lb (.51 kg) Recommended Environment Operation Temperature — 41°F to 95°F (5°C to 35°C) Relative Humidity — 20% to 80% (Noncondensing) Storage Temperature — -4°F to 104°F (-20°C to 40°C) Relative Humidity — 20% to 80% (Noncondensing) B-8 Specifications...
-
Page 182: Memory Map
Memory Map The system supports system and video shadowing, both controlled through complementary metal oxide semiconductor (CMOS). The system supports BIOS as a cacheable area with write protection. The following table shows the system's memory map. System Memory Map Memory Space Size Function 000000-0002FFh... -
Page 183: Interrupt Controllers
Real-time Clock Slave IRQ09 USB Port Slave IRQ10 PC CardBus Controller/Video Slave IRQ11 VersaBay in Versa Dock Slave IRQ12 PS/2 Mouse/NEC VersaGlide Slave IRQ13 Math Coprocessor (built into CPU) Slave IRQ14 Hard Disk Controller 1 Slave IRQ15 VersaBay III Master... -
Page 184: Frequently Asked Questions
Frequently Asked Questions External Mouse Display PC Cards Diskette Drive Booting Power Management Miscellaneous... -
Page 185: External Mouse
How can a PS/2 mouse and an external keyboard be connected to the note book at the same time? The NEC Versa LX computer has only one PS/2 port that accommodates either a mouse or a keyboard. You can get around this by purchasing an optional Y adapter or NEC Versa PortBar. -
Page 186: Pc Cards
PC Cards In which slots do my PC cards go? Your PC cards can go into either slot if they are NEC- approved cards. Other software may not support the use of both slots. Type III cards only fit in the bottom slot (slot 0). - Page 187 PC card, close all applications using the card and pop it part of the way out of the slot to save power. If my NEC Versa LX system is docked in the NEC Versa Dock and I’m using a LAN card, the card does not work.
-
Page 188: Diskette Drive
In Setup, I disabled or reconfigured peripheral devices (like the ports or sound), yet I am unable to use the freed IRQs or I/O address resources with my PC Cards? To provide a stable platform free of conflicts, NECC excluded some resources from PC card use. Diskette Drive Why can’t I boot from the diskette drive? To boot from the diskette drive, be sure that you have a... - Page 189 How do I format a diskette? In Windows 98, Windows 95 or Windows NT, double click on the My Computer icon and then right click (click the right-hand mouse button) on the 3.5 Floppy or SuperDisk (A:) icon (depending upon your hardware configuration. Select Format and choose the format process that best suits your needs.
-
Page 190: Booting
Booting What is the difference between a warm boot and a cold boot? A warm boot restarts the system while system power is on. A warm boot is also a software reset. A warm boot clears volatile system memory and reloads the operating system. To use a warm boot, press and hold the Ctrl, Alt, and Del keys. - Page 191 When your screen goes blank, before the system goes into Suspend mode (power status LED blinks), just press the space bar or move your mouse to reactivate your system. What is the purpose of Suspend to RAM? You can initiate full Suspend-to-RAM by pressing the Power/Sleep button and holding it in place for 4 or fewer seconds.
- Page 192 How do I bring my system out of Suspend mode? Sliding the Power/Sleep button forward brings the system out of Suspend mode. What is a time-out? A time-out is the amount of time your system or a particular component is inactive. Can I disable my system’s power management features? Yes.
-
Page 193: Miscellaneous
Miscellaneous How do I set the time and date? You can change the time and date in Windows 98 or 95 and Windows NT as follows. Double click the time in the lower right corner of the screen. Change the date and time as needed. How do I speed up my application? If the application you are using runs really slow, close any other applications you are not using - this should speed things up. - Page 194 How do I find help in a Windows application? If you need help in a Windows application, click on a Help button or Help menu item. Most applications provide online help. If the application doesn’t provide these, try pressing How do I save a file? You save a file by selecting File then Save from the drop down menu.
-
Page 195: Glossary
Glossary AC adapter A device that connects an NEC Versa portable computer and an AC wall outlet to provide AC power for running the system and recharging the battery. A/D conversion The process of converting an analog signal into a digital signal. - Page 196 BIOS Basic Input Output System. A collection of primitive computer routines, usually burnt into ROM, that controls the real-time clock, keyboard, disk drives, video display, and other peripheral devices. Binary digit. The smallest unit of computer data. bits per second (bps) A unit of transmission.
- Page 197 CD audio Also called digital audio, uses the same format as conventional music CDs. CD audio sounds have been digitized at a high sampling rate. CD-ROM drive Compact Disc Read-Only Memory. A computer-controlled device that reads high-capacity optical discs and sends the output to the computer. clock Electronic timer used to synchronize computer operations.
- Page 198 A magnetic drive that writes on and retrieves data from a diskette. DSTN Dualscan Super-Twisted Nematic. A type of technology used in some NEC Versa LCD screen displays. A denser, faster CD that can hold video as well as audio and computer data.
- Page 199 Technology that uses infrared waves to communicate data between the IR- equipped devices without the use of cables. the port on the NEC Versa is Infrared Data Association (IrDA) compatible. Glossary 5...
- Page 200 interface A connection that enables two devices to communicate. interrupt A special control signal from an I/O device that diverts the attention of the microprocessor from the program to a special address. kilobyte (KB) 1024 bytes. Local Area Network. Liquid Crystal Display. An LCD consists of a thin sandwich of two glass plates with sealed edges, containing nematic liquid-crystal material that forms the screen image.
- Page 201 microprocessor A semiconductor central processing unit that is the principal component of a microcomputer. Usually contained on a single chip that includes an arithmetic logic unit, control logic, and control-memory unit. MIDI Musical Instrument Digital Interface. A standard serial bus, digital interface designed to connect electronic musical devices.
- Page 202 nonvolatile memory Storage media that retains its data when system power is turned off. Nonvolatile memory in the Versa is a complementary metal oxide semiconductor (CMOS) chip which is backed up by an internal battery. The backup battery preserves the clock/calendar data and system configuration parameters stored in CMOS.
- Page 203 partition Process of dividing mass storage (hard disk drive) into isolated or separate sections. Partitioning a hard drive creates additional logical drives, e.g. a 5.1GB hard drive partitioned into three logical drives creates drives C, D, and E. Partitioning facilitates file management by allowing you to isolate the computer’s operating system to drive C while storing applications and data files on separate drives D and E (also referred to as partitions).
- Page 204 QWERTY The QWERTY keyboard, designed in the 1800s for mechanical typewriters, refers to the first six keys (QWERTY) on the top row of letters on the standard keyboard. Random Access Memory. A storage device into which data is entered and from which data is retrieved in a nonsequential manner.
- Page 205 serial interface An interface that communicates information one bit at a time. serial printer A printer with a serial interface. Serial Infrared, an infrared technology that sends data at 2.4 Mbit/second (2,400,000 bits per second). SO-DIMM Small outline dual-inline memory module. A small circuit board that holds memory chips.
- Page 206 When sent to a television, s-video produces sharper images and superior color definition. Thin Film Transistor. A type of NEC Versa LCD color screen that supports 256 colors. Universal Serial Bus. This new external bus standard supports the connection of up to 127 peripheral devices, such as mice, modems, and keyboards.
- Page 207 warm boot Process of resetting the computer without turning off the power through keyboard input (pressing Ctrl, Alt, and Del keys simultaneously). The system returns to an initial or arbitrarily selected condition. warm swap Process of swapping devices in and out of a computer system without turning off the power.
-
Page 208: Index
CD loading, 4-16 Battery CD-ROM drive features, 4-15 determining status, 2-7 CD-ROM drive, 6-4 handling, 2-8 Cleaning your NEC Versa, 2-16 pack, 2-17 CMOS battery, 2-13 recharging precautions, 2-12 Connecting a TV, 5-8 removing, 1-15 Connecting the AC adapter, 2-3... - Page 209 bar code scanner, 5-7 external monitor, 5-2 Digital video files, 6-8 keyboard, 5-5 Dimensions mouse, 5-5 battery pack, B-7 parallel device, 5-3 system, B-7 printer, 5-3 Dip switch settings, 4-37 serial device, 5-4 Diskette drives, 3-9 television, 5-8 Docking port, 1-10 USB port, 5-10 Docking station drives, 3-9 Installing SO-DIMMs, 4-32...
- Page 210 3-32, 8-2 Low battery power, 2-5 NEC utilities, 3-26 SuperDisk drive, 4-8 NEC Versa Dock, 5-11 NEC Versa file bay, 4-7 NEC Versa PortBar, 5-11 Main battery, 2-12 NEC VersaBay, 1-9 Main power source NEC VersaBay Swapping Utility, 4-10...
- Page 211 Power-on self test (POST), 3-2 bridge battery, B-7 Precautions, 2-14 calendar clock, B-2 Preparing the BIOS update diskette, 3-17 CD-ROM drive, B-6 Preparing your NEC Versa for travel, 2- diskette drive, B-4 hard disk drive, B-5 Problem checklist, 7-2 input/output facilities, B-3 keyboard, B-4...
- Page 212 USB controller, 3-13 USB port, 1-12, 5-10 User password, 3-10 Using the AC adapter, 2-2 Using the battery pack, 2-5 Using the NEC VersaGlide, 4-5 Using the TV out port, 5-8 VersaBay III, 4-9 customizing your system, 4-15 installing devices, 4-13...
- Page 213 This product is in conformity with the protection requirements of EC Council Directive 89/336/EEC on the approximation of laws of the Member States relating to electro-magnetic compatibility. This product satisfied the Class B limits of EN 55022. NEC Computers Inc. 15 Business Park Way...
- Page 214 Battery Replacement A lithium battery in some computers maintains system configuration information. In the event that the battery fails to maintain system configuration information, NECC recommends that you replace the battery. For battery replacement information, call your NECC dealer. There is a danger of explosion if the battery is incorrectly replaced.
-
Page 215: Declaration Of Conformity
NEC Computers Inc. DECLARATION OF CONFORMITY We, the Responsible Party NEC Computers Inc. 15 Business Park Way Sacramento CA 95828 declare that the product NEC Versa LX is in compliance with FCC CFR47 part 15 for Class B digital devices.