Table of Contents
Advertisement
Quick Links
Advertisement
Table of Contents

Related Manuals for Yamaha B1D


Summary of Contents for Yamaha B1D
- Page 1 Owner’s Manual Bedienungsanleitung Mode d’emploi...
-
Page 2: Table Of Contents
It can be used on normal 4-string basses as well as 5-string, and 6-string basses. To get the most out of your B1D, please read this owner’s manual carefully, and follow the installation instructions within, in order to en- sure proper operation. -
Page 3: Precautions
• Be careful not to damage the B1D controller when placing the guitar in a case or on a stand. Yamaha is not responsible for damage caused by improper installation, handling, or operation. !! PLEASE READ THIS BEFORE PROCEEDING !! Cleaning •... -
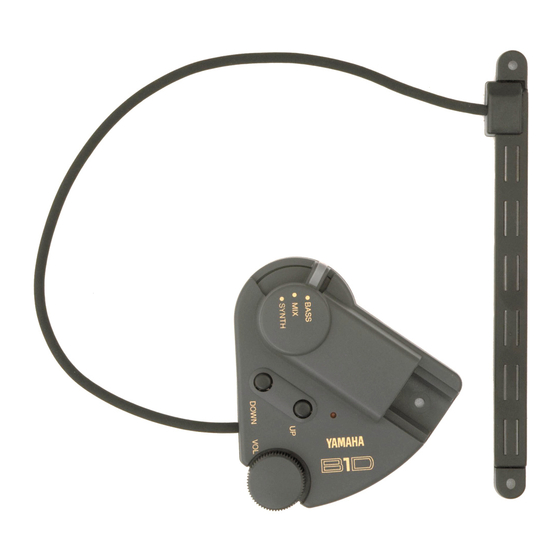
Page 4: Nomenclature & Functions
Controls the volume of the synthesizer. * Does not adjust the volume of the bass guitar. e Power Indicator The B1D is receiving power from the G50 Guitar MIDI Converter when this indicator is lit. The indicator lights when the B1D is properly con- nected to the G50 via the 13-pin cable. -
Page 5: Parts List
Before you install the B1D, please make sure you have all of the parts listed below. B1D Main Unit (Divided Pickup + Controller) Divided Pickup Attachment Parts • Spacer A (Thickness: 1mm) ... 10 Pieces • Pickup Double-Sided Adhesive Tape ... -
Page 6: Before You Install
It can be used with 4- string as well as 5- and 6-string basses. If your bass guitar is one of the types listed below, the B1D will not function properly with it. • 8-string basses or other non-standard string configurations other than 4-, 5-, and 6- string basses. -
Page 7: Attaching The Divided Pickup
Attaching the Divided Pickup Mark the Installation position for the divided Pickup. The divided pickup should be located between the rear pickup and bridge so that the cable end of the pickup is oriented toward the lower bass string (the pickup will not function if it is attached facing the opposite direction). - Page 8 Once the optimum installation position has been decided, you can prepare to attach the pickup. However, the distance between the string and the pickup’s magnetic yoke is ex- tremely important. Since the height of the pickup’s magnetic yokes cannot be adjusted individually, the pickup posi- tion, the pickup’s overall height, and string height, can be adjusted to meet the conditions necessary for optimum string/pickup clearance.
- Page 9 Attaching the Divided Pickup Attach the Divided Pickup (Removable) Fittings Attachment The divided pickup can easily be removed yet pickup height adjustment is still maintained. 1. Apply the base plate’s double-sided adhesive tape, to the underside of the base plate. (Do not remove the backing yet.) 2.
- Page 10 Double-Sided Adhesive Tape Attachment Use the cushions and spacers to adjust the height of the pickup, and use the double-sided adhesive tape to attach the pickup to the bass guitar. 1. Cut in half the spacers (A, B) used to adjust the pickup’s height.
- Page 11 Attaching the Divided Pickup Use the following steps if you need to read- just the pickup height. 1. Determine the number of spacers you need to add or remove. 2. Remove only the pickup from the body. Without applying any excessive force to the pickup, carefully pry the pickup from the spacers by sliding a thin, flat object under the low string end of the pickup,...
-
Page 12: Attaching The Controller
• The controller should not block of hamper access to any of the bass guitar’s controls: volume, tone, switches, etc. • The B1D controller should be positioned in an easily accessible position. • Do not position the controller in a manner that will apply excessive force to the cord that connects the divided pickup and controller. - Page 13 Attaching the Controller The bracket can also be fixed to the bass guitar using the strap pin. An alternate method is to attach the bracket using the bass guitar’s strap pin. Loosen the screw holding the strap pin to the bass guitar body, slide the slot in the bracket under the pin, then tighten the pin screw until the bracket is held firmly in position.
-
Page 14: Connections
5. Turn ON the power in the following order, Tone Generator Guitar MIDI Converter Related Equipment Bass Amp The B1D power indicator should light. If you are using the G50, “ ASS” will appear in the display. With this, connection is finished to bass amp. -
Page 15: G50 Settings
G50 Settings If you are using the Yamaha Guitar MIDI Converter G50, set the following settings on the G50. Guitar/Bass Mode Switch With the G50 power switched OFF. Set the GUITAR/BASS mode switch, located on the rear panel of the G50, to the BASS position. -
Page 16: Controller & Switch
Controller and Switch After connection and setup is finished, try to play your bass guitar. Play a synth sound only • Set the output select switch to the SYNTH position • Use the VOL knob to control the synth volume. Turn the knob right to increase the volume and left to decrease. -
Page 17: Getting The Most Out Of Your B1D & G50
Getting the most out of your B1D & G50 Please use the following functions to get the most out of your B1D and G50. What playing style will you use? Set the G50’s [A: Playing Style] to the “Pic” (pick) setting if you are going to play with your fingers. -
Page 18: Troubleshooting
Troubleshooting If you think there may be a problem with your B1D and G50, first check the infor- mation below for a possible solution. If that does not solve the problem, contact the nearest Yamaha dealer or the music store where you purchased the device. -
Page 19: Specifications
Output Selector Switch (BASS/MIX/SYNTH) UP/DOWN Buttons Power Indicator Divided Pickup (6-string independent) Direct Bass Guitar Input Jack B1D Output Jack (Divided Pickup + Bass Guitar Signal) Package Contents Direct Bass Guitar Cable (1/4" mono phone mono mini-plug) Hardware Parts for Installation Bass Guitar String Spacing 4-string : 17-20mm (0.67"-0.79") - Page 20 The G50 is a high-per f ormance Guitar MIDI Conver ter designed to work in conjunction with the Yamaha B1D Divided Pickup Unit installed on an electric or steel-string acous- tic guitar . The G50 offers unpr e cedented MIDI guitar synthesizer per exceptionally fast response and a range of advanced features that bring the true creative potential of MIDI control to guitar players for the first time.
- Page 21 For details of products, please contact your nearest Yamaha or the authorized distributor listed below. Pour plus de détails sur les produits, veuillez-vous adresser à Yamaha ou au distributeur le plus proche de vous figurant dans la liste suivante. NORTH AMERICA CANADA Yamaha Canada Music Ltd.
- Page 22 M.D.G., EMI Division © Yamaha Corporation 1997 VZ13850 704POCP5.2-01A0 Printed in Japan...