Table of Contents
Advertisement
Advertisement
Table of Contents

Related Manuals for MAMMOTION LUBA 2 AWD Series

Summary of Contents for MAMMOTION LUBA 2 AWD Series
- Page 1 Original Instructions LUBA 2 AWD SERIES -User Manual- V1.0 2024.01...
- Page 2 Thank you for choosing Mammotion as your garden care lawn mower. This user manual will help you learn and operate Mammotion Luba, a 4-wheel-drive and perimeter-free lawn mower, to cut grass and maintain your lawn. This manual is copyrighted by Mammotion Tech company. Without the written permission of the company, any unit or individual shall not copy, modify, reproduce, transcribe or transmit in any way or for any reason.
-
Page 3: Table Of Contents
Choosing a Location for Charging Station ..............- 18 - Installing ........................- 20 - Operation ....................- 28 - Preparation ........................ - 28 - Download Mammotion App ..................- 28 - Mammotion Account Signup and Login ..............- 29 - Add Luba ........................- 32 -... - Page 4 Map Page Introduction ....................- 33 - Product Specifications .................. - 59 - Technical Specifications .................... - 59 - LED Indicator Codes ....................- 62 - Fault Codes ......................... - 64 - Warranty ..................... - 66 - Compliance ....................- 69 -...
-
Page 5: Safety Instructions
Do not use the product in areas where people are unaware of its presence. When manually operating the product with the Mammotion App, do not run. Always walk, watch your steps on slopes, and maintain balance at all times. -
Page 6: Safety Instructions For Installation
When connecting the main cable to the power outlet, use a residual-current device (RCD) with a maximum tripping current of 30 mA. Only use original batteries recommended by Mammotion Tech. The safety of the product cannot be guaranteed with non-original batteries. Do not use non-rechargeable batteries. -
Page 7: Safety Instructions For Operation
Do not install the charging station, including any accessories, within 60 cm/24 in of any combustible material. Malfunctioning or overheating of the charging station and power supply can pose a fire hazard. For users in the USA/Canada: If installing the power supply outdoors, there is a risk of ... -
Page 8: Battery Safety
Battery Safety Lithium-ion batteries can explode or cause a fire if disassembled, short-circuited, exposed to water, fire, or high temperatures. Handle them with care, do not dismantle or open the battery, and avoid any form of electrical/mechanical abuse. Store them away from direct sunlight. Only use the battery charger and power supply provided by the Manufacturer. -
Page 9: Introduction
Introduction About Mammotion Luba The Luba 2 AWD series, also known as Luba, is a 4-wheel-drive robotic lawnmower with a suspension system that provides better grip through its spring. Luba is equipped with RTK GNSS navigation and virtual-mapping systems, which allow users to customize their mowing tasks by defining different mowing areas and schedules in the Mammotion app. - Page 10 2.1.2 About positioning Luba is equipped with a RTK (real-time kinematic) navigation system, a multi-sensor integrated navigation system, and a vision positioning system, which provide more accurate positioning data. RTK positioning RTK is a differential GNSS positioning technology that greatly enhances positioning accuracy to approximately 5 cm/2 in.
- Page 11 For instance, say 'Alexa, start charging' to initiate the charging process. To link your Alexa account 1. Go to Account page in the Mammotion app. 2. Select Alexa. 3. Follow the onscreen instructions to finish the setup. Afterward, you can activate Luba by speaking to her.
- Page 12 Luba has an anti-theft system to prevent unauthorized removal. The alarm is triggered when Luba is lifted. Users can track Luba's location through the Mammotion app, as long as it is online. Additionally, Luba's structure allows for an AirTag to be attached to track its location.
-
Page 13: In The Box
In the Box 2.2.1 Luba installation kit Luba x1 Luba Bumper x1 Screw x4 (2 pcs for spare use) Key x2 Vision Module x1 Screw x8 (4 pcs for spare use) Replacement Blades x8 (for Washer x8 (for spare use) Screw x8 (for spare use) spare use) 2.2.2 Charging station installation kit... - Page 14 2.2.3 RTK installation kit RTK Reference Station x1 Radio Antenna x1 Trident Ground Stake x1 Mounting Pole x2 RTK Reference Station RTK Reference Station Extension Cable (10M) x1 Power Supply x1 2.2.4 Tool kit Allen Key 8mm x1 Allen Key x1 Cord Tie x4 Stake x4 SIM-eject Tool x1...
- Page 15 2.2.5 Other accessories (optional) The following accessories are sold separately. RTK reference station wall mount kit RTK Wall Mount x1 M8x50 Expansion Bolt x4 Drilling Template x1 Luba garage Luba Garage x1 - 11 -...
-
Page 16: Symbols On The Product
Symbols on the Product These symbols can be found on the product. Study them carefully. Symbol Description Warning. Read user manual before operating the product. This product complies with the applicable EU Directives. This product complies with the applicable UK Directives. This product is manufactured in China. - Page 17 Symbol Description Class III appliance. Keep hands or feet away from movable blades. Do not ride on the product. Keep a safe distance from your product when operating. WARNING: Do not touch rotating blade. WARNING: Read the user instructions before operating the product. WARNING: Danger of projections of objects against the body.
-
Page 18: Product Overview
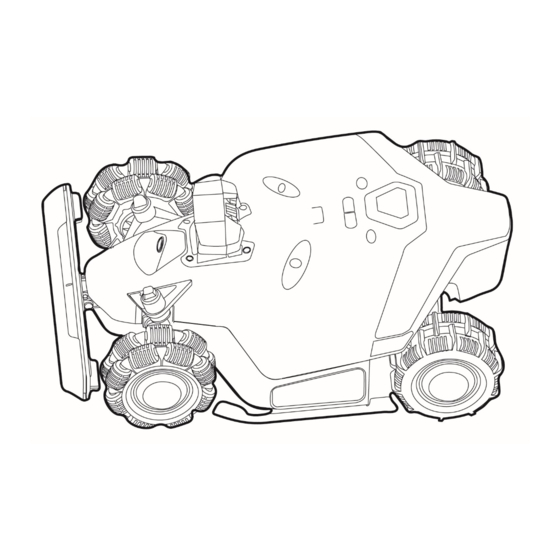
Product Overview Figure 2-1 Front View of Luba 1. Start Button 2. Emergency Stop Button 3. Auto-return Button — press to call back 4. Power Button — long press to turn on/off Luba Luba 5. Grass Button — press to continue the 6. - Page 19 Figure 2-2 Rear View of Luba 15. Key hole 16. SIM card tray 17. USB port — for troubleshooting and debugging 18. Infrared receiver 19. Charging port Figure 2-3 Bottom View of Luba 20. Cutting blade 21. Cutting disk - 15 -...
-
Page 20: Installation
Installation Preparation Read and understand the safety instructions prior to installation. Use original parts and installation materials. Sketch your lawn and mark up obstacles. This will make it easier to examine where to place the charging station and RTK reference station, and to set the virtual boundaries. Choosing a Location for RTK Reference Station To optimize the performance of the RTK system, the RTK reference station must be in an open area to receive satellite signals. - Page 21 The location requirements are as follows: The RTK reference station should be oriented vertically, as shown below: Place the RTK reference station on a flat, open ground or on an unobstructed wall or roof. Make sure there are no roofs or trees that may obstruct the satellite signals. DO NOT install the RTK reference station at the corner of an L-shaped building or on a ...
-
Page 22: Choosing A Location For Charging Station
Choosing a Location for Charging Station Place the charging station on a flat ground. DO NOT install the charging station at the corner of an L-shaped building or on a narrow path between two structures. No obstacles or other items should be between the charging station and the docking point. ... - Page 23 Thick grass Easy to bend when a heavy object on it, such as Luba. - 19 -...
-
Page 24: Installing
Installing 3.4.1 RTK reference station installed on a wall/roof (recommended) 1. Choose a suitable installation area at a high place of your house. 2. Stick the drilling template on the wall and drill four holes (10 x 40mm/0.4 x 1.6 in) at the appropriate position. - Page 25 8. Connect the RTK reference station cable (10 m/33 ft.) to the RTK reference station power supply. 9. Plug the power supply into a wall socket. 10. Select an open spot to install the charging station. 11. Use the six screws to properly fasten the charging station in the position as shown.
- Page 26 3.4.2 RTK reference station installed on the ground 1. Fix the radio antenna to the RTK reference station. 2. Assemble the two mounting poles and the trident ground stake as shown. 3. Route the RTK reference station cable into the mounting pole as shown. 4.
- Page 27 3.4.3 Luba Assembly Installing the vision module 1. Loosen the four screws using a screwdriver with a 2.5mm hex bit to remove the cover. 2. Connect the vision module wires (black to black and white to white). 3. Attach the vision module to the Luba using the four screws and tighten them with a 2.5mm hex screwdriver.
- Page 28 Installing the Luba bumper 1. Gently pull the plug inside the Luba out and connect it to the bumper. 2. Place the bumper into position with the front indicator facing upwards by pressing and holding the buttons. 3. Install and tighten the two screws using a 2.5mm hex screwdriver.
- Page 29 Installing the 4G sim card (optional) 1. Use the Allen key to detach the rear cover. 2. Eject the SIM card tray using the SIM-eject tool, install the SIM card, and push the card tray into place. 3. Reinstall the rear cover. - 25 -...
- Page 30 3.4.4 Docking Luba After the charging station and RTK reference station have been properly installed, place Luba on the charging station by: Placing or driving Luba about 1.5 m/5 ft. in front of the charging station with the back of ...
- Page 31 3.4.5 Installing the Luba garage (optional) Attach the garage to the top of the charging station from front to back and tighten the two screws on the back of the garage to complete the installation. NOTE Do not place anything on top of the garage to avoid damage and interference with the vehicle signal.
-
Page 32: Operation
Download Mammotion App Luba is designed to work with the Mammotion app, please download the free Mammotion app first. You can scan the QR code below to get it from the Android or Apple app stores, or search for Mammotion in these stores. -
Page 33: Mammotion Account Signup And Login
4.3.1 To sign up NOTE If you already have a Mammotion account, input your account and password to log it in. After successfully install the Mammotion app in your phone, you are ready to create your account. Follow the below instructions to register one. - Page 34 (Passwords must be 8 to 16 characters with at least two of the following: letters, numbers, and special characters.). 6. Click Confirm and Login to finish the signup. 4.3.2 To log in Log in with a Mammotion account Input your email address and password, check Privacy Agreement User Agreement, then click Login. NOTE If you forget your password, click Reset password and follow the screen instructions to reset your password.
- Page 35 2. Select Associated account to link your Mammotion account if needed. Or, 3. Click Set Password/Login to set your password for the Mammotion account you are signing 4. Click Confirm and login to log in.
-
Page 36: Add Luba
Add Luba NOTE Make sure the distance between your phone and Luba is less than 3 m/10 ft. 1. Click + to add your Luba. 2. Select Add Luba 2. 3. Follow the onscreen guidelines to set up Luba. 4. Long press (5 s) the power button to turn on Luba. 5. - Page 37 Map Page Introduction 1. Luba status 2. Return to previous page 3. Notification 4. Manually drive forward/backward 5. Status bar 6. Settings 7. View returns to the center of the map 8. Auto recharge 9. Manually turn Luba clockwise or anti-clockwise 10.
- Page 38 4.5.1 Create a Map NOTE The terms 'Map' and 'Task Area' in this context refer to the lawn. Before mapping Before mapping, it is important to be aware of key considerations. Remove debris, piles of leaves, toys, wires, stones, and other obstacles from the lawn. Make ...
- Page 39 To map your lawn Click the start button on the Map page. 2. Manually control Luba to draw the boundary of your lawn. The solid line marks the boundary that you have set, while the dotted line will help you to get back to the starting point.
- Page 40 NOTE When mapping, the system will estimate the area. Please ensure that the area is not more Technical Specifications than the upper limit (See for more information), or the task planning will fail. Drive Luba out of the task area or no-go zone first if a new task area is created. To add a no-go zone No-go zones are created for pools, flowerbeds, trees, roots, ditches, and any other obstructions present in the lawn.
- Page 41 After mapping 1. Return to previous page 2. Notification 3. Task area 4. No-go zone 5. Control panel 6. Status bar 7. Settings 8. Customer service 9. Channel 10. Auto-recharge 11. View returns to the center of the map - 37 -...
- Page 42 To edit or delete the current task area To edit the current task area, click Edit > Modify to continue. To delete a task area, click Edit > Delete to continue. Multiple task areas with overlapping If you have several lawns that overlap, the shared section will be assigned to the task area that was created first.
- Page 43 4.5.2 Status Bar From left to the right: Bluetooth Luba's Wi-Fi Cellular strength Positioning status Luba battery status Vision state and positioning status Click the status bar to show the following details. Positioning status — shows the strength of positioning. ...
- Page 44 *Only Fix status enables automatic mowing. Satellites (Luba) — refers to the total number of satellites received by Luba. Satellites (Ref. Station) — refers to the number of satellites that RTK reference station can receive. L1 and L2 respectively indicate the satellites operating at L1 and L2 frequencies. Satellites (Co-Viewing) —...
- Page 45 Confirm that the radio antenna has been installed. Re-pair the RTK reference station and Luba to see if it can be fixed. If you replace the RTK reference station, pair the new station with Luba on the Mammotion app. For more details, visit https://mammotion3006.zendesk.com/hc/en- us/articles/16503733641367 ...
- Page 46 Signal quality (Luba): Bad or Weak Positioning status: Float Measures: Check if Luba's current location is fully or partially covered. If the Luba is positioned on the charging station, relocate it to a less obstructed area. ...
- Page 47 4.5.3 Plan With the Plan function, you can set a regular task and Luba will automatically do its work according to your setting. To set a plan NOTE The Plan function is disabled when Luba is in automatic mowing. ...
- Page 48 To change/delete a plan 1. Click on the plan you set to open the drop-down menu. 2. Toggle the button to off to inactivate the plan if needed. 3. Click Edit to directly change the plan. Or 4. Select Copy to create a new plan with the same settings while keeping the original plan, then choose one to edit.
- Page 49 4.5.4 Customer Service The Customer Service provides an internet-based chat service for any inquiries you may have and receive prompt responses from our technical support team. Simply click on Chat to Agent to start a conversation with one of our representatives. 4.5.5 Mow Preparation Ensure Luba is in the task area before mowing.
- Page 50 To start mowing 1. Select Mow > Automatic to start mowing settings. 2. Choose one of the four available operation modes, which will be explained in the following sections. 3. Then follow the onscreen information to finish the settings and start mowing. Operation modes There are four operation modes to select: ...
- Page 51 Table 4-1 Task Mode Description Mode Description Use Cases Only use the bumper to detect the obstacle, as too much tall grass can interfere with the ultrasonic sensor. Mowing path with double grid. Use Cases High grass For lawns that have not been mowed for an extended period, the grass height typically exceeds 12 cm/4.7 in.
- Page 52 Mode Description Use Cases Cut at a lower speed (0.3 m/s) and reduce the spacing between each mowing pass using a double grid pattern. Fine cutting Use Cases For typical domestic lawns, cut the grass short but with reduced efficiency. Customer can define every task parameter.
- Page 53 Table 4-2 Parameters Description Parameters Description Reference The spacing between 2 mowing Path spacing paths. Can be adjusted between 20 to (cm) The speed of Luba when mowing. Task speed Lower speed produces better results 0.3-0.5 (m/s) for dense and thick grass at the cost of efficiency.
- Page 54 Parameters Description Reference Double grid Segment grid The mowing circles at the perimeter. Perimeter *Under the No grid mode, the mowing laps perimeter mowing laps cannot be set No-go zone The grass-cutting circles surrounding mowing laps the boundary of the restricted area. Luba starts mowing from the boundary.
- Page 55 When Luba enters an area without RTK signals while mowing If Luba enters an area without RTK signals while mowing, the multi-sensor fusion positioning system will assist Luba in continuing to operate through the vision module. The app will display the remaining momentum.
- Page 56 Manual mowing page introduction 1. Manually drive forward/backward 2. Switch mode 3. Start/Stop mowing 4. Switch to Video mode 5. Manually turn Luba clockwise or anti-clockwise 6. Mowing speed To activate Manual mowing 1. On the Map page, select Mow > Manual. 2.
- Page 57 Mode switch Click on MODE on the lower-right corner to switch between Manual and Video interfaces to clearly locate your Luba. - 53 -...
- Page 58 4.5.7 Track your devices In the case that your Luba or RTK reference station is missing, go to Device page to track your equipment. - 54 -...
- Page 59 4.5.8 Notification Information regarding the status, any errors, etc. will be displayed in the notification section. Click the push notification for more details. 4.5.9 Settings There are two modules in the settings: Device — click each item to access more operations. ...
- Page 60 Mow settings Manual mowing Manual mowing — Click to enter manual mowing mode. See for details. No mowing on rainy days — when you enable this function, the Luba will not mow if it rains. Multi-point turn — Luba turnaround mode. Multi-point turn is selected by default as it is more turf friendly.
- Page 61 RTK paring code — you can select to reset or change the RTK paring code. See reset/change the RTK pairing code for additional information. To relocate the Relocate charging station — click to relocate the charging station. See charging station for additional information.
- Page 62 Auto-recharge allows Luba to automatically return to charge when the battery is lower than 15%. To perform auto-recharge Click on the map page in Mammotion app, or Press the button on the Luba, then press to guide Luba to the charging station.
-
Page 63: Product Specifications
Product Specifications Technical Specifications Table 5-1 Standard Version Specifications Standard Version (Cutting Height: 30-70 mm/1.2-2.7 inches) LUBA 2 AWD Specifications 10000 5000 3000 1000 10000 m 5000 m 3000 m 1000 m Max. Mowing Size 2.5 acres 1.25 acres 0.75 acres 0.25 acres In-App Area 12000 m... - Page 64 Standard Version (Cutting Height: 30-70 mm/1.2-2.7 inches) Binocular Vision Positioning & Navigation Ultrasonic Radar Physical Bumper Voice Control Alexa & Google Home Vision Monitoring Connectivity 4G & Bluetooth & Wi-Fi Noise Level 60 dB A weighted sound power =64dB, K =3dB A weighted sound pressure...
- Page 65 H Version (Cutting Height: 60-100 mm/2.4-4 inches) Cutting Width 40 cm/15.7 in. In-App Cutting Height 60-100 mm/2.4-4 in. Adjustment Charging Time 150 min Mowing Time per Charge 180 min 120 min Auto-recharge Binocular Vision Positioning & Navigation Ultrasonic Radar ...
-
Page 66: Led Indicator Codes
LED Indicator Codes Table 5-4 Luba's Indicator Description Indicator Status Description System initialization Manual control mode Automatic work mode Charging finished (Luba still on the charging station) Breathing red OTA upgrade in progress RTK positioning failed Slow flash red ... - Page 67 Table 5-5 Charging Station's Indicator Description Indicator Status Description Flash green Luba is being charging. Charging station Green Luba is fully charged or uncharged. indicator An error has occurred. Table 5-6 RTK Reference Station Indicator Description Indicator Status Description Flash blue The reference station is powering on.
-
Page 68: Fault Codes
Fault Codes The app notification displays common fault codes along with their causes and troubleshooting steps. Here lists the most common issues. Fault Codes Causes Solutions The machine will return to normal once The left cutting disk motor is the motor has cooled down. This overheating. - Page 69 Fault Codes Causes Solutions The charging station has been 1301 Relocate the charging station. moved. Timeout occurred while Restart Luba. If the issue persists, 1420 retrieving wheel speed data. contact the after-sale team. Restart Luba. If the issue persists after a Charging has been stopped due 2713 few times of restart, contact the after-...
-
Page 70: Warranty
Warranty Mammotion Technology Co., Ltd warrants that this product will be free from material and workmanship defects under normal use in accordance with the product materials published by Mammotion during the warranty period. The published product materials include but not limited to user manual, quick start guide, maintenance, specifications, disclaimer, in-app notifications, etc. - Page 71 Mammotion factory for further diagnosis. Mammotion will repair or replace and send back to users at no cost if the problem falls under the warranty. If not, Mammotion or designated service center may charge a fee accordingly.
- Page 72 Mammotion, its affiliates, suppliers, resellers, or service providers for damages from any cause exceed the amount of actual direct damages, not to exceed the amount paid for the product. - 68 -...
-
Page 73: Compliance
Compliance EC/EU DECLARATION OF CONFIRMITY Manufacturer: Mammotion Technology Co., Limited Address: UNIT 89 3/F YAU LEE CENTRE NO.45 HOI YUEN ROAD, KWUN TONG KL Authorised Representative: Bowen International GmbH Address: Jagdfeldring 72,85540, Haar (Germany) The name and address of person authorized to compile the technical file: Bowen International GmbH, Jagdfeldring 72, 85540, Haar (Germany). - Page 74 IEC 62321-5:2013 IEC 62321-4:2013+A1:2017 IEC 62321-7-1:2015 IEC 62321-7-2:2017 IEC 62321-6:2015 IEC 62321-8:2017 ISO 18219:2015 Signed for and on behalf of: Mammotion Technology Co., Limited Signed: __________________ Name: Roland Huang Date: 29/11/2023 Position: Product manager Place: Shenzhen, China - 70 -...
- Page 75 MAMMOTION TECHNOLOGY CO., LTD UNIT 89 3/F YAU LEE CENTRE NO. 45 HOI YUEN ROAD, KWUN TONG KL www.mammotion.com Copyright © 2023, MAMMOTION All Rights Reserved.