Advertisement
SPECIFICATIONS
| Model: | WUT02 |
| Dimensions (L x W x H) | 154 mm x 71 mm x 57 mm |
| Net weight | 0.41 kg |
- Due to our continuing program of research and development, the specifications herein are subject to change without notice.
- Specifications may differ from country to country.
Symbols
The followings show the symbols used for the equipment. Be sure that you understand their meaning before use.
 | Take particular care and attention. |
 | DOUBLE INSULATION |
 | Do not expose to moisture. |
INTRODUCTION
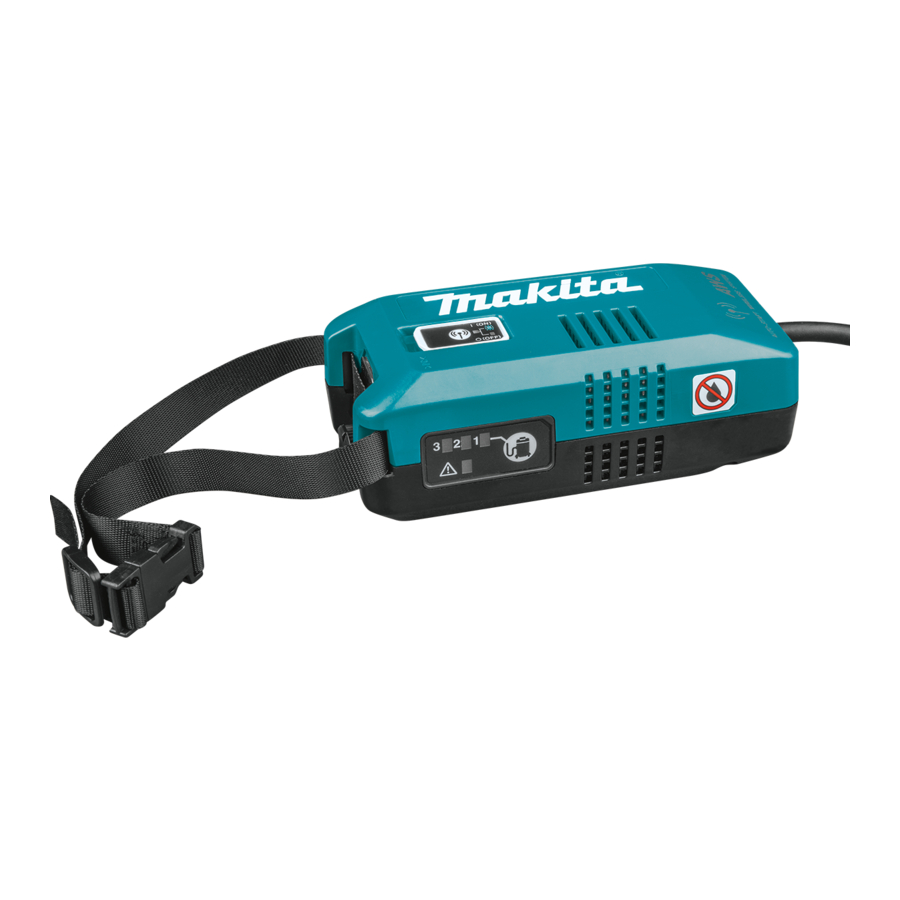
Parts description


| 1 | Adaptor | 2 | Lid |
| 3 | Wireless activation button | 4 | Wireless activation lamp |
| 5 | Hook | 6 | Clamping screw |
| 7 | Cord | 8 | Channel number indicator |
| 9 | Channel setting button | 10 | Caution lamp |
| 11 | Band | - | - |
Intended use
This adaptor enables to use supported Makita battery-powered tools when using the auto start/stop function of a mains-operated vacuum cleaner. The adaptor connected to a Makita vacuum cleaner receives the signal from the tool wirelessly and transmit it to the vacuum cleaner to support to determine the starting or stopping of the vacuum cleaner. (wireless activation function)
INITIAL SETUP
Installing the wireless unit
NOTE: The wireless unit is supplied as an optional accessory in some countries.
NOTICE: For the precautions for handling the wireless unit, refer to the instruction manual of the tool to be used with this adaptor.
Install the wireless units into the adaptor and tool as illustrated. When inserting the wireless unit, align the projections with the recessed portions on the slot.

- Adaptor
- Lid
- Wireless unit
- Projection
- Recessed portion
To remove the wireless unit, open the lid slowly. The hooks on the back of the lid will lift the wireless unit as you pull up the lid.

- Wireless unit
- Hook
- Lid
After removing the wireless unit, keep it in the supplied case or a static-free container.
NOTICE: Always use the hooks on the back of the lid when removing the wireless unit. If the hooks do not catch the wireless unit, close the lid completely and open it slowly again.
Installing the adaptor
NOTICE: Do not insert the adaptor's plug into the outlet of other appliances than the outlet of the vacuum cleaner for auto start/stop function.
Make sure that the stand-by switch on the vacuum cleaner is set to "O (OFF)".
Plug the vacuum cleaner's power cord into the mains and then plug the adaptor's cord into the cleaner's outlet.

NOTE: Due to the detecting method of vacuum cleaner's auto start/stop function, some vacuum cleaner may automatically run for a few seconds when;
- Plugging the adaptor's cord when the stand-by switch on the vacuum cleaner is set to "AUTO" or equivalent or;
- Changing the stand-by switch on the vacuum cleaner to "AUTO" or equivalent with the adaptor's plug connected to the outlet of the vacuum cleaner.
This is not a malfunction.
To prevent the adaptor from falling off, always secure it with the band or hook, or place it on a stable surface.
Use the band or hook for securing the adaptor onto the vacuum cleaner. To use the hook, loosen the clamping screw and extend the hook and then tighten the clamping screw.
When not using the adaptor, disconnect the adaptor's cord from the vacuum cleaner.

- Band
- Hook
- Clamping screw
Tool registration for the adaptor
To register a tool to the adaptor (wireless unit), follow the instructions in the instruction manual of the tool to be used with this adaptor. Refer to the section about "tool registration".
NOTE: In the tool's instruction manual, follow the instructions by substituting the wireless activation button/lamp "on the vacuum cleaner" with "on the adaptor".
NOTE: Make sure that the wireless unit is installed to the adaptor and the adaptor is plugged into the outlet of the vacuum cleaner before starting tool registration.
NOTE: The tool registration information is saved to the wireless unit inserted to the adaptor. You can use a pair of wireless units, of which the tool registration has been finished, with another tool and vacuum cleaner.
Channel setting
The suitable communication channel varies depending on the vacuum cleaner to be used with the adaptor. Perform the channel setting when;
- Using the adaptor for the first time or;
- Using another vacuum cleaner which have not been used with the adaptor.
NOTE: The last channel that you set will be saved even after you unplug the adaptor.
- Set the stand-by switch on the vacuum cleaner to "AUTO".

- Stand-by switch
NOTE: On some cleaners, the stand-by switch "AUTO" is described as an icon or different word. In this case, set the vacuum cleaner to auto start/stop function.
- Stand-by switch
- Confirm the number beside the lighted channel number indicator. It is the channel number currently being selected.

- Channel setting button
- Channel number indicator
- Push and hold the channel setting button for longer than 2 seconds for testing. The channel number indicator will blink in green for 15 seconds.

- Holding the channel setting button (2 seconds or longer)
- Channel number indicator blinks (for 15 seconds)
- Vacuum cleaner runs while the channel number indicator is blinking
- Check if the vacuum cleaner automatically runs correctly while the channel number indicator is blinking.
If so, the channel setting is completed. If the vacuum cleaner does not run or run incorrectly, go on to the next step.
NOTE: For example, when the vacuum cleaner runs incorrectly; the vacuum cleaner runs but stops soon or; the level of the suction power is different from the setting on the vacuum cleaner. - Push the channel setting button briefly to select another channel number.
- Hold the channel setting button for longer than 2 seconds for testing and check if the vacuum cleaner runs correctly.
If not, repeat the step 5 to 6 again.
If the vacuum cleaner does not run in any of the channel number, the vacuum cleaner may not be supported or there may be a problem in the configuration.


OPERATION
For the following operations, refer to the instruction manual of the tool to be used with this adaptor:
- Starting the wireless activation function
- Cancelling tool registration
NOTE: In the tool's instruction manual, follow the instructions by substituting the wireless activation button/lamp "on the vacuum cleaner" with "on the adaptor".
NOTE: Before performing the above operations, be sure to;
- Install the wireless unit to the adaptor and;
- Plug the adaptor into the outlet of the vacuum cleaner with the stand-by switch on the vacuum cleaner "O (OFF)".
NOTE: The wireless transmission distance varies depending on the vacuum cleaner model to be used.
Erasing all tool registrations
You can erase all tool registrations from the adaptor (wireless unit) as follows.
- Make sure that the stand-by switch on the vacuum cleaner is set to "O (OFF)" and then plug the vacuum cleaner's power cord into the mains.
- Install the wireless units to the adaptor.
- Plug the adaptor's cord into the cleaner's outlet.
- Set the stand-by switch on the vacuum cleaner to "AUTO".
NOTE: On some cleaners, the stand-by switch "AUTO" is described as an icon or different word. In this case, set the vacuum cleaner to auto start/stop function. - Hold down the wireless activation button on the adaptor for about 6 seconds until the wireless activation lamp blinks in red (about twice per one second).
- When the wireless activation lamp starts blinking in red, release your finger from the wireless activation button. Thereafter, hold down the wireless activation button again for about 6 seconds.
- When the wireless activation lamp starts blinking fast (about 5 times per one second) in red, release your finger from the wireless activation button. When the wireless activation lamp lights up in red and later lights off, all tool registrations are erased.
NOTE: If the wireless activation lamp does not blink in red, press the wireless activation button briefly and try again.
Description of the lamp status
Refer to the below table for the meaning of the lamp status.

- Wireless activation lamp
- Channel number indicator
- Caution lamp
| Lamp | Status | Color |  On |  Blinking | Duration | Description |
| Wireless activation lamp | Standby | Blue |  | Adaptor: continuing Tool: 2 hours | Waiting for the tool registration or the wireless activation function is available. The lamp on the adaptor blinks when the stand-by switch on the vacuum cleaner is set to "AUTO" or equivalent. The lamp on the tool blinks when the wireless activation button is pushed. The lamp on the tool will automatically turn off when no operation is performed for 2 hours. | |
 | When the tool is running. | The wireless activation of the vacuum cleaner is available and the tool is running. | ||||
| Tool registration | Green |  | 20 seconds | Ready for the tool registration. Searching the tool to be registered. | ||
| | 2 seconds | The tool registration has been finished. The wireless activation lamp will start blinking in blue. | ||||
| Cancelling/ erasing tool registration | Red |
(slow: 2 times/sec.) | 20 seconds | Ready for the cancellation of the tool registration. Searching the tool to be cancelled. | ||
|
(fast: 5 times/sec.) | When the wireless activation button is pressed down. | Ready to erase all tool registrations. | ||||
| | 2 seconds | The tool registration has been cancelled/erased. The wireless activation lamp will start blinking in blue. | ||||
| Others | Red | | 3 seconds | The power is supplied to the wireless unit and the wireless activation function is starting up. | ||
| Off | - | - | The stand-by switch on the vacuum cleaner is not set to "AUTO" or equivalent. | |||
| Channel number indicator | Channel number selection | Green |  | Continuing | The lighted channel number is selected. | |
| Testing | Green | | 15 seconds | The adaptor is testing the communication to the vacuum cleaner through the selected channel number. | ||
| Caution lamp | Overheated or other trouble | Red | | Continuing | The adaptor is overheated or in other trouble. Unplug the adaptor from the vacuum cleaner. Clean the vents on the adaptor and cool it down for a while and then check if it works properly. If the adaptor does not work properly, contact our authorized service center for repairs. | |
Troubleshooting for wireless activation function
Before starting the troubleshooting, check following:
- The wireless unit is installed into the adaptor.
- The adaptor is plugged into the outlet of the vacuum cleaner.
Conduct your own inspection first before asking for repairs. Also refer to the troubleshooting section of tool's instruction manual.
If you find a problem that is not explained in the manual, do not attempt to dismantle the tool. Instead, ask Makita Authorized Service Centers, always using Makita replacement parts for repairs.
| State of abnormality | Probable cause (malfunction) | Remedy |
Cannot finish tool registration / cancelling tool registration successfully | The tool registration procedures for the tool or adaptor has not been finished. | Perform the tool registration procedures for both the tool and the adaptor at the same timing. |
| The vacuum cleaner does not run along with the switch operation of the tool. | The wireless activation button on the tool has not been pushed. | Push the wireless activation button briefly and make sure that the wireless activation lamp is blinking in blue. |
| The stand-by switch on the vacuum cleaner is not set to "AUTO". | Set the stand-by switch on the vacuum cleaner to "AUTO". | |
| The tool and adaptor is away from each other (out of the transmission range). | Get the tool and adaptor closer each other. The maximum transmission distance is approximately 10 m however it may vary according to the circumstances. | |
| Incorrect channel setting | The current channel setting is not appropriate for the vacuum cleaner being used. Refer to "Channel setting" for how to configure. | |
| Using a vacuum cleaner which is not supported. | Use a Makita cleaner with auto start/stop function. | |
| More than 10 tools are registered to the adaptor. | Perform the tool registration again. If more than 10 tools are registered to the adaptor, the tool registered earliest will be cancelled automatically. | |
| The adaptor erased all tool registrations. | Perform the tool registration again. | |
Cannot erase all tool registrations | Pressing the wireless activation button on the tool. | Press the wireless activation button on the adaptor for erasing all tool registrations. |
| The stand-by switch on the vacuum cleaner is not set to "AUTO". | Set the stand-by switch on the vacuum cleaner to "AUTO". | |
| The wireless activation button is not held down correctly. | Hold down the wireless activation button for more than 6 seconds and then release it when the wireless activation lamp blinks in red. Hold down the wireless activation button for more than 6 seconds again until the wireless activation button rapidly blinks in red and then release the button. | |
The vacuum cleaner automatically runs when;
| The detecting method of vacuum cleaner's auto start/stop function. | If the vacuum cleaner stops running in a few seconds, you can use the wireless activation function as usual. If the vacuum cleaner continues to run for 20 seconds or longer, and you can stop it by unplugging the adaptor, the malfunction of the adaptor can be thought. Contact our authorized service center. |
NOTE: On some cleaners, the stand-by switch "AUTO" is described as an icon or different word. In this case, set the vacuum cleaner to auto start/stop function.
MAINTENANCE

Always be sure that the adaptor is unplugged before attempting to perform inspection or maintenance.
NOTICE: Never use gasoline, benzine, thinner, alcohol or the like. Discoloration, deformation or cracks may result.
To maintain product SAFETY and RELIABILITY, repairs, any other maintenance or adjustment should be performed by Makita Authorized or Factory Service Centers, always using Makita replacement parts.
OPTIONAL ACCESSORIES
These accessories or attachments are recommended for use with your Makita tool specified in this manual. The use of any other accessories or attachments might present a risk of injury to persons. Only use accessory or attachment for its stated purpose.
If you need any assistance for more details regarding these accessories, ask your local Makita Service Center.
- Wireless unit
NOTE: Some items in the list may be included in the tool package as standard accessories. They may differ from country to country.
SAFETY WARNINGS
NOTE: The wireless unit adaptor is hereinafter referred to as "adaptor" in this instruction manual.


Be sure to thoroughly read and understand this instruction manual as well as the instruction manuals of the vacuum cleaner, tool, and wireless unit to be used with this product.
Failure to follow the warnings and instructions may result in electric shock, fire and/or serious injury.
Important safety instructions for the adaptor and wireless unit
- Do not disassemble or tamper with the wireless unit and the adaptor.
- Keep the wireless unit and adaptor away from young children. If the wireless unit is accidentally swallowed, seek medical attention immediately.
- Use the wireless unit only with Makita tools.
![shock hazard]() Never handle the adaptor with wet hands. Doing so may cause electric shock.
Never handle the adaptor with wet hands. Doing so may cause electric shock.- Do not block the vents on the adaptor.
- Do not use the adaptor's cord for carrying and unplugging.
![shock hazard]() Do not expose the wireless unit and the adaptor to rain or wet conditions. Liquid come inside the appliance may cause malfunction and/or electric shock.
Do not expose the wireless unit and the adaptor to rain or wet conditions. Liquid come inside the appliance may cause malfunction and/or electric shock.- Do not use the wireless unit in places where the temperature exceeds 50°C (122°F).
- Do not operate the wireless unit in places where medical instruments, such as heart pace makers are near by.
- Do not operate the wireless unit in places where automated devices are near by. If operated, automated devices may develop malfunction or error.
- Do not operate the wireless unit in places under high temperature or places where static electricity or electrical noise could be generated.
- The wireless unit can produce electromagnetic fields (EMF) but they are not harmful to the user.
- The wireless unit is an accurate instrument. Be careful not to drop or strike the wireless unit.
- Avoid touching the terminal of the wireless unit with bare hands or metallic materials.
- Always remove the battery on the product when installing the wireless unit into it.
- When opening the lid of the slot, avoid the place where dust and water may come into the slot. Always keep the inlet of the slot clean.
- Always insert the wireless unit in the correct direction.
- Do not press the wireless activation button on the wireless unit too hard and/or press the button with an object with a sharp edge.
- Always close the lid of the slot when operating.
- Do not remove the wireless unit from the slot while the power is being supplied. Doing so may cause a malfunction of the wireless unit.
- Do not remove the sticker on the wireless unit.
- Do not put any sticker on the wireless unit.
- Do not leave the wireless unit in a place where static electricity or electrical noise could be generated.
- Do not leave the wireless unit and the adaptor in a place subject to high heat, such as a car sitting in the sun.
- Do not leave the wireless unit and the adaptor in a dusty or powdery place or in a place corrosive gas could be generated.
- Sudden change of the temperature may bedew the wireless unit. Do not use the wireless unit until the dew is completely dried.
- When cleaning the wireless unit, gently wipe with a dry soft cloth. Do not use benzine, thinner, conductive grease or the like.
- When storing the wireless unit, keep it in the supplied case or a static-free container.
- Do not insert any devices other than Makita wireless unit into the slot on the adaptor and the tool.
- Do not use the tool and/or adaptor with the lid of the slot damaged. Water, dust, and dirt come into the slot may cause malfunction.
- Do not pull and/or twist the lid of the slot more than necessary. Restore the lid if it comes off.
- Replace the lid of the slot if it is lost or damaged.
 Never handle the adaptor with wet hands. Doing so may cause electric shock.
SAVE THESE INSTRUCTIONS.

Documents / ResourcesDownload manual
Here you can download full pdf version of manual, it may contain additional safety instructions, warranty information, FCC rules, etc.
Advertisement


Need help?
Do you have a question about the WUT02 and is the answer not in the manual?
Questions and answers