KitchenAid KCM1209 - 12 Cup Drip Coffee Maker with Spiral Showerhead Manual
- Manual (49 pages) ,
- Get started (6 pages) ,
- Manual (49 pages)
Advertisement
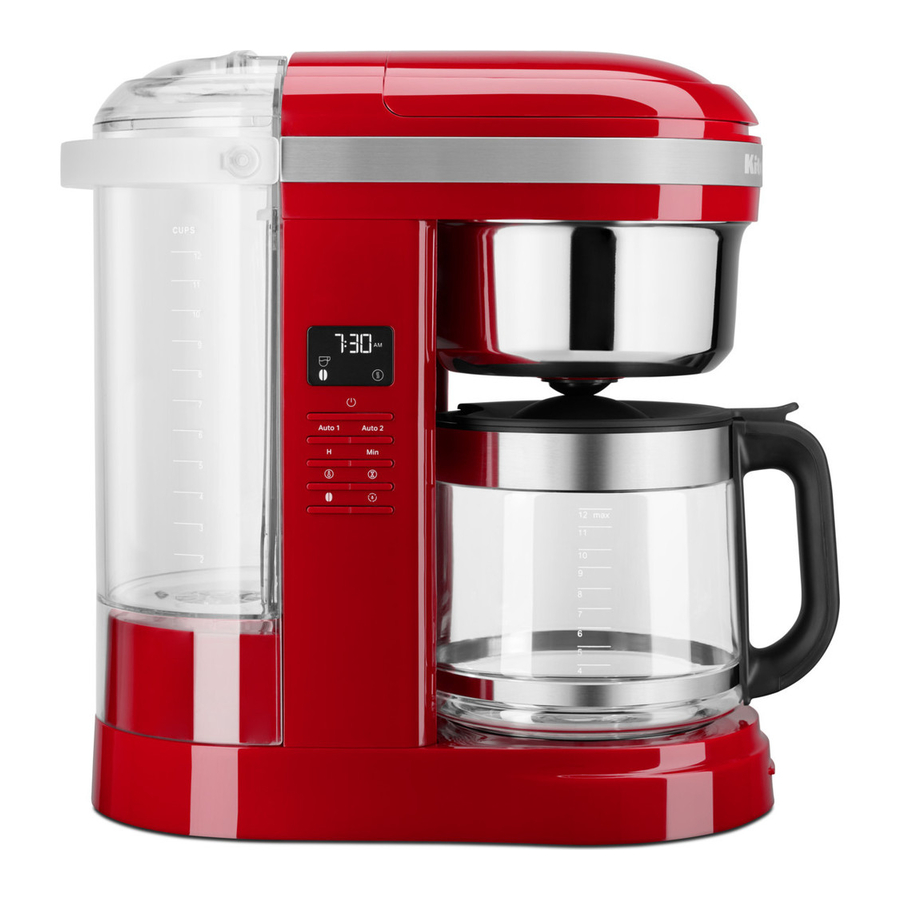
PARTS AND FEATURES

- Dosage Ladder
- Gold Tone Filter
- Brew Basket Lid
- Showerhead
- Carafe Lid
- Carafe Handle
- Glass Carafe
- Brew/Cancel Button
- Warming Plate
- Cord Storage in Base (not shown)
- Water Tank
- Water Tank Handle
- Water Tank Lid
- Brew Basket
- A.M./P.M. Indicator
- Auto 1 or 2 Icon
- High Plate Temperature
- Low Plate Temperature
- Control Panel
- Clean Icon
- Bold Icon
- Remaining Keep Warm Time Icon
- Brew Icon
- Clock
- Programmable Display
 NOTE: Default measurement for 1 cup = approximately 5 oz (147 ml).
GETTING STARTED
SETTING THE CLOCK
NOTE: When the Coffee Maker is first plugged in or when power is restored after an interruption, the display will initially show 12:00 A.M.

Electrical Shock Hazard
Plug into a grounded 3 prong outlet.
Do not remove ground prong.
Do not use an adapter.
Do not use an extension cord.
Failure to follow these instructions can result in death, fire, or electrical shock.
- Cord is stored in the base. If needed, gently pull cord outwards. Plug into grounded 3 prong outlet.

- Press Hour to set the hour. The hour digits will change with each press; or press and hold to scroll rapidly.

- Press Minute to set the minutes. To save the current displayed time and exit clock set-up: Press any other button or do not press any button for 10 seconds.


PRODUCT USAGE
SETTING BREW STRENGTH
To switch between Regular and Bold brew strengths: Press the Bold button.

NOTE: Regular is the default setting.
 TIP: While brewing small batches (2-4 cups), using the "Bold Setting" is recommended.
FILLING WATER FOR BREWING
TIP: Brew 2 Carafe of fresh, cool water and discard before brewing the first Carafe of coffee.
- Pour fresh water in the Water Tank. Use the level markings. Then, close the lid properly.

OR
Lift the Water Tank up gently. Pour fresh water in the Water Tank. Place the Water Tank back in position properly.

![warning]() NOTE: Fill the Water Tank with only the amount of water needed to brew your desired number of cups. If you put in 12 cups of water, the Coffee Maker will brew all 12 cups.
NOTE: Fill the Water Tank with only the amount of water needed to brew your desired number of cups. If you put in 12 cups of water, the Coffee Maker will brew all 12 cups. - Place the Carafe in the Coffee Maker. Make sure the Carafe lid is in place and bottom of the Carafe is fully seated.


ASSEMBLY OF BREW BASKET
- Raise the Brew Basket lid and remove the Brew Basket.

- Insert the Gold Tone Permanent Filter or Cone Paper Filter into the Brew Basket.

![information]() TIP: The coffee filter can also be inserted and coffee grounds added with or without removing the Brew Basket from the Coffee Maker.
TIP: The coffee filter can also be inserted and coffee grounds added with or without removing the Brew Basket from the Coffee Maker.
![]()
Do not use both types of filters at the same time. Using both filters might cause water and coffee to overflow the brew basket. - Gold Tone Permanent Filter: Add coffee grounds. Use the "Dosage Ladder". For example: If you need 8 cups of Brew Coffee, then add coffee grounds till 8 cups scale level.

OR
Cone Paper Coffee Filter: Add desired coffee grounds. Use the "Coffee Dosage Chart" on the back of the Water Tank as a guide for how much coffee grounds to use. Pre-wetting the paper is not required.

- Place the basket into the Coffee Maker and rotate the handle toward the front of the Coffee Maker to lock the brew basket in place. Be sure the brew basket lid is fully closed before brewing.


NOTE: Use a medium grind appropriate for automatic drip Coffee Makers. Too fine a grind will produce bitterness and may clog the coffee filter.
NOTE: Do not operate the Coffee Maker without the brew basket in place.
PROGRAMMING THE AUTO SET FEATURE

Set the correct time as per the instructions in "Setting the clock" before using the Auto Set feature.
- Press the Auto Set 1 or Auto Set 2 button one time. The Auto 1 or 2 indicator light will flash and the time display will change to the currently set Auto Set time (12:00 A.M is the default time).
To set the time the Coffee Maker should begin brewing: Press the Hour button to set hour. The hour digits will change with each press; or press and hold to scroll rapidly.

- Next, press the Minute button to set minute. The hour setting will stay solid and the minute setting will begin to blink.
To save the Auto set time and exit set-up: Press any other button or do not press any button for 10 seconds. The Auto 1 or 2 indicator will remain lit and the time display will go back to the current time.


TIP: To cancel the Auto Set 1 or 2 time after programming is complete: Press Auto Set 1 or Auto Set 2 button again; or press the Brew/Cancel button.
NOTE: Default standard brewing cycle time for a full Carafe (12 cups) is approximately 10-minutes.
USING THE PREVIOUSLY PROGRAMMED AUTO SET TIME
These steps can be followed to save the Auto Set time after following the steps in the "Programming the Auto Set feature" section.
- Press the Auto Set 1 or Auto Set 2 button. The Auto indicator will flash and the time display will show the previously set Auto time.

- To save the current displayed time and exit Auto Set: Wait for 10 seconds, or press any button (Clean, Bold or Brew). The Auto indicator will remain lit and the time display will go back to the current time.


SETTING THE PLATE TEMPERATURE AND TIMER FEATURE
NOTE: Default Plate temperature for Coffee Maker is set at High Temperature.(icon)
- Plate Temperature: Press Plate Temp button. By each press you can select between Low Plate temperature or High Plate temperature. Press Plate Timer button to set time for Plate Temperature.
The display will show Keep Warm Time with icon.

- Press the Hour button.
Next, press the Minute button. The Hour setting will stay solid and the Minute setting will begin to blink. The minute digits will change with each press by 0 or 30 minutes.
To save the current displayed time and exit Keep Warm setup: Press any other button (Auto Set1, Auto Set 2, Plate Temp, Plate Timer, Bold, Clean or Brew); or do not press any button for 10 seconds.


You can select time for Plate temperature from 0:00 to maximum 4:00 hours.
NOTE: Heating the brewed coffee for more time adds bitterness to the coffee taste. It is advised to consume brewed coffee as early after brewing cycle completes.
BREWING COFFEE
TIP: Brew 2 Carafe of fresh, cool water and discard before brewing the first Carafe of coffee.
- Press any of the Brew/Cancel buttons provided on side or on front to begin brewing coffee. The Coffee Maker will beep and "Brew" icon will light up in the display.

- The Coffee Maker will beep 3 times when the Brew cycle is complete. Then, 30 minutes Warm mode will start.

![warning]() NOTE: Default Standard Brewing cycle time for a full pot (12 cups) is approximately 10-minutes. Allow the Coffee Maker to cool for 5 minutes before starting the next brew cycle.
NOTE: Default Standard Brewing cycle time for a full pot (12 cups) is approximately 10-minutes. Allow the Coffee Maker to cool for 5 minutes before starting the next brew cycle. - After Warm mode end, the Coffee Maker will automatically turn off. To Cancel the Brew cycle or Warm mode, press the Brew/Cancel button once.


NOTE: Opening the brew basket while coffee is brewing will interrupt the brew process and impair flavor.
PAUSE AND POUR FEATURE
The "Pause and Pour" feature enables you to remove the Carafe and pour a cup of coffee before brewing is finished. When the Carafe is removed, a special valve stops the flow of coffee from the Brew Basket. However, brewing does not stop.
Make sure to place the Carafe back in the place within 25 seconds to avoid the overflow of the water and coffee grounds from the Brew Basket.
CARE AND CLEANING
CLEANING THE COFFEE MAKER
NOTE: Unplug and allow the Coffee Maker to cool down before cleaning.
- Dishwasher-safe parts, top rack only: Brew Basket and Gold Tone Permanent Filter. Wipe the Showerhead with a damp cloth to remove any coffee splashes.

- Wash by hand in warm and soapy water. Dry thoroughly: Carafe and Water Tank.


REMOVING MINERAL DEPOSITS
Mineral deposits (scale) from water will build up in the Coffee Maker over the time and impair brewing efficiency and coffee quality. The "Clean" indicator will flash in display after completing 100 brew cycles. Then, it is time to descale the Coffee Maker.
NOTE: The Coffee Maker can be descaled using a vinegar and water solution, or by using a packaged descaling agent, like affresh. Always mix the descaling solution using cool water.
- Empty the Brew Basket.

- Fill the Water Tank with 1.4 L (6 cup) vinegar and 1.4 L (6 cup) cool water.

- Press "Clean" button. Then press the Brew/Cancel button to begin the Clean cycle.
After the Clean cycle ends (approximately 30 minutes), 3 beeps will sound, and the "Clean" indicator will turn off.

- Run at least 2 fresh, cool water-only cycles after the Clean cycle is complete.


NOTE: The Coffee Maker should be run through a complete Clean cycle using a full Water Tank of the descaling solution.
TROUBLESHOOTING
Electrical Shock
Hazard Plug into a grounded 3 prong outlet.
Do not remove ground prong.
Do not use an adapter.
Do not use an extension cord.
Failure to follow these instructions can result in death, fire, or electrical shock.
| Problem | Solution | ||
| If the display is not illuminated: | Check if the Coffee Maker is plugged into a grounded 3 prong outlet. If it is, check the fuse or circuit breaker on the electrical circuit the Coffee Maker is connected to and make sure the circuit is closed. | ||
| If only a portion of the water added to the Coffee Maker actually brews: | The Coffee Maker requires immediate descaling. Please refer to the "Care and Cleaning" section. | ||
| Coffee Maker takes longer than usual to brew: | |||
| If you hear 3 rapid tones: | There is no water in the Water Tank. See the "Filling water for brewing" section. | ||
| If "Er1" flashes on the display and you hear 1 tone: | A button may be jammed. Unplug and press each button several times. Plug the Coffee Maker. If "Er1" appears again on the display, repeat this procedure. | ||
| If coffee overflows the Brew Basket: | The Brew Basket is not correctly in place. See the "Assembly Of Brew Basket" section. | ||
| Too much coffee ground was placed into the Brew Basket. | |||
| Used both Gold Tone Filter and Paper Filter together. | |||
| If water exits from the back of the Coffee Maker: | Too much water was poured into the Water Tank. | ||
NOTE: Do not return the Coffee Maker to the retailer. Retailers do not provide service.
PRODUCT SAFETY
Your safety and the safety of others are very important.
We have provided many important safety messages in this manual and on your appliance. Always read and obey all safety messages.
This is the safety alert symbol.
This symbol alerts you to potential hazards that can kill or hurt you and others.
All safety messages will follow the safety alert symbol and either the word "DANGER" or "WARNING."
These words mean:

You can be killed or seriously injured if you don't immediately follow instructions.

You can be killed or seriously injured if you don't follow instructions.
All safety messages will tell you what the potential hazard is, tell you how to reduce the chance of injury, and tell you what can happen if the instructions are not followed.
IMPORTANT SAFEGUARDS
When using electrical appliances, basic safety precautions should always be followed, including the following:
- Read all instructions.
- Do not touch hot surfaces. Use handles or knobs.
- Do not operate any appliance with a damaged cord or plug or after the appliance malfunctions, or is dropped or damaged in any manner. Contact the manufacturer at their customer service telephone number for information on examination, repair, or adjustment.
- To protect against fire, electric shock and injury to persons do not immerse appliance in water or other liquid.
- Unplug from outlet when not in use and before cleaning. Allow to cool before putting on or taking off parts, and before cleaning the appliance.
- Close supervision is necessary when any appliance is used by or near children.
- Do not let cord hang over the edge of table or counter or touch hot surfaces.
- Do not place on or near a hot gas or electric burner, or in a heated oven.
- The use of attachments not recommended or sold by KitchenAid may cause fire, electrical shock, or injury.
- This appliance is not intended for use by children or by persons with reduced physical, sensory, or mental capabilities, or lack of experience and knowledge. Close supervision is necessary when any appliance is used near children. Children should be supervised to ensure that they do not play with the appliance.
- Do not use the appliance outdoors.
- Do not use appliance for other than intended use.
- Do not use appliance without lid properly placed on carafe.
- The carafe is designed for use with this appliance. It must never be used on a range top or in a microwave oven.
- Do not set a hot carafe on a wet or cold surface.
- To disconnect, turn any control to "off," then remove plug from wall outlet.
- Scalding may occur if the lid is removed during the brewing cycles.
- Do not use a cracked carafe or a carafe having a loose or weakened handle.
- Do not clean carafe with abrasive cleaners, steel wool pads, or other abrasive material.
- Do not fill the water tank above the marked maximum fill line. Do not overfill Glass Carafe. If the Glass Carafe is overfilled, brewed coffee may be ejected.
- This appliance is intended to be used in household and similar applications such as:
- staff kitchen areas in shops, farmhouses, offices, or other working environments;
- farmhouses;
- by clients in hotels, motels and other residential type environments;
- bed and breakfast type environments.
- Refer to the "Care and Cleaning" section for instructions on cleaning the surfaces in contact with food.
- If the supply cord is damaged, it must be replaced by the manufacturer, its service agent or similarly qualified persons in order to avoid a hazard.
- The heating element surface is subject to residual heat after use. Do not touch hot surface. Use handles.
SAVE THESE INSTRUCTIONS
This product is designed for household use only.
ELECTRICAL REQUIREMENTS
Electrical Shock Hazard
Plug into a grounded 3 prong outlet.
Do not remove ground prong.
Do not use an adapter.
Do not use an extension cord.
Failure to follow these instructions can result in death, fire, or electrical shock.
Voltage: 120 VAC
Frequency: 60 Hz
Wattage: 1100 W
NOTE: If the plug does not fit in the outlet, contact a qualified electrician. Do not modify the plug in any way. Do not use an adapter.
Do not use an extension cord. If the power supply cord is too short, have a qualified electrician or service technician to install an outlet near the appliance.
The cord should be arranged so that it will not drape over the countertop or tabletop where it can be pulled on by children or tripped over unintentionally.

Documents / ResourcesDownload manual
Here you can download full pdf version of manual, it may contain additional safety instructions, warranty information, FCC rules, etc.
Download KitchenAid KCM1209 - 12 Cup Drip Coffee Maker with Spiral Showerhead Manual
Advertisement
Thank you! Your question has been received!


Need Assistance?
Do you have a question about the KCM1209 that isn't answered in the manual? Leave your question here.