KitchenAid KCGD500GSS - 30" 4 Burner Gas Downdraft Cooktop Manual
- Use and care manual (12 pages) ,
- Owner's manual (31 pages) ,
- Use and care manual (24 pages)
Advertisement
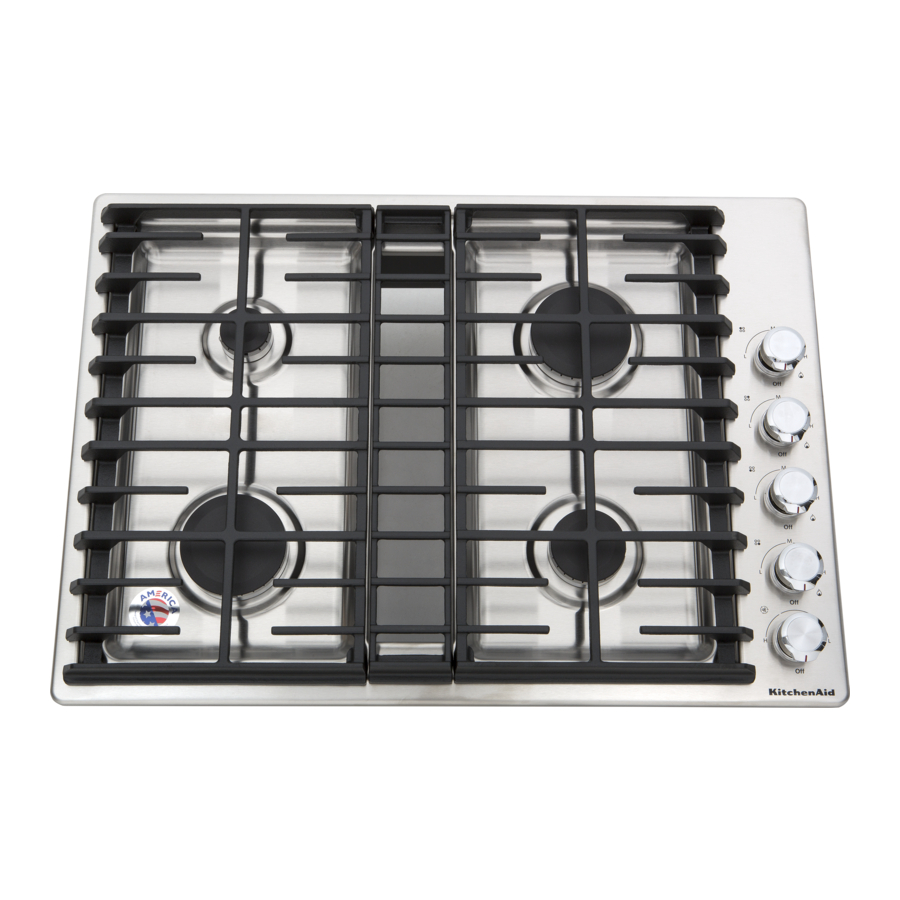
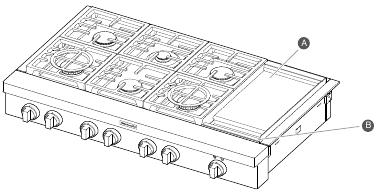
PARTS AND FEATURES
These instructions cover several different models. The cooktop you have purchased may have some or all of the items listed. The locations and appearances of the features shown here may not match those of your model.
COOKTOP

- Cooktop grate
- Electric griddle (on some models)
- Drip tray (on griddle models)
- Console panel
- Cooktop knobs
*Cooktop configuration may differ.
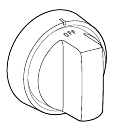
CONTROL KNOBS
The cooktop features are accessed through the cooktop knobs.
30" (76.2 CM)
Cooktop Knobs

- Left Rear Knob
- Left Front Knob
- Right Rear Knob
- Right Front Knob
NOTE: Cooktop configuration, features, and controls may differ.
36" (91.4 CM)
Cooktop Knobs

- Left Rear Knob
- Left Front Knob
- Center Rear Knob
- Center Front Knob
- Right Rear Knob
- Right Front Knob
NOTE: Cooktop configuration, features, and controls may differ.
48" (121.9 CM)
Cooktop Knobs and Indicator Lights

- Left Rear Knob
- Left Front Knob
- Center Rear Knob
- Center Front Knob
- Right Rear Knob
- Right Front Knob
- Griddle Knob
- Griddle Preheat Light
- Griddle Cooktop ON Light
NOTE: Cooktop configuration, features, and controls may differ.
COOKTOP FEATURES
BURNERS

Fire Hazard
Do not let the burner flame extend beyond the edge of the pan.
Turn off all controls when not cooking.
Failure to follow these instructions can result in death or fire.
| BTU/hr | BURNER APPEARANCE | FEATURES |
| Large stacked burner |  | This burner has an upper and lower level of flame. The H setting uses both flame levels at full power to provide the highest heat. It is ideal for cooking large quantities of food or liquid and using large pots and pans. The Simmer H and L settings use the lower flame only. |
| Large burner |  | This burner is ideal for cooking large quantities of food. |
| Small burner |  | This burner is ideal for cooking smaller quantities of food and melting chocolate or butter. |
Igniting Burners:
- Electric igniters automatically light the surface burners when burner knobs are turned to
![]() .
. - Before setting a burner knob, place filled cookware on the grate. Do not operate a burner using empty cookware or without any cookware on the grate.
- Visually check that the burner has lit. If the burner does not ignite, listen for the clicking sound. If you do not hear the igniter click, turn off the burner. Check for a tripped circuit breaker or blown fuse. Check that the burner knob is pressed completely down on the valve shaft. If the spark igniter still does not operate, call a trained repair specialist.
- When the burner knob for the desired burner is turned to the
![]() position, the burner will click independent of the other burners.
position, the burner will click independent of the other burners.
REMEMBER: When cooktop is in use, the entire cooktop area may become hot.
Reignition Feature
During cooktop use, if one or more burners are extinguished due to external causes (such as a water spill, wind, or ventilation draft), the ignition system will turn on to reignite the flame. When the flame comes back on, the system will stop sparking. If the draft in the room is not removed, occasional sparking may continue. Sparking may also occasionally occur when using the low setting on a burner.
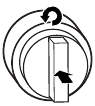
To Set a Burner:
- Push in and turn counterclockwise
![]()
- Turn knob counterclockwise between H and L.
![]()
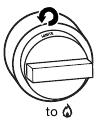

Turn knob counterclockwise further for Simmer H and Simmer L.
In Case of Power Failure
Hold a lit match near a burner and turn knob counterclockwise to H. After burner lights, turn knob to desired setting.
SEALED SURFACE BURNERS
Sealed surface burners are designed to minimize gaps and seams that can allow liquids and spills to get under the cooktop. This design makes cleanup quick and easy.
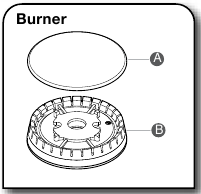
- Burner cap
- Burner base

Do not obstruct the flow of combustion and ventilation air around the burner grate edges.
Burner cap: Always keep the burner cap in place when using a surface burner. A clean burner cap will help avoid poor ignition and uneven flames. Always clean the burner cap after a spillover, and routinely remove and clean the caps according to the "Care and Cleaning" section.
Gas opening: Gas must flow freely throughout the gas opening for the burner to light properly. Keep this area free of soil and do not allow spills, food, cleaning agents, or any other material to enter the gas opening. Keep spillovers out of the gas opening by always using a burner cap.
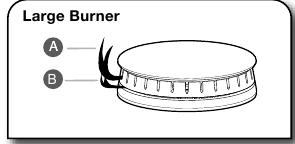
- Upper(main) flame
- Lower (sim mer) flame
Burner Ports:
Check burner flames occasionally for proper size and shape as shown above. A good flame is blue in color, not yellow. Keep this area free of soil and do not allow spills, food, cleaning agents, or any other material to enter the burner ports.
WOK RING GRATES
Some grates on the unit are designed for use with a wok. These grates can be used over the high power burners (LF or RF) or can be used for improved melting performance when used with the small, low power burners (RR or CR).
To use for wok cooking, place the grates with the removable ring over the LF or RF burner, remove the center ring and set it aside. A 14" (35.5 cm) or larger wok pan will rest in the opening of the grate for optimum cooking with your wok.
To use for improved melting performance, place the grates with the removable ring over the small, low power burner. Turn the center ring upside down and reposition it in the center of the grate so the pan will be farther away from the heat source.
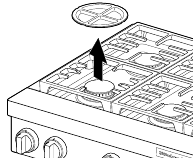
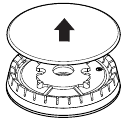
To Use:
- Remove inner ring.
![]()
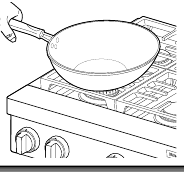
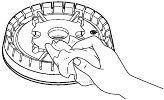
- Place wok on the grate.
![]()
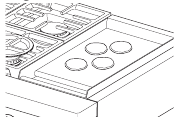
CHROME ELECTRIC GRIDDLE (on some models)
The chrome electric griddle provides the perfect cooking surface for grilled sandwiches, pancakes, eggs, burgers, sautéed vegetables, and many more family favorites. The attractive low-stick surface is designed to make cleanup easy.
- Griddle
- Drip tray
The chrome electric griddle system provides a convenient cooking surface.
- Be sure plastic film has been removed and wash with hot water before first use.
- To avoid scratching the griddle, do not place any pots or pans on the griddle. Use only heat-resistant plastic or wooden utensils.
- The griddle surface is ready to use and does not need to be seasoned.
- Pouring cold water on a hot griddle may warp the griddle, resulting in an uneven cooking surface.
To Use:
To use for improved melting performance, place the grates with the removable ring over the small, low power burner. Turn the center ring upside down and reposition it in the center of the grate so the pan will be farther away from the heat source.
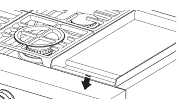
To Use:
- Position drip tray.
![]()
- Push in and turn knob to desired temperature
![]()
- Wait for preheat light to solid indicating the griddle has reached preheat.
- Place food on the griddle and cook to desired doneness.
![]()
COOKTOP FEATURES
The right griddle indicator light shows that there is power applied to the griddle.
The left griddle indicator light blinks to show that the griddle is preheating. When preheat is complete, the left griddle indicator lights solid.
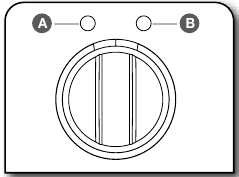
- Griddle Preheat Light
- Griddle Cooktop ON Light
Cooking Chart
The settings and times are guidelines only and may need to be adjusted for individual tastes.
| FOOD ITEM | TEMPERATURE | COOK TIME (IN MINUTES) |
| Toast/Pancakes | 350ºF (175ºC) | 4-10 |
| Eggs | 250ºF (120ºC) | 7-10 |
| Meats | 350ºF (175ºC) | 10-20 |
| Potatoes | 350-450ºF (175-230ºC) | 10-20 |
| Fish | 250-350ºF (120-175ºC) | 8-15 |
USING YOUR COOKTOP
LIGHT INDICATORS, BEHAVIORS AND CONTROLS
The indicator lights illuminate and blink to show the status of the unit.
| FUNCTION | USE AND LIGHT BEHAVIOR |
| Griddle Power Indicator Light (on 48" models only) | Solid Blue Light The griddle power indicator light illuminates blue when the griddle is powered on. |
| Griddle Preheat Light (on 48" models only) | Blinking Blue Light The griddle preheat light flashes blue while the griddle is preheating. Once preheat temperature has been reached, the indicator light turns solid blue. |
CARE AND CLEANING
COOKTOP SURFACE
- Before cleaning, make sure all cooktop knobs are OFF and the oven and cooktop are cool. Do not use oven cleaners, bleach, or rust removers.
- Soap, water, and a soft cloth or sponge are suggested first. Affresh ® Cooktop Cleaner or affresh ® Cooktop Cleaning Wipes can also be used.
After Each Use:
- Wipe off cooktop, grates, and caps.

- Clean food spills.
![]()

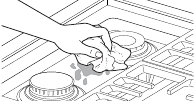
To preserve the finish, clean food spills containing acids, such as vinegar and tomato, as soon as the entire appliance is cool.
SEALED SURFACE BURNERS
- Remove burner cap.
![]()
- Clean gas opening with damp cloth.
![]()
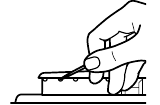
- Clean clogged burner ports.
![]()
Use a straight pin. Do not enlarge or distort the port. Do not use a wooden toothpick. If the burner needs to be adjusted, contact a trained repair specialist. - Replace burner cap.

- Incorrect
- Correct
- Turn on burner.
![]()
If the burner does not light, check cap alignment. If the burner still does not light, do not service the sealed burner yourself. Contact a trained repair specialist.


PORCELAIN-COATED GRATES AND CAPS
Use scrub and cleanser.

Clean with a nonabrasive nylon scrub pad and mildly abrasive cleanser.
Know Your Grates and Caps
- Food spills containing acids, such as vinegar and tomato, should be cleaned as soon as the cooktop, grates, and caps are cool. These spills may affect the finish.
- To avoid chipping, do not bang grates and caps against each other or hard surfaces such as cast iron cookware.
- Do not reassemble caps on burners while wet.
- Do not clean in the Self-Cleaning cycle.
- Grates and caps are dishwasher safe.
GRIDDLE
Tips:
- Prior to cleaning the griddle, make sure that all cooktop burners and oven controls have been turned off.
- For best results, clean the griddle shortly after removing the food.
Do Not Use:
- Soap
- Abrasive materials
- Cleaning materials, including stainless steel cleaner
- Turn knob to 300°F (149°C) to preheat.
![]()
Wait until preheat is complete before cleaning. - Pour water on soiled area.

Using a measuring cup, pour up to 1 cup (236.6 mL) tap water over the soiled area. Start at the back, allowing the water to run toward the drip tray in the front. Allow the water to bubble on the griddle for 3–4 seconds. - Scrape residue into drip tray.

Use a pad holder or wooden spoon with a non-abrasive pad or cloth. Use pressure on soiled areas. Repeat if needed for heavy soils. - Remove remaining residue.

Fold a damp towel and, with the pad holder or wooden spoon, go over the griddle to remove remaining residue. - Turn off griddle and let cool.
![]()
- Wipe off griddle.

Once cool, wipe the griddle with a clean, damp terry cloth towel. Then buff with a microfiber cloth. If streaking, rainbowing, or ghosting occurs, use a mixture of 1 part white vinegar to 2 parts water on a towel to wipe the griddle. - Remove, empty, and clean drip tray.

Clean the drip tray with warm, soapy water. Wipe the area under the drip tray clean. Once dry, put the drip tray back in position.


COOKTOP CONTROLS
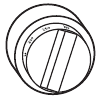
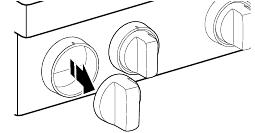
- Remove knobs.
![]()
- Clean with warm, soapy water.


Know Your Cooktop Controls
- To avoid damage to the cooktop controls, do not use steel wool, abrasive cleansers, or an oven cleaner.
- To avoid damage, do not soak knobs.
- When replacing knobs, make sure knobs are in the Off position.
- When replacing knobs after cleaning either the surface burner controls or the griddle module control, make sure the knobs are replaced to the correct location. See the "Knob Variations" section for reference.
STAINLESS STEEL EXTERIOR
Use cleaner or wipes.

Use affresh® Stainless Steel Cleaning Spray, affresh® Stainless Steel Cleaning Mousse or affresh® Stainless Steel Cleaning Wipes (not included). Rub in direction of the grain to avoid possible damage to the steel surface.
Do Not Use:
- Soap-filled scouring pads
- Abrasive cleaners
- Cooktop polishing creme
- Steel-wool pads
- Gritty washcloths
- Abrasive paper towels
TROUBLESHOOTING
First try the solutions suggested here. If you need further assistance or more recommendations that may help you avoid a service call, refer to the "Warranty" or visit https://kitchenaid.com. In Canada, visit http://www.kitchenaid.ca.
| IF YOU EXPERIENCE | POSSIBLE CAUSES | SOLUTION |
| Nothing will operate. | A household fuse has blown or a circuit breaker has tripped. | Replace the fuse or reset the circuit breaker. If the problem continues, call an electrician. |
| Surface burners will not operate. | This is the first time the surface burners have been used. | Turn on any one of the surface burner knobs to release air from the gas lines. |
| The control knob is not set correctly. | Push in knob before turning to a setting. | |
| The burner ports are clogged. | Clean clogged burner ports with a straight pin. | |
| Surface burner flames are uneven, yellow, and/ or noisy. | The burner ports are clogged. The burner caps are not positioned properly. | Clean clogged burner ports with a straight pin. Make sure cap is properly aligned with the burner. |
| Propane gas is being used. | The cooktop may have been converted improperly. Contact a trained repair specialist. | |
| Surface burner makes popping noises. | The burner is wet. | Let it dry. |
| Burner sparks but does not light. | There is continuous sparking, but the burner does not light. | Make sure cap is properly aligned with burner. If sparking continues, discontinue use of the surface burner and contact a service technician. |
| Excessive heat around cookware on cooktop. | The cookware is not the proper size. | Use cookware about the same size as the surface cooking area or surface burner. Cookware should not extend more than 1/2" (1.3 cm) outside the cooking area. |
| Cooktop cooking results not what expected. | The proper cookware is not being used. | Use medium-to-heavy cookware made of the material that cooks food the way you want. The best cookware should have a flat bottom, straight sides, and a well-fitting lid. |
| The control knob is not set to the proper heat level. | Set the Cooktop Control to H or L, depending upon the type of cooking you want to do. | |
| The cooktop is not level. | The cooktop must be level for the griddle to operate properly. See the Installation Instructions for leveling instructions. |
ASSISTANCE OR SERVICE
Before calling for assistance or service, please check "Troubleshooting." It may save you the cost of a service call. If you still need help, follow the instructions below. When calling, please know the purchase date and the complete model and serial number of your appliance. This information will help us to better respond to your request.
If You Need Replacement Parts
If you need to order replacement parts, we recommend that you use only factory specified parts. These factory specified parts will fit right and work right because they are made with the same precision used to build every new KitchenAid® appliance. To locate factory specified parts in your area, call us or your nearest KitchenAid designated service center.
In the U.S.A.
Call the KitchenAid Customer eXperience Center toll free: 1-800-422-1230.
Our consultants provide assistance with:
- Features and specifications on our full line of appliances.
- Installation information.
- Use and maintenance procedures.
- Accessory and repair parts sales.
- Specialized customer assistance (Spanish speaking, hearing impaired, limited vision, etc.).
- Referrals to local dealers, repair parts distributors and service companies. KitchenAid designated service technicians are trained to fulfill the product warranty and provide after-warranty service anywhere in the United States. To locate the KitchenAid designated service company in your area, you can also look in your telephone directory Yellow Pages.
For further assistance
If you need further assistance, you can write to KitchenAid with any questions or concerns at:
KitchenAid Brand Home Appliances
Customer eXperience Center
553 Benson Road
Benton Harbor, MI 49022-2692
Please include a daytime phone number in your correspondence.
In Canada
Call the KitchenAid Customer eXperience Centre toll free: 1-800-807-6777.
Our consultants provide assistance with:
- Features and specifications on our full line of appliances.
- Use and maintenance procedures.
- Accessory and repair parts sales.
- Referrals to local dealers, repair parts distributors and service companies. KitchenAid Canada designated service technicians are trained to fulfill the product warranty and provide after-warranty service anywhere in Canada.
For further assistance
If you need further assistance, you can write to KitchenAid Canada with any questions or concerns at:
Customer eXperience Centre KitchenAid Canada
200 - 6750 Century Ave.
Mississauga, Ontario L5N 0B7
Please include a daytime phone number in your correspondence.
ACCESSORIES
To order accessories, call the KitchenAid Customer eXperience Center toll free at 1-800-422-1230 and follow the menu prompts or visit our website at www.kitchenaid.com. For replacement parts, go to "Replacement Parts. Portable appliances, bakeware, cookware, gadgets, and textiles are also available.
In Canada, call the KitchenAid Customer eXperience Center toll free at 1-800-807-6777 and follow the menu prompts. Or visit our website at www.kitchenaid.ca. For replacement parts, go to "Replacement Parts & Accessories". Portable appliances, bakeware, cookware, gadgets, and textiles are also available.
Affresh® Stainless Steel Cleaning Spray (stainless steel models)
Affresh® Stainless Steel Cleaning Wipes (stainless steel models)
Affresh® Cooktop Cleaner
Affresh® Cooktop Cleaning Wipes
Affresh® Stainless Steel Cleaning Mousse (stainless steel models)
SAFETY INFORMATION
Your safety and the safety of others are very important.
We have provided many important safety messages in this manual and on your appliance. Always read and obey all safety messages.
This is the safety alert symbol.
This symbol alerts you to potential hazards that can kill or hurt you and others.
All safety messages will follow the safety alert symbol and either the word "DANGER" or "WARNING." These words mean:

You can be killed or seriously injured if you don't immediately follow instructions.

You can be killed or seriously injured if you don't follow WARNING instructions.
All safety messages will tell you what the potential hazard is, tell you how to reduce the chance of injury, and tell you what can happen if the instructions are not followed.
If the information in these instructions is not followed exactly, a fire or explosion may result causing property damage, personal injury or death.
- Do not store or use gasoline or other flammable vapors and liquids in the vicinity of this or any other appliance.
- WHAT TO DO IF YOU SMELL GAS:
- Do not try to light any appliance.
- Do not touch any electrical switch.
- Do not use any phone in your building.
- Immediately call your gas supplier from a neighbor's phone. Follow the gas supplier's instructions.
- If you cannot reach your gas supplier, call the fire department.
- Installation and service must be performed by a qualified installer, service agency or the gas supplier.
Never Operate the Top Surface Cooking Section of this Appliance Unattended
- Failure to follow this warning statement could result in fire, explosion, or burn hazard that could cause property damage, personal injury, or death.
- If a fire should occur, keep away from the appliance and immediately call your fire department.
DO NOTATTEMPT TO EXTINGUISH AN OIL/GREASE FIRE WITH WATER.
Gas leaks cannot always be detected by smell.
Gas suppliers recommend that you use a gas detector approved by UL or CSA.
For more information, contact your gas supplier.
If a gas leak is detected, follow the "What to do if you smell gas" instructions.
Do not install a ventilation system that blows air downward toward this gas cooking appliance. This type of ventilation system may cause ignition and combustion problems with this gas cooking appliance resulting inpersonal injury or unintended operation.
In the State of Massachusetts, the following installation instructions apply:
- Installations and repairs must be performed by a qualified or licensed contractor, plumber, or gas fitter qualified or licensed by the State of Massachusetts.
- Acceptable Shut-off Devices: Gas Cocks and Ball Valves installed for use shall be listed.
- A flexible gas connector, when used, must not exceed 4 feet (121.9 cm).
IMPORTANT SAFETY INSTRUCTIONS
![]()
Danger of fire: Do not store items on the cooking surfaces. Never leave anything on the surface when unattended and not in use. Never place flammable or plastic items on or near the surface.![]()
Do not store items of interest to children in cabinets above an appliance or on the backguard of an appliance - children climbing on the appliance to reach items could be seriously injured.- Do Not Leave Children Alone - Children should not be left alone or unattended in area where appliance is in use. They should never be allowed to sit or stand on any part of the appliance.
- Wear Proper Apparel – Loose-fitting or hanging garments should never be worn while using the appliance.
- User Servicing – Do not repair or replace any part of the appliance unless specifically recommended in the manual. All other servicing should be referred to a qualified technician.
- This appliance is not intended for storage.
- Do Not Use Water on Grease Fires – Smother fire or flame or use dry chemical or foam-type extinguisher.
- Use Only Dry Potholders – Moist or damp potholders on hot surfaces may result in burns from steam. Do not let potholder touch hot surface units. Do not use a towel or other bulky cloth.
- Never Leave Surface Units Unattended at High Heat Settings – Boilover causes smoking and greasy spillovers that may ignite.
- Glazed Cooking Utensils – Only certain types of glass, glass/ceramic, ceramic, earthenware, or other glazed utensils are suitable for range-top service without breaking due to the sudden change in temperature.
- Utensil Handles Should Be Turned Inward and Not Extend Over Adjacent Surface Units – To reduce the risk of burns, ignition of flammable materials, and spillage due to unintentional contact with the utensil, the handle of a utensil should be positioned so that it is turned inward, and does not extend over adjacent surface units.
- Disconnect power before servicing.
- This appliance is equipped with a three-prong grounding plug for your protection against shock hazard and should be plugged directly into a properly grounded receptacle. Do not cut or remove the grounding prong from this plug.
- Proper Installation - The appliance, when installed, must be electrically grounded in accordance with local codes, or in the absence of local codes, with the National Electrical Code, ANSI/NFPA 70 or the Canadian Electrical Code, CSA C22.1-02. In Canada, the appliance must be electrically grounded in accordance with Canadian Electrical Code. Be sure your appliance is properly installed and grounded by a qualified technician.
- Injuries may result from the misuse of appliance doors or drawers such as stepping, leaning, or sitting on the doors or drawers.
- Maintenance – Keep range area clear and free from combustible materials, gasoline, and other flammable vapors and liquids.
- Top burner flame size should be adjusted so it does not extend beyond the edge of the cooking utensil. This instruction is based on safety considerations.
- Do not use replacement parts that have not been recommended by the manufacturer (e.g. parts made at home using a 3D printer).
- Clean Cooktop With Caution – If a wet sponge or cloth is used to wipe spills on a hot cooking area, be careful to avoid steam burn. Some cleaners can produce noxious fumes if applied to a hot surface.
- Use Care When Opening Door – Let hot air or steam escape before removing or replacing food.
- Do Not Heat Unopened Food Containers – Build-up of pressure may cause container to burst and result in injury.
- Care must be taken to prevent aluminum foil and meat probes from contacting heating elements.

For self-cleaning ranges –
- Do Not Clean Door Gasket – The door gasket is essential for a good seal. Care should be taken not to rub, damage, or move the gasket.
- Clean Only Parts Listed in Manual.
For units with ventilating hood –
- Clean Ventilating Hoods Frequently – Grease should not be allowed to accumulate on hood or filter. When flaming foods under the hood, turn the fan on.
For smart enabled ranges
- Remote operation – This appliance is configurable to allow remote operation at any time. Do not store any flammable materials or temperature sensitive items inside, on top or near surface units of the appliance

Documents / Resources
References
![kitchenaid.com]() Kitchen Appliances to Bring Culinary Inspiration to Life | KitchenAid
Kitchen Appliances to Bring Culinary Inspiration to Life | KitchenAid![www.kitchenaid.ca]() Premium Major & Small Kitchen Appliances | KitchenAid
Premium Major & Small Kitchen Appliances | KitchenAid![www.kitchenaid.com]() Kitchen Appliances to Bring Culinary Inspiration to Life | KitchenAid
Kitchen Appliances to Bring Culinary Inspiration to Life | KitchenAid
Download manual
Here you can download full pdf version of manual, it may contain additional safety instructions, warranty information, FCC rules, etc.
Download KitchenAid KCGD500GSS - 30" 4 Burner Gas Downdraft Cooktop Manual
Advertisement
Thank you! Your question has been received!


Need Assistance?
Do you have a question about the KCGD500GSS that isn't answered in the manual? Leave your question here.