Advertisement
OVERVIEW

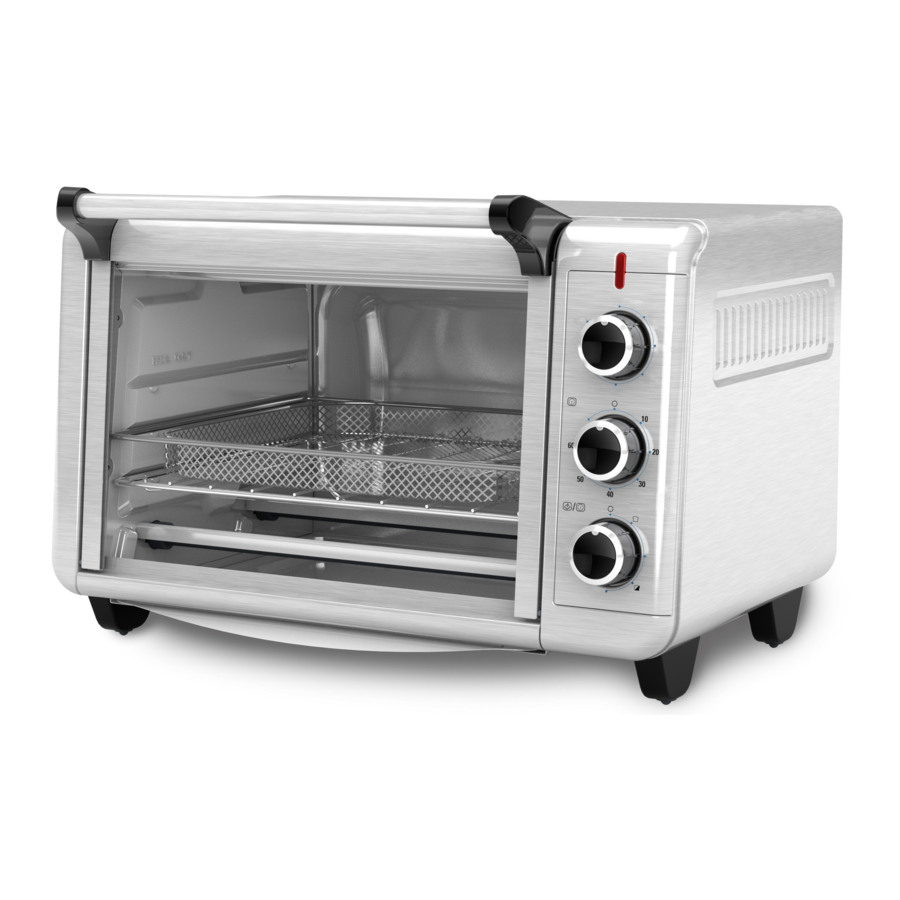
Product may vary slightly from what is illustrated.
- †Air Fry mesh cooking rack
(Part# TO3215-01) - †Bake pan/drip tray
(Part# TO3250-05) - †Rack
(Part# TO3250-06) - Easy-view glass door
- Power indicator light
- Temperature/cooking function knob
- Timer knob
- Toast shade knob
- †External crumb tray
(Part# TO3250-04)
Note: † indicates consumer replaceable/ removable parts
There are three ways to turn the toaster oven ON:
- Turn Timer knob to "Stay On".
- Turn the Toast shade knob past medium shade
![]() then to desired toast shade.
then to desired toast shade. - Turn Timer knob past 10 and then to desired time.
 then to desired toast shade.
To turn OFF turn the Timer and Toast shade knobs to the  position.

HOW TO USE
This product is for household use only.

THIS OVEN GETS HOT. WHEN IN USE, ALWAYS USE OVEN MITTS OR POT HOLDERS WHEN TOUCHING ANY OUTER OR INNER SURFACE OF THE OVEN.
Do not leave oven unattended when in operation. Food ignition may occur. If this happens, unplug unit but DO NOT open door. To reduce the risk of fire, keep oven interior completely clean and free of food residues, oil, grease and any other combustible materials.
A fire may occur if the toaster oven is covered or touching flammable materials including curtains, draperies, walls and the like when in operation or after, when still hot.
Do not place any of the following materials in the oven, on top of the oven, or in contact with the oven sides or bottom surfaces: paper, cardboard, plastic or the like.
GETTING STARTED
- Remove all packing material, any stickers, and the plastic band around the power plug.
- Please go to www.prodprotect.com/blackanddecker to register your warranty.
- Wash all removable parts as instructed in CARE AND CLEANING.
- Select a location where this unit is to be used, allowing enough space from back of the unit and the wall to allow heat to flow without damage to cabinets and walls.
- Plug unit into electrical outlet.
IMPORTANT INFORMATION ABOUT YOUR DEVICE
- This oven gets hot. When in use, always use oven mitts or pot holders when touching any outer or inner surface of the oven.
- During first few minutes of use you may notice smoke and a slight odor. This is normal and should cause no concern.
- Temperatures in the oven will be lower than your set point. This is due to advanced heating elements used in this oven. Temperature dial settings have been calibrated to provide expected results for most recipes taking into account the advanced heating elements.
- You must set the timer or select Stay On for the oven to function.
- Be sure food or baking dish does not come within 1½ inches of the top heating elements.
- Food should not extend beyond the edges of the bake pan/drip tray to avoid drippings from falling onto the heating elements.
- You can cook your food 3 ways:
- Use the bake pan/drip tray placed on the slide rack.
- Place the bake pan/drip tray under the slide rack / broil rack.
- Place food on Air Fry mesh rack
TOASTING
It is not necessary to preheat the oven for toasting.
- Set temperature selector knob to TOAST position.
- Open oven door and insert slide rack.
- Place items to be toasted directly on slide rack in the bottom slot and close the door.
- Turn toast shade selector knob to middle
![]() and then turn back to desired toast shade.
and then turn back to desired toast shade. - The power indicator light comes on and remains on until toasting cycle is complete.
- When toast cycle is complete, there will be an audible signal. The oven and the power indicator light will turn off.
- Open the oven door. Using oven mitts or pot holders, slide the rack out to remove the toast.
- Unplug appliance when not in use.
 and then turn back to desired toast shade.
Note: You must set the toast shade selector knob as desired for the oven to begin toasting.
BROILING
When broiling, preheat oven for 10 minutes. For optimal results use top rack position. Be sure food or baking dish does not come within 1 1/2 inches of the top heating element.
- Set temperature selector knob to BROIL.
- Set the timer selector knob to 20 then turn back or forward to desired broiling time. Select Stay On to bake longer than 60 minutes or to control cooking time yourself. The power indicator light comes on and remains on during the entire broiling time. Note: You must set the timer for the oven to function.
- Once the oven is preheated, open oven door and insert food. Close oven door.
- If using the oven timer, there will be an audible signal once the broiling cycle is complete. The oven turns off and the power indicator light does out. If not using the oven timer, turn the oven off once the cooking cycle is complete.
- Open the oven door. Using oven mitts or pot holders, slide the rack out to remove the cooked food.
- Unplug appliance when not in use.
AIR FRY
It is not necessary to preheat the oven in the air fry function as it may cook slightly faster than recommended cooking times
- Place food on Air Fry mesh rack
- Open door and slide Air Fry mesh rack with food into the middle or lower rack position
- Set Temperature selector knob to AIR FRY position
- Turn TIMER selector knob to 20 and then turn to desired Air Frying time. Select Stay On to air fry longer than 60 minutes or to control cooking time yourself. The power indicator light comes on and remains on during the entire Air Frying time.
Note: You must choose Stay On or set the timer for the oven to start.
- If using the oven timer, there will be an audible signal once the Air Fry cycle is complete. The oven turns off and the power indicator light goes out. If not using the oven timer, turn the oven off once the cooking cycle is complete.
- Open the oven door. Using oven mitts or pot holders, slide the rack out to remove the cooked food.
Note: Clean out the crumb tray frequently when using the air fry setting.
- Unplug the appliance when not in use.
BAKING
For best results, when baking or cooking, always preheat the oven for at least 10 minutes at the desired temperature setting. For optimal results use middle or lower rack position.
- Set temperature selector knob to the desired temperature.
- Turn TIMER selector knob to 20 and then turn to desired baking time. Select Stay On to bake longer than 60 minutes or to control cooking time yourself. The power indicator light comes on and remains on during the entire baking time. Note: You must set the times for the oven to FUNCTION.
- Once oven has preheated, open oven door and insert food. Close oven door.
- If using the oven timer, there will be an audible signal once the baking cycle is complete. The oven turns off and the power indicator light does out. If not using the oven timer, turn the oven off once the cooking cycle is complete.
- Open the oven door. Using oven mitts or pot holders, slide the rack out to remove the cooked food.
- Unplug appliance when not in use.
CARE AND CLEANING
This product contains no user serviceable parts. Refer service to qualified service personnel.
CLEANING

Before cleaning any part, be sure the oven is off, unplugged, and cool.
- Clean the glass door with a sponge, soft cloth, or nylon pad with dish soap and warm water. Do not use a spray glass cleaner.
- To remove the slide rack, open the door, pull the rack forward and out. Wash the slide rack with warm water and dish soap or in a dishwasher. To remove stubborn spots, use a polyester or nylon pad.
- Wash the bake pan with warm water and dish soap. To minimize scratching, use a polyester or nylon pad.
EXTERNAL CRUMB TRAY
External crumb tray is inserted and removed from the exterior of the oven, beneath the oven door.
- Grasp handle and pull out tray.
- Dispose of crumbs and wipe tray with a damp cloth; dry thoroughly before placing back in the oven.
EXTERIOR SURFACES
Wipe the top and exterior walls with a damp cloth or sponge. Dry thoroughly.
COOKING CONTAINERS
Metal, ovenproof glass or ceramic bakeware without glass lids can be used in your oven. Follow manufacturer's instructions. Be sure the top edge of the container is at least 1½" (3.81 cm) away from the upper heating elements.
Two-Year Limited Warranty
Applies only in the United States and Canada
For service, repair or any questions regarding your appliance, call the appropriate 800 number on cover of this book. Please DO NOT return the product to the place of purchase. Also, please DO NOT mail product back to manufacturer, nor bring it to a service center. You may also want to consult the website listed on the cover of this manual.
For how long?
- Two years from the date of original purchase with proof of such purchase.
What will we do to help you?
- Provide you with a reasonably similar replacement product that is either new or factory refurbished.
How do you get service?
- Save your receipt as proof of date of sale.
- Visit the online service website at www.prodprotect.com/blackanddecker, or call toll-free 1-800-465-6070, for general warranty service.
- If you need parts or accessories, please call 1-800-738-0245.

Documents / Resources
References

Download manual
Here you can download full pdf version of manual, it may contain additional safety instructions, warranty information, FCC rules, etc.
Download Black & Decker TO3215SS, TO3215SSD - Convection Oven Manual
Advertisement
Thank you! Your question has been received!


Need Assistance?
Do you have a question about the TO3215SS that isn't answered in the manual? Leave your question here.