Philips HD9230 - Digital Airfryer Manual
- User manual (6 pages) ,
- Manual (10 pages) ,
- Usage instructions (8 pages)
Advertisement
Introduction
Congratulations on your purchase and welcome to Philips! To fully benefit from the support that Philips offers, register your product at www.philips.com/welcome.
Your new airfryer allows you to prepare your favorite ingredients and snacks in a healthier way.
The airfryer uses hot air in combination with high-speed air circulation (Rapid Air) and a top grill to prepare a variety of tasty dishes in a healthy, fast and easy way. Your ingredients are heated from all sides at once and there is no need to add oil to most of the ingredients.
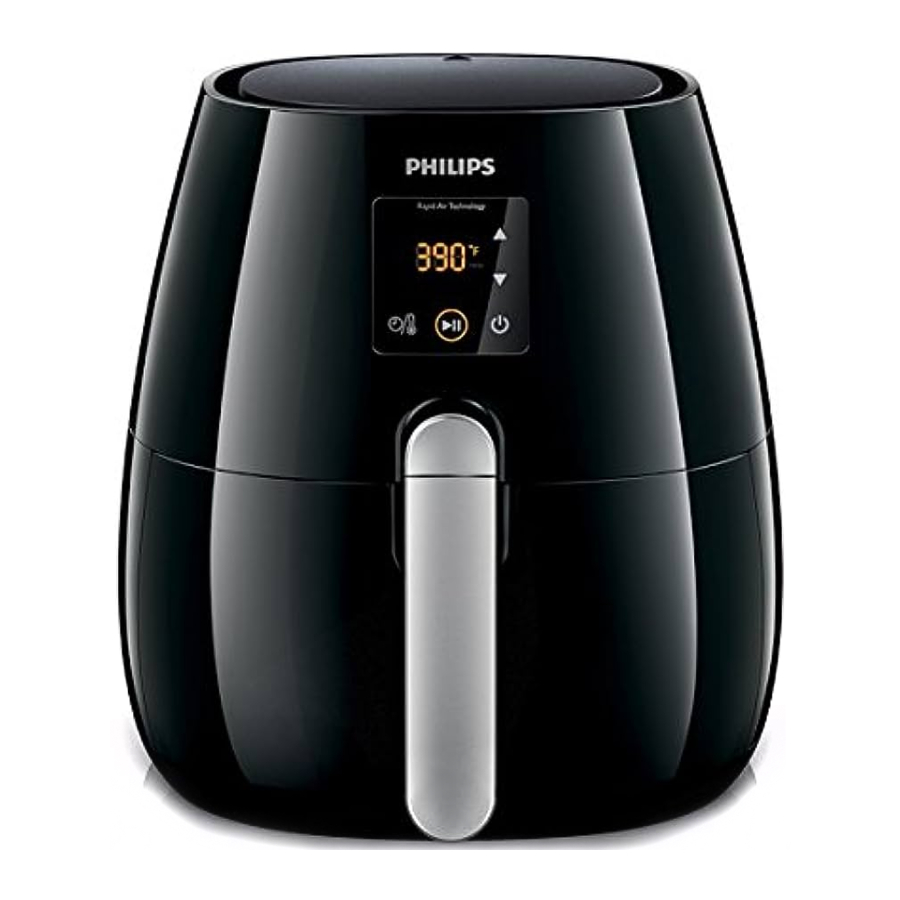
General description

Fig. 1
- Basket
- MAX indication
- Basket release button
- Basket handle
- Pan
- Double layer rack
- Control panel
- Power on/off button
- Start/pause button
- Temperature/timer selection button
- Temperature/timer display
- Up/down arrow buttons
- Air inlet
- Hot air outlet
- Cord storage compartment
- Power cord
Before first use
- Remove all packing material.
- Remove any stickers or labels from the appliance.
- Thoroughly clean the basket, rack and pan with hot soapy water and a non-abrasive sponge.
![warning]() Note: You can also clean these parts in the dishwasher.
Note: You can also clean these parts in the dishwasher. - Wipe the inside and outside of the appliance with a moist cloth.
Preparing for use
- Place the appliance on a stable, horizontal and level surface.
Do not place the appliance on non-heat-resistant surface. - Pull the power cord out of the cord storage compartment at the back of the appliance.
This is an airfryer that works on hot air. Do not fill the pan with oil, frying fat or any other liquid.
Do not put anything on top of the appliance or block air vents. This disrupts the airflow and affects the hot air frying result.
Using the appliance
Refer to Recipe Book for recipes, cooking temperatures and times and tips.
The double layer rack can double your cooking space.
 Note: Always position meats on lower level and vegetables above to avoid cross contamination of food or unsafe transfer of meat juices or partially cooked foods.
Preheating
- Put the plug in a grounded wall outlet.
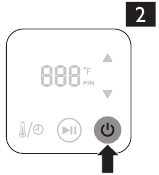
- Press the power on/off button to switch on the appliance (Fig. 2).
![]()
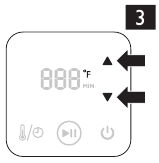
- Set the preheating temperature by pressing the up/down arrow buttons (Fig. 3).
![]()
- Press the start/pause button (Fig. 4).
![]()
- The appliance starts preheating to the set temperature.
![warning]() Note: If you do not want to preheat, but want to start frying immediately, skip steps 3, 4 and 5 and follow the instructions in section 'Hot air frying' in this chapter.
Note: If you do not want to preheat, but want to start frying immediately, skip steps 3, 4 and 5 and follow the instructions in section 'Hot air frying' in this chapter.
- The appliance starts preheating to the set temperature.
- The set temperature flashes until the set temperature has been reached. Then the appliance beeps and the set temperature is displayed continuously (see step 4 in section 'Hot air frying') (Fig. 5).
![]()


Hot air frying
- Put the power plug in a grounded wall outlet.
- Carefully pull the pan out of the airfryer (Fig. 6).
![]()
- Put the ingredients in the basket (Fig. 7).
![]()
![warning]() Note: Never fill the basket beyond the MAX indication. This has a negative effect on the end result.
Note: Never fill the basket beyond the MAX indication. This has a negative effect on the end result.
The double layer rack lets you cook more food at the same time. Place ingredients on the bottom of the basket and place the double layer rack directly over the ingredients already in the basket. Position the second layer of ingredients evenly spaced on the rack. - Slide the pan back into the airfryer (Fig. 8).
![]()
Never use pan without basket in place.
![]()
Do not touch pan, basket or rack during and directly after use as they get very hot! Only hold pan by basket handle. - Press the temperature/timer selection button to start setting the cooking time. The 'MIN' indication lights up on the display (Fig. 9).
![]()
- Set the required cooking time by pressing the up/down arrow buttons (Fig. 10).
![]()
![warning]() Note: You can change the time or the temperature anytime during the process.
Note: You can change the time or the temperature anytime during the process.
![warning]() Note: If you have not preheated the appliance, add 3 minutes to the cooking time.
Note: If you have not preheated the appliance, add 3 minutes to the cooking time.
![warning]() Note: If you do not set the required cooking time within 5 minutes, the appliance returns to standby mode and will automatically shut off after 30 minutes.
Note: If you do not set the required cooking time within 5 minutes, the appliance returns to standby mode and will automatically shut off after 30 minutes. - Press the start/pause button to start the cooking process (Fig. 11).
![]()
- The display starts counting down the set cooking time.
- Excess oil or rendered fat from the ingredients is collected on the bottom of the pan.
- When the appliance starts beeping, the set cooking time has elapsed.
![warning]() Note: You can also pause the cooking process manually. To do this, press the start/pause button (Fig.4).
Note: You can also pause the cooking process manually. To do this, press the start/pause button (Fig.4). - Some ingredients require shaking midway through the cooking process. Do not shake ingredients when using double layer rack. To shake ingredients, pull the pan out of the appliance and shake it. Then slide the pan back into the airfryer (Fig. 12).
![]()
![]()
Do not press the basket release button during shaking (Fig. 13).
![]()
![warning]() Note: Depending on type of ingredients cooking, carefully pour off any excess oil or rendered fat from pan before shaking or replacing basket in pan.
Note: Depending on type of ingredients cooking, carefully pour off any excess oil or rendered fat from pan before shaking or replacing basket in pan.
![information]() Tip: To reduce the weight, you can remove the basket from the pan and shake the basket only. To do so, pull the pan out of the appliance, place it on a heat-resistant surface and press the basket release button (Fig. 14).
Tip: To reduce the weight, you can remove the basket from the pan and shake the basket only. To do so, pull the pan out of the appliance, place it on a heat-resistant surface and press the basket release button (Fig. 14).
![]()
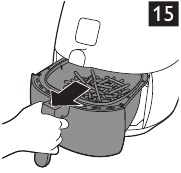
- Pull the pan out of the airfryer to check if the ingredients are ready (Fig. 15). If the ingredients are not ready yet, simply slide the pan back into the airfryer and add a few extra minutes to the set time.
![]()
- To remove small ingredients (e.g. fries), press the basket release button (1) and lift the basket out of the pan (2) (Fig. 14).
After the cooking process the pan, basket, rack and ingredients are hot. Depending on the type of ingredients in the airfryer, steam may escape from the pan.
Always remove basket with ingredients from pan to serve, as hot oil or rendered fat may be in bottom of pan. Be careful, steam may escape from pan. - Empty the basket into a bowl or onto a plate (Fig. 16).
![]()
![information]() Tip: To remove large or fragile ingredients, use a pair of tongs to lift the ingredients out of the basket (Fig. 17).
Tip: To remove large or fragile ingredients, use a pair of tongs to lift the ingredients out of the basket (Fig. 17).
![]()
- When a batch of ingredients is ready, the airfryer is instantly ready for preparing another batch.
![warning]() Note: If you want to prepare another batch, press the start/pause button. The appliance starts operating at the settings you set before (temperature and cooking time).
Note: If you want to prepare another batch, press the start/pause button. The appliance starts operating at the settings you set before (temperature and cooking time).
![warning]() Note: If you prepare another batch within 30 minutes, it is not necessary to preheat the appliance again.
Note: If you prepare another batch within 30 minutes, it is not necessary to preheat the appliance again. - Press the power on/off button to switch off the airfryer (Fig. 2).


 Tip: To reduce the weight, you can remove the basket from the pan and shake the basket only. To do so, pull the pan out of the appliance, place it on a heat-resistant surface and press the basket release button (Fig. 14).


Cleaning
Clean appliance after every use. Remove oil from bottom of pan after every use to prevent smoke.
Let basket, pan, rack and inside of appliance cool completely before you start cleaning.
Pan and basket have a non-stick coating. Do not use metal kitchen utensils or abrasive cleaning materials as this may damage non-stick coating.
- Unplug the appliance and let it cool down.
![warning]() Note: Remove the pan to let the appliance cool down more quickly.
Note: Remove the pan to let the appliance cool down more quickly. - Wipe the outside of the appliance with a moist cloth.
![warning]() Note: Make sure no moisture remains behind on the control panel. Dry the control panel with a cloth after you have cleaned it.
Note: Make sure no moisture remains behind on the control panel. Dry the control panel with a cloth after you have cleaned it. - Thoroughly clean basket, rack and pan with hot, soapy water and nonabrasive sponge or in dishwasher.
![information]() Tip: If residue sticks to basket or bottom of pan, fill pan with hot soapy water. Put basket in pan and let soak for at least 10 minutes.
Tip: If residue sticks to basket or bottom of pan, fill pan with hot soapy water. Put basket in pan and let soak for at least 10 minutes. - Clean inside of appliance with hot water and non-abrasive sponge.
- If necessary, clean heater with a cleaning brush to remove any food residue.
Storage
- Unplug appliance and let it cool down.
- Be sure all parts are clean and dry.
- Push power cord into cord storage compartment.
Environment
- Do not throw away the appliance with the normal household waste at the end of its life, but hand it in at an official collection point for recycling. By doing this, you help to preserve the environment (Fig. 18).
![]()

Warranty and service
If you need information, support, or if you have a problem, please visit www.philips.com/support or in the U.S. or Canada only, call 1-866-309-8817 for assistance.
Troubleshooting
This chapter summarizes the most common problems you could encounter with the appliance. If you are unable to solve the problem with the information below, visit www.philips.com/support or in the U.S. or Canada only, call 1-866-309-8817 for assistance.
| Problem | Possible cause | Solution | ||
| The appliance does not work. | The appliance is not plugged in. | Put the plug in a grounded wall outlet. | ||
| You have not pressed the on/ off button. | Press the on/off button to switch on the appliance. | |||
| The ingredients fried with the airfryer are not done. | The amount of ingredients in the basket is too big. | Put smaller batches of ingredients in the basket. Smaller batches are fried more evenly. | ||
| The set temperature is too low. | Set the temperature to the required temperature setting. | |||
| The preparation time is too short. | Set the timer to the required preparation time. | |||
| The ingredients are fried unevenly in the airfryer. | Certain types of ingredients need to be shaken halfway through the cooking time. | Ingredients that lie on top of or across each other (e.g. fries) need to be shaken halfway through the cooking time. | ||
| Fried foods are not crispy when they come out of the airfryer. | You used a type of food to be prepared in a traditional deep fryer. | Use food intended to be cooked in an oven or lightly brush some oil onto the food for a crispier result. | ||
| I cannot slide the pan into the appliance properly. | There are too many ingredients in the basket. | Do not fill the basket beyond the MAX indication. | ||
| The basket is not placed in the pan correctly. | Make sure the pan and basket are placed correctly. Push the basket down into the pan until you hear it click. | |||
| White smoke comes out of the appliance. | You are preparing fatty ingredients. | When you fry greasy ingredients, a large amount of oil or rendered fat leaks into the pan. The oil or fat causes white smoke and the pan may heat up more than usual. This does not affect the appliance or the end result. Midway through the cooking process you can carefully pour off any excess oil or rendered fat from the pan and then continue cooking. | ||
| The pan still contains greasy residue from previous use. | White smoke is caused by greasy residue heating up in the pan. Make sure you clean the pan properly after each use. | |||
| Marinade, liquid or meat juices are splattering in the rendered fat or grease. | Pat food dry before placing it in the basket. Occasionally pour off rendered fat or grease from the pan during cooking. | |||
| Breading or coating did not adhere properly to the food. | White smoke can be caused by tiny pieces of airborne breading. Press breading or coating to food to ensure it sticks. | |||
| Home-made fries are fried unevenly in the airfryer. | You did not soak the potato sticks properly before you fried them. | Soak the potato sticks in a bowl for at least 30 minutes, take them out and dry them with paper towel. | ||
| You did not use the right potato type. | Use fresh potatoes and be sure they stay firm during frying. | |||
| Home-made fries are not crispy when they come out of the airfryer. | The crispiness of the fries depends on the amount of oil and water in the fries. | Be sure you dry the potato sticks properly before you add the oil. | ||
| Cut the potato sticks smaller for a crispier result. | ||||
| Add slightly more oil for a crispier result. | ||||
| The message 'Er' appears on the display. | An error has occurred. | In the U.S. or Canada only, call 1-866-309-8817 for assistance. | ||
| The time and temperature indications change automatically, even though I do not press any buttons. | There is moisture on the control panel. | Make sure you dry the control panel with a cloth after you have cleaned it. | ||

Documents / Resources
References
![www.philips.com]() Product registration | Philips
Product registration | Philips![www.philips.com]() Philips Customer Service Support - Home | Philips
Philips Customer Service Support - Home | Philips![philips.com]() Philips - United States | Philips
Philips - United States | Philips
Download manual
Here you can download full pdf version of manual, it may contain additional safety instructions, warranty information, FCC rules, etc.
Advertisement
Thank you! Your question has been received!


Need Assistance?
Do you have a question about the HD9230 that isn't answered in the manual? Leave your question here.