Advertisement
Quick Links
Wall Mount User's Manual / Mode d'emploi du montage mural
Manual de Usuario para Montaje en Pared
Bedienungsanleitung zur Wandbefestigung / Manuale d'uso della staffa a muro
ウォールマウントキット取扱説明書 / 壁挂架用户手册
(WM-46UN-L) / (WM-46UN-P)
This wall mount is only for NEC MultiSync X461UN.
Ce montage mural ne convient qu'au système NEC MultiSync X461UN.
Este kit de montaje en pared es sólo para el modelo X461UN MultiSync de NEC.
Diese Wandhalterung ist nur mit dem NEC MultiSync X461UN kompatibel.
Questa staffa a muro è solo per NEC MultiSync X461UN.
此壁挂架仅适用于 NEC MultiSync X461UN 。
Contents
・Wall bracket (top) x 1
・Wall bracket (bottom) x 1
・Monitor bracket (top) x 2
・Monitor bracket (bottom) x 2
・Adjuster pin x 2
・Stopper x 2
・Screws x 20
・Hexagonal wrench x 1
Lieferumfang
・Wandhalterung (oben) x 1
・Wandhalterung (unten) x 1
・Bildschirmhalterung (oben) x 1
・Bildschirmhalterung (unten) x 1
・Justierstift x 2
・Stopper x 2
・Schrauben x 20
・Sechskantschlüssel x 1
物品清单
・ 壁挂支架(上端) x 1
・ 壁挂支架(下端) x 1
・ 显示器支架(上端) x 1
・ 显示器支架(下端) x 1
・ 调节销 x 2
・ 制动器 x 2
・ 螺丝 x 20
・ 六角扳手 x 1
Contenu
・Support mural (haut) x 1
・Support mural (bas) x 1
・Support du moniteur (haut) x 1
・Support du moniteur (bas) x 1
・Cheville de réglage x 2
・Butée x 2
・Vis x 20
・Clé hexagonale x 1
Contenuti
・1 Staffa a muro (superiore)
・1 Staffa a muro (inferiore)
・1 Staffa monitor (superiore)
・1 Staffa monitor (inferiore)
・2 perni di regolazione
・2 Fermi
・20 viti
・1 Chiave esagonale
Contenidos
・Soporte de pared (superior) x 1
・Soporte de pared (inferior) x 1
・Soporte de monitor (superior) x 1
・Soporte de monitor (inferior) x 1
・Clavija de ajuste x 2
・Limitador x 2
・Tornillos x 20
・Llave Allen x 1
Advertisement

Related Manuals for NEC WM-46UN-2X2


Summary of Contents for NEC WM-46UN-2X2
- Page 1 This wall mount is only for NEC MultiSync X461UN. Ce montage mural ne convient qu’au système NEC MultiSync X461UN. Este kit de montaje en pared es sólo para el modelo X461UN MultiSync de NEC. Diese Wandhalterung ist nur mit dem NEC MultiSync X461UN kompatibel.
- Page 2 Caution DO NOT mount the monitor yourself. Ask your dealer for assistance. For proper installation it is strongly recommended to use a trained, qualified technician. Refer to the manual of the monitor for safety precautions and maintenance. Moving and setting the monitor must be done by two or more people.
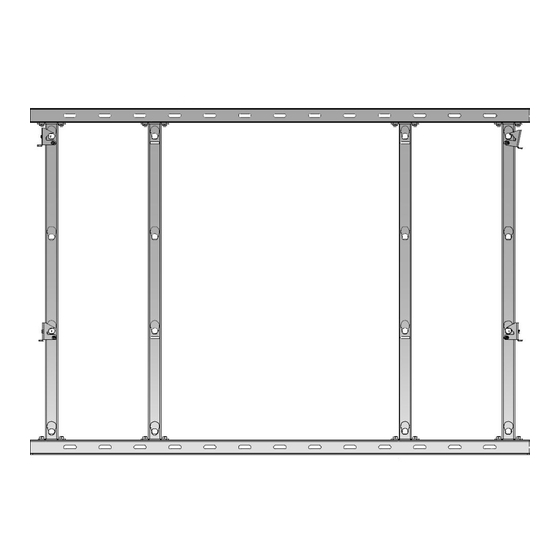
- Page 3 Settings / Installations /Configuraciones /Arretierungen /Impostazioni / WM-46UN-L Wall bracket (top) / support mural (haut) / Soporte de pared (parte superior) / Wandhalterung (oben) / Supporto per l ’ installazione su parete (superiore) / 壁挂支架(上端) Wall bracket (bottom) / support mural (bas) / Soporte de pared (parte inferior) / Wandhalterung (unten) / Supporto per l ’...
- Page 4 Place the adjuster pin screws in the top monitor brackets (2). Turn by hand until the adjuster pin reaches the end and stops. Positionnez les vis des chevilles de réglage sur les supports en haut du moniteur (2). Tournez les vis à la main jusqu ’ à ce que la cheville de réglage arrive à...
- Page 5 The adjuster pin is inserted through the hole of the wall brackets (top), and the monitor brackets (bottom) are inserted in the pin of the wall brackets (bottom). La cheville de réglage est insérée dans le trou des supports muraux (haut). Les supports du moniteur (bas) se placent dans la cheville des supports muraux (bas).
- Page 6 Ajuste en el sentido vertical: Ajuste el monitor verticalmente rotándolo en el sentido de las agujas del reloj con la llave Allen incluida. En la figura, el tornillo está en la parte superior del rango de ajuste del monitor. La límite superior del rango de ajuste se dará cuando la muesca de la clavija de ajuste esté...
- Page 7 Attach stoppers. The stopper is attached with two screws each. Install the two stoppers in each monitor. You can adjust vertical position of monitor even after installing the stopper. Caution: The monitor might fall if the stopper is not attached securely. Fixez les butées.
- Page 8 Additional monitors are set up using the same steps. Caution: When sliding the monitors to adjust spacing, DO NOT contact sides of monitors with force. Les moniteurs supplémentaires sont à installer en suivant les mêmes étapes. Mise en garde : lorsque vous faites glisser les moniteurs pour ajuster l ’ espacement. NE POUSSEZ PAS fortement les moniteurs l ’...
- Page 9 After all monitors in the the lower row are set up, begin monitor installation in the upper row. The monitor bracket (top) / (bottom) and the adjuster pin are installed just as they are on the lower monitors. The adjuster pins on the upper row monitor are inserted through the hole of the wall brackets (top), and the monitor brackets (bottom) are inserted in the adjuster pins on the the lower monitor.
- Page 10 Caution / Mise en garde / Precaución / Achtung / Attenzione / When the hole of monitor bracket attach the part where adjuster pin is thin, the monitor surface does not align. Adjuster pin must be placed correct position as shown in Step #5. Lorsque le trou du support colle la partie de la cheville de réglage (espace fin), la surface du moniteur ne s ’...