Advertisement
Available languages
Available languages
Quick Links
's
I
3/4 Horsepower
(continuous
duty)
1-1/2 Horsepower
(maximum
developed)
600 C°FoM°
3450 R.PoM. (no _oad R.PoM.}
Model
No.
152.213351
C
CAUTION:
FOR YOUR OWN SAFETY;
Read
and follow all of the Safety and
Operating
Instructions
before
Operating
this Dust CoUlector.
Customer Helpline
1-800-897-7709
PRease have your Model No.
and Sedal No. availabUe.
Sears, Roebuck
and Co., Hoffman
Estates,
JL (}0179 U.S.A.
Part No. 0R92122
Revision
A
Espa5olpg.
23
Advertisement

Related Manuals for Craftsman 152.213351


Summary of Contents for Craftsman 152.213351
- Page 1 3/4 Horsepower (continuous duty) 1-1/2 Horsepower (maximum developed) 600 C°FoM° 3450 R.PoM. (no _oad R.PoM.} Model 152.213351 CAUTION: Customer Helpline FOR YOUR OWN SAFETY; Read 1-800-897-7709 and follow all of the Safety and Operating Instructions before PRease have your Model No.
- Page 2 Dust Collector, use proper circuit protection, expose to rain, or use in a damp environment, The Dust Collector is factory wired for 120V, 60 Hz, operation, Connect to a 120V, 15 amp branch circuit and use a 15 amp time delay fuse or circuit breaker,...
- Page 3 Read this manual to understand this Dust Collector, DO NOT operate this Dust Collector if you do not fully understand the limita- tions of this tool, DO NOT modify this Dust Collector in any way, REMEMBER: Your personal safety is your...
- Page 4 21, EACHANDEVERY TmME,CHECK FOR DAM- AGED PARTS PRmOR TO USmNGTHE TOOL, Carefully check all guards to see that they operate properly, are not damaged, and perform their intended functions, Check for alignment, binding or breaMng of moving parts, A guard or other part that is damaged should be immediately repaired or replaced, 22, CHILDPROOF...
- Page 5 This Dust Collector is for indoor use only, Do not expose to rain or use in damp locations, Fig. 2 grounding...
- Page 6 DO NOT handle the plug or dust collector with wet hands, REPLACE a damaged cord immediately, DO NOT use a damaged cord or plug, if the dust collector is not operating properly, or has been damaged, left outdoors or has been in contact with water, return it...
-
Page 7: Available Accessories
Do not use any accessory unless you have completely STOCK NUMBER read the Owner's Manual for that accessory, 21374 21372 21373 Use only accessories recommended Collector, Using other accessories may cause serious See catalog or store injury and cause damage to the Dust Collector, for this Dust... -
Page 8: Unpacking And Checking
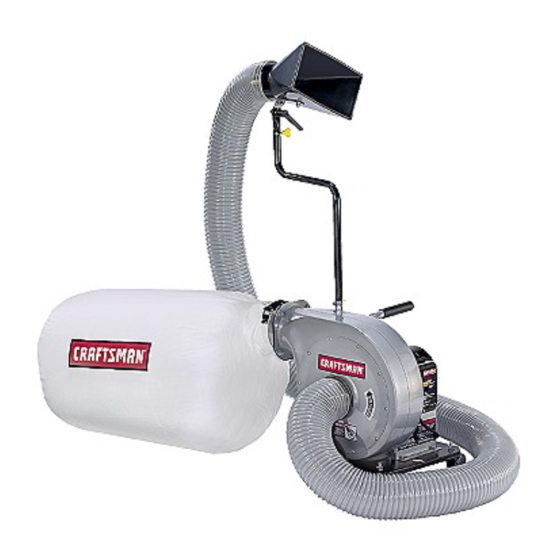
"ON" the Dust Collector, The Dust Collector can only be turned "ON" after all the parts have been obtained and installed correctly,... - Page 9 Fig. 4 4-inch HnHet Port 4-inch FHexibHe Hose C, Hntake Port Cap D, Hntake FunneH Support Rod 4-inch Exhaust Port G, CoHHectionBag H, Dust CoHHector H, Base Caster...
- Page 10 DO NOT assemble the Dust Collector until you are sure the tool iS NOT plugged in, DO NOT assemble the Dust Collector until you are sure the power switch is in the "OFF" position, For your own safety, DO NOT connect the machine...
- Page 11 See figure 8, Repeat Steps 1,2, and 3 for the remaining hobs, Tighten all hardware, SUPPORT TUBE ASSEMBLY MAKE CERTAIN THE DUST COLLECTOR DISCONNECTED FROM THE POWER SOURCE. Place support tube clamp (A) over lower support tube holder (B), See figure 9, Fig.
- Page 12 (H) and tighten tube clamp (I) securely, See figure 13, iNTAKE HOSE ASSEMBLY MAKE CERTAIN THE DUST COLLECTOR DISCONNECTED Fig. 14 SHde the collar (A) of the intake port cap (B) over intake port (C). Make sure the collar is position to the back if you intend to attach the hose at this time.
- Page 13 (H) and tighten 4-inch hose clamp securely, See figure 15, COLLECTION BAG TO DUST COLLECTOR ASSEMBLY MAKE CERTAIN THE DUST COLLECTOR DISCONNECTED FROM THE POWER SOURCE. Fig. 16 Loosely thread end of collection bag strap (A) through clamp (B), Place open end of collection...
-
Page 14: Transportation And Storage
See figure 18, LOCKING "OFF" POSiTiON When the Dust Collector is not in use, the switch key (B) shouid be removed so that it cannot be started, Grasp the switch key and puli it out of the switch assembiy, With the switch key removed, the switch... -
Page 15: Helpful Hints
Below aresometermsthatwiiihelpyouto understand andsetupyourDustCollector anddesign yourown DustCollection S ystem, DustCollector- A machine usedto collect f inewood dustandchips, DustCollectionSystem- Adustcollector c onnected to multiple woodworking machines u tilizing various typesof hose/pipe a ndfittings, C.F.M. = CubicFeet/Minute - A measurement of the amount o f airvolume thatcanmovethrough a dust collector i n oneminute, StaticPressure - A measurement of theamount o f the... -
Page 16: Static Pressure
For this example a Dust Collector See Product Specifications on page 2 for your dust collector NOTE: To determine if you have met the Static Pressure Requirement when using a Dust Collection System, identify the branch of the system with the highest static pressure requirement first, If you run your Dust Collection System with... - Page 17 Table Saw Dust Hood, 14" x 14" x 4" Diameter 21346 Universal Dust Hood, 6-1/4" x 6-1/4" x 4" Diameter Floor Sweep: 21369 Floor Sweep Kits: 21350 Wall Mounting Kit 21375 Dust Collector Accessory Kit 21341 4-inchHoseCoupling 21364 4-inch 90-degree E lbow 21366 4-inch YoFitting 21368 4-inch ToFitting 21360...
- Page 18 Turnthepower switch"OFF" a ndunplug thepower cordfromitspower source priortoanymaintenance, Always makesurethatthe intake portcapscovers the intakeportwhena hoseis notconnected tothedust collector. TheDustCollector hassealedlubricated bearings i n themotorhousing thatdoesnotrequire anyadditional lubrication f romtheoperator, WiththeDustCollector unplugged, blowoffmotorwith lowpressure airto remove dustor dirt, Air pressure above 50 R S. I. should notbe usedas high-pressured TOPREVENT I NJURY TOYOURSELF o r damage to theDustCollector, turntheswitchto the"OFF"...
- Page 19 OR65935 OR90645 OR92138 OR92132 OR90648 (COLOR: BLACK) STD523106 OR90615 OR90649 OR92139 OR92138 OR92124 0R92122 & 1-OR90636 MODEL NO.152.213351 Description Qfry. GASKET WARNING LABEL BLOWER HOUSING (COLOR: PANTONE 877) FLAT WASHER M9.8 LOCK WASHER 5/18' HEX HEAD SCREW 5/18-18 X .'5/4"...
- Page 20 PORTABLE DUST COLLECTOR P ARTS UST MODEL NO,152,213351 55--...
- Page 21 ,_ NOTES ,_...
- Page 22 ,_ NOTES ,_...
- Page 23 1-1/2 cabaHos de fuerza (ma×imo desarroHado} 600 C.F.M. (pies c_bicos pot minuto) 3450 R.PoM. (R.PoM. sin carga) COLE No. de Mode_o 152.213351 Linea de Ayuda al Cliente PARA SU SEGURIDAD PERSONAL: Lea y obedezca todas Ras 1°800°897°7709 tnstrucciones de Seguridad Sirvase tenet listo su No.
- Page 24 SECCION Garant[a ...24 Especificaciones de_Producto ...24 Instrucciones de Seguridad ...25 Instrucciones de Cone×i6n a Tierra ...27 Instrucciones de Seguridad Especfficas pare los Colectores de Polvo ...28 Accesorios y Aditamentos ...29 Contenido de la Caja ...30 Conozca su Colector de Polvo ...31 Instrucciones de Montaje ...32 Accionando el Co_ector de Polvo ...
- Page 25 INSTRUCCUONES GENERALES SEGURIDAD E! funcionamiento de un Colector de Polvo puede resuHtar peligroso si se hace case omiso de Ia seguddad y del sentido com0n. El operario debe estar familiarizado con el fun- cionamiento de Ia herramienta. Lea este manual para enten- der su Colector de PoHvo.
- Page 26 21. REVISE SI HAY PIEZAS DANADAS ANTES DE CADA USO DE LA HERRAMIENTA. Revise todos los protec- tores cuidadosamente para comprobar que funcionan correctamente y que no estan daffados, y que realizan sus funciones diseffadas correctamente. alineamiento, la fijaci6n o la ruptura de Ias piezas en movimiento.
- Page 27 ESTA HERRAM_ENTA DEBE ESTAR CONECTADA A T_ERRA DURANTE EL USO PARA PROTEGER AL OPERARJO DE LOS CHOQUES ELECTRJCOS. EN EL CASO DE UN MALFUNCIONAMJENTO conexi6n a tierra ofrece el trecho de menor resistencia para Ia corriente el6ctrica y reduce el riesgo de los choques el6ctri- cos.
- Page 28 JNSTRUCCJONES DE SEGURJDAD ESPECJNCAS PARA LOS COLECTORES DE POLVO El funcionamiento de cualquier colector de polvo puede tener come consecuencia la expulsi6n de escombros hacia sus ojos, Io que puede resuitar en heridas oculares graves. UTILiOE SlEMPRE Gafas de Protecci6n (que cumplan con Ia normativa Z87.1 de ANSi) cuando vaya a hacer use del colector de polvo.
- Page 29 ACCESOFHOS DJSPONJBLES Visite su Departamento de Ferreteffa de Sears o consulte el Catalogo de Herramientas EI6ctricas y de Mane de Sears para los siguientes accesorios: ARTJCULO NUMERO DE EXISTENCJA Bolsa de fiRro de 30 micras Manguera flexible 4 pulg. diametro x 10 pies Manguera flexible 4 pulg.
- Page 30 DESEMPAQUE Y VEFIJFJCACJON CONTENJDO (Figura El Colector de Polvo requerira una cantidad mfnima de ensambIaje. Quite todas Ias piezas de la caja de env[o y coI6quelas sobre una superficie de trabajo Iimpia. Compare los art[culos con Ia Figura 3. Verifique que todos los art[culos esten presentes antes de descartar la caja de env[o.
- Page 31 Fig. 4 A. Puerto de admisi6n de 4 putg. B. Manguera flexible de 4 pulg. C. Tapa del puerto de admisi6n D. Embudo de entrada E. Vara de soporte Puerto de escape de 4 pulg. G. Bolsa de recolecci6n H. Colector de polvo Base Rueda pivotante...
- Page 32 NO inicie ei ensamUaje hasta que este seguro de que la herramienta NO ESTA enchufada. NO ensamble eI Colector de Potvo hasta que este seguro de que el interruptor de energfa se encuentre en la posi- ci6n de "APAGADO". Para su propia seguridad, NO CONECTE Ia m_.quina a la fuente de energfa hasta que la maquina se encuentre completamente...
-
Page 33: Montaje
Fig. 8 Inserte un tornillo de cabeza hexagonal de 5/16-18 x 5/8 pulg. (C) a traves de la pestaha de escape, la empaque- tadura de Ia pestafia de empaque, y la pestaha del puer- to de escape. Consulter la figura 8= Enrosque la tuerca de pesta5a hexagonal de 5/16-18 (D) al tornilIo hexagonal de 5/8 pulg= No Io apriete completa- mente= Ver la figura 8... - Page 34 hserte dos pernos de carrocer[a de cabeza redonda de 5/16-18 x 5/8 puIg. a traves del interior de! embudo de admisi6n y el refuerzo de soporte de admisi6n. Coloque una tuerca de pesta_a hexagonal de 5/16-18 sobre Ios pernos de carrocerfa de cabeza redonda y apri6telos seguramente.
- Page 35 Coloque la abrazadera de manguera de 4 pulg. (F) sobre el otro extreme de la manguera flexible de 4 pulg. (G). Deslice la manguera flexible de 4 pulg. sobre el embudo de admisi6n (H) y apriete la abrazadera de manguera de 4 pulg.
-
Page 36: Interruptor De Encendido/Apagado
PARA LA SEGURIDAD DEL OPERARIO, dedos y todos los cuerpos extrahos fuera de los puertos de admisi6n. El acceso a! ventilador girante dentro de la caja deI soplador es posible a traves de los puertos de admisi6n yes peligroso. No utilice vestimenta hoigada ni artfcutos de joyerfa. - Page 37 A continuaci6n se presentan aIgunos terminos que le ayu- daran a entender y montar su Colector de Polvo y a diseBar su propio sistema de recolecci6n de potvo. OoBeetor de Polvo - Maquina utiJizada para recolectar polvo fine y astillas de madera. Sistema de Recomecci6n de Potvo - Un coiector de polvo conectado a maquinas m0ItipIes de ebanister[a mediante el use de distintos tipos de mangueras/tuber[as...
- Page 38 REQUJSITOS DEC.FoMo ALASHERRAMIENTAS _uina Sierra decinta (12a 16puig,) Lijadora d ecorrea/disco Taladradora Lijadora d etambor (12a24putg,) Terraja depiso Machimbradora (hasta 8 pulg,) Machimbradora (mas de8 pulg,) Sierra debrazo radiat Sierra deingletes Mesa derecortadora Sierra decalar Lijadora d ehuso Sierra demesa (10pulg,) Cepilladora degrosor (10a 15pulg.) Cepilladora...
- Page 39 Para comprar cualquiera de los Accesorios de Recolecci6n de Polvo listados a continuaci6n, Conectores varios: 21340 AcopIamiento para manguera de 3 puIg. 21363 Pieza acodada de 90 grades de 3 pulg. 21365 Conector en Y de 3 puIg. 21367 Conector en T de 3 puIg. Manguera: 21370 Manguera Flexible de 3 pulg.
- Page 40 Apague el interruptor de energfa y desenchufe potencia de su fuente de energfa antes de realizar cualquier mantenimiento. Asegurese siempre de que Ias tapas de puer- to de admisi6n cubran los puertos de admisi6n cuando una manguera no se encuentre conectada al cobctor de polvo. El Colector de Polvo tiene cojinetes lubricados seiIados en la carcasa de motor.
- Page 41 MSTADO DE PIEZAS DEL COLECTOR DE POLVO PORTATmL S61o utilice piezas de repuesto CRAFTSMAN Cualquier intento per reparar o reemplazar reparaciones sean Ilevadas a cabo por un t@nico de servicio calificado, El servicio de reparaciones Sears mas cercano, Encargue siempre pot NUMERO DE PIEZA y no pot numero clave.
- Page 42 USTADO DE PIEZAS DEL COLECTOR DE POLVO PORTATmL MODELO NO. 152.213351...
- Page 43 NOTAS...
- Page 44 For repair - in your iiiiiiiiiiiiiiiiiiiii_ lawn and garden equipment, oo mo_te_ For the replacement owner's manuals that you need to do-it-yourself. For Sears professional and items like garage door openers and water heaters. 1-800-4-MY-HOME (1-800-469-4663) www_eo,_oo_ For repair of carry-in products and electronics, 1-800-488-1222 To purchase...