Advertisement
Quick Links
20V 6-1/2" CIRCULAR SAW
MODEL HCCS200
ATTACH YOUR RECEIPT HERE
Serial Number _____________________ Purchase Date ______________________
Questions, problems, missing parts? Before returning to your retailer, call
our customer service department at 1-877-888-1880, 8:30 a.m. – 8:00 p.m.
EST (Monday – Friday) & 10:00 a.m. – 6:00 p.m. EST (Saturday and Sunday).
Advertisement

Related Manuals for Hammerhead HCCS200


Summary of Contents for Hammerhead HCCS200
- Page 1 20V 6-1/2" CIRCULAR SAW MODEL HCCS200 ATTACH YOUR RECEIPT HERE Serial Number _____________________ Purchase Date ______________________ Questions, problems, missing parts? Before returning to your retailer, call our customer service department at 1-877-888-1880, 8:30 a.m. – 8:00 p.m. EST (Monday – Friday) & 10:00 a.m. – 6:00 p.m. EST (Saturday and Sunday).
-
Page 2: Table Of Contents
TABLE OF CONTENTS Product Specifications ........... . 3 Safety Information . -
Page 3: Product Specifications
Please read and understand this entire manual before attempting to assemble or operate this product. If you have any questions regarding the product, please call Hammerhead customer service at 1-877-888-1880, 8:30 a.m. – 8:00 p.m. EST (Monday – Friday) &... -
Page 4: Safety Information
This tool should only be serviced only by a qualified service technician. IMPORANT SAFETY INSTRUCTIONS SAVE THESE INSTRUCTIONS-This manual contains important safety and operating instructions for cordless circular saw Model HCCS200 DANGER To reduce the risk of fire or electric shock, carefully follow these operating instructions. General Power Tool Safety Warnings... - Page 5 SAFETY INFORMATION • Do not operate power tools in explosive atmospheres, such as in the presence of flammable liquids, gases or dust. Power tools create sparks which may ignite the dust or fumes. • Keep children and bystanders away while operating a power tool. Distractions can cause you to lose control.
- Page 6 SAFETY INFORMATION • Dress properly. Do not wear loose clothing or jewellery. Keep your hair and clothing away from moving parts. Loose clothes, jewellery or long hair can be caught in moving parts. • If devices are provided for the connection of dust extraction and collection facilities, ensure these are connected and properly used.
- Page 7 SAFETY INFORMATION • Use power tools only with specifically designated battery packs. Use of any other battery packs may create a risk of injury and fire. • When battery pack is not in use, keep it away from other metal objects, like paper clips, coins, keys, nails, screws or other small metal objects, that can make a connection from one terminal to another.
- Page 8 SAFETY INFORMATION • Hold the power tool by insulated gripping surfaces, when performing an operation where the cutting tool may contact hidden wiring. Contact with a “live” wire will also make exposed metal parts of the power tool “live” and could give the operator an electric shock.
-
Page 9: Preparation
SAFETY INFORMATION • Do not use dull or damaged blades. Unsharpened or improperly set blades produce narrow kerf causing excessive friction, blade binding and kickback. • Blade depth and bevel adjusting locking levers must be tight and secure before making the cut. -
Page 10: Package Contents
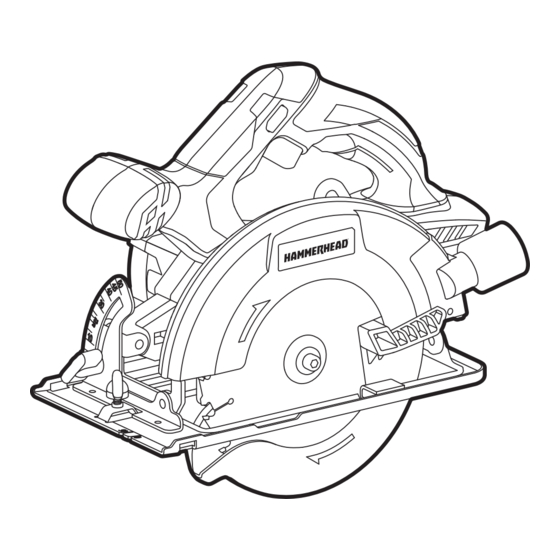
PACKAGE CONTENTS 20V 6-1/2" CIRCULAR SAW... - Page 11 PACKAGE CONTENTS PARTS DESCRIPTION Auxiliary Handle Lock-off Button Trigger Switch Upper Guard Lower-Guard Lift Lever Blade bolt Foot Blade outer flange 0° blade-guide notch 45° blade-guide notch Rip-Fence Locking Knob Bevel-Adjustment Knob Bevel Gauge Spindle-Lock Button Hex Key Storage Compartment Hex key Depth-of-cut Adjustment Lever Depth-of-cut Gauge...
-
Page 12: Operating Instructions
OPERATING INSTRUCTIONS 1. Attaching the Blade WARNING: Detach the battery pack from the tool before performing any assembly, adjustments, or changing accessories. Such preventive safety measures reduce the risk of starting the tool accidentally. WARNING: This tool is for cutting wood only. Use only the correct saw blades for wood-cutting operations. - Page 13 This cordless drill driver must be used only with the battery packs and charger listed below: BATTERY PACK CHARGER 1.5Ah 2.0Ah 4.0 Ah Hammerhead Hammerhead Hammerhead Hammerhead Hammerhead HCBT015 HCBT020 HCBT040...
- Page 14 OPERATING INSTRUCTIONS To attach the battery pack: Align the raised rib on the battery pack Detach with the grooves in the tool, and then Battery - Release slide the battery pack onto the tool. Button NOTICE: When placing the battery pack on the tool, be sure that the raised rib on the battery pack aligns with the groove in the tool and that the latches snap into...
- Page 15 OPERATING INSTRUCTIONS 4. Depth-of-Cut Adjustment The depth-of-cut adjustment lever is located beside the main handle. a) Detach the battery pack from the tool. b) Loosen the depth-of-cut adjustment lever. Indicator Mark c) Hold the foot of the saw flat against the edge of the workpiece Depth - of - cut and then raise or lower the saw Adjustment Lever...
- Page 16 OPERATING INSTRUCTIONS WARNING: Attempting to make bevel cuts without the bevel-adjustment knob securely tightened can result in serious injury. WARNING: Because of the increased amount of blade engagement in the work while bevel cutting and decreased stability of the foot, blade binding may occur. Keep the saw steady and the foot firmly on the workpiece.
- Page 17 OPERATING INSTRUCTIONS 7. Blade-guide notch For a 0° cut, align your line of cut with the left notch in the foot at the 0° 0° Indicator 45° Indicator indicator. For 45° bevel cuts, align your line of cut with the right notch at the 45° indicator. The Blade-guide notch will give an approximate line of cut.
- Page 18 OPERATING INSTRUCTIONS • Maintain a firm grip and operate the trigger switch with a decisive action. Never force the saw. Use light and continuous pressure. • When lifting the saw from the workpiece, the blade is exposed on the underside of the saw until the lower blade guard closes.
- Page 19 OPERATING INSTRUCTIONS 10. Rip Cutting Using a Straight Edge a) Secure the workpiece. b) Clamp a straight edge (not Desired Line of Cut included) to the workpiece using C-clamps (not included). NOTICE: Position the C-clamps so that they will not interfere with the saw housing during the cut.
- Page 20 OPERATING INSTRUCTIONS WARNING: Attempting a bevel cut without having the bevel- adjustment knob securely locked in place can result in serious injury. c) Attach the battery pack. d) Align the cutting line with the 45° indicator notch on the foot when making 45° bevel cuts.
- Page 21 OPERATING INSTRUCTIONS WARNING: Once the foot plate rests flat on the surface being cut, release the lower guard and move the hand holding the front of the foot plate to hold the auxiliary handle. g) Proceed cutting in forward direction to end of cut. WARNING: Allow blade to come to a complete stop before lifting the saw from cut.
-
Page 22: Care And Maintenance
CARE AND MAINTENANCE WARNING: To avoid serious personal injury, always remove the battery pack from the tool when cleaning or performing any maintenance. Service WARNING: Preventive maintenance performed by unauthorized personnel may result in misplacing of internal wires and components which could cause serious hazard. -
Page 23: Troubleshooting
TROUBLESHOOTING Suspected malfunctions are often due to causes that the users can fix themselves. Therefore, check the product using this section. In most cases the problem can be solved quickly. WARNING: Only perform the steps described within these instructions! All further inspection, maintenance and repair work must be performed by an authorised service centre or a similarly qualified specialist if you cannot solve the problem yourself! PROBLEM... -
Page 24: Warranty
This cordless circular saw is warranted to the original purchaser from the original purchase date for 24 Months, Hammerhead consumer portable power tool models will be free from defects in material or workmanship for a period of ninety days if the tool is used for professional use.