Advertisement
- 1 Warnings
- 2 Principle of Operation
- 3 Installation
- 4 Layout of Control Unit
- 5 Operation
- 6 Testing Operation
- 7 Technical Malfunction
- 8 Environmentally Caused Malfunction
- 9 Daily Performance Test
- 10 False Alarms
- 11 Troubleshooting Guide
- 12 Technical Specifications
- 13 Conditions of Operation & Storage
- 14 Contents
- 15 Cleaning and Disposal
- 16 Caring for your Babysense Connect
- 17 Documents / Resources
Warnings

- Ensure you read this user manual before installing and using the product.
- Babysense is a high quality, high sensitivity electronic device, which must be handled with care:
- Do not handle roughly, drop or throw.
- Follow the installation instruction carefully to ensure the device is installed securely and correctly. Babysense is not a toy. Do not allow children of any age to play with it.
- Do not put any additional baby or pet in the bed.
- Babysense Connect is intended for use with one infant and cannot be used for two infants in one bed.
- Babysense Connect cannot be used with co-sleepers that are attached to the parent's/caregiver's bed.
- Do not operate the unit in the presence of electromagnetic interference.
- Portable and mobile RF communications equipment may effect operation of this device.
- You must undertake the performance test daily and every time you move the monitor, change bedding or relocate crib/bed position (Daily Performance Test Section).
- Do not operate vaporizer or ventilator directly towards the bed.
- To avoid possible danger from sensor cords, ensure that excess cords are pulled back under the mattress, secured with the included cable tie and are not visible or reachable.
- Install 4 new and identical Alkaline size AA 1.5 volt batteries.
NOTE: Rechargable batteries may be used - www.babysensemonitors.com/pages/bs-connect-batteries for applicable list. The batteries must be fully charged before inserting in the Babysense Control Unit Please remove batteries if the device is not in use for an extended time (2 weeks or more). When using the device after having not used it for an extended period of time please install 4 new identical Alkaline AA Batteries or fully charge and insert the rechargable batteries (www.babysensemonitors.com/pages/bs-connect-batteries for applicable list.).
- If you have any problems with this device, such as setting up, maintaining or using, please contact the manufacturer's service personnel. Also, please report to the manufacturer if any unexpected operation or events occur.
- Do not use the equipment if you notice a change in the system's performance, if the system is damaged, or if any of its components are worn or frayed.
- The equipment should not be used adjacent to or stacked with other equipment. If adjacent or stacked use is necessary, the equipment should be observed to verify normal operation in the configuration in which it is used.
SAFETY INSTRUCTIONS FOR HUB AC POWER ADAPTER
- The adapter should not be exposed to direct heat sources such as a candle, stove, radiator, heat register or other appliance that emits heat.
- During continual use, the power adapters may become warm to the touch.
- Examine intactness of the power cord and its plug.
- The adapter must be handled with care: Do not handle roughly, drop or throw.
- Once removing the power adapter from the wall outlet, hold and pull from the receptacle. Do not pull on the cable itself or bend the cable as that will put additional stress on the cable and could lead to damages.
- Do not touch the power adapter with wet hands or allow liquids to spill on it.
- Make sure the mains adaptor cables are kept out of reach of your baby and other young children at all times. To avoid possible danger from power cords, the cords should be secured and never be hung on or near the crib.
- Do not replace the plugs or cable on your power adapter. This product should only be used with the AC power adapters supplied by the manufacturer, as included in this package.
- Never cut, damage or bend the power cord.
- Do not put any objects on top of the power cord, which could cause overheating, damage, inflammation and electrocution.
- Do not leave the power adapter connected to the wall outlet when it is not plugged into the Hub.
 Please note
Babysense monitors and alerts, but cannot prevent any type of distress. The responsibility for applying first aid rests on caretakers. The Babysense senses movements and motion only, and cannot monitor other occurrences. The purpose of the device is to alert when stopping or slowing of movement occurs.
Babysense is a unique safety and reassurance system which helps give parents peace of mind, alerting if movements stop or become irregularly slow, giving time to intervene. There are a number of cautionary steps, which are internationally applicable for SAFE SLEEPING:
- Always lay baby to sleep on his or her back.
- Refrain from smoking near or around baby.
- Avoid over-heating of baby's surrounding.
- Do not leave any objects near your baby that can cause suffocation.
- It is strongly advised that parents and caregivers learn how to give first aid to babies.
Babysense Connect is a home movement monitor for infants up to one year of age, and is not to be used with high-risk infants requiring constant medical supervision.
Medically trained staff such as nurses, or non-medically trained users such as parents or caregivers may use the Babysense Connect. Babysense Connect is intended for home use.
Principle of Operation
Babysense continually detects baby's movements and will set off a sound and visual alarm if movement stops within 20 seconds or if the monitor detects less than 10 micro-movements per minute. The system's non-touch, under the mattress sensor pads monitor baby's movement without restraining him.
Installation
applicable
- To insert the batteries, remove the battery cover by placing a flat screwdriver in the opening recess and gently pulling away from the control unit (see illustration 7). Insert, in accordance with the markings, the 4 supplied Alkaline size AA 1.5 volt batteries or the rechargable batteries (www.babysensemonitors.com/pages/bs-connect-batteries for applicable list.) and close cover.
Note: Please dispose of used batteries in accordance with local waste regulations.
Note: Once batteries are inserted the Blue LED will flash 3 times indicating that Bluetooth is activated.
- Place control unit holder on the base of the crib or bed and in between two bars as shown in illustration 1.

- Sensor pad installation:
In a crib/bassinet, the 2 sensor pads need to be placed at equal distance from the sides, so that the sensor pads are placed individually on the 1st and 3rd quarter of the crib/bassinet (See illustration 2). PLEASE NOTE: The sensors should be placed with the marking "THIS SIDE UP" facing up.

- When using a crib/bed equipped with spring base, place extra wooden board (plywood) under each sensor pad, as shown in illustration 3. The applicablesize of the board is at least 17'' x 11'' and 1/2'' thick.

- Pass the cords of the sensor pads through special openings in the holder (see illustration 4 and 5).

- Attach sensor pad connectors to the outlets marked "SENSOR" on the back of control unit (see illustration 6 and 7).
PLEASE NOTE: Do not insert any cable into the blocked socket, marked "DO NOT USE" (see illustration 7)

- Should the design of the crib not allow proper installation with the control unit holder, please use the supplied hanging hook (see illustration 6). Hang the control unit from the bottom edge of the crib or affix the hook with a screw (not supplied) to the bottom edge of the crib and hang the control unit from the bottom edge of the crib.
![]()
To avoid possible danger from sensor cords, ensure that excess cords are pulled back under the mattress, secured with the included cable tie and are not visible or reachable.

- Press control unit holder or hanging hook firmly and fully into slot in back of control unit (see illustrations 5, 6 and 7).
![]()
To avoid possible danger from sensor cords, ensure that excess cords are pulled back under the mattress, secured with the included cable tie and are not visible or reachable. - Place mattress securely on top of sensor pads, ensuring firm contact between the mattress and sensor pads is established.
- Please scan QR code below and follow instructions. You may also download the app by selecting "Babysense" app in the Apple App Store or Google Play Store.
![]()
![www.apple.com]()
![play.google.com]()


Note: The Babysense Connect comes with Bluetooth Activated.
- To stabilize connectivity and allow continuous communication between the Babysense Connect and the app, please place the hub in the same room as the Babysense Connect and ensure it is within Wi-Fi range. Please install (see instructions below) and pair the hub as per app instructions.
- To apply:

please remove the liner (1) and adhere the one half of the double-sided hook and loop strip to the wall (2) above the electrical outlet. Press the hub hook to the hook and loop strip on the wall (3). Attach the hub to the hub hook (4). - To remove:
![]()
please remove the Hub and the hub hook from the adhesive hook and loop strip on the wall. Hold the strip (5) and gently pull the tab down (6) until the strip loosens completely off the wall. - Connect the power adapter to the electrical outlet and the Hub.
- The LED on the side of the HUB will be on to indicate power. If no LED then the HUB is not getting power.


Note: When plugging in Hub please wait 2 minutes before pairing with cellular device.
Note: Once Hub is installed and connected, BLE can be turned off on your cellular device.
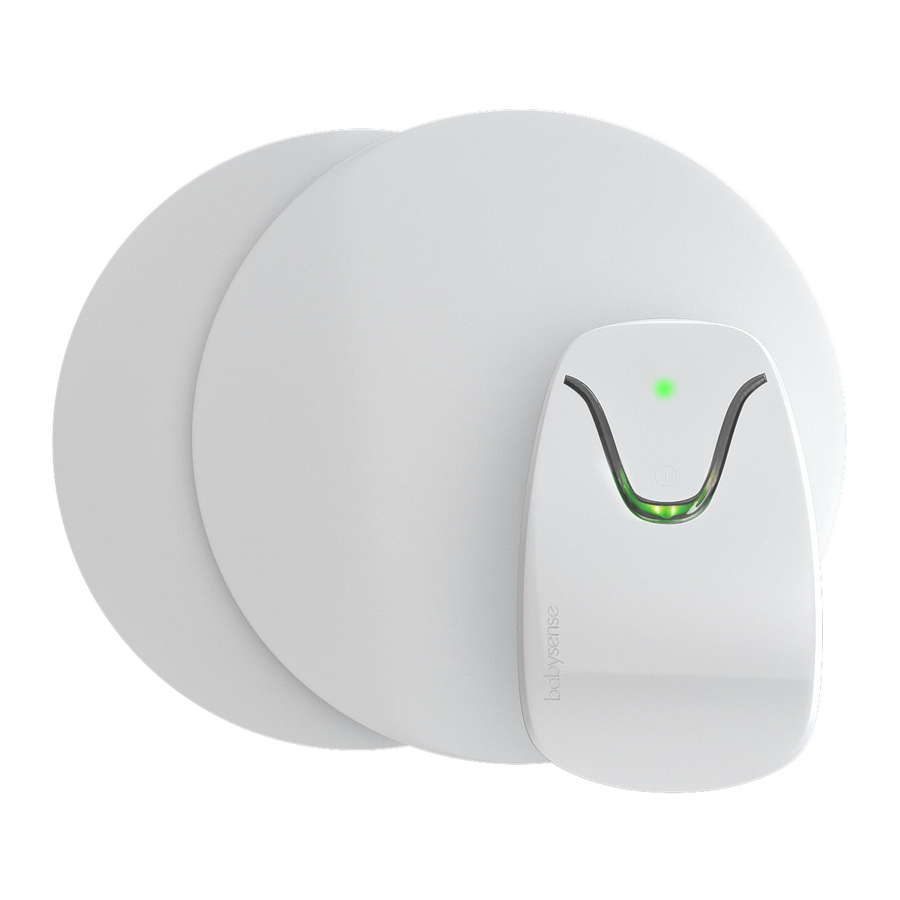
Layout of Control Unit
See illustration 8 for layout of control unit:

Lower LED
- Green Movement indicator light flashes
- Red flashing LED: Visual alarm
Upper LED:
- Green LED: power indicator
- Orange LED flashes at 5 second intervals alternating with the Green Power Indicator LED: low battery indication
- Orange LED flashes continuously: critical low battery indication
- Red flashing LED: Visual alarm
- Blue LED: Bluetooth activation
- Purple LED: updating software
Operation

Please note that the green LED (power indicator) is not an indicator for movements of the baby. It only indicates that the Babysense Connect Monitor is ON. When movement is sensed, the green movement LED light flashes.
Babysense is ready for operation and use once the installation is completed. To operate, follow the below instructions:
- Place your baby in crib/bed.
- Turn control unit on by pressing ON/OFF button.
- Make sure Green Power Indicator LED is illuminated briefly.
- When any movement is sensed, the green movement light flashes. NOTE: This is not an indication of the baby's movement rate but that movement is being sensed.
- Acoustic and visual red alarm light are activated if the baby's movement stops or slows significantly. If Orange LED light flashes in 5 second intervals and Green Power LED is on (low-battery warning), replace all batteries as soon as possible. If the Orange LED continuously flashes with no Green Power LED, all batteries must be replaced immediately or fully charge the rechargable batteries (www.babysensemonitors.com/pages/bs-connect-batteries for applicable list).
- Turn off control unit by pressing ON/OFF Power Button before taking your baby out of the crib / bed. Make sure the Green LED is off and no other lights are seen thereafter, to indicate the device is turned off.
Note: Ensure that the auditory alarm can be heard in all locations throughout the home or place of care and that the Babysense Connect Control Unit is hung with the LEDs facing out so that they are easily visible.
Testing Operation
Babysense Connect is a highly sensitive device, which monitors a baby's movements through the mattress during sleep. There are two main causes of malfunction - technical malfunctions and malfunctions due to environmental factors.
Technical Malfunction
In order to minimize technical problems, follow installation and operation instructions carefully.
Environmentally Caused Malfunction
Due to the high sensitivity of Babysense Connect, fans, wind, air-conditioning, and other similar environmental devices can influence it. Such environmental factors could be picked up by the sensors on a similar level to that of slight movements, thus preventing or delaying alarm activation.
If the Babysense Connect is concurrently used with other devices, it is required to conduct the Daily Performance Test (see Daily Performance Test Section) under an environment identical to the actual situation and while all concurrently used devices are "ON". Under such conditions, it is required to verify that the acoustic and visual alarms of Babysense Connect are activated
Daily Performance Test
Do not conduct performance test by picking the baby up out of the crib/bed and waiting for the alarm to sound
- The performance test should be conducted while the baby is not in the crib/ bed. Turn device on and take two steps away from bed.
- Ensure that alarm goes off within 20 seconds (due to absence of movement).
- The alarm may sound with or without preliminary ticking.
- Check that alarm can be heard in all locations throughout the home or place of care. Please ensure that the Babysense Connect Control Unit is hung with the LEDs facing out so that they are easily visible.
- In case the alarm does not sound within 20 seconds refer to the "Troubleshooting Guide"
- The Daily Performance Test must be conducted daily and every time you move the monitor, change bedding or relocate crib/bed position.
Note: The Daily Performance Test can be conducted via the Babysense App too (found under the name "Environmental Test").
False Alarms
Isolated cases of false alarms are possible. Should one occur, check to see if caused by faulty connection of sensor pads to the control unit or if the there is no direct connection between the mattress and sensor pads. In case of false alarms, kindly refer to the "Troubleshooting Guide". If the problem cannot be solved, please contact the manufacturer's service personnel.
Troubleshooting Guide
| Symptom | Possible Cause | Solution |
| Green Power Indicator LED on Control Unit doesn't illuminate when turned ON |
|
|
| Low battery Orange LED on the Control Unit |
|
|
| False alarm up to 30 seconds from activating |
|
|
| False alarm after 30 seconds from activating |
|
|
|
| |
|
| |
| No alarm due to Incorrect testing of the monitor by taking baby out the bed to test for alarm activation |
|
|
| The alarm does not sound within 20 seconds when performing the Daily Performance Test |
|
After neutralizing all environmental influences (eliminate sources of wind, remove the mobile toy etc.), perform the test again. If even after neutralizing all of the environmental influences, the alarm does not sound within 20 seconds, perform the following:
|
| Cellular Device and Hub did not connect |
|
|
| Unable to connect to Wi-Fi |
|
|
| LED flashes Green |
|
|
| LED flashes Red |
|
|
Technical Specifications
- Powered by 4 size AA, Alkaline 1.5 volt batteries. Power consumption approx. 3.3mA.
- Battery life approximately 2 months using Alkaline batteries. When using rechargable batteries (www.babysensemonitors.com/pages/bs-connect-batteries for applicable list) the battery life will be shorter.
- Alarm volume typically 85dB SPL at distance of one meter
- The diameter size of the sensor pad is 216mm
- Hub power input is a Micro-USB with 5V and 2A
- Babysense Connect has a service life of 3 years from date of purchase
Conditions of Operation & Storage
Conditions of operation are as follows:
- Temperature: 0°C to 40°C
- Relative humidity: 20 %RH to 80 %RH Atmospheric pressure: up to 55kPa
Conditions of storage between uses are as follows:
- Temperature: 0°C to 40°C
- Relative humidity: 5 %RH to 95 %RH Atmospheric pressure: up to 55kPa
Contents
- Control Unit
- Control Unit Holder
- Optional Hanging Hook
- 2 Sensor Pads
- Alkaline Batteries
- Hub
- Hub Power Adapter
- Hub Wall Mount
- 2 Cable Ties (tied around the sensor cables when supplied)
- User Manual
Cleaning and Disposal
As necessary, the device (sensor pads, control unit and hub) may be wiped with a damp cloth.
The device and accessories are to be disposed of according to local regulations after their service lives. Alternatively, they can be returned to the dealer or the manufacturer for recycling or proper disposal.
Caring for your Babysense Connect
Babysense Connect requires no special treatment beyond inserting 4 new identical AA Alkaline batteries when the battery indication LED flashes Orange. The sensor pads, control unit and hub may be wiped with a damp cloth.
Batteries should be removed, and device stored in a dry shaded place when not in use.
It is applicableto replace sensor pads two years after their first use. Use only Babysense Connect sensor pads.
Imported by Hisense Ltd
27 Shaked Street Hevel Modi'in
Industrial Park, 731990 ISRAEL
Tel +(972) 3 956 66 04
www.hisense.co.il | www.babysensemonitors.com

Distributed by:
Baby Monitor Direct LLC
2093A Philadelphia Pike
Suite 177
Claymont, DE 19703
Customer Support
If you have any further questions about using the product, please contact us via:
Email - support@babysensemonitors.com
US Toll-Free number (833) 568-2229 (USA ONLY)

Website - www.babysensemonitors.com
Other phenomena, symptoms, malfunctions – if you cannot find and solve the problem, please contact us at support@babysensemonitors.com

Documents / Resources
References
![www.babysensemonitors.com]() BS Connect Batteries
BS Connect Batteries![www.apple.com]() App Store - Apple
App Store - Apple![play.google.com]() Google Play
Google Play![www.hisense.co.il]() Hisense - our Babysense monitors helping protect millions of babies
Hisense - our Babysense monitors helping protect millions of babies![www.babysensemonitors.com]() Babysense Baby Monitors
Babysense Baby Monitors
Download manual
Here you can download full pdf version of manual, it may contain additional safety instructions, warranty information, FCC rules, etc.
Download Babysense Connect - Non-Contact Movement Monitor Manual
Advertisement
Thank you! Your question has been received!


Need Assistance?
Do you have a question about the Connect that isn't answered in the manual? Leave your question here.