Advertisement
- 1 BEFORE YOU BEGIN
- 2 DEVICE OVERVIEW
- 3 TURN TOOL ON / OFF
- 4 SCAN IN NORMAL SCAN MODE
- 5 USE DEEPSCAN MODE
- 6 RECALIBRATE FOR MORE ACCURACY
- 7 USE THE HANDLE
- 8 REPLACE BATTERIES
- 9 CHANGE INK RESERVOIR
- 10 ORDERING REPLACEMENT PARTS
- 11 USE THE POUCH
- 12 TROUBLESHOOTING & CONSTRUCTION TIPS
- 13 Documents / Resources
BEFORE YOU BEGIN
- Always use new alkaline batteries with an extended expiration date. Match battery directions to images inside of battery cavity.
- Do not rely exclusively on the tool to locate items behind a surface. Use other information to help locate such items before penetrating the surface, including construction plans and visible points of entry of pipes and wiring. - Readings should always be consistent and repeatable.
- Other objects commonly contained in walls, floors, or ceilings are water pipes, gas lines, firestops, and electrical wiring.- Sensing depth and accuracy can vary depending on scanning environment conditions such as mineral content, moisture, texture and consistency of the wall materials.
- Always turn off power when working near electrical wires.
- Depending on the proximity of electrical wiring or pipes to the wall surface, the scanner may detect them in the same manner as studs. Caution should always be used when nailing, cutting, or drilling in walls, floors, and ceilings that may contain these items.
- Targets deeper than 10 cm will not be detected.
- Avoid wearing jewelry, including a watch, while scanning, as the metal in the jewelry could interfere with readings.
DEVICE OVERVIEW

NOT SHOWN: Protective Pouch (with Velcro® closures and storage for pens or pencils and spare batteries)
BOTTOM VIEW

LCD DISPLAY VIEW

The MetalliScanner™ MT X electronic metal locator can not only locate metal studs, but is optimized to quickly locate a rebar grid in concrete (and other non-metallic materials). It is able to scan up to 10 cm deep and up to 7.6 cm deep in concrete. It can be used for residential, commercial, or industrial construction.
It is specifically tuned to locate rebar.
2 scanning modes
- Normal Scan for shallow rebar placed in tight grid patterns.
- DeepScan® for deeper pieces of pipe or rebar.
The tool's accuracy is typically +/– 13 mm.
When rebar is detected, use the marker to identify the spot.
TURN TOOL ON / OFF
To turn on, press any of the buttons beneath the display:

The display will illuminate.
 NOTE: Tool always powers up in Normal Scan Mode, indicated by this icon:

Tool calibrates automatically at power-up.
To turn off, press and hold  Button for 3 seconds.
Tool will turn off automatically after 3 minutes of inactivity.
SCAN IN NORMAL SCAN MODE
This tool is designed to locate tight rebar grid patterns behind or beneath a surface up to 5 cm deep.
Avoid wearing jewelry, including a watch, while scanning, as the metal in the jewelry could interfere with readings.
- Before scanning, clear debris, including sand and gravel, from the area. If the scanning surface is rough, cover it with thin cardboard.
- Turn the tool face down, open the yellow cap that covers the marker on the bottom of the tool (Figure A), and snap it into the cap slot.

Figure A - Scan from side to side. As the tool moves toward a target, the Signal Strength Indicators will begin to fill in on the display. (Figure B)

Figure B
If Audio is on (![]() ), a tone will emit when the tool is over the target.
), a tone will emit when the tool is over the target. - Press the tool against the surface to mark the spot.
- Continue scanning horizontally, marking each target found.
- Scan the same area again, but in a vertical direction. Repeat the scan for multiple targets, or to fully identify target using a grid pattern, mark each target as found.


 ), a tone will emit when the tool is over the target.
USE DEEPSCAN MODE
DeepScan Mode is optimized to detect metal as deep as 10 cm.
To use DeepScan Mode:
- Perform steps 1 and 2 as described under SCAN IN NORMAL SCAN MODE.
- Turn tool on. It always starts in Normal Scan Mode.
- Press the
![]() Mode Selection Button to switch to DeepScan.
Mode Selection Button to switch to DeepScan. - Follow steps 3 – 6 as described under SCAN IN NORMAL SCAN MODE.
 Mode Selection Button to switch to DeepScan.
To return to Normal Scan Mode, press  again, or turn the tool off and then back on.
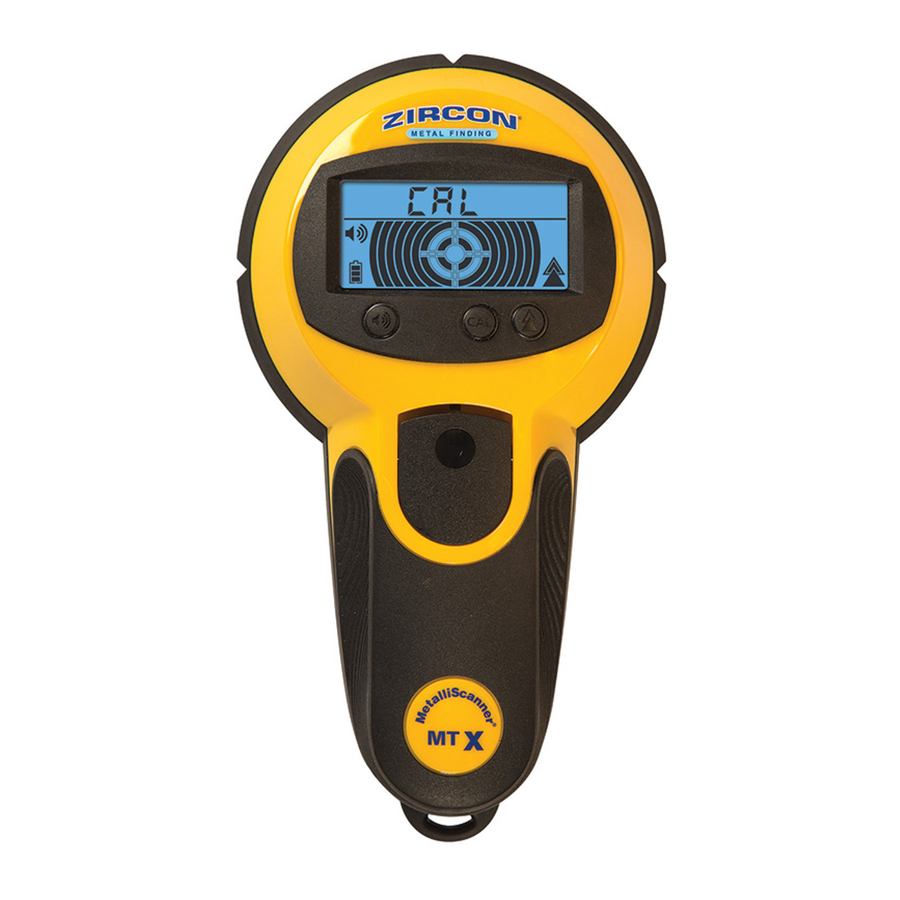
RECALIBRATE FOR MORE ACCURACY
The MT X calibrates automatically when the tool is turned on. However, accuracy is dependent on materials in the vicinity of the scan, particularly when metallic minerals may be present in the concrete, as is common.
- If the tool is unable to calibrate for any reason, Err will appear on the tool's display. If this happens, there is too much metal near the tool to calibrate properly. Move the tool to another location and perform the calibration process again by pressing and releasing the Calibration Button.
- If the target is near a large mass of metal, the tool may not be able to locate the centre. Recalibrate and/or move the tool away and move back slowly.
- This tool recalibrates automatically. Always perform several scans of an area to confirm that consistent results are achieved.
To manually recalibrate:
- Locate an area on the surface free of metal. If a tight pattern exists, calibrate at a midpoint between targets.
In this situation, accuracy may be affected and recalibration may not improve the overall accuracy. - With the tool on, press and release the
![]() Calibration Button. The CAL message will flash on the display.
Calibration Button. The CAL message will flash on the display. - Scan the target area again.
 Calibration Button. The CAL message will flash on the display.
USE THE HANDLE
The tool can be used as a hand-held tool or with the pivoting handle attachment.
To attach handle to the tool:
- Open the hatch by pressing the dimpled area. The hatch will lift up. (Figure C)
![]()
Figure C
- Align the handle so that the button on the tip of the handle is flush against the hatch door. Push down gently until it snaps securely in place. (Figure D)

Figure D - To remove the handle, hold the tool in place with one hand.
- With the other hand, pull the handle up from the base.
![warning]() NOTE: Do not use the pole attachment overhead.
NOTE: Do not use the pole attachment overhead.


REPLACE BATTERIES
To install new batteries:
- Using a screwdriver, loosen securing screw on end of battery cover. (Figure E)

Figure E - Gently lift battery cover. (Figure F)

Figure F - Remove old batteries and replace with new AA (LR6) alkaline batteries, matching directions to the diagrams inside the battery cavity. (Figure G)

Figure G
- Close the battery door and tighten the screw securely back in place.


NOTE: The screw provides a water-tight seal. Tighten the screw securely to maintain the seal.
CHANGE INK RESERVOIR
- Open cap and grasp firmly at base (Figure H) and twist counter-clockwise until it loosens.

Figure H - Lift to remove.
- Insert new reservoir and twist clockwise until it locks in place. The cap, when open, should align with the cap slot.

ORDERING REPLACEMENT PARTS
To order replacement parts, email techsupport@zircon.com.
USE THE POUCH
The tool comes with a versatile protective pouch:
- Padded pouch holds and protects tool, instructions, and handle attachment
- Velcro flap keeps pouch securely closed
- D-rings on end of flap and bottom of pouch can be used to lock pouch
- Clear front pocket holds ID for company or individual
- Velcro straps can be used as a shoulder strap, strapped around waist, or hung from belt loops
- D-ring on back can be used to hang pouch when not in use
- Exterior elastic loops conveniently hold pencils, pens, or small tools
- Interior elastic loops can hold 3 AA batteries

Scan the QR code above for more information on this tool and watch a video demonstrating the uses of the protective pouch or visit: https://qr.zircon.com/metalliscanner-mt-x/.
TROUBLESHOOTING & CONSTRUCTION TIPS
| SITUATION | LIKELY CAUSE | SOLUTION |
| Difficulty detecting metal accurately. | Metal objects grouped too closely prevent calibration. |
|
| Calibration is lost. | Tool was turned off. | Tool calibrates automatically when powered up. Recalibrate as needed for more accurate readings by pressing the CAL Button. |
| Err appears on display. | A calibration error has occurred. | Reposition the tool and recalibrate. |
| Battery Strength Indicator flashes. | Low battery. | Install 3 new AA (LR6) alkaline batteries with extended expiration dates. |
 ZirconCorporation
 ZirconTV
 ZirconTools | ZirconToolPro
 ZirconTools

Documents / Resources
References
Download manual
Here you can download full pdf version of manual, it may contain additional safety instructions, warranty information, FCC rules, etc.
Download Zircon MetalliScanner MT X - Electronic Metal Locator Manual
Advertisement
Thank you! Your question has been received!


Need Assistance?
Do you have a question about the MetalliScanner MT X that isn't answered in the manual? Leave your question here.