Kenmore Elite KKECMGBSS - Grind & Brew Coffeemaker Manual
- Use & care manual (13 pages)
Advertisement
IMPORTANT SAFETY INSTRUCTIONS
When using electrical appliances, basic safety precautions should always be followed, including the following:
- Read all instructions.
- DO NOT touch hot surfaces. Use handles or knobs.
- To protect against fire, electric shock and injury to persons, DO NOT immerse cord, plug, or the coffeemaker in water or other liquids.
- Close supervision is necessary when any appliance is used by or near children.
- ALWAYS UNPLUG coffeemaker from power outlet when not in use and before cleaning. Allow to cool before putting on or taking off parts, cleaning or storing.
- DO NOT operate any appliance with a damaged cord or plug, or after the appliance malfunctions or has been dropped or damaged in any manner. Return appliance to the nearest authorized service facility for examination, repair or adjustment.
- The use of accessory attachments not recommended by the appliance manufacturer may result in fire, electric shock or injury to persons.
- DO NOT use outdoors.
- NEVER let the cord hang over the edge of table or counter, or touch hot surfaces.
- DO NOT place coffeemaker on or near a hot gas or electric burner, or in a heated oven.
- DO NOT use this appliance for anything other than its intended use.
- The carafe is designed for use only with this coffeemaker.
- Scalding may occur if the lid is removed during the brewing cycles. ALWAYS keep the lid on the carafe when in use.
- DO NOT unplug the appliance while coffee is brewing! Press the Start/Stop button to stop brewing before unplugging the appliance from the electrical outlet.
- To protect against electrical shock, this appliance is equipped with a cord having a 3-prong grounding-type plug for insertion into a proper grounding-type receptacle. DO NOT alter the plug for use in a 2-prong receptacle. If the plug will not fit into a receptacle, have the proper receptacle installed by a qualified electrician.
- Observe the following for proper and safe carafe use:
- Do not set a hot carafe on a wet or cold surface.
- Do not use a cracked carafe or a carafe having a loose or weakened handle.
- Do not clean carafe with cleansers, steel wool pads, or other abrasive material.
- The carafe is designed for use with this appliance only; it must never be used on a range top.
- This appliance is for HOUSEHOLD USE ONLY!
- This appliance is not intended for use by persons, including children, with reduced physical sensory or capabilities, or lack of experience and knowledge, unless they have been given supervision or instruction concerning use of the appliance by a person responsible for their safety.
SHORT POWER CORD INSTRUCTIONS
This appliance is equipped with a short retractable power-supply cord to reduce the risk resulting from becoming entangled in or tripping over a longer cord. Extension cords may be used if care is exercised in their use.
If an extension cord is used:
- The marked electrical rating of the cord set or extension cord should be at least as great as the electrical rating of the appliance cord.
- The cord should be arranged so that it will not drape over the countertop or tabletop where it can be pulled on by children or tripped over unintentionally.
- The extension cord should be a grounding type 3-wire cord.
 To reduce the risk of fire or electric shock, DO NOT remove the cover at the bottom of the unit. There are no user serviceable parts inside. |
SAVE THESE INSTRUCTIONS!
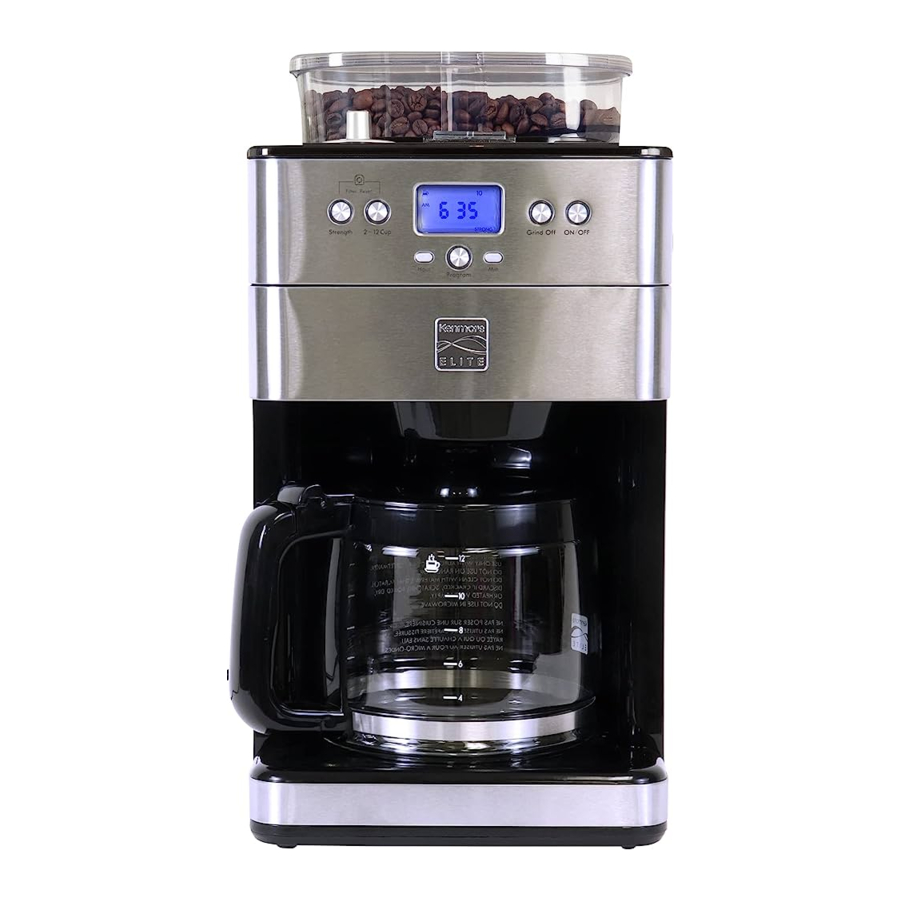
PARTS AND FEATURES

PREPARING TO USE YOUR COFFEEMAKER
- Before the first use of the coffeemaker wash the brew basket, the permanent gold-tone filter, the carafe and carafe lid in either the top rack of your dishwasher, or by hand in warm, sudsy water.
- The exterior of the coffeemaker, the control panel area and the warming plate should only be cleaned with a soft damp cloth.
NOTE - NEVER clean the warming plate unless it is completely cool.
NOTE - DO NOT use abrasive cleansers or scouring pads when cleaning the unit. NEVER immerse the coffeemaker in water or any liquid.
After all parts are washed for the first time, pour cold water up to the 12 cup level mark in the water reservoir. Brew it through the coffeemaker as instructed in BREWING COFFEE, but do not add coffee grounds to the filter. When done, turn off the coffeemaker and discard the water from the carafe. This will remove any possible residue left over from the manufacturing process.
OPERATING YOUR COFFEEMAKER
CONTROL PANEL

ON/OFF
If you want to start or stop the current operation, you need to press the ON/OFF button. The button LED is either on or off to indicate operating status. When the machine is in brewing mode, the Grind Off, Program, Hour, Min, 2-12 Cup and Strength buttons cannot be used. However, other buttons that do not affect the current grind and brew procedure can be pressed.
PROGRAM
Briefly press this button to start or stop the delay brew after setting the current time and delay brew time. The PROG button LED will turn on or off accordingly. After setting the current time, long press the PROG button, then enter the delay brew setting state. The initial setting is "12:00 PM", 10 cups, medium strength, grind and brew. Now press the "Hour" button, then "Min" (minutes) to set the delay brew time. If no operation is performed for 10 seconds, the brew delay setting is set. Briefly press the PROG button to start the delayed brew.
HOUR
Button for setting the time. Press the HOUR button to set the hour. The setting range can be 0-12 AM-PM. The clock stops running during this time, the second digit displays zero, and if you set the time for brew delay, then brew delay times will display.
MIN
Button for setting the minutes. Press the MIN (minutes) button to set the minutes. The setting range can be from 0 to 59 minutes. The clock stops running during this time, the second digit displays zero, and if you set minutes for brew delay, then brew delay minutes will display.
STRENGTH
Strength adjustment knob (light, medium, strong). Press the STRENGTH button to adjust the strength, and when pressed, the STRENGTH button LED will illuminate.
2-12 CUP
Number of cups selection button (this function allows you to choose the quantity of ground coffee for 2, 4, 6, 8, 10, 12 cups of coffee). Use this button to set the desired number of cups. Once you press this button, the 2-12Cup (2-12 tases) button LED will light up. When you choose 2.4 cups, the heater will run for 20 seconds, then turn off for 10 seconds while brewing. For other cups, it will heat at full power.
GRIND OFF
Button to select different types of coffee. When the Grind Off button LED is on, this indicates brewing only. When the Grind Off button LED is off, this indicates both grind and brew activation.
Pressing the STRENGTH button and 2-12 CUP button simultaneously will reset filter.
BREWING COFFEE
The easy-to-use programmable digital controls let you know when the coffee is ready, and even keeps track of the freshness of each brewed carafe. It's never been easier to brew the perfect cup of coffee.
- Press the OPEN button on the right side of the unit and swing out the Filter Basket Door. See Fig. 2

- Fill the water reservoir with cold water. You ca use the coffee carafe to fill with the amount of water you require. There is a gauge for 2 to 12 cups (270ml to 1730ml) on both the water reservoir window and on the glass carafe. These markings apply for the amount of fresh water. The amount of brewed coffee will differ slightly, as the coffee grinds absorb some water. Be sure to add no more than 12 cups, or the carafe may overflow.
- Place the permanent gold-tone filter (or a No. 4 basket paper filter) into the filter basket. You can use both the gold-tone filter and the paper filter together. Using the gold-tone filter alone will allow some fine grounds to fall into the coffee carafe. This will appear as sediment in the carafe.
NOTE - When using the gold-tone filter, be sure to position its handle to the front of the coffeemaker. Otherwise the handle may interfere with the flow of the coffee from the grinder into the filter basket. - Remove the hopper lid and fill the hopper with coffee beans. Be sure to have enough beans in the hopper for the amount of coffee you intend to brew. The hopper should always be kept at least half full, maximum capacity is about 1/2 lb. Do not overpack, as it could jam the grinder. See Fig. 3.

- Turn the Grinder Selector Knob to chose the preferred size of the coffee grounds, coarse, medium or fine. See Fig. 3a.
- Plug in the appliance. The LCD display window lights up and the coffeemaker will beep for about 2 seconds to let you know the clock is not set.
The clock does not have to be set to brew coffee. To set the clock, see SETTING THE CLOCK TIMER AND AUTO-BREWING.
Each time you turn the unit on, the message: Check Basket, shows up on the LCD display window. This is a reminder to see if used grounds are still in the filter basket. To remove the message, push the ON/OFF button. - Choose the amount of cups you intend to make by pressing the 2 - 12 Cup Button. Press button until the desired number of cups is highlighted in LCD display window. See Fig. 4. The coffeemaker will grind the corresponding amount of beans. It will also automatically adjust for low cup settings.

- To select the strength of the coffee, press the Strength button until the desired strength (mild, medium, strong) is highlighted in the LCD display window. See Fig. 5.

- To use pre-ground coffee, push the Grind Off button to disable the grinder feature. The Grind Off button will stay backlit. Add ground coffee to the paper or gold-tone filter. The amount of coffee you use is a matter of personal taste. For an average strong coffee, one measuring spoon (approx. 4-5g) is sufficient per cup (150ml).
- Close the filter Basket Door. Place carafe on the Warming Plate. Turn on the coffeemaker by pressing the ON/OFF button. The ON/OFF button will be backlit. When the brewing cycle is finished, the coffeemaker beeps 5 times. Coffee continues to enter the carafe for several seconds. The coffeemaker automatically switches to the warming mode. The Coffee Cup icon in the LCD display window flashes. For delayed brewing, see SETTING THE CLOCK, TIMER AND AUTO-BREWING.
- When you are finished using up the coffee in the carafe, press the ON/OFF button to turn off the appliance, and remove the carafe from the warming plate. NOTE: If the coffeemaker is not turned off, it will keep the coffee warm for two hours and then automatically shut off.


PAUSE AND POUR FEATURE
The pause and pour feature enables you to remove the carafe from the Coffeemaker and pour a cup of coffee before brewing is finished. When the carafe is removed, a special valve stops the flow of coffee from the brew basket to the carafe. Brewing does not stop. If the carafe is not replaced under the brew basket after 20 seconds, water and coffee will overflow from the brew basket.
SETTING THE CLOCK, TIMER AND AUTO-BREWING
Use the HOUR and MIN Buttons to set the clock
- Set the time of day by pressing the HOUR and MIN buttons. Be sure to set the time with the correct AM and PM designation.
- You can make the hours and minutes move more quickly in the clock display by holding the buttons in. The clock starts a few seconds after you finish setting it.
PROGRAM AN AUTOMATIC BREW TIME
Use the PRPGRAM button.
- First set the clock. See directions above.
- Press and hold the PROGRAM button until the button's indicator light flashes to let you know you are in programming mode.
- Set the time you wish the coffeemaker to begin brewing by pressing the Hour and Minute buttons. Be sure to set the correct designation of AM or PM.
- You can make the hours and minutes move more quickly in the clock display by holding the buttons down.
- When you have set the brew time, press the Program button again and the Coffeemaker will begin to count down to the programmed time. The Program button stays backlit to show the Coffeemaker is in the program mode.
The coffeemaker will shut itself off 2 hours after the brewing finishes. At this time another long beep will sound. A long beep also sounds when the coffeemaker is turned OFF.
CARE AND CLEANING
| NOTE - Always turn coffeemaker off and remove the plug from the electrical outlet before cleaning unit. |
| NEVER immerse the coffeemaker in water or any liquid. |
| DO NOT clean the warming plate unless it is completely cool. DO NOT use abrasive cleansers or scouring pads. |
The exterior of the coffeemaker, the control panel area and the warming plate should only be cleaned with a soft damp cloth.
After every use, open filter basket door by pressing filter basket door release button. Remove filter basket, gold-tone filter or paper filter. Discard ground coffee and paper filter.
Remove the carafe from the heating plate. Discard any remaining coffee.
Wash the coffee carafe, carafe lid, filter basket and gold-tone filter in warm sudsy water and rinse thoroughly, or clean in the upper rack of the dishwasher.
Dry all parts after every use.
Any other servicing should be performed by an authorized service representative.
CARAFE CARE
A damaged carafe may result in possible burns from a hot liquid.
To avoid breaking:
- DO NOT allow all liquid to evaporate from the carafe while on the warming plate and never heat the glass carafe when empty.
- DISCARD the carafe if chipped, cracked, or damaged in any manner.
- NEVER use abrasive scouring pads or cleansers; they will scratch and weaken the glass.
- DO NOT place the carafe on or near a gas or electric burner, in a heated oven, or in a microwave oven.
- Avoid rough handling and sharp blows.
- DO NOT set a hot carafe down on a wet or cold surface.
CLEANING THE COFFEE BEAN CHUTE
NOTE - Always turn coffeemaker off and remove the plug from the electrical outlet before cleaning unit.
We suggest cleaning the Coffee Bean Chute every 1 to 2 weeks, depending on frequency of use.
To clean the Chute, use the back end of the brush handle and insert in the Lock/Turn button. Turn to the ![]() position and lift up the Chute Cover. See Fig. 6.
position and lift up the Chute Cover. See Fig. 6.

Use the brush to brush any ground coffee that remains down into the lowest part of chute. Be sure to have a filter in place. Coffee grinds will go into filter.
Close Chute Door and turn button back to ![]() position.
position.
NOTE - Failing to properly clean the coffee chute may lead to grind accumulations, which can result in weak-tasting coffee.
CLEANING THE COFFEEMAKER AND CHANGING THE WATER FILTER
After every 70 cycles, or carafes of coffee, a Clean Filter  icon will flash on and off in the control panel display to tell the user it is time to clean the inside of the coffeemaker of all mineral buildup, and to change the charcoal water filter. See Fig. 7

Mineral deposits left by hard water can clog your coffeemaker. Cleaning is recommended about every 70 uses, when the coffeemaker's reminder lets you know you have reached this point.
TO CLEAN
- Open the lid of reservoir, and pull out the water filter. See Fig. 8.
![]()
- Pour white vinegar into water reservoir up to the 6-cup level shown in the reservoir's window.
- Add cold water up to the 12-cup line.
- Put a paper filter in the brew basket, close door, and place empty carafe on the warming plate.
- Turn ON the coffeemaker and let half of the vinegar water solution brew through into carafe.
- Turn the coffeemaker OFF at this point and let it soak for at least 15 minutes to soften any deposits.
- Turn the coffeemaker back ON and brew the remaining solution into the carafe. When brew cycle has stopped, turn OFF coffeemaker, empty carafe, and discard soiled paper filter.
- Refill reservoir with cold water and turn ON to run another brew cycle. You may want to repeat again to eliminate any vinegar smell/taste.
- Wash the brew basket and carafe.

TO CHANGE THE CHARCOAL WATER FILTER
- Remove new filter from wrapping and soak in cold tap water for 15 minutes.
- Grasp the water filter holder's stem in one hand, with the word Open facing up. Using the thumb of the other hand, gently press down and pull toward you. See Fig. 9. Compartment will flip open.

- Place the filter in the holder and close the water filter holder; you will hear a snap indicating the filter is in place.
NOTE - Use caution when inserting the new water filter so that it does not tear. - Hold the filter under cold running tap water to flush, being sure to have the hole openings in the unit directly under the water stream. Allow water to drain from filter completely.
- Place the new charcoal water filter into the water reservoir, pushing it all the way down into the base. Coffeemaker is cleaned and ready for use.

To remove the Clean Filter icon in the Control Panel Display, push the Strength and 2 -12 Cup buttons simultaneously.
Customer Assistance
1-800-265-8456
www.koolatron.com

Documents / Resources
References

Download manual
Here you can download full pdf version of manual, it may contain additional safety instructions, warranty information, FCC rules, etc.
Download Kenmore Elite KKECMGBSS - Grind & Brew Coffeemaker Manual
Advertisement
Thank you! Your question has been received!


Need Assistance?
Do you have a question about the KKECMGBSS that isn't answered in the manual? Leave your question here.