Sony Walkman SRF-M37, SRF-M37L Manual
- Operating instructions (2 pages) ,
- Service manual (17 pages)
Advertisement
- 1 Overview
- 2 Before You Begin
- 3 Features
- 4 Installing the Battery
- 5 Using the Belt Clip
- 6 Preventing Accidental Change — HOLD Function
- 7 Setting the Clock
- 8 Changing AM(MW) Channel Step
- 9 Improving the Reception
- 10 Operating the Radio — Manual Tuning
- 11 Presetting Your Favorite Station — Preset Tuning
- 12 Precautions
- 13 Troubleshooting
- 14 Specifications
- 15 Documents / Resources
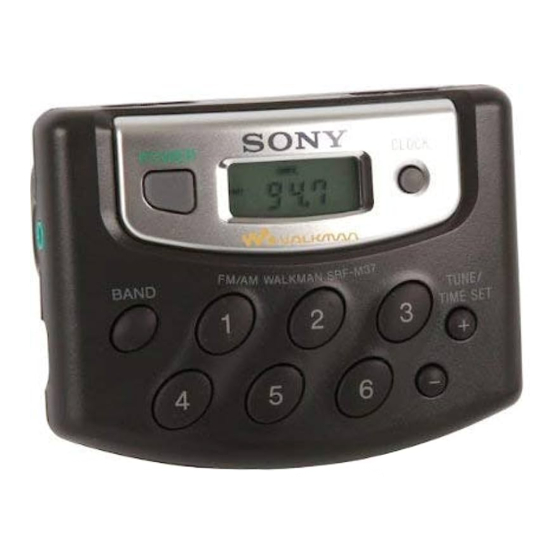
Overview

*1 accessories vary depending on model. Refer to "Specifications."
*2 There is a tactile dot on/beside Vol, TUNE/TIME SET +, and the number 2 button.
Before You Begin
Sonny radio will give you many hours of reliable service and listening pleasure.
Before operating the radio, please read these instructions thoroughly and retain them for future reference.
Features
- FM stereo/AM (SRF-M37) or FM stereo/MW/LW (SRF-M37L) PLL (phase locked loop) synthesized radio.
- Easy Preset Digital Tuning with 18 (SRF-M37) or 24 (SRF-M37L) memory presets.
- 6 direct presets calls.
- Ergonomic Design for belt-holder use.
Notes on AM(MW) Channel Step
The AM(MW) channel step differs depending on areas. See "Changing AM(MW) Channel Step".
Installing the Battery

(See Fig.  )
)
- Open the battery compartment lid and install one R03 (size AAA) battery (not supplied) with correct polarity.
When battery is first installed, "AM 12:00" or "0:00" flashes in the display. Once the current time is set, the flashing stops. - Close the lid.
| Battery Life (Approx. hours) | (JEITA*) | ||
| When using | FM | AM | MW/LW |
| Sony alkaline LR 03 (size AAA) | 35 | 52 | 52 |
| Sony R03 (size AAA) | 14 | 21 | 21 |
* Measured by JEITA (Japan Electronics and Information Technology Industries Association) standards. The actual battery life may vary depending on the circumstance of the unit.
When to replace the battery
You can check the remaining battery power that appears in the display. The indicators are as follows:
Indicator

* Displayed only when the radio is turned on.
Note
Do not take more than 3 minutes to replace the battery, otherwise, your clock settings and preset stations will be initialized. Should that happen, reset the functions again.
Notes on battery
- Do not charge the dry battery.
- Do not carry the dry battery together with coins or other metallic objects. It can generate heat if the positive and negative terminals of the battery are accidentally come into contact with metallic objects.
- When you are not going to use the unit for a long time, remove the battery to avoid damage from battery leakage and corrosion.
To attach the battery compartment lid if it is accidentally detached
(See Fig.  )
)
The battery compartment lid is designed to come off when opened with excessive force. To put it back on, see the illustration.
- Insert one side of the lid as illustrated.
- Push the other side to attach.
Using the Belt Clip
(See Fig.  )
)

Use the belt clip when attaching the unit to your belt.
To detach the belt clip, see fig.  .
.
To attach the belt clip, see fig.  .
.
Preventing Accidental Change — HOLD Function
Slide HOLD in the direction of the arrow.
" " is displayed, indicating that all the function buttons are locked.
To cancel HOLD, slide HOLD in the opposite direction of the arrow so that "" disappears.
Setting the Clock
The display will flash "AM 12:00" or "0:00" when the battery is first inserted.
- Hold down CLOCK for more than 2 seconds.
The beep sounds and the hour flashes in the display.
![]()
- Press TUNE/TIME SET + or – until the correct hour appears in the display.
Each press changes the digit(s) by one.
When you keep the button pressed, the digit(s) change rapidly. - Press CLOCK.
The beep sounds and the minute starts to flash.
Repeat step 2 to set the minute. After setting the minute, press CLOCK again. The two beeps sound and the clock starts from 0 seconds.
![]()
The clock system varies depending on the model you own.
12-hour system: "AM 12:00" = midnight
24-hour system: "0:00" = midnight


Changing AM(MW) Channel Step
The AM(MW) channel step differs depending on areas. The channel step of this unit is factory-set to 9 or 10 kHz. Change the settings as shown below to be able to listen to the radio.
| Area | Channel step |
| North and South American countries | 10 kHz |
| Other countries | 9 kHz |
Note
When the AM(MW) channel step is changed, the preset stations for AM(MW) will be initialized.
- Press POWER to turn off the power.
- While holding down CLOCK, keep pressing POWER for more than 5 seconds.
Two short beeps sound, and the AM(MW) channel step will be changed.
"AM(MW) 9" (or "AM(MW) 10") is displayed for about 2 seconds. If you proceed to step 2 again, the channel step changes again.
Improving the Reception

FM: Extend the headphones/stereo earphones cord which functions as the FM antenna (See Fig.  ).
).
AM(MW)/LW: Rotate the unit horizontally for optimum reception. A ferrite bar antenna is built-in the unit (See Fig. ).
).
Set FM SENS to LOCAL if interference is prevalent and reception is too strong. Under normal conditions, set it to DX.

Operating the Radio — Manual Tuning
- Connect the headphones/stereo earphones to the
![]() jack.
jack. - Press POWER to turn on the radio.
- Press BAND to select the band.
Each press changes the band as follows:

FM1 and FM2 are differentiated only for Preset tuning. For Manual tuning of FM stations, select either band.
Each band memorizes the frequency you had tuned previously. You can return to the previous frequency by pressing BAND. - Press TUNE/TIME SET + or – to tune in to the desired station.
The FM channel step is set to 0.1 MHz and the AM channel step is set to 10 kHz (North and South American model).
The FM channel step is set to 0.05 MHz* and the AM channel step is set to 9 kHz (other models).
* The FM frequency display is raised or lowered by a step of 0.1 MHz. For example, frequency 88.00 and 88.05 MHz is displayed as "88.0 MHz."
Two short beeps sound when the minimum frequency of each band is received during tuning. - Adjust the volume using VOL.

To turn off the radio, press POWER.
Presetting Your Favorite Station — Preset Tuning
You can preset up to 12 stations in FM (6 stations in FM1, 6 stations in FM2), and 6 stations in AM (North and South American model) or each MW, LW (other models).
Presetting a station
- Follow steps 1 to 4 in "Operating the Radio" and manually tune in to the station you wish to preset.
- Press the preset tuning 1 to 6 button you wish to preset for more than a few seconds.
You will hear two confirmation beeps and preset number appears in the display.
To preset another station, repeat these steps.
To change the preset station, tune in to the desired station and hold down the preset tuning 1 to 6 button. The new station will replace the previous station on the preset button.
Example: Display window when you preset FM 90.0 MHz in the preset tuning 2 button for FM2.
![]()

Tuning in a Preset Station
- Press POWER.
- Press BAND to select the band.
- Press the desired preset tuning button.
- Adjust the volume using VOL.
Note
Holding down the desired preset tuning button for more than a few seconds will replace the previous station on the preset tuning button with the station you tuned in to.
Precautions
- Operate the unit only on 1.5 V DC with one R03 (size AAA) battery.
- Avoid exposure to temperature extremes, direct sunlight, moisture, sand, dust or mechanical shock. Never leave the unit in a car parked under the sun.
- Should any solid object or liquid fall into the unit, remove the battery and have the unit checked by qualified personnel before operating it any further.
- In vehicles or buildings, radio reception may be difficult or noisy. Try listening near a window.
- To clean the casing, use a soft cloth dampened with a mild detergent solution.
Notes on Headphones /stereo earphones
Road safety
Do not use headphones/stereo earphones while driving, cycling, or operating any motorized vehicle. It may create a traffic hazard and is illegal in many areas. It can also be potentially dangerous to play your headphones/stereo earphones at high volume while walking, especially at pedestrian crossings. You should exercise extreme caution or discontinue use in potentially hazardous situations.
Preventing hearing damage
Avoid using headphones/stereo earphones at high volume.
Hearing experts advise against continuous, loud and extended play. If you experience a ringing in your ears, reduce volume or discontinue use.
Caring for others
Keep the volume at a moderate level. This will allow you to hear outside sounds and to be considerate to people around you.

If there is lightning when you are using the unit, take off the headphones/stereo earphones immediately.
If you have any questions or problems concerning your unit, please consult your nearest Sony dealer.
Troubleshooting
Should any problem persist after you have made the following checks, consult your nearest Sony dealer.
All buttons do not operate at all.
- "
![]() " is displayed. Slide the HOLD switch so that "
" is displayed. Slide the HOLD switch so that "![]() " disappears.
" disappears.
Very weak or interrupted sound, or unsatisfactory reception
- Weak battery.
- In a vehicle or in a building, move closer to a window.
Display is dim, or no indication is displayed.
- Weak battery.
- The unit is being used in extremely high or low temperatures or in a place with excessive moisture.
The station cannot be received when a PRESET TUNING (1 to 6) button is pressed.
- You chose the wrong preset number.
- The memory of the station has been initialized. Preset the station again.
The power cannot be turned on, and " " is flashing in the display.
- The battery have been completely exhausted.
The preset stations may be initialized, if a maintenance service is performed.
Please note down your settings in case you want to preset them again.
Specifications
Time display:
North and South America: 12-hour system
Other countries: 24-hour system
Frequency range
| Model for North and South America | ||
| Band | SRF-M37 | Channel step |
| FM | 87.5-108 MHz | 0.1 MHz |
| AM | 530-1 710 kHz 531-1 710 kHz | 10 kHz 9 kHz |
| Model for other countries | ||
| Band | SRF-M37L | Channel step |
| FM | 87.5-108 MHz | 0.05 MHz |
| MW | 531-1 602 kHz 530-1 610 kHz | 9 kHz 10 kHz |
| LW | 153-279 KHz | 9 kHz |
Output
 jack (ø 3.5 mm, stereo minijack)
Power output
2.8 mW + 2.8 mW (at 10% harmonic distortion)
Power requirements
1.5 V DC, one R03 (size AAA) battery
Dimensions
Approx. 83 × 63 × 32 mm (w/h/d) (3 3/8 × 2 1/2 × 1 5/16 inches) incl. projecting parts and controls
Approx. 83 × 63 × 25 mm (w/h/d) (3 3/8 × 2 1/2 × 1 inches) not incl. projecting parts and controls
Mass
Approx. 94 g (3.32 oz.) incl. battery and belt clip
"WALKMAN" is a registered trademark of Sony Corporation to represent Headphone Stereo products.  is a trademark of Sony Corporation.

Documents / Resources
References
Download manual
Here you can download full pdf version of manual, it may contain additional safety instructions, warranty information, FCC rules, etc.
Advertisement
Thank you! Your question has been received!


Need Assistance?
Do you have a question about the Walkman SRF-M37 that isn't answered in the manual? Leave your question here.