Sony WEGA KV-SW212 Operating Instructions Manual
Trinitron color tv
Hide thumbs
Also See for WEGA KV-SW212:
- Operating instructions manual (24 pages) ,
- Operating instructions manual (22 pages) ,
- Operating instructions manual (46 pages)
Advertisement
Available languages
Available languages
Quick Links
Trinitron Color TV
Operating Instructions
• Before operating the unit, please read this manual thoroughly and retain
it for future reference.
使用說明書
• 使用本電視機之前請先詳細閱讀此手冊﹐並妥善保存以備日後用作參考。
Panduan Pengendalian
• Sebelum mengendalikan unit, sila baca buku panduan ini dengan teliti
dan simpan untuk rujukan masa depan.
KV-SW212
© 2006 Sony Corporation
2-682-380-12 (1)
GB
CT
MY
M53
M50
Advertisement
Chapters

Related Manuals for Sony WEGA KV-SW212


Summary of Contents for Sony WEGA KV-SW212
- Page 1 • Before operating the unit, please read this manual thoroughly and retain it for future reference. 使用說明書 • 使用本電視機之前請先詳細閱讀此手冊﹐並妥善保存以備日後用作參考。 Panduan Pengendalian • Sebelum mengendalikan unit, sila baca buku panduan ini dengan teliti dan simpan untuk rujukan masa depan. KV-SW212 © 2006 Sony Corporation...
- Page 2 WARNING • Dangerously high voltages are present inside the TV. • TV operating voltage: 220 – 240 V AC. • Do not plug in the power cord until you have completed making all other connections; otherwise a minimum leakage current might flow through the antenna and other terminals to ground.
-
Page 3: Table Of Contents
Table of Contents Getting Started ....................... 4 Setting up your TV (“Initial Setup”) ................5 TV top control, front and rear panels ................. 7 Connecting the 3D WOOFER (KV-SW212M53 only) ..........8 Connecting optional components ................9 Using the remote control and basic functions ............11 Introducing the WEGA GATE navigator .............. -
Page 4: Getting Started
Getting Started Step 1 Insert the batteries (supplied) into the remote. Note • Do not use old or different types of batteries together. Step 2 Connect the antenna cable (not supplied) to 8 (antenna input) at the rear of the TV. •... -
Page 5: Setting Up Your Tv ("Initial Setup")
Setting up your TV (“Initial Setup”) When you turn on your TV for the first time, the “Initial Setup” menu will appear. You may change the menu language, preset the TV channels automatically, sort or edit the channels and adjust the picture position using the buttons on the remote control or TV top control panel. - Page 6 Setting up your TV (“Initial Setup”) (continued) d) If you wish to edit the channels, press to change to edit mode. Press b until the mode that you wish to edit Program Sorting/Edit PROG Label Skip is highlighted: Label, Skip, (block symbol).
-
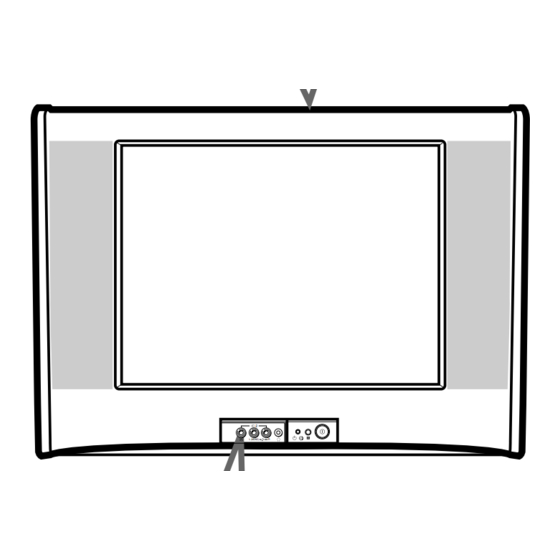
Page 7: Tv Top Control, Front And Rear Panels
TV top control, front and rear panels TV top control panel WEGA GATE PROG SOUND MODE TV rear panel (MONO) TV front panel (MONO) (MONO) (MONO) Button/Terminal Function Page Turn off or turn on the TV. Remote control sensor. – Wake Up indicator. -
Page 8: Connecting The 3D Woofer (Kv-Sw212M53 Only)
Connecting the 3D WOOFER KV-SW212M53 only You can enjoy high quality sound by connecting the 3D WOOFER as follows: Step 1 3D WOOFER Step 2 Black Red wire wire Notes • Connect only the supplied 3D WOOFER; otherwise your TV may malfunction. •... -
Page 9: Connecting Optional Components
Connecting optional components Connecting to the video input terminal ( t ) Audio/Video cable (not supplied) TV front panel Camcorder (MONO) TV rear panel Antenna cable (not supplied) (MONO) (MONO) Audio/Video cable (not supplied) DVD Player Note • If you connect a VCR to 8 (antenna input), preset the signal output from the VCR to the program number 0 on the TV (see page 18). - Page 10 Connecting optional components (continued) Connecting to the component video input terminal ( TV rear panel Component video cable (not supplied) (MONO) (MONO) DVD player Audio cable (not supplied) Notes • If your DVD player can output interlace and progressive mode signals, select the interlace output when connecting to (component video input) on your TV.
-
Page 11: Using The Remote Control And Basic Functions
Using the remote control and basic functions Button Description Page 1 ?/1 Turn off temporarily or turn on – the TV. Display the TV program. – Jump to last program number – that has been watched for at least five seconds. PROG +/–... - Page 12 Using the remote control and basic functions (continued) Button Description Page WEGA GATE menu operations Confirm selected items. WEGA GATE Display or cancel WEGA GATE menu. V, v, B, b Select and adjust items. RETURN Return to the previous level. Timer operations Set TV to turn on automatically according to the –...
-
Page 13: Introducing The Wega Gate Navigator
Introducing the WEGA GATE navigator WEGA GATE is a gateway that allows you access to preset TV channels, connected external inputs and “Settings” menu. WEGA GATE “TV” External Inputs watch the preset TV Settings channels (see page 5) Select Confirm Select Confirm External Inputs... -
Page 14: Settings" Adjustment
“Settings” Adjustment You are able to change the settings of your TV from “Settings” in WEGA GATE menu. Press WEGA GATE button to display WEGA GATE menu. Press V or v to select “Settings” and press The following is an overview of the items that can be adjusted. “Picture”... -
Page 15: Changing The "Picture" Setting
Changing the “Picture” setting The “Picture” menu allows you to adjust settings below. Press WEGA GATE and select “Settings”. Make sure the “Picture” icon ( ) is selected, then press Press V or v to select the desired item (e.g., “Picture Mode”), then press Select “Picture Mode”... -
Page 16: Changing The "Sound" Setting
Changing the “Sound” setting The “Sound” menu allows you to adjust settings below. Press WEGA GATE and select “Settings”. Press V or v to select the “Sound” icon ( ), then press Press V or v to select the desired item (e.g., “Sound Mode”), then press Select “Sound Mode”... -
Page 17: Changing The "Channel Setup" Setting
Changing the “Channel Setup” setting The “Channel Setup” menu allows you to adjust settings below.. Press WEGA GATE and select “Settings”. Press V or v to select the “Channel Setup” icon ( ), then press Press V or v to select the desired item (e.g., “Auto Program”), then press Select “Auto Program”... - Page 18 Changing the “Channel Setup” setting (continued) Presetting channels manually After selecting “Manual Program”, select the program number to which you want to preset a channel. (1) Make sure “Program” is selected, then press (2) Press V or v until the program number you want to preset appears on the menu, then press Select the desired channel.
-
Page 19: Changing The "Setup" Setting
Changing the “Setup” setting The “Setup” menu allows you to adjust settings below. Press WEGA GATE and select “Settings”. Press V or v to select the “Setup” icon ( ), then press Press V or v to select the desired item (e.g., “Language”), then press Select “Language”... -
Page 20: Troubleshooting
• Check the antenna cable and connection on the TV, VCR and at the wall noisy sound (see page 9). • Check the antenna setup. Contact a Sony dealer for advice. • Display the “Channel Setup” menu and select “Manual Program” to preset the channel again (see page 18). - Page 21 TV. • Count the number of times the 1 (standby) indicator flashes. The 1 (standby) indicator on your Press ! (main power) to turn off your TV. Contact your nearest Sony TV flashes red service center. several times after every three seconds.
- Page 22 警告 • 本電視機內存在危險性高電壓。 • 本電視機僅可在 220-240 伏特交流電壓下操作。 • 若未完成所有連接程序﹐請勿插入電源線﹔否則極少量的電流可能經天線或其它端子 外泄。 • 若打算近期內不使用遙控器﹐請將電池取出﹐以避免電池泄漏而損壞遙控器。若您不 小心觸及電池所泄漏的液體﹐應立即用水洗淨。 為防止火災或觸電﹐請勿使本電 為了個人安全起見﹐雷雨期間﹐ 為了兒童安全起見﹐請勿讓他們 視機被雨淋或受潮。 請勿觸摸電視機的任何部份﹐包 獨自逗留在電視機旁。千萬別讓 括電源線和天線電纜。 兒童攀爬本電視機。 放置電視機於穩定的、並足以支 請勿放置任何物體於電視機上。 若有任何液體流入或固體落入本 撐電視機重量的電視支架及地面 電視機內時﹐請勿操作本電視 請勿使任何液體滴濕或噴濕本電 上。確保電視支架的表面平整且 機。應立即請合格的專業人員檢 視機。請勿放置任何裝有液體的 表面積寬於電視機底面。 查。 物體(如花瓶)於電視機上。 請勿堵塞本電視機的通風口。 本電視機只適於家庭使用。請勿 請勿在同一電源插座上插入太多 請勿將本電視機放置於諸如書架 將本電視機放置於任何交通工具 的電器。請勿損壞電源線。 或嵌入式壁櫥等封閉之處。 內或多塵、高溫、潮濕或震動頻...
- Page 23 目錄 準備工作 ............4 設定您的電視機 (“初始化设定”) ........5 電視機頂部控制、前面和背後的控制板 ........7 連結“3D WOOFER” (僅於 KV-SW212M53) ......8 連接選購的裝置 ............9 使用遙控器和基本功能 ..........11 介紹 WEGA GATE 指示系統 ......... 13 “设定”調整 ............14 調整“图像设定” ........... 15 調整“声音设定” ........... 16 調整“频道设定” ........... 17 調整“设定”菜單...
-
Page 24: 準備工作
x 準備工作 步驟 1 將所提供的電池裝入遙控器。 註 • 請勿使用舊電池或同時使用不同類型的電池。 步驟 2 將天線電纜(未提供)連接至電視機背後的 8(天線輸 入)端子。 提示 • 您也可將本電視機連接至其它選購的裝置(參考第 9 頁)。 步驟 3 插入電源線﹐然後按壓電視機上的 ! 鍵以接通電視機的 電源。 註 • 打開電視機時 1(待機)指示燈將閃爍為綠燈數秒鐘。這並不 表示發生故障。 步驟 4 按照“Initial Setup”(“初始化设定”)菜單的指示以設 定您的電視機(參考第 5 頁)。 Select Confirm... -
Page 25: 設定您的電視機("初始化设定
x 設定您的電視機(“初始化设定”) 當您第一次打開電視機時﹐“Initial Setup”(“初始化设定”)菜單將會顯示在 屏幕上。您可用遙控器或電視機頂部控制板上的按鍵以改變菜單語言﹐自動預設 電視頻道﹐排序或編輯頻道和調整圖像位置。 按壓 V 或 v 鍵以選擇所要的菜單語言﹐ 然後按壓 鍵。 被選擇的菜單語言將顯示在屏幕上。 按壓 V 或 v 鍵以選擇“是”﹐然後 按壓 鍵以自動預設頻道。 屏幕將顯示自動預設頻道正在進行中。 當所有可接收的頻道已被調諧和儲存後﹐ “频道排序/编辑”菜單將會自動顯示在 屏幕上。 若要略掉自動預設頻道﹐選擇“否”﹐ 然後按壓 鍵。 如果出現“无信号。请连接有线信号线或天线” 的訊息﹐請檢查您的電視連接﹐然後按壓 鍵。 “频道排序/编辑”菜單可以讓您排序或 編輯頻道。 若您要保留當前頻道的狀態﹐按壓 PROG WEGA GATE 鍵以退出。 b) 按壓 V 或 v 鍵以選擇您要改變的頻道號碼。 被選定的頻道將會顯示在屏幕上。... - Page 26 設定您的電視機(“初始化设定”)(續) d) 若您要編輯頻道﹐按壓 鍵以改換成編輯 模式。 按壓 b 鍵直到您要編輯的模式被選中: PROG 標註、跳越頻道、 (鎖定符號)。 然後按壓 鍵。 若要標註﹐按壓 V 或 v 鍵以選擇英文﹐ 數字﹐字符進行標註。然後按壓 鍵。 PROG 若要跳越頻道號碼﹐按壓 V 或 v 鍵 以選擇“开”。然後按壓 鍵。 當您在使用 PROG +/– 鍵時﹐您可跳越 此頻道號碼。 若要鎖定不要的頻道號碼﹐按壓 V 或 v 鍵 PROG 以選擇 。然後按壓...
-
Page 27: 電視機頂部控制、前面和背後的控制板
電視機頂部控制、前面和背後的控制板 電視機頂部的控制板 WEGA GATE PROG SOUND MODE 電視機背後的控制板 (MONO) 電視機前面的控制板 (MONO) (MONO) (MONO) 按鍵/端子 功能 頁面 打開或關閉電視機。 遙控傳感器。 – 喚醒指示燈。 待機指示燈。 耳機插口。 – 視頻輸入端子 2。 5 t2 6 PROG +/– 選擇頻道號碼。 – 7 2 +/– 調整音量。 – 選擇電視或視頻輸入。 WEGA GATE 菜單操作 6, 7 V,v,B,b 選擇和調整項目。... - Page 28 連接 “3D WOOFER” 僅於 KV-SW212M53 您可連接 “3D WOOFER” 以享受高素質音響如下: 步驟 1 “3D WOOFER” 步驟 2 步驟 2 黑色 紅色電線 電線 註 • 只可連接提供的 “3D WOOFER” ;否則您的電視機可能出現故障。 • 連接 “3D WOOFER” 時﹐請從牆上插座拔下電視機插頭。 • 為防止因端子電流短路所導致的故障﹐請確保 “3D WOOFER” 金屬線沒有暴露於外﹐而與旁邊 的 “3D WOOFER” 端子相接觸。...
-
Page 29: 連接選購的裝置
連接選購的裝置 連接至視頻輸入端子(t) 音頻/視頻電纜 (未提供) 電視機前面的控制板 攝像機 (MONO) 電視機背後的控制板 天線電纜(未提供) (MONO) (MONO) 音頻/視頻電纜 (未提供) 錄像機 DVD 播放機 註 • 若將錄像機連接至 8(天線輸入)端子﹐請將錄像機輸出的信號預設至電視機上的頻道號碼 “0”(參考第 18 頁)。 連接至監視器輸出端子(T) 電視機背後的控制板 音頻系統 音頻/視頻電纜 (未提供) (MONO) (MONO) 錄像機 續... - Page 30 連接選購的裝置(續) 連接至 DVD 分量信號輸入端子( ) 電視機背後的控制板 DVD 分量信號電纜 (未提供) (MONO) (MONO) DVD 播放機 音頻電纜 (未提供) 註 • 當連接 DVD 播放機至電視機上的 (分量信號輸入端子) 時﹐若您的 DVD 播放機可輸出 隔行和逐行的掃描模式信號﹐則請選擇隔行掃描輸出。您的電視機可接收 525i/60 赫茲或 625i/50 赫茲的隔行掃描信號。 • 某些 DVD 播放機的插口可能標記為 Y/C 或 Y/B-Y/R-Y。 , Y/P , Y/C •...
-
Page 31: 使用遙控器和基本功能
使用遙控器和基本功能 按鍵 說明 頁面 1 ?/1 打開或關閉電視機。 – 顯示電視節目。 – 跳回到之前收看至少五秒的頻 – 道號碼。 4 PROG +/– 選擇頻道號碼。若要快速選擇﹐ – 按住此鍵直到所要的頻道號碼 出現。 5 2 +/– 調整音量。 – 改變圖像尺寸: – “开”(16:9 寬熒幕模式)﹐ PROG “关”。 選擇環繞聲模式: “开”﹐“模拟立体声”﹐ “关”。 顯示屏幕上的信息。 – 消除聲音。 – 選擇電視或視頻輸入。 qd t WEGA RETURN GATE... - Page 32 使用遙控器和基本功能(續) 按鍵 說明 頁面 WEGA GATE 菜單操作 確認被選項目。 7 WEGA GATE 顯示或取消 WEGA GATE 菜單。 選擇和調整項目。 qj V, v, B, b 回到之前的階段。 qk RETURN 定時器操作 依照您所要的時間設定電視以自動打開(最多12 小 – (喚醒定時器) 時)。 一旦你已設定喚醒定時﹐電視機上的 指示燈將亮 起黃褐色。 用喚醒定時接通電視機電源並超過一小時後﹐若您不 按壓電視機或遙控器上的任何一個按鍵或控制鍵﹐則 電視機再進入待機狀態。 依照您所要的時間設定電視以自動關閉(最多 1 小時 – (睡眠定時器)...
-
Page 33: 介紹 Wega Gate 指示系統
介紹 WEGA GATE 指示系統 WEGA GATE 是個允許您進入預設電視頻道﹐已連接的外接輸入和“设定”菜 單的通道。 WEGA GATE “电视” 觀看預設電視頻道 (參考第 5 頁)。 “外接输入” 選擇連接裝置的輸入 (參考第 9 頁)。 改變電視機的 “设定” 設定(參考 第 14 頁)。 如何使用 WEGA GATE 菜單 WEGA GATE (3) 按壓 V 或 v 鍵以選擇所要的項目。 (1) 按壓 WEGA GATE 鍵以顯示 或取消... -
Page 34: 设定"調整
x “设定”調整 您可在 WEGA GATE 菜單里的“设定”改變電視機的設定。 按壓 WEGA GATE 鍵以顯示 WEGA GATE 菜單。按壓 V 或 v 鍵以選擇 “设定”﹐然後按壓 鍵。 以下是可以被調整項目的總概況。 “图像设定” (參考第 15 頁) “图像模式”:“动态” “标准” “用户设定” “图像用户设定”:“对比度”﹐“亮度”﹐“颜色”﹐ “色调”﹐“锐度”﹐“重新设定” “彩色色调设定”:“冷色调” “自然色调” “暖色调” “智能图像降噪”:“开” “关” “信号强度指示器”:“开” “关” “声音设定” (參考第 16 頁) “声音模式”:“动态”... -
Page 35: 調整"图像设定
x 調整“图像设定” “图像设定”菜單可使您調整以下設定。 按壓 WEGA GATE 鍵並選擇“设定”。 確認“图像设定”符號( )已被選擇﹐然後按壓 鍵。 按壓 V 或 v 鍵以選擇所要的項目 (例如﹐“图像模式”)﹐然後按壓 鍵。 選擇 以 “图像模式” 選擇“动态”(亮度、對比和銳度)、“标准”(普通)或“用户设定”*。 “彩色色调设定” 調整白色色澤。 選擇“冷色调”(藍色澤)、“自然色调”(自然色澤)或“暖色 调”(紅色澤)。 “智能图像降噪” 接收最理想的圖像效果。 按壓 V 或 v 鍵以選擇“开”﹐然後按壓 鍵。 要取消時﹐選擇“关”﹐然後按壓 鍵。 “信号强度指示器” 當“智能图像降噪”操作時顯示信號強度。 當您更換頻道號碼或輸入模式時﹐ “智能图像降噪信号强度” 指示 器將會顯示﹐接著圖像被改善。... -
Page 36: 調整"声音设定
x 調整“声音设定” “声音设定”菜單可使您調整以下設定。 按壓 WEGA GATE 鍵並選擇“设定”。 按壓 V 或 v 鍵以選擇“声音设定”符號 ( )﹐然後按壓 鍵。 按壓 V 或 v 鍵以選擇所要的項目 (例如﹐“声音模式”)﹐然後按壓 鍵。 選擇 以 “声音模式” 選擇“动态”(低和高音調)、“标准”(人聲和高音調)或“用户 设定”*。 “平衡” 按壓 v 或 B 鍵以強調左揚聲器。 按壓 V 或 b 鍵以強調右揚聲器。 “智能音量控制” 自動調整所有頻道號碼和視頻輸入的音量。 按壓... -
Page 37: 調整"频道设定
x 調整“频道设定” “频道设定”菜單可使您調整以下設定。 按壓 WEGA GATE 鍵並選擇“设定”。 按壓 V 或 v 鍵以選擇“频道设定”符號( )﹐然後按壓 鍵。 按壓 V 或 v 鍵以選擇所要的項目(例如﹐“自动调台”)﹐然後按壓 鍵。 選擇 以 “自动调台” 自動預設頻道。 “手动调台” 手動預設所要的頻道及不能自動預設的頻道 (參考第 18 頁的手 動預設頻道)。 改變顯示在屏幕上的頻道順序﹐標註頻道號碼﹐跳越頻道號碼 “频道排序/编辑” 和鎖定不要的頻道(參考第 5 頁“初始化设定”的步驟 3)。 註 • 若您預設一個鎖定的頻道號碼﹐該頻道號碼將自動解鎖。 • 若您排序一個鎖定的頻道﹐該頻道將保留在鎖定狀態。 續... - Page 38 調整“频道设定”(續) 手動預設頻道 在選擇“手动调台”之後﹐選擇您要預設頻道 的頻道號碼。 (1)確認“频道”已被選定﹐然後按壓 鍵。 (2)按壓 V 或 v 鍵直到您要預設的頻道號碼 顯示在菜單上﹐然後按壓 鍵。 選擇所要的頻道。 (1)確認“VHF 低”、“VHF 高”或“UHF”已被選定﹐然後按壓 鍵。 (2)按壓 V 或 v 鍵直到您所要的頻道顯示在電視屏幕上﹐然後按壓 鍵。 若所要頻道的聲音失真﹐則請選擇適當的電視系統。 (1)按壓 V 或 v 鍵以選擇“电视系统”﹐然後按壓 鍵。 (2)按壓 V 或 v 鍵直到聲音正常為止﹐然後按壓 鍵。 若您不滿意圖像和聲音質量﹐您可用“微调”來改善它。 (1)按壓 V 或 v 鍵以選擇“微调”﹐然後按壓 鍵。...
-
Page 39: 調整"设定"菜單
調整“设定”菜單 “设定”菜單可使您調整以下設定。 按壓 WEGA GATE 鍵並選擇“设定”。 按壓 V 或 v 鍵以選擇“设定”符號 ( )﹐然後按壓 鍵。 按壓 V 或 v 鍵以選擇所要的項目(例如﹐“语言/Language”)﹐然後按壓 鍵。 選擇 以 “语言/Language” 更換菜單語言。 按壓 V 或 v 鍵以選擇“English”(英文)或“中文”﹐然後按壓 鍵。 “图像旋转度调校” 調整電視屏幕上傾斜的圖像。 按壓 B 或 b 鍵以調整圖像位置﹐然後按壓 鍵。 “视频输入标注” 標註所連接的裝置。 (1) 選擇“视频输入”並按壓... -
Page 40: 故障檢修
按壓 WEGA GATE 鍵。選擇“设定”(“Settings”) 後進入“设定”(“Setup”) ( )菜單。從“设定”菜單里選擇“出厂设定”。然後選擇“是”並按壓 鍵。電視屏幕即呈現空白﹐約數秒後﹐“初始化设定”菜單將會顯示在電視屏幕 上。您的電視機將恢復到工廠設定﹐但一些電視故障可能會消失。 癥狀 解決方法 • 檢查天線電纜以及電視機﹐錄像機和牆上的天線連接是否正確(參考第 9 頁)。 圖像有雪花狀斑點﹐ 有噪聲 • 檢查天線的裝置。請尋求 Sony 經銷商的協助。 • 顯示“频道设定”菜單並選擇“手动调台”以再次預設頻道(參考第 18 頁)。 • 顯示“频道设定”菜單並選擇“手动调台”裡的“信号增强”為“自动” (參考第 18 頁)。 • 嘗試使用外部信號增強器。 • 切斷外部信號增強器的電源或拔掉其插頭以終止其操作。 圖像失真﹐有噪聲 • 顯示“频道设定”菜單並選擇“手动调台”裡的“信号增强”為“关”(參考 第 18 頁)。 • 顯示“频道设定”菜單並在“手动调台”裡選擇適當的“电视系统”(參考... - Page 41 • 將外部揚聲器或其它電器放置在離電視機較遠的地方。 圖像傾斜 • 顯示“设定”菜單﹐並調整“图像旋转度调校”以使圖像位置調至最佳(參考 第 19 頁)。 • 將外部揚聲器或其它電器放置在離電視機較遠的地方。請別在電視機打開時進 圖樣出現反常彩色斑 行搬移。按壓電視機上的 !(主電源)鍵以切斷電視機的電源﹐約 15 分鐘 點 後再將其打開以使電視機消磁。 • 計算 1(待機)指示燈的亮光次數。按壓 !(主電源)鍵以切斷電視機的電 電視機上的 1(待機) 指示燈每隔三秒閃爍 源。通知您鄰近的 Sony 維修服務中心。 至少一次的紅色亮 光。 • “信号增强”正在操作以探測微弱的信號。這並不表示發生故障。 電視屏幕有時會在更 換頻道時呈顯空白﹐ 空白時間比一般略 長。 • 室溫的變化有時會導致電視機的外殼膨脹或縮小﹐因此產生噪聲。這並不表示 電視機外殼吱嘎聲。 發生故障。 • 電視機自動消磁。這並不表示發生故障。...
- Page 42 AMARAN • TV anda bervoltan tinggi yang membahayakan. • Voltan pengendalian TV: 220 – 240 V AC. • Jangan sambungkan palam wayar kuasa TV sebelum anda selesai membuat semua sambungan yang lain; jika tidak, kebocoran arus yang minimum mungkin mengalir menerusi antena dan terminal lain ke bumi.
- Page 43 Kandungan Persediaan Awal ......................4 Mengaturkan TV anda (“Initial Setup”) ..............5 Panel kawalan atas, hadapan dan belakang TV ............7 Menyambung 3D WOOFER (KV-SW212M53 sahaja) ..........8 Menyambung komponen pilihan ................9 Menggunakan alat kawalan jauh dan fungsi asas ..........11 Memperkenalkan penunjuk WEGA GATE ..............
-
Page 44: Persediaan Awal
x Persediaan Awal Langkah 1 Masukkan bateri (dibekalkan) ke dalam alat kawalan jauh. Nota • Jangan gunakan bateri lama atau bateri yang berlainan jenis bersama-sama. Langkah 2 Sambungkan kabel antena (tidak dibekalkan) kepada terminal 8 (input antena) yang terdapat di belakang TV anda. -
Page 45: Mengaturkan Tv Anda ("Initial Setup")
Mengaturkan TV anda (“Initial Setup”) Apabila anda memasangkan TV pada kali pertama, menu “Initial Setup” akan muncul. Anda boleh menukar bahasa menu, mengatur saluran TV secara automatik, menukar susunan saluran atau menyunting saluran dan melaraskan kedudukan gambar dengan menggunakan butang pada alat kawalan jauh atau panel kawalan atas TV. - Page 46 Mengaturkan TV anda (“Initial Setup”) (sambungan) d) Jika anda ingin menyunting saluran, tekan untuk menukar kepada mod menyunting. Tekan b sehingga mod yang anda ingin Program Sorting/Edit PROG Label Skip menyunting dipilih: Label, Langkau, (simbol sekatan). Kemudian tekan 1) Untuk melabel, tekan V atau v untuk Edit mode memilih abjad nombor untuk label Exit...
-
Page 47: Panel Kawalan Atas, Hadapan Dan Belakang Tv
Panel kawalan atas, hadapan dan belakang TV Panel kawalan atas TV WEGA GATE PROG SOUND MODE Panel belakang TV (MONO) Panel hadapan TV (MONO) (MONO) (MONO) Butang/Terminal Fungsi Halaman Menutup atau memasang TV. Pengesan alat kawalan jauh. Penunjuk Bangun Tidur. Penunjuk “standby”. -
Page 48: Menyambung 3D Woofer (Kv-Sw212M53 Sahaja)
Menyambung 3D WOOFER KV-SW212M53 sahaja Anda boleh menikmati bunyi berkualiti tinggi dengan menyambungkan 3D WOOFER seperti berikut: Langkah 1 3D WOOFER Langkah 2 Wayar Wayar merah hitam Nota • Sambungkan 3D WOOFER yang dibekalkan sahaja; kalau tidak TV anda mungkin mengalami masalah. -
Page 49: Menyambung Komponen Pilihan
Menyambung komponen pilihan Menyambungkan kepada terminal input video ( t ) Kabel Audio/Video (tidak dibekalkan) Panel hadapan TV kamkorder (MONO) Panel belakang TV Kabel antena (tidak dibekalkan) (MONO) (MONO) Kabel Audio/Video (tidak dibekalkan) Perakam pita video Pemain DVD Nota • Jika anda menyambungkan VCR kepada 8 (input antena), aturkan output isyarat dari VCR kepada nombor rancangan 0 pada TV (rujuk halaman 18). - Page 50 Menyambung komponen pilihan (sambungan) Menyambungkan kepada terminal input komponen video Panel belakang TV Kabel komponen video (tidak dibekalkan) (MONO) (MONO) Pemain DVD Kabel audio (tidak dibekalkan) Nota • Jika pemain DVD anda boleh mengeluarkan isyarat mod “interlace” dan “progressive”, pilih output “interlace”...
-
Page 51: Menggunakan Alat Kawalan Jauh Dan Fungsi Asas
Menggunakan alat kawalan jauh dan fungsi asas Butang Deskripsi Halaman 1 ?/1 Menutup sementara atau – memasangkan TV. Memaparkan input TV. – Kembali kepada nombor – rancangan sebelumnya yang telah ditonton sekurang- kurangnya lima saat. PROG +/– Memilih nombor rancangan. –... - Page 52 Menggunakan alat kawalan jauh dan fungsi asas (sambungan) Butang Deskripsi Halaman Operasi menu WEGA GATE Mengesahkan butiran yang dipilih. WEGA GATE Memapar atau membatalkan menu WEGA GATE. V, v, B, b Memilih dan melaraskan butiran. RETURN Kembali ke paras yang sebelumnya. Operasi pemasa Setkan TV supaya dipasang mengikut tempoh masa –...
-
Page 53: Memperkenalkan Penunjuk Wega Gate
Memperkenalkan penunjuk WEGA GATE WEGA GATE adalah satu laluan yang membolehkan anda memasuki saluran TV yang diaturkan, input luaran yang disambungkan dan menu “Settings”. WEGA GATE “TV” External Inputs menonton saluran TV Settings yang diaturkan (rujuk halaman 5) Select Confirm Select Confirm External Inputs... -
Page 54: Melaraskan "Settings
Melaraskan “Settings” Anda boleh menukar aturan TV anda daripada “Settings” dalam menu WEGA GATE. Tekan butang WEGA GATE untuk memaparkan menu WEGA GATE. Tekan V atau v untuk memilih “Settings” dan tekan Berikut adalah gambaran menyeluruh tentang butiran yang boleh dilaraskan. “Picture”... -
Page 55: Menukar Aturan "Picture
Menukar aturan “Picture” Menu “Picture” membenarkan anda menukar aturan di bawah. Tekan WEGA GATE dan memilih “Settings”. Pastikan lambang “Picture” ( ) dipilih, kemudian tekan Tekan V atau v untuk memilih butiran yang dikehendaki (contohnya, “Picture Mode”), kemudian tekan Pilih Untuk “Picture Mode”... -
Page 56: Menukar Aturan "Sound
Menukar aturan “Sound” Menu “Sound” membenarkan anda menukar aturan di bawah. Tekan WEGA GATE dan memilih “Settings”. Tekan V atau v untuk memilih lambang “Sound” ( ), kemudian tekan Tekan V atau v untuk memilih butiran yang dikehendaki (contohnya, “Sound Mode”), kemudian tekan Pilih Untuk “Sound Mode”... -
Page 57: Menukar Aturan "Channel Setup
Menukar aturan “Channel Setup” Menu “Channel Setup” membenarkan anda menukar aturan di bawah. Tekan WEGA GATE dan memilih “Settings”. Tekan V atau v untuk memilih lambang “Channel Setup” ( ), kemudian tekan Tekan V atau v untuk memilih butiran yang dikehendaki (contohnya, “Auto Program”), kemudian tekan Pilih Untuk... - Page 58 Menukar aturan “Channel Setup” (sambungan) Mengatur saluran secara manual Selepas memilih “Manual Program”, pilih nombor rancangan bagi saluran yang ingin anda aturkan. (1) Pastikan “Program” dipilih, kemudian tekan (2) Tekan V atau v sehingga nombor rancangan yang ingin anda aturkan muncul pada menu, kemudian tekan Pilih saluran yang dikehendaki.
-
Page 59: Menukar Aturan "Setup
Menukar aturan “Setup” Menu “Setup” membenarkan anda menukar aturan di bawah. Tekan WEGA GATE dan memilih “Settings”. Tekan V atau v untuk memilih lambang “Setup” ( ), kemudian tekan Tekan V atau v untuk memilih butiran yang dikehendaki (contohnya, “Language”), kemudian tekan Pilih Untuk “Language”... -
Page 60: Penyelesaian Masalah
Jika anda mengalami sebarang masalah semasa menonton TV, anda boleh menggunakan fungsi “Factory Settings” atau baca panduan penyelesaian masalah berikut. Jika masalah masih lagi berterusan, hubungi pengedar Sony anda. Fungsi “Factory Settings” Tekan butang WEGA GATE. Pilih “Settings” dan pergi ke menu “Setup” ( Daripada menu “Setup”, pilih “Factory Settings”. - Page 61 • Kira bilangan kelipan penunjuk 1 (“standby”). Penunjuk 1 Tekan ! (kuasa utama) untuk menutup TV anda. Beritahu pusat servis (“standby”) pada TV anda berkelip- Sony yang berhampiran. kelip dengan cahaya merah setiap tiga saat. • “Signal Booster” sedang berfungsi untuk mengesan isyarat yang lemah.
-
Page 62: Specifications
Specifications KV-SW212M53 KV-SW212M50 Note Power requirements 220-240 V AC, 50/60 Hz Power consumption (W) Indicated on the rear of the TV Television system B/G, I, D/K, M Color system PAL, PAL 60, SECAM, NTSC3.58, NTSC4.43 Channel coverage VHF : E2 to E12 /UHF : E21 to E69 / CATV : S01 to S03, S1 to S41 UHF : B21 to B68 /CATV : S01 to S03, S1 to S41 VHF : C1 to C12, R1 to R12 /...