Table of Contents
Advertisement
Quick Links
Product appearance depends on goods
Wired Controller
BSG175A8R
Thank you for choosing Pioneer International Air Conditioners, please read this owner's
manual carefully before operation and retain it for future reference.
If you have lost the User's Manual,please contact the local agent or visit
www.pioneerair.com.au or sent email to sales@pioneerair.com.au
Advertisement
Table of Contents

Related Manuals for Pioneer BSG175A8R


Summary of Contents for Pioneer BSG175A8R
- Page 1 Product appearance depends on goods Wired Controller BSG175A8R Thank you for choosing Pioneer International Air Conditioners, please read this owner’s manual carefully before operation and retain it for future reference. If you have lost the User's Manual,please contact the local agent or visit...
-
Page 2: Table Of Contents
Content User Instructions ....................1 Installation and Disassembly ................1 Installation Place and Installation Requirements ........... 1 Installation of the Signal Wire ................... 1 Installation of Wired Controller ................. 2 Disassembly the Wired Controller ................2 Display and Installation instruction ............ -
Page 3: User Instructions
User Instructions Please carefully read this manual before installation and use of this product. ● Do not install or remove the wired controller by yourself. If necessary, please contact the after- sales serviceman. ● Do not install the wired controller in the humid area or under direct sunlight. ●... -
Page 4: Installation Of Wired Controller
Installation and Disassembly Installation and Disassembly Installation of Wired Controller The simple installation step of wired controller is as shown on the figure, please notice below issues: ● Pull out the 4 core twisted pair wire from the mounting hole and pass this line through the oblong hole located at the bottom of the wired controller. -
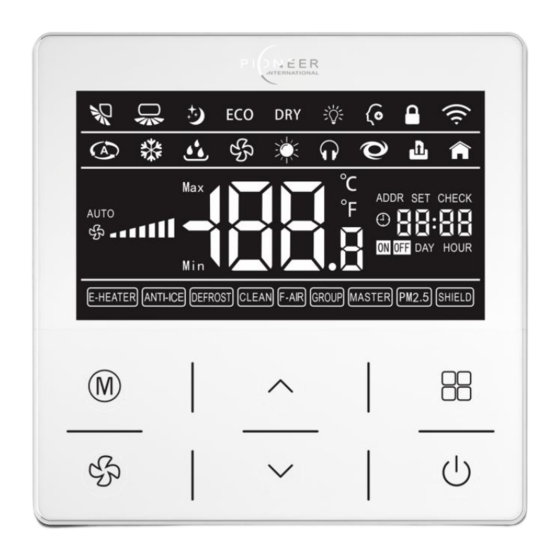
Page 5: Display And Installation Instruction
Display and Installation instruction Display and Installation instruction Liquid crystal display 中间 显 示区 域漏 空 ADDR SET CHECK DAY HOUR ON OFF DEFROST F- IR GROUP TI-ICE PM2.5 No. Icon Name Icon Instruction Vertical Swing Vertical Swing function status Horizontal Swing Horizontal Swing function status (N/A) Sleep... -
Page 6: Bottons
Access control Plug-in/out card status (N/A) Low temperature heating function status E-Heater E-Heater function status Anti-ice Anti-ice function status Defrost Defrost function status Clean Refer to filter clean reminding Fresh air Fresh air function status (N/A) Group function status (N/A) Group Master Refer to master indoor unit... -
Page 7: Operation Instruction
Operation Instruction Operation Installation Lock Function In the on/off-state, press " " and " " buttons at the same time for 5s till the wired controller enters the lock state. In this case, the LED display " ". After that, repress these two buttons at the same time for 5s to quit the lock state. -
Page 8: Fan Speed Setting
Operation Instruction Operation Installation Notice: In Auto mode, the setting temperature is un-adjustable. Fan Speed Setting Press " " button, fan speed of indoor unit will change as the sequence below: Notice: ● After installation completed, wired controller will detect the unit type automatically. Different types may have different ways of fan speed display, it can be divided into the 2 kinds above. -
Page 9: Timer Setting
Operation Instruction Operation Installation Timer Setting In on-state, press " " button for 3s to set turn off time; in off-state,press " " button for 3s to set turn on time. Timer range: 0.5-24h Notice: The min gap of time display is 0.5h, less than 0.5h will display 0.5h. ●... -
Page 10: Turbo Function Setting
Operation Instruction Operation Installation Turbo Function Setting In Cooling/Heating/Fan mode, press" " button for 3s to switch the Turbo function, In this case,the LED display " " and " " .After that, press" " button at the at the same time for 3s to quiet function. Then press" "... -
Page 11: Quiet Function Setting
Operation Installation Quiet Function Setting In Auto/Cooling/Dehumidification/Fan/Heating mode,press" "button for 3s to switch the Turbo function,After that press" "button at the same time for 3s to Quiet function ,In this case ,the LED display " "and " ".Then press " "button to turn off the function. -
Page 12: Eco Function Setting
Operation Instruction Operation Installation ECO Function Setting ECO function can make the air conditioner runs in a smaller temperature range by setting limited value of setting temperature in the Cooling or heating mode to achieve energy saving. In Cooling/Dehumidification/Heating mode, press " "... -
Page 13: Error Code
Error Code When error happens to the unit, the error code will be shown on the wired controller. When multiple errors simultaneously happen, the error codes will circularly show up. When error occurs, please immediately shut down the unit and contact service center. ●...