Advertisement
How to register your Camera to Hubble account
-
Setting Up the Camera - can be connected via WiFi or LAN

Via WIFI-
Connect the antenna with the connector on the rear surface of the camera.
-
Insert the power adapter connector into the camera's power socket and screw in the waterproof cover. Connect the power adaptor plug to a suitable mains socket and wait for the LED to start blinking RED. 1
-
Press and hold the pair button for 3 seconds or more until both RED and GREEN LEDs blink together.
-
From the APP, press "+" camera to search for the Focus72, then Pair button follow the instructions from the APP.
Via LAN
-

- Connect the LAN cable to the camera's LAN socket and the other end to your router, and screw in the waterproof cover.
If the LAN is not being connected, fit the waterproof blanking cap provided. - Insert the power adapter connector into the camera's power socket and screw in the waterproof cover. Connect the power 2 adaptor plug to a suitable mains socket and wait for the LED to start blinking RED.
- Press and hold the pair button for 3 seconds or more until both RED and GREEN LEDs blink together.
- From the APP, press "+" camera to search for the Focus72, then follow the instructions from the APP.
-
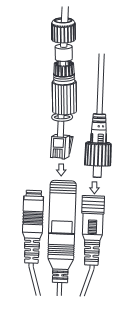
How to assemble the waterproof plug for the LAN cable
-
Place the O-Ring washer over the end of the LAN socket.

-
Pass the LAN plug and cable through Part 1, the Rubber Gasket and Part 2 in the order shown below.

-
Connect the LAN plug into the LAN socket.

-
Turn and lock Part 2 to the LAN socket.

-
Make sure the Rubber Gasket is inserted into the rear of Part 2 and screw Part 1 to Part 2 to finalise the connection.

-
-
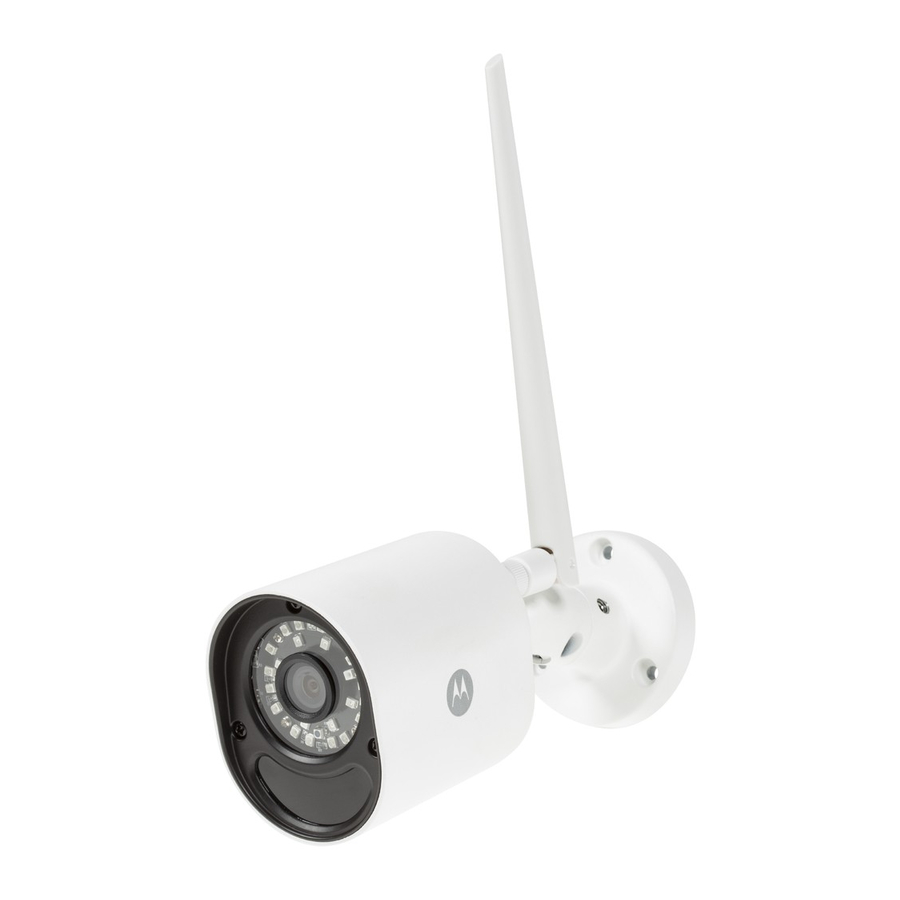
Overview of your Camera

- Antenna
- Camera Base Plate
- Camera Lens
- IR-LED Window
- Motion detect Window
- Cable
- Power Socket
- Pair Button
- LAN Socket
- Status LED


| Status | LED Behaviour |
| GREEN and RED LED ON for around 5 sec Then GREEN LED ON for 10 sec |
| RED LED Blink every 2 sec |
| Both RED and GREEN LEDs blink together |
| The LED blinks GREEN every second |
| The LED is on GREEN continuously |
| The LED blinks RED every second |
- Install the Hubble for Motorola Monitors App
Download the Hubble for Motorola Monitors App from the App Store for iOS devices or from the Google Play™ Store for Android™ devices.
![]()
![itunes.apple.com]()
![]()
![play.google.com]()
- View on Compatible Smartphones, Tablets and Computers
![]()
- Open the Hubble for Motorola Monitors App on your compatible smartphone or tablet.
- Follow the in-app instructions to create your Hubble account.
- Log in to your account on your compatible smartphone, tablet or via https://app.hubbleconnected.com/#login on your PC to access your live camera stream.


Please take note of the following minimum system requirements:
Smartphones/Tablets: iOS 7, Android™ 4.2 PC (only for viewing - NOT setup): Windows® 7, Mac OS® 10.7, Chrome™ 24, Internet Explorer® 9, Safan® 6, Firefox® 18, Adobe® Flash® 15, Java™ 7
Wi-Fi® requirements:
At least 0.6 Mbps upload bandwidth per camera. Test your Internet speed at: http://www.speedtest.net/
How to mount your Camera on the wall
NOTE: We recommend you set up your camera with your router and make sure that the camera operates fully with your Wi-Fi / LAN in the location you are going to mount it, before you start to drill holes for the installation.
- Drill the Screw Holes


- Mark the position on the wall using the camera base plate as a template, making sure the cable guide in the base plate is correctly aligned for the direction you want the camera wires to leave the mounting, unless you pass them directly through the wall behind the base plate.
- Drill 3 holes (4.5mm diameter) and hammer the expansion plugs (included) into the holes as needed.
- If you want to pass the camera wires through the wall behind the base plate, drill a 22mm diameter hole in the midpoint between the screw holes.
- Fixing the Camera unit to the wall or ceiling


- Pass the camera wires through the cable guide of the base plate or through a hole in the wall or ceiling directly behind the base plate.
- Fasten the base plate on the wall or ceiling with the 3 screws provided.
- Make sure the unit is fixed firmly on the wall or ceiling.
- Adjust angle and secure the camera unit


- Loos en the tamper-proof screws with the wrench key (provided).
- Adjust the camera angles to give your required field of view, then tighten the tamper-proof screws.
- Connecting LAN with the Camera Unit
![]()
- The LAN socket provides an option for you to connect directly via a LAN cable if necessary. Insert the LAN jack into the LAN socket through the water proof cover and fasten the cover, as shown.

VideosMotorola FOCUS72 Review and Set-Up Video
Documents / Resources
References
![app.hubbleconnected.com]() Hubble App
Hubble AppHubble Connected for Motorola on the App Store
![play.google.com]() Google Play
Google Play![www.speedtest.net]() Speedtest by Ookla - The Global Broadband Speed Test
Speedtest by Ookla - The Global Broadband Speed Test
Download manual
Here you can download full pdf version of manual, it may contain additional safety instructions, warranty information, FCC rules, etc.
Download Motorola FOCUS 72 /72-2 /72-3 /72-4 /72-W /72-W2 /72-W3 /72-W4 Quick Start Guide
Advertisement
Thank you! Your question has been received!


Need Assistance?
Do you have a question about the FOCUS 72 that isn't answered in the manual? Leave your question here.