
Related Manuals for Sony C2104


Summary of Contents for Sony C2104
- Page 1 Working Instructions - mechanical - C2104,C2105,S36h 1273-2279 Rev3 Sony Mobile Communications AB – Company Internal...
-
Page 2: Table Of Contents
Working Instruction Repair Instruction Mechanical/ CONTENTS Exterior Views ................. 4 1.1 C2104, C2105, S36h ................4 Tools ....................5 Disassembly ..................6 3.1 Battery Cover ..................6 Disassembly ..................7 3.2 Battery ....................7 3.3 Middle Frame Assembly ............... 8 3.4 Sub PBA assembly ................ - Page 3 Country of Origin Barcodes for Brazil/VIVO Labels ....49 Revision History ................50 For general information about mechanical repair related issues, refer to 1220-1333: Generic Repair Manual - mechanical 1273-2279 Rev3 Sony Mobile Communications AB – Company Internal 3(50)
-
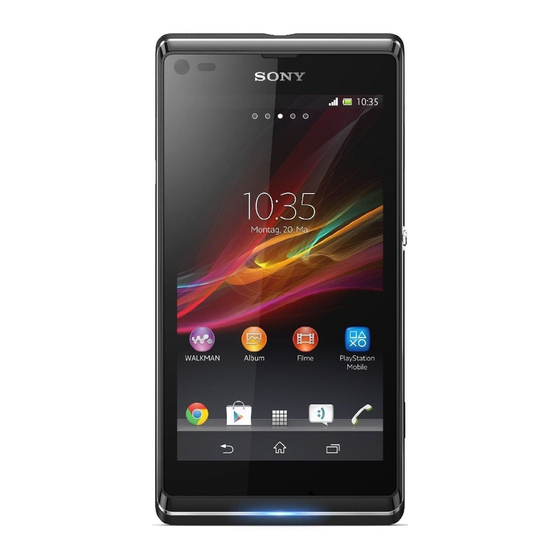
Page 4: Exterior Views
Working Instruction Repair Instruction Mechanical/ Exterior Views C2104, C2105, S36h 1273-2279 Rev3 Sony Mobile Communications AB – Company Internal 4(50) -
Page 5: Tools
2. Flex Film Assembly Tool 3. Bits (T5) 4. Front Opening Tool 5. Guitar Pick For part no’s on the tools above, refer to the ‘Tools Catalogue/Matrix’! STANDARD TOOLS 1. Tweezers 1273-2279 Rev3 Sony Mobile Communications AB – Company Internal 5(50) -
Page 6: Disassembly
Insert a finger or Guitar Pick into the gap as shown in picture to release the hooks of the Battery Cover. Open the top side of Battery Cover first. Push Battery Cover back towards bottom side. 1273-2279 Rev3 Sony Mobile Communications AB – Company Internal 6(50) -
Page 7: Disassembly
Insert a finger or Front Opening tool to Loosen the bottom side of battery. Remove the Battery. Remove these six Screws by using a screwdriver with Bits (T5). Scrap! Not to be reused! 1273-2279 Rev3 Sony Mobile Communications AB – Company Internal 7(50) -
Page 8: Middle Frame Assembly
Scrap! Not to be reused! Remove the RF Cable Film. Scrap! Not to be reused! Slide Guitar Pick along Middle Frame Assembly as shown in picture, to release the side hooks. 1273-2279 Rev3 Sony Mobile Communications AB – Company Internal 8(50) - Page 9 RX Diversity Cable connector is disassembled then during Middle Frame Assembly removal. RX Diversity Cable connector is shown in picture. RX Diversity Cable connector is disassembled then during Middle Frame Assembly removal. 1273-2279 Rev3 Sony Mobile Communications AB – Company Internal 9(50)
-
Page 10: Sub Pba Assembly
Open the RF cable connector on Sub PBA assembly. Insert Front Opening tool as shown in picture to release the Sub PBA assembly hooks. Remove the Sub PBA assembly. 1273-2279 Rev3 Sony Mobile Communications AB – Company Internal 10(50) -
Page 11: Main Pba (A) & Rf Cable (B)
Open the Side Key FPC BtB connector. Open the LCM BtB connector. Open the Touch Panel FPC BtB connector. Insert Tweezers at the shielding corner to disassemble Touch Panel FPC from Main PBA. 1273-2279 Rev3 Sony Mobile Communications AB – Company Internal 11(50) -
Page 12: Front Housing Lcm Tp Assembly
Insert the Front Opening tool as shown in picture to release Main PBA hooks. Remove Main PBA and RF Cable. Front Housing LCM TP Assembly Front Housing LCM TP Assembly as shown in picture. 1273-2279 Rev3 Sony Mobile Communications AB – Company Internal 12(50) - Page 13 Conductive cloth for TP IC is shown in picture. Note: Conductive cloth for TP IC can’t be reused, Scrap! Remove the Conductive cloth for TP IC. Note: Conductive cloth for TP IC can’t be reused, Scrap! 1273-2279 Rev3 Sony Mobile Communications AB – Company Internal 13(50)
-
Page 14: Replacement
Prepare a new Front Housing LCM TP Assembly. Follow the 5.2 – 5.6 Reassembly instructions! Note: Calibrate the Touch Panel/ Proximity sensor/Light sensor 1275-0758 Trouble Shooting Application – mechanical after replacement. 1273-2279 Rev3 Sony Mobile Communications AB – Company Internal 14(50) -
Page 15: Conductive Cloth For Tp Ic
Be careful! Do not damage TP IC on FPC! Installation Attach a new Conductive Cloth for TP IC carefully. Be careful! Do not damage TP IC on FPC! Yellow film inside Cloth covers TP IC completely. 1273-2279 Rev3 Sony Mobile Communications AB – Company Internal 15(50) -
Page 16: Conductive Cloth Main Camera
Conductive Cloth Main camera as shown in picture. Can’t be reused, Scrap! Remove the Conductive Cloth Main camera carefully. Can’t be reused, Scrap! Installation Attach a new Conductive Cloth Main camera carefully. 1273-2279 Rev3 Sony Mobile Communications AB – Company Internal 16(50) -
Page 17: Cu Label
Attach a new CU Label carefully. Only one Label is attached. Screw Follow the 3.1 – 3.3 Disassembly instructions! Prepare new Screws. Follow the 5.4 – 5.6 Reassembly instructions! 1273-2279 Rev3 Sony Mobile Communications AB – Company Internal 17(50) -
Page 18: Film Main Camera
Be careful, do not damage Main Camera! 4.10 Film RF Cable Follow the 3.1 – 3.3 Disassembly instructions! Prepare a new Film RF Cable. Follow the 5.4 –5.6 Reassembly instructions! 1273-2279 Rev3 Sony Mobile Communications AB – Company Internal 18(50) -
Page 19: Film Rf Hole
Peel off the Film RF Hole. Scrap! Not to be reused! INSTALLATION Place a new Film RF Hole in the correct position as shown in the picture. Press to secure its attachment. 1273-2279 Rev3 Sony Mobile Communications AB – Company Internal 19(50) -
Page 20: Film Side Key
Peel off the Film Side Key. Scrap! Not to be reused! INSTALLATION Place a pair of new Film Side Key in the correct position as shown in the picture. Press to secure its attachment. 1273-2279 Rev3 Sony Mobile Communications AB – Company Internal 20(50) -
Page 21: Nfc Antenna
Peel off the NFC Antenna. Scrap! Not to be reused! INSTALLATION Place a new NFC Antenna in the correct position as shown in the picture. Press to secure its attachment. 1273-2279 Rev3 Sony Mobile Communications AB – Company Internal 21(50) -
Page 22: Loudspeaker & Speaker Adhesive
Detach the Loudspeaker by using a pair of tweezers. Peel off the Speaker Adhesive. Scrap! Not to be reused! INSTALLATION Place a new Speaker Adhesive in the correct position as shown in the picture. 1273-2279 Rev3 Sony Mobile Communications AB – Company Internal 22(50) - Page 23 Make sure there is no adhesive residue on the back side of the Loudspeaker. Press to secure its attachment. The pin direction should be as shown in the picture! Do not touch the pins of the Loudspeaker! 1273-2279 Rev3 Sony Mobile Communications AB – Company Internal 23(50)
-
Page 24: Main Camera
Push the Main Camera to release it from the cavity as shown in picture. Unsnap the BtB connector and remove the Main Camera. INSTALLATION Attach a new Film Main Camera on Main Camera carefully. 1273-2279 Rev3 Sony Mobile Communications AB – Company Internal 24(50) - Page 25 Turn around the Main Camera 180 degree into its cavity. Note: Do not damage the Main Camera FPC! Put the Main Camera in its cavity on Main PBA. Note: Do not damage the Main Camera FPC! 1273-2279 Rev3 Sony Mobile Communications AB – Company Internal 25(50)
- Page 26 Working Instruction Repair Instruction Mechanical/ Replacement Attach a new Conductive Cloth Main camera. Inspect the Main Camera at its cavity from front side. 1273-2279 Rev3 Sony Mobile Communications AB – Company Internal 26(50)
-
Page 27: Rubber Pl Sensor
Remove the Rubber PL Sensor by using a Flex Film Assembly Tool. INSTALLATION Place a new Rubber PL Sensor in the correct position as shown in the picture. Press to secure its position. 1273-2279 Rev3 Sony Mobile Communications AB – Company Internal 27(50) -
Page 28: Earspeaker & Receiver Adhesive
Clean the remaining foil of the Receiver Adhesive on the Front Housing LCM TP Assembly. Scrap! The Receiver Adhesive can’t be reused! INSTALLATION Place a new Receiver Adhesive in the correct position. 1273-2279 Rev3 Sony Mobile Communications AB – Company Internal 28(50) - Page 29 Don’t touch the Earspeaker pins! Check Earspeaker’s pin correct direction as shown in the picture! Don’t touch the Earspeaker pins! Press to secure its attachment. Do not touch the Earspeaker pins! 1273-2279 Rev3 Sony Mobile Communications AB – Company Internal 29(50)
-
Page 30: Rf Cable
Place the RF Cable in the correct position. Note: the long metal side is at Main PBA side. Press to secure its position. Note: the long metal side is at Main PBA side. 1273-2279 Rev3 Sony Mobile Communications AB – Company Internal 30(50) -
Page 31: Rubber 2Nd Mic
Detach and remove the Rubber 2 MIC. INSTALLATION Place a new Rubber 2 MIC in the correct position. Press to secure its position. Note: Pay more attention about the Rubber Hole direction. 1273-2279 Rev3 Sony Mobile Communications AB – Company Internal 31(50) -
Page 32: Power Key
Release the Power Key from the guiding slot by using a Flex Film Assembly Tool and remove it. INSTALLATION Place the Power Key in the correct position. Pay more attention about the Power Key direction. 1273-2279 Rev3 Sony Mobile Communications AB – Company Internal 32(50) -
Page 33: Rubber Main Mic
Follow the 5.3 – 5.6 Reassembly instructions! REMOVAL Remove the Rubber MIC from Sub PBA Assembly. INSTALLATION Prepare a new Rubber Main MIC. Pay attention the Rubber hole locating direction for Main MIC. 1273-2279 Rev3 Sony Mobile Communications AB – Company Internal 33(50) -
Page 34: Water Intrusion Label
There are two Water Intrusion Labels on the phone as shown in the picture. Detach the Water Intrusion Labels. Scrap! Not to be reused! INSTALLATION Place pair of new Water Intrusion Label in the correct position. 1273-2279 Rev3 Sony Mobile Communications AB – Company Internal 34(50) -
Page 35: Label Nfc
Scrap! Not to be reused! INSTALLATION Attach a new Label NFC on battery cover. Label NFC position is shown in picture. (unit: mm) Pay more attention about Label NFC direction. 1273-2279 Rev3 Sony Mobile Communications AB – Company Internal 35(50) -
Page 36: Tp Ic Adhesive
Follow the 5.4 – 5.6 Reassembly instructions! REMOVAL Remove the TP IC Adhesive from TP FPC. Scrap! Not to be reused! INSTALLATION Attach a new TP FPC Adhesive on TP FPC. 1273-2279 Rev3 Sony Mobile Communications AB – Company Internal 36(50) -
Page 37: Board Swap - Replacement
Build swap for change of label. 4.26 Board Swap – Customize of Software CUSTOMIZE OF SOFTWARE Follow the instructions in the Generic Repair Manual – Build swap for customization of the software. 1273-2279 Rev3 Sony Mobile Communications AB – Company Internal 37(50) -
Page 38: Reassembly
Prepare the Front Housing LCM TP Assembly. Assemble a new Conductive cloth for TP IC. Attach the new Conductive cloth for TP IC at correct position. Note: Yellow Film inside cloth covers TP IC completely. 1273-2279 Rev3 Sony Mobile Communications AB – Company Internal 38(50) - Page 39 Attach the new TP FPC adhesive at correct position. Front Housing LCM TP Assembly with New TP FPC Adhesive and new Conductive Cloth for TP IC. Check Earspeaker pins and its direction are correct. 1273-2279 Rev3 Sony Mobile Communications AB – Company Internal 39(50)
-
Page 40: Main Pba (A) & Rf Cable (B)
Check RF Cable connector and Conductive cloth for Main Camera on position. Assemble Main PBA and RF Cable onto Front Housing LCM TP Assembly at correct position. Press Main PBA to ensure two hooks well assembled. 1273-2279 Rev3 Sony Mobile Communications AB – Company Internal 40(50) - Page 41 Place the Conductive Cloth for TP IC at Correct Position carefully. Press the TP FPC connector onto Main PBA. Press the Conductive Cloth for TP IC gently to secure it’s well attached on shielding can. 1273-2279 Rev3 Sony Mobile Communications AB – Company Internal 41(50)
-
Page 42: Sub Pba Assembly
Press the LCM connector onto Main PBA. Press the Side key FPC connector onto Main PBA. Insert the RF cable back into front housing hooks. Sub PBA Assembly Prepare the Sub PBA Assembly 1273-2279 Rev3 Sony Mobile Communications AB – Company Internal 42(50) - Page 43 Place Sub PBA Assembly on correct position. Press the Sub PBA Assembly to ensure its hooks are well assembled. Press the RF Cable connector onto Sub PBA Assembly. 1273-2279 Rev3 Sony Mobile Communications AB – Company Internal 43(50)
-
Page 44: Middle Frame Assembly
Middle Frame Assembly Prepare the Middle Frame Assemble. Press the RX diversity Cable back into its cavity on Middle Frame Assembly. There are 10 hooks around Front Housing Assembly. 1273-2279 Rev3 Sony Mobile Communications AB – Company Internal 44(50) - Page 45 Assemble the Top side first while inserting the audio Jack connector. Press down the Bottom side of Middle Frame Assembly. Press on all four sides around Middle Frame Assembly securing all hooks 1273-2279 Rev3 Sony Mobile Communications AB – Company Internal 45(50)
- Page 46 Place a new Film RF Cable onto Middle Frame Assemble at its correct position for hole. Press to secure its position and inspect its fully attached. Assemble the six screws. 1273-2279 Rev3 Sony Mobile Communications AB – Company Internal 46(50)
-
Page 47: Battery
Bits (T5) in shown sequence. Battery Place the battery into the socket as shown in picture. Press to secure its position. Battery Cover Place the Battery Cover from bottom side first. 1273-2279 Rev3 Sony Mobile Communications AB – Company Internal 47(50) - Page 48 Working Instruction Repair Instruction Mechanical/ Reassembly Assemble bottom side first Press down on top side of Battery Cover. Press all four sides to secure its position. 1273-2279 Rev3 Sony Mobile Communications AB – Company Internal 48(50)
-
Page 49: Country Of Origin Barcodes For Brazil/Vivo Labels
Below is a link to a list of countries of origin. If you are printing a Brazil or VIVO label, scan the barcode corresponding to the correct country of origin for the “Fabricado” field. 1273-2279 Rev3 Sony Mobile Communications AB – Company Internal 49(50) -
Page 50: Revision History
Working Instruction Repair Instruction Mechanical/ Revision History Rev. Date Changes / Comments 2013-04-22 Initial release 2013-04-27 Add chapter 6 2013-11-18 Update the chapter 4.4 1273-2279 Rev3 Sony Mobile Communications AB – Company Internal 50(50)