Advertisement
- 1 Control reference guide
- 2 Memory backup batteries (not supplied)
- 3 Power source
- 4 Preparing the antenna
- 5 Unit on/standby
- 6 Listening to DAB/DAB+
- 7 Listening to FM radio
- 8 Time and alarm settings
- 9 Sleep timer
- 10 Display brightness
- 11 System settings
- 12 Troubleshooting
- 13 Maintenance
- 14 Specifications
- 15 Documents / Resources
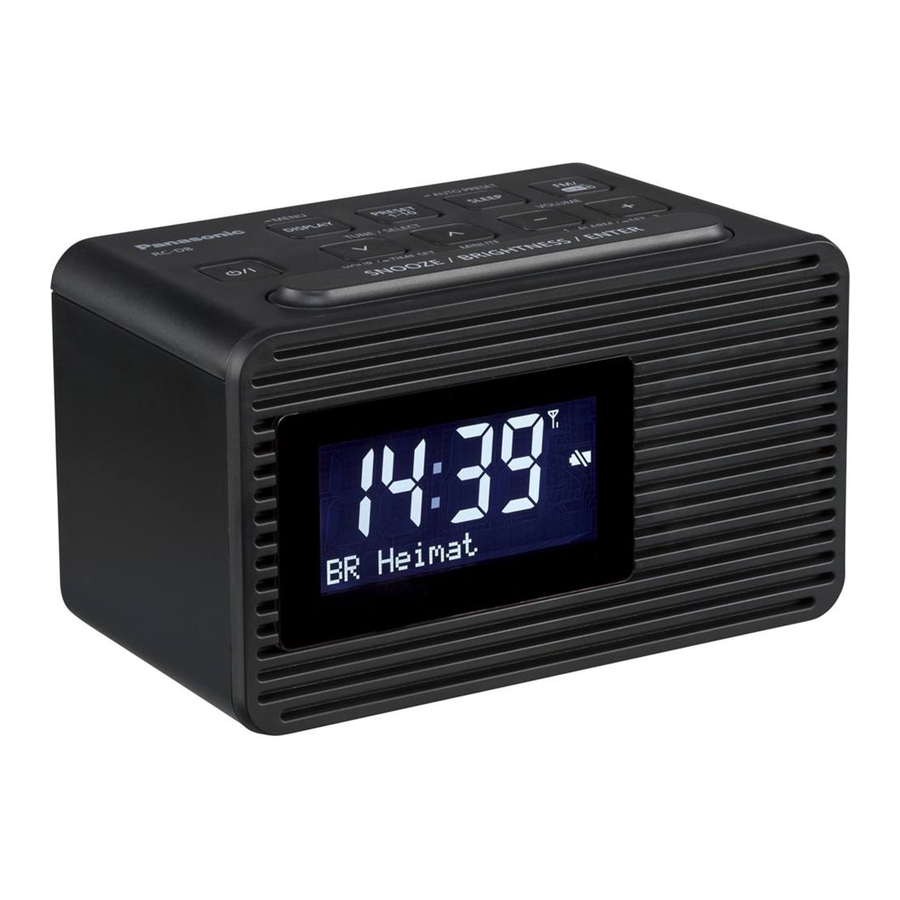
Control reference guide
Please read these instructions carefully before using this product, and save this manual for future use.

- Standby/on switch
![]()
- Selects the frequency for radio source Selects menu item/setting (During standby mode) Adjusts hour and minute setting
![]() (During standby mode) Press and hold to enter time setting mode.
(During standby mode) Press and hold to enter time setting mode. - Changes the displayed information
- Press and hold to enter menu mode.
- Stores or selects preset radio station
- Sets sleep timer
- Press and hold to perform auto presetting for FM stations.
- Selects "DAB" or "FM" as the audio source
![]() This button is indicated as [FM/dab+] in these operating instructions.
This button is indicated as [FM/dab+] in these operating instructions. - Adjusts the volume (0 (minimum) to 16 (maximum))
(During standby mode)
Turn alarm on/off- Press and hold to enter alarm setting mode.

 (During standby mode) Press and hold to enter time setting mode.
 This button is indicated as [FM/dab+] in these operating instructions.
- Snoozes the alarm
Changes brightness of display
Confirms menu items/setting - Display
- Speaker
The speaker does not have magnetic shielding. Do not place this unit near PCs or other magnetic devices. - Battery compartment
- USB port for charging a device
Memory backup batteries (not supplied)
The memory backup batteries retain the clock settings during power supply interruption. (These batteries do not power the unit.) Use alkaline or manganese batteries.
Install the batteries so that the poles (r and s) align with those in the unit.

- "
![]() " will light up on the display if there is no battery inserted or when the battery level is below its minimum.
" will light up on the display if there is no battery inserted or when the battery level is below its minimum. - When the batteries are weak, "
![]() " flashes on the display. Replace the batteries with new ones.
" flashes on the display. Replace the batteries with new ones. - Do not disconnect the unit from the power source when replacing the batteries.
 " will light up on the display if there is no battery inserted or when the battery level is below its minimum.
Power source
Connect the AC adaptor firmly to the household mains socket.


- The unit is in the standby condition when the AC adaptor is connected. The primary circuit is always "live" as long as the AC adaptor is connected to an electrical outlet.
- "0:00" flashes on the display if the time is not set.
Charging a device
Charging starts when a device (rated value: 5 V/1 A) is connected to the USB port of this unit.
- Confirm from the screen of the connected device, etc. to make sure charging has started.


- You can charge the device regardless the unit is turned on or in standby mode.
- A cable compatible with your device is required. Use the cable that comes with your device.
- Even if you connect a cable compatible with the USB port of this unit, your device may not be charged. In that case, use the charger that comes with the device.
- Depending on your device, using other chargers may not work. Check the operating instructions of your device before use.
- Do not connect a device with a rated value higher than 5 V/1 A to this unit.
- To check if charging is complete, look at the screen of the connected device, etc.
- Once fully charged, remove the USB cable from the USB port.
- Depending on the type and placement of the device that is connected to the USB port, you may notice a degradation in radio signal reception,
Preparing the antenna
This unit can receive DAB/DAB+ and FM stations with the antenna.
Rotate the antenna at  to improve reception.

Unit on/standby
Press  to turn on the unit.
- The first time you turn on the unit, it will enter DAB mode and automatically scan for stations. It sets the time and date (if data is available) and starts playing the first station it finds.
- Press
![]() again to switch the unit to standby mode.
again to switch the unit to standby mode.
- The unit is not turned off completely even in the standby condition. In the interest of energy conservation, if you will not be using the unit for an extended period of time, we recommend disconnecting the mains plug from the mains socket or removing the batteries. The unit consumes a small amount of power even in the standby condition. (⇒ "Specifications")
- In standby mode, the time and date are displayed.
Listening to DAB/DAB+
Preparation
- Turn the unit on.
- Press [FM/dab+] repeatedly to select "DAB".
Memorising stations
The first time you enter DAB mode, or if the station list is empty, the unit will start the full scan and memorise the stations.
You can perform the full scan procedure when there is a new station or a station becomes available.
Press and hold [j MENU] for at least 2 seconds to select "Full scan" and then press [SNOOZE / BRIGHTNESS / ENTER] to start full scan.
- To cancel, press and hold [- MENU] for at least 2 seconds.
Remove unavailable listed stations
This unit indicates those stations that are closed or no longer available with a question mark in front of the station name. You can remove these stations from the station list.
- Press and hold [j MENU] for at least 2 seconds.
- Press [TUNE / SELECT
![]() ] to select "Prune" and then press [SNOOZE / BRIGHTNESS / ENTER].
] to select "Prune" and then press [SNOOZE / BRIGHTNESS / ENTER]. - Press [TUNE / SELECT
![]() ] to select "Y" (Yes) and then press [SNOOZE / BRIGHTNESS / ENTER].
] to select "Y" (Yes) and then press [SNOOZE / BRIGHTNESS / ENTER]. - To cancel, press [TUNE / SELECT
![]() ] to select "N" (No).
] to select "N" (No).
- To cancel, press [TUNE / SELECT
Listening to the memorised stations
- Press [TUNE / SELECT
![]() ] to select a station from the station list.
] to select a station from the station list. - Press [SNOOZE / BRIGHTNESS / ENTER] to tune to the selected station.
- "
![]() " indicates a secondary service station. Secondary service stations are always listed next to their primary station in the station list.
" indicates a secondary service station. Secondary service stations are always listed next to their primary station in the station list.
 " indicates a secondary service station. Secondary service stations are always listed next to their primary station in the station list.
Presetting DAB/DAB+ stations
You can preset up to 10 DAB/DAB+ channels.
- While listening to a radio broadcast: Press and hold [PRESET 1-10] for at least 2 seconds.
- Press [TUNE / SELECT
![]() ] to select the desired preset channel number and then press [SNOOZE / BRIGHTNESS / ENTER].
] to select the desired preset channel number and then press [SNOOZE / BRIGHTNESS / ENTER].
- The station occupying a channel is erased if another station is preset in that channel.
Listening to preset DAB/DAB+ stations
Press [PRESET 1-10] repeatedly to select desired channel number.
Manually tuning 1 frequency block
You can manually tune to 1 frequency block. This can be useful when you are adjusting the antenna to achieve the best possible reception and scanning a particular frequency block to update the station list.
- Press and hold [j MENU] for at least 2 seconds.
- Press [TUNE / SELECT
![]() ] to select "Manual tune" and then press [SNOOZE / BRIGHTNESS / ENTER].
] to select "Manual tune" and then press [SNOOZE / BRIGHTNESS / ENTER]. - Press [TUNE / SELECT
![]() ] to select the frequency block that is receivable in your region and then press [SNOOZE/BRIGHTNESS/ENTER]. The display shows the received signal strength of the selected frequency block. Adjust the antenna to achieve the best reception.
] to select the frequency block that is receivable in your region and then press [SNOOZE/BRIGHTNESS/ENTER]. The display shows the received signal strength of the selected frequency block. Adjust the antenna to achieve the best reception.
![]()
Adjust the antenna so that the received signal strength (solid rectangles) exceeds the threshold indicator.

Viewing available information
You can view various information about the DAB/DAB+ broadcast such as dynamic label information (if available), signal strength, program type, ensemble name, frequency, bit rate, DAB variant and date.
Press [DISPLAY] repeatedly to view the available information.
Listening to FM radio
You can preset up to 10 FM channels.
Preparation
- Turn the unit on.
- Press [FM/dab+] repeatedly to select "FM".
Presetting stations automatically
Press and hold [j AUTO PRESET] for at least 2 seconds. (Once this step is performed, all previously preset stations will be erased.)
- Auto preset begins with the lowest frequency.
- The tuner starts to preset all the stations it can receive into the channels in ascending order.
- To cancel, press [TUNE / SELECT
![]() ]. (Erased stations will not be recovered.)
]. (Erased stations will not be recovered.)
Listening to preset stations
Press [PRESET 1-10] repeatedly to select desired channel number.
Tuning to a station
Press and hold [TUNE / SELECT  ] until the frequency starts changing quickly.
- The unit stops tuning when it finds a station.
- Press [TUNE / SELECT
![]() ] repeatedly to search for the required station manually.
] repeatedly to search for the required station manually.
Presetting stations manually
- While listening to a radio broadcast:
Press and hold [PRESET 1-10] for at least 2 seconds. - Press [TUNE / SELECT
![]() ] to select the desired preset channel number and then press [SNOOZE / BRIGHTNESS / ENTER].
] to select the desired preset channel number and then press [SNOOZE / BRIGHTNESS / ENTER].
- The station occupying a channel is erased if another station is preset in that channel.
Viewing available information
(Except for Australia and New Zealand)
This unit can show the text data transmitted by the Radio Data System available in some areas, such as radio text, programme service, programme type and date.
(For Australia and New Zealand) This unit can show the date.
Press [DISPLAY] repeatedly to view the available information.
- Radio Data System may not be available if reception is poor.
Time and alarm settings
Time
This is a 24-hour clock.
The time and date are updated automatically with the DAB/DAB+ broadcast (if available).
You can also set the time and date manually as follows.
(Only when the unit is in standby mode)
- Press and hold [HOUR / jTIME SET] for at least 2 seconds.
- Set the time. (Hours and minutes)
- Press [HOUR / jTIME SET] repeatedly to adjust the hour.
- Press [MINUTE] repeatedly to adjust the minute.
- Press [SNOOZE / BRIGHTNESS / ENTER].
- Set the date. (Day, month and year)
- Press [TUNE / SELECT
![]() ] to adjust the setting and then press [SNOOZE / BRIGHTNESS / ENTER].
] to adjust the setting and then press [SNOOZE / BRIGHTNESS / ENTER].
- Press [TUNE / SELECT
- Reset the clock regularly to maintain accuracy.
Alarm
You can set two alarms with different desired settings.
Preparation
- Ensure the time is set.
(Only when the unit is in standby mode)
- Press and hold [ALARM/jSET, 1] or [ALARM/jSET, 2] for at least 2 seconds.
- If the time is not set, this unit will enter time setting mode. Make settings for the time.
- While "Alarm 1 Setup" or "Alarm 2 Setup" is displayed, press [SNOOZE / BRIGHTNESS / ENTER].
- Set the alarm time.
- Press [HOUR / jTIME SET] repeatedly to adjust the hour.
- Press [MINUTE] repeatedly to adjust the minute.
- Press [SNOOZE / BRIGHTNESS / ENTER] to confirm the alarm time.
- Press [TUNE / SELECT
![]() ] to select desired item or setting and then press [SNOOZE / BRIGHTNESS / ENTER].
] to select desired item or setting and then press [SNOOZE / BRIGHTNESS / ENTER]. - Set the audio source.
Source: Buzzer, DAB, FM
If FM or DAB is set, select the last station you tuned in to ("Last listened") or a preset station as the audio source. - Set the volume (8 (minimum) to 16 (maximum))
The alarm starts at a low volume and increases gradually to the preset level.
(Volume adjustment made using [VOLUME j, i] will not affect the alarm volume.) - Turn on the alarm
Alarm: Off, On
Select "On" to turn on the alarm.
- Set the audio source.
Turning the alarm on/off
The alarm will sound at the set time every day for a duration of 59 minutes. You can turn the alarm on/off as desired.
(Only when the unit is in standby mode)
Press [ALARM/jSET, 1] or [ALARM/jSET, 2] to turn the corresponding alarm on/off.
- The corresponding alarm indicator ("
![]() " or "
" or "![]() ") will be displayed when its alarm is turned on.
") will be displayed when its alarm is turned on.
To stop the sounding alarm
Press or press the corresponding alarm button ([ALARM/jSET, 1] or [ALARM/jSET, 2]).
"Alarm off" is displayed.
To snooze the sounding alarm
Press [SNOOZE / BRIGHTNESS / ENTER] to put the alarm into snooze mode.
- The unit will switch into standby mode and the corresponding alarm indicator ("
![]() " or "
" or "![]() ") blinks slowly.
") blinks slowly. - Snooze interval is 5 minutes.
- Press
![]() to turn on the unit will also stop the snooze mode.
to turn on the unit will also stop the snooze mode. - The alarm works in both unit on and standby modes.
 " or "
 ") blinks slowly.
 Sleep timer
The sleep timer can turn the unit off after a set time.
Press [SLEEP] repeatedly to select the setting (in minutes).
-→Sleep off, 30 minutes, 60 minutes, 90 minutes, 120 minutes
- "SLEEP" is displayed when the sleep timer is set.
- To cancel, select "Sleep off".
- Pressing [SLEEP] while the sleep timer is set allows you to check the remaining time.
Display brightness
Press [SNOOZE / BRIGHTNESS / ENTER] repeatedly to select desired display brightness (bright, less bright, dim).
- You can change the display brightness during unit on or standby mode.
- You cannot change the brightness during menu setting mode, or when the alarm sounds or snoozes.
System settings
- Press and hold [j MENU] for at least 2 seconds.
- Press [TUNE / SELECT
![]() ] to select "System" and then press [SNOOZE / BRIGHTNESS / ENTER].
] to select "System" and then press [SNOOZE / BRIGHTNESS / ENTER]. - Press [TUNE / SELECT
![]() ] to select desired item or setting and then press [SNOOZE / BRIGHTNESS / ENTER].
] to select desired item or setting and then press [SNOOZE / BRIGHTNESS / ENTER]. - To cancel the setting in the middle, press [- MENU].
- If there is an asterisk on the right-hand side of the menu item, the display is showing the current setting of the item.
Backlight
You can set the backlight of display to turn off automatically after 10 seconds of inactivity.
- On: The backlight is always on.
- 10 sec: The backlight turns off after 10 seconds of inactivity.
Language
(Except for Australia and New Zealand) You can change the language for the display.
- English, Français, Deutsch, Italiano
Factory Reset
Select "Y" (Yes) to reset the unit to factory default setting.
- N (No), Y (Yes)
Software ver
Select "Y" (Yes) to view the software version installed for this unit.
- N (No), Y (Yes)
Troubleshooting
Before requesting service, make the following checks. If you are uncertain about some of the check points, or if the solutions indicated in the following guide does not resolve the issue, then consult your dealer for instructions.
To return all settings to the factory defaults
Set "Factory Reset" in System menu to "Y" (Yes).
- The settings are returned to the factory defaults. It is necessary to set the settings again.
General
Sound is distorted or no sound
- Adjust the volume.
- If the AC adaptor or fluorescent lights are near the cords, then keep other appliances and cords away from the cables.
The unit does not work
- One of the unit's safety devices may have been activated.
- Press
![]() to switch the unit to standby.
to switch the unit to standby. - If the unit does not turn off, disconnect the AC adaptor from the AC mains socket. After about 30 seconds, reconnect the AC adaptor to the AC mains socket. Then wait for about 10 seconds.
- Press
![]() to switch it on. If the unit still cannot be operated, consult the dealer.
to switch it on. If the unit still cannot be operated, consult the dealer.
Radio
DAB/DAB+ reception is poor
- Keep the antenna away from computers, televisions, other cables and cords.
- Move the unit to another location and do a full scan again.
Static or noisy reception is heard while listening to a radio broadcast.
- Check and adjust the antenna.
- Try to keep a certain amount of distance between the antenna and AC adaptor.
- Turn the TV or other audio players off or separate it from this unit.
- Keep this unit away from mobile phones if there is interference.
Messages
The following messages may appear on the unit's display.
"Alarm Not saved"
- The changes made to the alarm settings are incomplete. The changes will be lost.
"No DAB Station"
- No DAB/DAB+ station available.
- Check the antenna.
- Move the unit to another location and do a full scan again.
"Preset Empty" (" " stands for a number.)
- There are no preset stations to select. Preset some channels.
"Service Invalid"
- No DAB/DAB+ reception.
"Time Not saved"
- The changes made to the time settings are incomplete. The changes will be lost.
"USB over current remove USB"
- The USB device is using too much power. Disconnect the USB device. Then, disconnect the AC adaptor from the AC mains socket, and then reconnect the AC adaptor to the AC mains socket.
- Check the connection, it may be caused by a faulty cable.
Maintenance
Disconnect the AC adaptor from the outlet before maintenance.
Clean this unit with a soft, dry cloth
- When dirt is heavy, wring a wet cloth tightly to wipe the dirt, and then wipe it with a dry cloth.
- Never use alcohol, paint thinner or benzine to clean this unit.
- Before using chemically treated cloth, carefully read the cloth's instructions.
To dispose or transfer this unit
The unit may keep the user settings information in the unit. If you discard this unit either by disposal or transfer, then follow the procedure to return all the settings to the factory defaults to delete the user settings. (⇒ Troubleshooting, "To return all settings to the factory defaults")
Specifications
GENERAL
| Power supply | |
| AC adaptor | |
| Input | AC 100 V to 240 V, 50/60 Hz, 0.5 A |
| Output | (For Australia and New Zealand) DC 5.0 V, 2.0 A (For others) DC 5.0 V, 2.0 A, 10.0 W |
| Main unit | |
| Power supply input | |
| DC IN | DC 5 V, 2 A |
| Power consumption | 9 W |
| Power consumption in standby mode | Approx. 0.8 W |
| Memory backup batteries | 3 V (2kR6/LR6) |
| Dimensions (WkHkD) | 150 mmk89 mmk90 mm (including protrusions) |
| Mass | |
| Without batteries | Approx. 0.53 kg |
| With batteries | Approx. 0.58 kg |
| Operating temperature range | 0 oC to r40 oC |
| Operating humidity range | 20% to 80% RH (no condensation) |
- AMPLIFIER SECTION
Output power
RMS output power
Front Ch: 1 W Mono (8 ≠), 1 kHz, 10% THD - TUNER SECTION
Preset Memory FM: 10 stations
Frequency Modulation (FM)
Frequency range: 87.50 MHz to 108.00 MHz (50 kHz step) - DAB SECTION
DAB memories: 10 channels
Frequency Band (Wavelength)
Band III: 5A to 13F (174.928 MHz to 239.200 MHz)
Sensitivity *BER 4x10 -4
Min Requirement: s98 dBm - SPEAKER SECTION
Speaker unit
Full Range: 5 cm cone typek1 - TERMINAL SECTION
USB Port
USB Port power (for charging only): DC OUT 5 V 1 A
- Specifications are subject to change without notice.
- Mass and dimensions are approximate.
- Total harmonic distortion is measured by a digital spectrum analyzer.
Safety_information_for_customers_in_the_EU
Declaration of Conformity (DoC)
Hereby, "Panasonic Corporation" declares that this product is in compliance with the essential requirements and other relevant provisions of Directive 2014/53/EU. Customers can download a copy of the original DoC to our RE products from our DoC server: http://www.ptc.panasonic.eu
Contact to Authorized Representative: Panasonic Marketing Europe GmbH, Panasonic Testing Centre, Winsbergring 15, 22525 Hamburg, Germany
Manufactured by:
Panasonic Corporation Kadoma, Osaka, Japan
Authorized Representative in Europe:
Panasonic Marketing Europe GmbH Panasonic Testing Centre
Winsbergring 15, 22525 Hamburg, Germany
Web Site: http://www.panasonic.com
© Panasonic Corporation 2020

Documents / Resources
References

Download manual
Here you can download full pdf version of manual, it may contain additional safety instructions, warranty information, FCC rules, etc.
Advertisement
Thank you! Your question has been received!


Need Assistance?
Do you have a question about the RC-D8 that isn't answered in the manual? Leave your question here.