Advertisement
Introduction
Please read this instruction leaflet before using the P-Touch. Keep it in a handy place for future reference. Use only tape cassettes bearing the  logo with this machine.
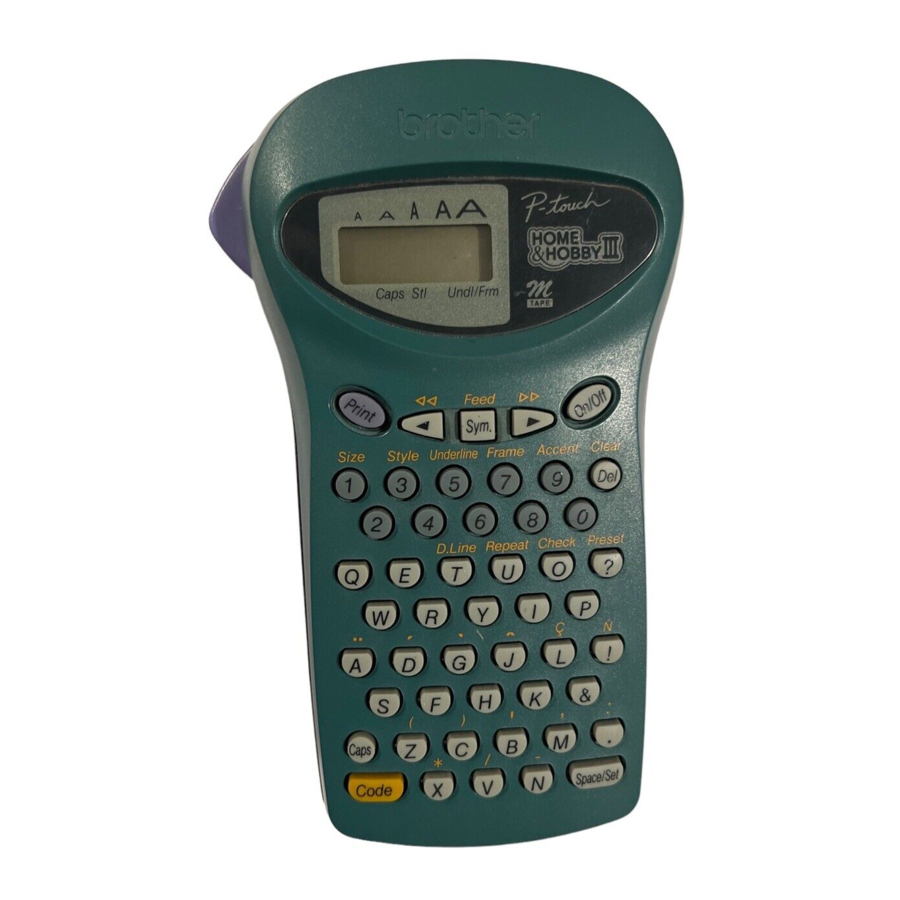
With the P-Touch 85, you can make labels quickly and easily. Simply switch on the P-Touch, type in your message, then print out your label. You can choose from five different text sizes, nine character styles, and seven framing settings. Messages can be printed on either one or two lines and can include accented characters and special symbols. In addition, nine preset layout formats are available for you to type in and print out labels quickly. Six tape colours (white, silver, gold, blue, green and pink) and two tape widths (9 mm and 12 mm) are available for creating personalized labels.
Care and precautions
- Use a soft, dry cloth to clean the machine.
- Use only AA-size (LR6) alkaline batteries.
- Do not expose the machine or the tape cassette to high temperatures, high humidity, or excessive dust.
- If you do not intend to use the machine for an extended period of time, remove the batteries.
- Do not touch the tape cutter button while printing or replacing the cutter unit.
- Do not touch the cutter blade.
- Do not put labels in your mouth.
- Do not stick labels onto skin.
- If the machine "locks up" (i.e., it does not respond when a key is pressed), press
![]() to turn off the machine; then, while holding down
to turn off the machine; then, while holding down ![]() and
and ![]() , press
, press ![]() once to turn the machine on again.
once to turn the machine on again.
 to turn off the machine; then, while holding down
  and
and  , press
 How to make a label
- Insert the batteries.
- Insert a tape cassette.
- Turn on the P-Touch by pressing
![]() .
. - Type in and format the text.
Your message can be up to 55 characters long including spaces. See "Advanced functions" for more details on formatting your text. - Print the label by pressing
![]() .
.
Before printing, be sure that the back cover is attached, otherwise the label cannot be printed. - Cut off the label.
The tape cutter button is equipped with a safety mechanism. Do not try to force the cutter button since it cannot be operated if no cassette is installed and the back cover is removed. If the cutter button is forcefully operated, correct printing may no longer be possible. - Peel off the backing.
 .
.Changing the batteries
- Remove the back cover by pressing in on the rough area at the top end of the machine and pulling off the back cover.

- If batteries are already installed, remove them and insert six new AA-size (LR6) alkaline batteries in the direction shown by the illustration on the bottom of the battery compartment. The positive end of the three batteries in the bottom row point downward, while the positive end of the top three batteries point in the opposite direction.
![]()
When inserting new batteries, always insert them positive end first. When removing old batteries, always remove them negative end first. Always replace all six batteries at the same time with brand new ones.


- Attach the back cover by inserting the two hooks on the bottom end of the back cover into the slots on the bottom end of the machine, then pushing down firmly on the cover until it snaps into place.
Changing the tape cassette
- Remove the back cover by pressing in on the rough area at the top end of the machine and pulling off the back cover.

- If a tape cassette is already installed, pull it straight out and remove the paper tab from the new tape cassette. Make sure that the end of the tape in the new cassette feeds under the tape guides.

- Insert the tape cassette, making sure that it clicks into place.
Check that the cassette fits properly around the two metal guides in the cassette compartment. The 9-mm-wide and 4-m-long tape cassette is only available enclosed with the P-Touch 85 and cannot be purchased separately.

- Attach the back cover by inserting the two hooks on the bottom end of the back cover into the slots on the bottom end of the machine, then pushing down firmly on the cover until it snaps into place.
- Feed the tape by holding down
![]() and pressing
and pressing ![]() , then cut the tape by pressing in on the tape cutter button.
, then cut the tape by pressing in on the tape cutter button.
The amount of tape remaining is visible through the window in the back of the P-Touch. When there is only a small amount of tape left, green tape appears.


 and pressing
  , then cut the tape by pressing in on the tape cutter button.
Changing the cutter unit
When the cutter becomes blunt and ceases to cut the tape cleanly, replace it.

- Remove the back cover and the tape cassette.
- Grasp the tab on the top of the cutter unit and pull out the cutter, taking care not to touch the blade.
- Grasp the tab on the new cutter unit and insert it as shown below.

- When changing the cutter unit, be sure not to touch the cutter blade.
- Keep the cutter unit in a safe place that is out of the reach of small children.
Cleaning the print head
If dust accumulates on the print head, blank horizontal lines may appear through the printed label. If this happens, clean the print head as follows:
- Turn off the P-Touch.
- Remove the back cover and the tape cassette.
- Use a dry cotton swab to gently wipe the print head and rubber pinch roller with an up-and-down motion.

- Re-insert the tape cassette, attach the back cover, turn on the machine, hold down
![]() and press
and press ![]() to feed the tape, and then try printing.
to feed the tape, and then try printing. - If blank lines remain in the printed label, repeat steps 1 through 4, this time using a cotton swab dipped in isopropyl (rubbing) alcohol.

 and press
  to feed the tape, and then try printing.
Accessories
The following accessories are available:

Function keys

- On/off (
![]() )
)
To switch the P-Touch on or off, press![]() . The P-Touch conserves battery power by automatically switching itself off if no key is pressed within five minutes. When the batteries are low, "BATT" appears on the display after printing. When the batteries are very low, the P- Touch will automatically turn itself off when you try to print a message or feed the tape. If the P-Touch is turned off and then on again, the current message, text style and size, underline/frame setting, and Caps setting remain unchanged.
. The P-Touch conserves battery power by automatically switching itself off if no key is pressed within five minutes. When the batteries are low, "BATT" appears on the display after printing. When the batteries are very low, the P- Touch will automatically turn itself off when you try to print a message or feed the tape. If the P-Touch is turned off and then on again, the current message, text style and size, underline/frame setting, and Caps setting remain unchanged. - Caps (
![]() )
)
To turn the Caps function on or off, press![]() . When the Caps display indicator above Caps is on, you can add capital letters to your message by simply pressing the character keys. When the Caps indicator is off, pressing a character key will enter a small letter in your message.
. When the Caps display indicator above Caps is on, you can add capital letters to your message by simply pressing the character keys. When the Caps indicator is off, pressing a character key will enter a small letter in your message. - Space/set (
![]() )
)
To add a space to your message, press![]() . This key can also be used to select some settings, such as an accented character, a symbol, the label length, or an automatically formatted layout.
. This key can also be used to select some settings, such as an accented character, a symbol, the label length, or an automatically formatted layout. - Code (
![]() )
)
To access those functions or enter those characters printed in yellow above the keys, press![]() . See the following Code explanations and "Advanced functions" for more details on how this key is used.
. See the following Code explanations and "Advanced functions" for more details on how this key is used. - Cursor movement (
![]() )
)
You can move the cursor ( _ ) to view or edit parts of the text to the left or right of the 5 characters shown in the LCD display. To move the cursor to the left, press![]() ; to move the cursor to the right, press
; to move the cursor to the right, press ![]() . Move the cursor several characters in a row by holding down the appropriate key.
. Move the cursor several characters in a row by holding down the appropriate key.
To position the cursor under the first character of the message, hold down![]() and press
and press ![]() ; to position the cursor Code immediately after the last character, hold down
; to position the cursor Code immediately after the last character, hold down ![]() and press
and press ![]() . If you try to move past the start or end of the message, the error message "ERROR" appears.
. If you try to move past the start or end of the message, the error message "ERROR" appears. - Delete (
![]() )
)
To delete the character to the left of the cursor, press![]() .
.
This key can also be used to quit any function and return to the current message. To erase the current message text, hold down![]() and press
and press ![]() . The text style, size, underline/frame setting, and x Caps setting are not cleared.
. The text style, size, underline/frame setting, and x Caps setting are not cleared.
 )
) )
) . When the Caps display indicator above Caps is on, you can add capital letters to your message by simply pressing the character keys. When the Caps indicator is off, pressing a character key will enter a small letter in your message.
 )
) . This key can also be used to select some settings, such as an accented character, a symbol, the label length, or an automatically formatted layout.
 )
) . See the following Code explanations and "Advanced functions" for more details on how this key is used.
 )
) ; to move the cursor to the right, press
  . Move the cursor several characters in a row by holding down the appropriate key.
 and press
  )
) .
. . The text style, size, underline/frame setting, and x Caps setting are not cleared.
- Text (
![]() )
)
To view the entered text, hold down![]() and press
and press ![]() . All Code T of the entered text, starting from the beginning, scrolls along the display, then the length of the message appears in millimetres.
. All Code T of the entered text, starting from the beginning, scrolls along the display, then the length of the message appears in millimetres. -
Feed (
![]() )
)
Sym. To feed out about 24 mm of tape at a time, hold down![]() and press
and press ![]() . The message "FEED" appears while the tape Sym. is fed. Do not press the tape cutter button while the P-Touch is feeding the tape, as this will cause the tape to jam.
. The message "FEED" appears while the tape Sym. is fed. Do not press the tape cutter button while the P-Touch is feeding the tape, as this will cause the tape to jam.
 )
) . All Code T of the entered text, starting from the beginning, scrolls along the display, then the length of the message appears in millimetres.
 )
) . The message "FEED" appears while the tape Sym. is fed. Do not press the tape cutter button while the P-Touch is feeding the tape, as this will cause the tape to jam.
- Print (
![]() )
)
To print out the entered text, press![]() . The message "PRINT" appears while printing.
. The message "PRINT" appears while printing. - Composite characters (
![]() )
)
To enter a composite character, first make sure the Caps function is turned on or off as desired, then hold down![]() and press the key of the desired accent (
and press the key of the desired accent (![]() or
or ![]() ). Finally, press the key of the letter that you wish to combine with the accent. The accented character appears in your message.
). Finally, press the key of the letter that you wish to combine with the accent. The accented character appears in your message.
The following composite characters are available:

Some accented characters can be entered directly using![]() (see "Code") or using
(see "Code") or using ![]() (see "Accented characters Code 9 below).
(see "Accented characters Code 9 below).
 )
) . The message "PRINT" appears while printing.
 )
) or
or  ). Finally, press the key of the letter that you wish to combine with the accent. The accented character appears in your message.
 (see "Accented characters Code 9 below).
-
Accented characters (
![]() )
)
To enter an accented character, first make sure the Caps function is turned on or off as desired, then hold down![]() and press
and press ![]() . After the message "A–Y?" appears, press the key of the desired letter (A, C, E, I, N, O, U or Y). If you press any other key, the error message "ERROR" appears. In the displayed list of available accented characters, press
. After the message "A–Y?" appears, press the key of the desired letter (A, C, E, I, N, O, U or Y). If you press any other key, the error message "ERROR" appears. In the displayed list of available accented characters, press ![]() or
or ![]() to position the cursor under the desired accented character, then press
to position the cursor under the desired accented character, then press ![]() . Your message reappears on the display with the selected character added.
. Your message reappears on the display with the selected character added.
To clear the list of available accented characters and return to the current message, press![]() (or hold down
(or hold down ![]() and press
and press ![]() ) instead of pressing
) instead of pressing ![]() . The following accented characters are available:
. The following accented characters are available:

Some accented characters can be entered directly using![]() (see "Code") or using the accent keys (see "Composite characters" above).
(see "Code") or using the accent keys (see "Composite characters" above).
 )
) or
or  to position the cursor under the desired accented character, then press
  . Your message reappears on the display with the selected character added.
 (or hold down
  and press
Advanced functions
- Changing text size
![]()
To select a text size, hold down![]() and press
and press ![]() once. The name of the currently selected size is displayed and is shown by the indicator at the top of the display. Keep
once. The name of the currently selected size is displayed and is shown by the indicator at the top of the display. Keep ![]() held down and continue pressing
held down and continue pressing ![]() until your desired text size appears and is indicated at the top of the display. The selected text size applies to the entire message.
until your desired text size appears and is indicated at the top of the display. The selected text size applies to the entire message.
The following five text sizes are available:


 and press
  once. The name of the currently selected size is displayed and is shown by the indicator at the top of the display. Keep
- Changing text style
![]()
To select a text style, hold down![]() and press
and press ![]() once. The name of the currently selected style is displayed. Keep
once. The name of the currently selected style is displayed. Keep ![]() held down and continue pressing
held down and continue pressing ![]() until your desired text style appears. The selected text style applies to the entire message.
until your desired text style appears. The selected text style applies to the entire message.
The following nine text styles are available:


 once. The name of the currently selected style is displayed. Keep
- Add underlining
![]()
To select underlining, hold down![]() and press
and press ![]() once. The name of the currently selected setting is displayed. Keep
once. The name of the currently selected setting is displayed. Keep ![]() held down and continue pressing
held down and continue pressing ![]() until your desired setting appears and is shown by the
until your desired setting appears and is shown by the ![]() indicator. The underline is printed under all of the text, but is not printed when the VERT style is selected. If a frame was chosen before selecting underlining, the frame is cancelled and the underline is printed.
indicator. The underline is printed under all of the text, but is not printed when the VERT style is selected. If a frame was chosen before selecting underlining, the frame is cancelled and the underline is printed.
The following underline settings are available:


 once. The name of the currently selected setting is displayed. Keep
  indicator. The underline is printed under all of the text, but is not printed when the VERT style is selected. If a frame was chosen before selecting underlining, the frame is cancelled and the underline is printed.
- Add framing
![]()
To select a frame, hold down![]() and press
and press ![]() once. The Code 7 name of the currently selected setting is displayed. Keep
once. The Code 7 name of the currently selected setting is displayed. Keep ![]() held down and continue pressing
held down and continue pressing ![]() until your desired setting appears and is shown by the
until your desired setting appears and is shown by the ![]() indicator. The frame is printed around the entire message, but is not printed when the VERT style is selected. If underlining was chosen before selecting a frame, the underline is cancelled and the frame is printed.
indicator. The frame is printed around the entire message, but is not printed when the VERT style is selected. If underlining was chosen before selecting a frame, the underline is cancelled and the frame is printed.
The following frame settings are available:


 once. The Code 7 name of the currently selected setting is displayed. Keep
  indicator. The frame is printed around the entire message, but is not printed when the VERT style is selected. If underlining was chosen before selecting a frame, the underline is cancelled and the frame is printed.
- Add a symbol
![]()
To enter a symbol, press![]() . After the message "A–K?" Sym. appears, press the letter key of the group containing the desired symbol. In the displayed list of available symbols, press
. After the message "A–K?" Sym. appears, press the letter key of the group containing the desired symbol. In the displayed list of available symbols, press ![]() or
or ![]() to position the cursor under the desired symbol, then press
to position the cursor under the desired symbol, then press ![]() . Your message reappears on the display with the selected symbol added. To clear the list of available symbols and return to the current message, press
. Your message reappears on the display with the selected symbol added. To clear the list of available symbols and return to the current message, press ![]() (or
(or ![]() ) instead of pressing
) instead of pressing ![]() .
.
The following symbols are available:


 . After the message "A–K?" Sym. appears, press the letter key of the group containing the desired symbol. In the displayed list of available symbols, press
  or
or  to position the cursor under the desired symbol, then press
  . Your message reappears on the display with the selected symbol added. To clear the list of available symbols and return to the current message, press
  (or
(or  ) instead of pressing
  .
.
- Double-line printing
![]()
To print a message as a two-line label, press![]() or
or ![]() to position the cursor under the character that will start the second line. Hold down
to position the cursor under the character that will start the second line. Hold down ![]() and press
and press ![]() . A marker (
. A marker (![]() ) appears to the left of the character above the cursor. Twoline messages are only printed with the SIZE1 text size and the NORM style.
) appears to the left of the character above the cursor. Twoline messages are only printed with the SIZE1 text size and the NORM style.
To change a message back to a single-line label, delete the marker.

 or
or  to position the cursor under the character that will start the second line. Hold down
  . A marker (
 ) appears to the left of the character above the cursor. Twoline messages are only printed with the SIZE1 text size and the NORM style.
- Setting the label length
![]()
To set the length of the label, hold down![]() and press
and press ![]() to display the currently selected setting. Keep
to display the currently selected setting. Keep ![]() held down and continue pressing
held down and continue pressing ![]() until either "L ON" appears (indicating the label length function is on) or "L OFF" (indicating the function is off), then release the keys to display the current length in millimetres. Use the number keys or press
until either "L ON" appears (indicating the label length function is on) or "L OFF" (indicating the function is off), then release the keys to display the current length in millimetres. Use the number keys or press ![]() or
or ![]() to enter the desired length between 50 and 300 mm, then press
to enter the desired length between 50 and 300 mm, then press ![]() . Labels will now be of the set length. To set the label length automatically, turn off the function by holding down
. Labels will now be of the set length. To set the label length automatically, turn off the function by holding down ![]() and pressing
and pressing ![]() twice.
twice.

 to display the currently selected setting. Keep
  or
or  to enter the desired length between 50 and 300 mm, then press
  . Labels will now be of the set length. To set the label length automatically, turn off the function by holding down
 -
Using automatically formatted layouts
![]()
To select an auto format, hold down![]() and press
and press ![]() .After the message "1–9?" appears, press the number key of the desired preset format. After the format name appears, press
.After the message "1–9?" appears, press the number key of the desired preset format. After the format name appears, press ![]() to view each of the format settings (text size, style and underline/frame). Press
to view each of the format settings (text size, style and underline/frame). Press ![]() to select the displayed format, then enter the text. The label will be printed with the format settings of the selected auto format.
to select the displayed format, then enter the text. The label will be printed with the format settings of the selected auto format.
The following automatically formatted layouts are available:


 .After the message "1–9?" appears, press the number key of the desired preset format. After the format name appears, press
  to view each of the format settings (text size, style and underline/frame). Press
  to select the displayed format, then enter the text. The label will be printed with the format settings of the selected auto format.

Documents / ResourcesDownload manual
Here you can download full pdf version of manual, it may contain additional safety instructions, warranty information, FCC rules, etc.
Advertisement
Thank you! Your question has been received!


Need Assistance?
Do you have a question about the P-touch 85 that isn't answered in the manual? Leave your question here.