
Related Manuals for Husqvarna PG 510


Summary of Contents for Husqvarna PG 510
- Page 1 PG 510 Operator's manual 2-21 Bedienungsanweisung 22-40 Manuel d'utilisation 41-59 Gebruiksaanwijzing 60-78...
-
Page 2: Table Of Contents
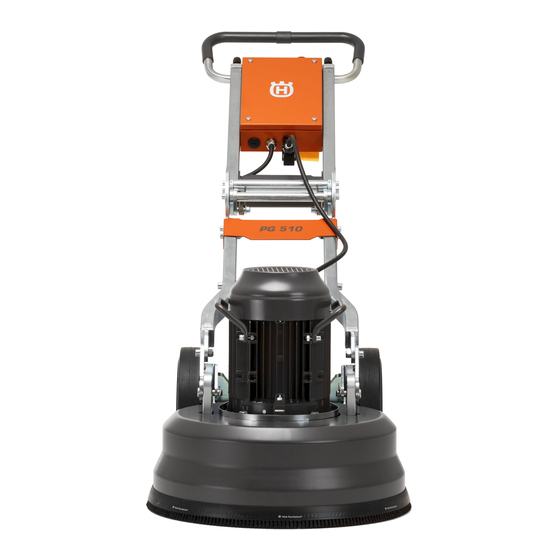
Contents Introduction..............2 Troubleshooting............15 Safety................4 Transportation and storage...........16 Operation................ 8 Technical data.............. 18 Maintenance..............14 Declaration of Conformity..........20 Introduction Product description • Available in 1- or 3-phase. • A grind width of 515 mm. The product is a power grinder for concrete surfaces Intended use of different hardness. - Page 3 Product overview 1. Operator's manual 21. Bottom/lower plate - grinding head 2. Handle/Handlebar 22. Connection, vacuum hose 3. Lock knobs for handlebar adjustment Symbols on the product 4. Emergency stop 5. Overload lamp WARNING: Not careful or incorrect use 6. ON/OFF switch can result in injury or death to the operator 7.
-
Page 4: Safety
not breathe exhaust fumes. Always make 2. Product weight sure that there is good airflow. 3. Rated power 4. Rated voltage 5. Rated current This product is in compliance with 6. Frequency applicable EC directives. 7. Enclosure Note: 8. Maximum slope angle Other symbols/decals on the product refer to 9. - Page 5 • Only use the product for operations that are given in operate the product carefully and be prepared to Intended use on page 2 . this manual. Refer to stop the product if it is necessary. • Use personal protective equipment. Refer •...
- Page 6 Incorrect connection can Daily maintenance on page 14 . If the safety devices result in electrical shock. Speak to an are defective, speak to your Husqvarna approved approved electrician if you are not sure if service agent. your mains outlet is correctly grounded.
- Page 7 ON/OFF switch 4. Wait for 5 seconds, this is to let the product operate at the idle speed. The ON/OFF switch is used to start and stop the 5. Turn the ON/OFF switch to 0 to stop the product. product. Emergency stop The emergency stop is used to quickly stop the motor.
-
Page 8: Operation
• Do the inspection and/or maintenance with the motor • Do the maintenance to make sure that the product Daily maintenance on stopped and the power plug disconnected. operates correctly. Refer to page 14 . Operation Introduction Tilted transport position WARNING: Before you operate the product, you must read and understand the... - Page 9 1. Loosen the lock knobs (A) and adjust the handle (B) 1. Remove the lock knobs (A) to loosen the support to idle position. foot (B). 2. Hold the handlebar to keep the frame stable and lift 2. Tighten the lock knobs to set the position. the support foot out and up.
- Page 10 3. Select the applicable position for the operation and Metal bond diamond tools tighten the lock knob. The bottom hole increases the Note: grinding pressure and the height of the handlebar. We recommend 3 tools with 1 segment on each The top hole decreases the grinding pressure and ®...
- Page 11 • Plastic bonded tool attached to resin holder disc. 10. Turn the emergency stop button clockwise to make sure that the emergency stop is disengaged. • Grinding head with 3 resin holder discs and tools 11. Make sure that you know in which direction the motor rotates.
- Page 12 To stop the product 2. Turn the 2 pins in the power plug in the opposite direction to change in which direction the motor rotates. This is only applicable for 3-phase. CAUTION: Do not lift the tool plate from the surface when you stop the motor. The tool plate rotates for a while after the motor stops.
- Page 13 3. Put the product into servicing position. 6. When the diamond tools are replaced, put the product into operation position. 4. Use a hammer to remove the diamond tools. To connect a dust extractor Use a Husqvarna dust extractor system. 1146 - 002 - 09.12.2022...
-
Page 14: Maintenance
1. Connect the dust extractor to the product. Use a 50 2. Make sure that the filters in the dust extractor are mm (2 inch) hose. clean and not damaged. Monitor the dust during the operation. Maintenance Introduction • Remove blockage from all air openings. The product must always have sufficiently cool temperature. -
Page 15: Troubleshooting
1. Remove the grinding discs (A) and the tool plates 2. Examine the grind holder for damages and the wear (B). of the rubber cylinders (C). 3. Replace the rubber cylinders if it is necessary. Troubleshooting The product does not start The product stops after only a while •... -
Page 16: Transportation And Storage
Transportation and storage To set the product in transport position 2. Pull out the lock pins (A) and remove the lock bolts (B) on each side of the grinding head Put some type of protection on the product during transportation. The protection keeps natural elements such as rain and snow away from the product. - Page 17 4. Push the handle on the central hinge and at the 7. Hold the handlebar with one hand and push the same time fold the top frame forward. The product is handle on the central hinge. This folds the product in the lift position.
-
Page 18: Technical Data
Storage of the product • Keep the product in a locked area to prevent access for children or persons that are not approved. • Keep the product in a dry and frost free area. Technical data Technical data Three-phase, Three-phase, Three-phase, Single-phase, 220-240V 380-420V... - Page 19 Three-phase, Three-phase, Three-phase, Single-phase, 220-240V 380-420V 440-480V 220-240V Sound power level L (meas- ured) Sound levels dB(A) Sound pressure level at the op- erators ear Vibration levels m/s² Right handle Left handle Sound pressure level according to EN 60335-2-72. Expected measurement uncertainty 4 dB(A). Vibration level according to EN 60335-2-72.
-
Page 20: Declaration Of Conformity
Declaration of Conformity EC Declaration of Conformity We, Husqvarna AB, SE-561 82 Huskvarna, Sweden, tel: +46- 36-146500, declare on our sole responsibility that the product: Description Polish & Grind Equipment Brand Husqvarna Type/Model PG 510 Identification Serial numbers dating from 2022 and onwards... - Page 21 UK Declaration of Conformity We Husqvarna AB, SE-561 82 Huskvarna, Sweden, tel: +46- 36-146500, declares on our sole responsibility that the product: Description Polish & Grind Equipment Brand Husqvarna Type/Model PG 510 Identification Serial numbers dating from 2022 and onwards...
-
Page 22: Einleitung
Inhalt Einleitung..............22 Fehlerbehebung............36 Sicherheit..............24 Transport und Lagerung..........36 Betrieb................28 Technische Angaben............ 39 Wartung................ 35 Konformitätserklärung...........40 Einleitung Gerätebeschreibung • Erhältlich als Ein- oder Dreiphasenausführung. • Schleifbreite von 515 mm. Das Gerät ist eine Hochleistungschleifmaschine Verwendungszweck für Betonoberflächen unterschiedlicher Härte. Der Schleifbereich reicht von rauen bis hin zu glatteren Verwenden Sie das Gerät zum Abschleifen von Oberflächen. - Page 23 Produktübersicht 1. Bedienungsanleitung 21. Bodenplatte/untere Platte – Schleifkopf 2. Griff/Lenker 22. Anschluss, Vakuumschlauch 3. Sperrhebel für die Einstellung des Lenkers Symbole auf dem Gerät 4. Notaus-Taste 5. Überlastlampe WARNUNG: Bei unvorsichtiger oder 6. EIN/AUS-Schalter nicht ordnungsgemäßer Bedienung kann 7. Betriebsstundenzähler es zu Verletzungen oder zum Tode des Benutzers oder anderer Personen 8.
-
Page 24: Sicherheit
WARNUNG! Der Staub kann 1. Gerätenummer Atembeschwerden verursachen. 2. Gerätegewicht Verwenden Sie einen Atemschutz. Atmen 3. Nennleistung Sie die Abgase nicht ein. Sorgen Sie 4. Nennspannung immer für eine gute Luftzirkulation. 5. Nennstrom 6. Häufigkeit Dieses Gerät entspricht den geltenden 7. - Page 25 Sicherheitshinweise für den Betrieb Nach Ausschalten des Motors dreht sich die Werkzeugplatte noch eine Zeit lang weiter. WARNUNG: • Tragen Sie stets Schutzhandschuhe und lassen Sie Lesen Sie die folgenden das Gerät abkühlen, wenn Sie Diamantwerkzeuge Warnhinweise, bevor Sie das Gerät ausbauen.
- Page 26 Netzstecker oder das Netzkabel kann unter bestimmten Bedingungen an das beschädigt ist oder ersetzt werden muss, Netz angeschlossen werden. Sprechen Sie wenden Sie sich an Ihre Husqvarna mit dem Energieversorgungsunternehmen, Servicewerkstatt. Beachten Sie die vor Ort um Anweisungen zum Anschließen des geltenden Vorschriften und Gesetze.
- Page 27 Führen Sie regelmäßig eine Überprüfung der Tägliche Sicherheitsvorrichtungen anhand von Wartung auf Seite 35 durch. Wenn die Sicherheitsvorrichtungen defekt sind, wenden Sie sich an Ihre autorisierte Husqvarna-Servicewerkstatt. • Nehmen Sie keine Modifizierungen der Sicherheitsvorrichtungen vor. 1146 - 002 - 09.12.2022...
-
Page 28: Betrieb
3. Schalten Sie den EIN-/AUS-Schalter auf 1, um das So prüfen Sie die Notaus-Taste Gerät einzuschalten. 1. Drücken Sie die Notaus-Taste (A), und stellen Sie sicher, dass der Motor abgestellt wird. 4. Warten Sie 5 Sekunden, damit das Gerät mit Leerlaufdrehzahl laufen kann. - Page 29 Gerätepositionen Angehobene Transportposition Bringen Sie zwischen dem Motor und dem Schaltkasten Betriebsposition einen Schutz an, um Beschädigungen am Gerät zu vermeiden. Wartungsposition ACHTUNG: So stellen Sie den Lenker ein Stellen Sie das Gerät in der Wartungsposition immer auf eine ebene Die Sperrhebel des Lenkers werden im Uhrzeigersinn Fläche.
- Page 30 3. Wenn die Lenkerposition eingestellt ist, ziehen Sie 2. Halten Sie den Lenker so, dass der Rahmen stabil die Lenkersperrhebel (A) nach oben (A) und bringen bleibt, und heben Sie den Stützfuß nach außen und diese in die Leerlaufstellung (B). oben.
- Page 31 Installation der Diamantwerkzeuge Die Installation der Diamantwerkzeuge auf der Werkzeugplatte hat Auswirkungen auf die Leistung des Geräts. Die Art des Diamantwerkzeugs in Kombination mit der Anzahl der Segmente auf dem Diamantwerkzeug ist wichtig. Verwenden Sie metallgebundene Diamantwerkzeuge mit zwei Segmenten für die üblichen Schleifarbeiten, um die Oberfläche zu ebnen oder für leichteres Abtragen.
- Page 32 Wichtige Schritte, bevor Sie mit dem 1. Achten Sie auf den Pfeil, um zu sehen, in welcher Richtung sich der Motor dreht. Gerät arbeiten 1. Lesen Sie die Bedienungsanleitung sorgfältig durch, und vergewissern Sie sich, dass Sie die Anweisungen verstehen. 2.
- Page 33 So starten Sie das Gerät 1. Schalten Sie den EIN-/AUS-Schalter auf 0, um das Gerät zu stoppen. 1. Drücken Sie den Lenker leicht um ungefähr 1 mm nach unten, um den Schleifkopf von der Oberfläche zu heben. Dadurch wird der Druck gegen die Oberfläche verringert.
- Page 34 Sie das Gerät in die Arbeitsposition. 4. Entfernen Sie die Diamantsegmente mit einem Hammer. So schließen Sie einen Staubabsauger Verwenden Sie ein Husqvarna-Staubabsaugersystem. 1. Schließen Sie den Staubabsauger an das Gerät an. Verwenden Sie einen 50 mm langen Schlauch. 5. Befestigen Sie neue Diamantwerkzeuge auf der Werkzeugplatte.
-
Page 35: Wartung
Wartung Einleitung So prüfen Sie den Bürstenstreifen • Stellen Sie sicher, dass der Bürstenstreifen WARNUNG: Bevor Sie eine Wartung vollständig besetzt ist. durchführen, müssen Sie das Kapitel über • Stellen Sie sicher, dass der Bürstenstreifen die die Sicherheit lesen und verstehen. Oberfläche berührt. -
Page 36: Fehlerbehebung
Fehlerbehebung Das Gerät springt nicht an Das Gerät stoppt bereits nach kurzer Zeit. • Stellen Sie sicher, dass das Netzteil und die Stromkabel nicht beschädigt sind. • Wenn das Gerät überlastet wird, rastet der • Überprüfen Sie die Notaus-Taste und drehen Sie sie Überlastschutz ein und stoppt den Motor. - Page 37 1. Trennen Sie das Motorkabel vom Schaltkasten (A). 3. Entfernen Sie das Rad-Chassis vom Schleifkopf. 4. Drücken Sie den Griff auf dem mittleren Scharnier, und legen Sie gleichzeitig den oberen Rahmen nach vorn. Das Gerät befindet sich in der Hubposition. 2.
- Page 38 6. Halten Sie den Lenker so, dass der Rahmen stabil 9. Verschieben Sie den Sperrstift und die bleibt, und heben Sie den Stützfuß nach außen und Schlossschraube von Position (A) auf Position (B), oben. um das Gerät zu sperren. 7. Halten Sie den Lenker mit einer Hand fest, und drücken Sie den Griff auf dem mittleren Scharnier.
-
Page 39: Technische Angaben
Technische Angaben Technische Daten Dreiphasig, Dreiphasig, Dreiphasig, Einphasig, 220-240 V 380-420 V 440-480V 220-240V Motorfrequenz, Hz Maximale Leistung in kW 4,0/5,4 4,0/5,4 2,2/3,0 Nennstrom, A Nennspannung, V 380-420 440-480 220-240 220-240 220-240 Gewicht, kg 133/293 133/293 133/293 120/265 133/293 Schleifbreite, mm/in. 515/20,3 515/20,3 515/20,3 515/20,3... -
Page 40: Konformitätserklärung
Konformitätserklärung EU-Konformitätserklärung Die Husqvarna AB, SE-561 82 Huskvarna, Schweden, Tel.: +4636-146500, erklärt in alleiniger Verantwortung, dass das Gerät: Beschreibung Polier- und Schleifausrüstung Marke Husqvarna Typ/Modell PG 510 Identifizierung Seriennummern ab 2022 die folgenden EU-Richtlinien und -Verordnungen erfüllt: Richtlinie/Verordnung Beschreibung 2006/42/EC „Maschinenrichtlinie“... -
Page 41: Introduction
Sommaire Introduction..............41 Dépannage..............54 Sécurité.................43 Transport et stockage........... 55 Utilisation..............47 Caractéristiques techniques......... 57 Entretien............... 53 Déclaration de conformité..........59 Introduction Description du produit • Disponible en version monophasée ou triphasée. • Une largeur de meulage de 515 mm. Le produit est une meuleuse électrique pour les Utilisation prévue surfaces en béton de différentes duretés. - Page 42 Aperçu du produit 1. Manuel de l'opérateur 21. Plaque arrière/inférieure - tête de meulage 2. Poignée/Guidon 22. Raccordement, tuyau d'aspiration 3. Boutons de verrouillage pour le réglage du guidon Symboles concernant le produit 4. Arrêt d'urgence 5. Témoin de surcharge AVERTISSEMENT : Une utilisation 6.
-
Page 43: Sécurité
AVERTISSEMENT ! La poussière peut 1. Référence de produit entraîner des problèmes respiratoires. 2. Poids du produit Utilisez un masque respiratoire. Ne 3. Puissance nominale respirez pas les fumées d'échappement 4. Tension nominale Assurez-vous systématiquement de la 5. Intensité nominale bonne circulation de l'air. 6. - Page 44 Consignes de sécurité pour le continue à tourner pendant un moment après l'arrêt du moteur. fonctionnement • Lorsque vous retirez les outils diamantés, laissez le produit refroidir et utilisez des gants de protection. AVERTISSEMENT: Lisez les Après utilisation, les outils diamantés sont très instructions qui suivent avant d'utiliser le chauds.
- Page 45 EN61000-3-11 et être remplacé, adressez-vous à votre est soumis au branchement conditionnel agent d'entretien Husqvarna. Respectez la au secteur. Consultez votre distributeur législation et les réglementations locales. d'électricité pour obtenir des instructions sur Si vous n'avez pas bien compris les le branchement du produit.
- Page 46 Contrôlez régulièrement les dispositifs de sécurité, Entretien quotidien à la page 53 . Si reportez-vous à les dispositifs de sécurité sont défectueux, parlez-en à votre agent d'entretien Husqvarna homologué. • Ne modifiez pas les dispositifs de sécurité. Interrupteur de marche/arrêt 4.
-
Page 47: Utilisation
Arrêt d'urgence 2. Tournez le bouton d'arrêt d'urgence dans le sens des aiguilles d'une montre (B) pour le désengager. L'arrêt d'urgence permet d'arrêter rapidement le moteur. L'arrêt d'urgence du produit coupe l'alimentation Instructions de sécurité pour l'entretien électrique du secteur. •... - Page 48 Pour régler le guidon Position d'entretien Les boutons de verrouillage de la poignée tournent dans REMARQUE: placez le produit en le sens des aiguilles d'une montre et dans le sens position d'entretien uniquement sur une contraire des aiguilles d'une montre, et peuvent être surface horizontale.
- Page 49 Pour régler la hauteur du cadre 3. Sélectionnez la position correspondant à l'utilisation et serrez le bouton de verrouillage. Le trou inférieur L'angle du cadre peut être modifié pour répartir le poids augmente la pression de meulage et la hauteur du du cadre.
- Page 50 Remarque: ™ les outils Piranha sont conçus pour fonctionner dans un seul sens. Outils en diamant à liant métallique Remarque: Nous vous recommandons d'utiliser 3 outils à 1 segment sur chaque disque support Redi ® Lock pour retirer le béton normal ou les surfaces en •...
- Page 51 10. Tournez le bouton d'arrêt d'urgence dans le sens 2. Faites tourner les 2 fiches de la prise de courant des aiguilles d'une montre pour vous assurer qu'il dans le sens opposé pour modifier le sens de est désengagé. rotation du moteur. Cette instruction est applicable uniquement pour du courant triphasé.
- Page 52 Pour arrêter le produit 2. Appuyez sur le bouton d'arrêt d'urgence. REMARQUE: ne soulevez pas la plaque de l'outil de la surface lorsque vous arrêtez le moteur. La plaque de l'outil tourne pendant un moment après l'arrêt du moteur. La majeure partie de la poussière peut être soufflée dans l'air et la surface risque d'être endommagée.
-
Page 53: Entretien
5. Fixez les outils diamantés neufs sur la plaque de l'outil. poussière Utilisez un système extracteur de poussière Husqvarna. 1. Branchez l'extracteur de poussière sur le produit. Utilisez une buse de 50 mm. 6. Lorsque les outils diamantés sont remplacés, placez le produit en position de fonctionnement. -
Page 54: Dépannage
• Éliminez toute obstruction de toutes les prises d'air. 1. Retirez les disques à meuler (A) et les plaques Le produit doit être toujours suffisamment frais. d’outils (B). Pour contrôler l'alimentation électrique AVERTISSEMENT: n'utilisez pas de câbles endommagés. Un câble endommagé... -
Page 55: Transport Et Stockage
• Le produit redémarre après environ une minute, trop longues et/ou d'un calibre trop petit diminuent la lorsque la température du moteur a diminué à son puissance du moteur pendant le fonctionnement. niveau habituel. • En cas de surcharge du moteur, le témoin de •... - Page 56 4. Poussez la poignée sur la charnière centrale et pliez 7. Tenez le guidon avec une main et poussez la simultanément le cadre supérieur vers l'avant. Le poignée sur la charnière centrale. Cela permet de produit est en position relevée. placer le produit en position repliée.
-
Page 57: Caractéristiques Techniques
Remisage du produit • Conservez le produit dans un endroit verrouillé afin que des enfants ou personnes qui ne sont pas autorisées à l'utiliser ne puissent pas y avoir accès. • Conservez le produit dans un endroit sec et à l'abri du gel. - Page 58 Niveaux sonores Triphasé, Triphasé, Triphasé, Courant monophasé, 380-420 V 440-480 V 220-240 V 220-240 V Émissions sonores dB(A) Niveau de puissance sonore L (mesuré) Niveaux sonores dB(A) Niveau de pression sonore à l'oreille de l'utilisateur Niveaux de vibrations m/s² Poignée droite Poignée gauche Émissions sonores dans l'environnement mesurées en tant que puissance acoustique conformément à la norme EN 60335-2-72.
-
Page 59: Déclaration De Conformité
Déclaration de conformité Déclaration de conformité CE Nous, Husqvarna AB, SE-561 82 Huskvarna, Suède, tél : +46- 36-146500, déclarons sous notre entière responsabilité que le produit : Description Équipement de polissage et de ponçage Marque Husqvarna Type/Modèle PG 510 Identification Numéros de série à partir de 2022 et ultérieurs est entièrement conforme à... -
Page 60: Inleiding
Inhoud Inleiding................ 60 Probleemoplossing............73 Veiligheid..............62 Transport en opslag............74 Werking.................66 Technische gegevens...........76 Onderhoud..............72 Verklaring van overeenstemming......... 78 Inleiding Productbeschrijving • Beschikbaar met 1 of 3 fasen. • Een slijpbreedte van 515 mm. Het product is een schuurmachine voor betonnen Gebruik oppervlakken van verschillende hardheid. - Page 61 Productoverzicht 1. Bedieningshandleiding 21. Bodem-/onderste plaat - slijpkop 2. Hendel/stuur 22. Aansluiting, vacuümslang 3. Vergrendelknoppen voor stuurinstelling Symbolen op het product 4. Noodstop 5. Waarschuwingslampje voor overbelasting WAARSCHUWING: Onzorgvuldig of 6. AAN/UIT-schakelaar onjuist gebruik kan leiden tot letsel of de 7.
-
Page 62: Veiligheid
uitlaatgassen in. Zorg voor goede 2. Gewicht van het product ventilatie. 3. Nominaal vermogen 4. Nominale spanning 5. Nominale stroom Dit product voldoet aan de geldende EU- 6. Frequentie richtlijnen. 7. Behuizing Let op: 8. Maximale hellingshoek Overige op het product aangebrachte 9. - Page 63 • Gebruik het product niet als er tekenen van schade WAARSCHUWING: Overmatige zijn. blootstelling aan trillingen kan bloedvat- • Start het product alleen wanneer de slijpkop het en zenuwbeschadigingen veroorzaken oppervlak raakt, tenzij u een controle van de aan/ bij personen met een verminderde uit-schakelaar uitvoert.
- Page 64 Als beschreven om letsel te voorkomen. de stekker of de voedingskabel beschadigd is of moet worden vervangen, raadpleeg dan uw Husqvarna-servicewerkplaats. Volg de OPGELET: Het product voldoet aan lokale regel- en wetgeving. de eisen van EN61000-3-11 en mag...
- Page 65 • Controleer of de verlengkabel in goede staat 2. Duw de hendel omlaag om de slijpkop van de vloer verkeert en niet beschadigd is. te heffen. • Gebruik de verlengkabel niet in opgerolde toestand. Daardoor kan de kabel oververhit raken. •...
-
Page 66: Werking
Veiligheidsinstructies voor onderhoud De noodstop controleren 1. Druk op de noodstopknop (A) en controleer of de • Zorg ervoor dat alle onderdelen in een goede staat motor stopt. blijven en controleer of alle fittingen goed vastzitten. • Gebruik geen product dat defect is. Voer de in deze handleiding beschreven veiligheidscontroles en onderhouds- en servicetaken uit. - Page 67 Transportpositie voor heffen 3. Wanneer het stuur in een stand is geplaatst, trekt u de vergrendelknop van het stuur omhoog (A) en zet Plaats beschermingsmateriaal tussen de motor en u deze in de ruststand (B). de controlekast om beschadiging van het product te voorkomen.
- Page 68 2. Houd het stuur vast om het frame stabiel te houden Installatie van de diamantschijven en de steunvoet omhoog en eruit te tillen. De installatie van de diamantschijven op de schijfplaat heeft gevolgen voor de prestaties van het product. Het type diamantschijf en het aantal segmenten op de diamantschijf zijn belangrijk.
- Page 69 Voordat u het product gebruikt • Slijpkop met halve set op de 3 slijpschijven. 1. Lees de gebruikershandleiding zorgvuldig door en zorg dat u de instructies hebt begrepen. Onderhoud op 2. Voer dagelijks onderhoud uit. Zie pagina 72 . 3. Controleer of het product goed gemonteerd en niet beschadigd is.
- Page 70 Product starten 1. Kijk naar de pijl om te zien in welke richting de motor draait. 1. Duw de hendel een beetje naar beneden om de slijpkop ongeveer 1 mm van het oppervlak te heffen. Dit vermindert de druk op het oppervlak. Hef de slijpkop niet volledig van het oppervlak.
- Page 71 2. Houd de schijfplaat tegen het oppervlak. Zorg ervoor 4. Gebruik een hamer om de diamantschijven te dat de schijfplaat niet draait wanneer u de voorkant verwijderen. optilt. 3. Haal de stekker uit het stopcontact. De diamantschijven vervangen WAARSCHUWING: Haal de stekker uit het stopcontact.
-
Page 72: Onderhoud
Stofzuiger aansluiten 2. Controleer of de filters in de stofzuiger schoon en onbeschadigd zijn. Controleer op stof tijdens het Gebruik een Husqvarna-stofzuigersysteem. gebruik. 1. Sluit de stofzuiger aan op het product. Gebruik een slang van 50 mm. Onderhoud Inleiding •... -
Page 73: Probleemoplossing
De schijfhouder controleren 2. Controleer de schijfhouder op beschadigingen en de rubberen cilinders (C) op slijtage. OPGELET: De toestand van de 3. Vervang indien nodig de rubberen cilinders. schijfhouder is belangrijk voor de prestaties en de veiligheid. 1. Verwijder de slijpschijven (A) en de schijfplaten (B). Probleemoplossing Het product start niet Diamantgereedschappen op... -
Page 74: Transport En Opslag
Het product stopt tijdens het starten • Als de motor wordt overbelast, gaat het waarschuwingslampje voor overbelasting branden. De juiste voedingsspanning is noodzakelijk voor goede Wacht 2 minuten en probeer het opnieuw. Neem motorprestaties. Door te lange verlengkabels en/of te contact op met een erkende servicewerkplaats als laag kaliber wordt de kracht van de motor tijdens het dat niet helpt. - Page 75 4. Druk op de hendel op het centrale scharnier en vouw 7. Houd het stuur met één hand vast en duw de hendel het bovenframe naar voren. Het product staat in de op het centrale scharnier. Hierdoor wordt het product hefstand.
-
Page 76: Technische Gegevens
Het product opslaan • Bewaar het product in een afgesloten ruimte om toegang door kinderen of onbevoegde personen te verhinderen. • Bewaar het product in een droge en vorstvrije ruimte. Technische gegevens Technische gegevens Driefasig, Driefasig, Driefasig, Enkelfasig, 220-240 V 380-420 V 440-480 V 220-240 V Motorfrequentie, Hz... - Page 77 Driefasig, Driefasig, Driefasig, Enkelfasig, 220-240 V 380-420 V 440-480 V 220-240 V Geluidsvermogensniveau L (gemeten) Geluidsniveau dB(A) Geluidsdrukniveau bij het oor van de gebruiker Trillingsniveau m/s² Rechter handgreep Linker handgreep Geluidsdrukniveau volgens EN 60335-2-72. Verwachte onzekerheidsmarge 4 dB(A). Trillingsniveau volgens EN 60335-2-72. De gerapporteerde gegevens voor een trillingsniveau vertonen een typische statistische spreiding (standaardafwijking) van 1 m/s 1146 - 002 - 09.12.2022...
-
Page 78: Verklaring Van Overeenstemming
Verklaring van overeenstemming EC-verklaring van overeenstemming Wij, Husqvarna AB, SE-561 82 Huskvarna, Zweden, tel: +46- 36-146500, verklaren onder onze alleenverantwoordelijkheid dat het product: Beschrijving Polijst- en slijpapparatuur Merk Husqvarna Type/model PG 510 Identificatie Serienummers vanaf 2022 en verder volledig voldoet aan de volgende EU-richtlijnen en -regelgeving: Richtlijn/Verordening... - Page 79 1146 - 002 - 09.12.2022...
- Page 80 À DÉPOSER À DÉPOSER Cet appareil, EN MAGASIN EN DÉCHÈTERIE ses cordons, et ba erie se recyclent Points de collecte sur www.quefairedemesdechets.fr Privilégiez la répara on ou le don de votre appareil ! www.husqvarnaconstruction.com Original instructions Originalanweisungen Instructions d’origine Originele instructies 1143363-20 2023-03-23...