Motorola MXP600 - Two Way Radio Quick Start Guide
- Feature user manual (164 pages) ,
- Manual (185 pages)
Advertisement
- 1 Looking After Your Radio
- 2 Holding Your Radio
- 3 Device Overview
- 4 Installing the Battery
- 5 Removing the Battery
- 6 Attaching the Antenna
- 7 Turning the Radio On or Off
- 8 LED Status Indicator
- 9 Battery Capacity Information
- 10 Status Icons
- 11 Unlocking the Radio
- 12 Unlocking or Locking the Keypad
- 13 Using the Radio Menu
- 14 Selecting TMO or DMO
- 15 Making TMO or DMO Group Calls
- 16 Making TMO or DMO Emergency Group Calls
- 17 Making Simplex Private Calls
- 18 Making Duplex Private, Phone, or PABX Calls
- 19 Sending Status Message
- 20 More Information on the Radio
- 21 Learning Experience Portal
- 22 Open Source Software Legal Notices
- 23 Documents / Resources
Looking After Your Radio
Never leave your radio or battery in extreme temperatures (over +85°C).
For example, behind a windscreen in direct sunlight. The radio is submersible (compliant with the IP68 standard), but only with the battery and antenna attached.
To clean your radio, use a moistened or antistatic cloth.
Ensure no contamination is on the gore port membrane, that is the area labelled as VENT on the back of the radio chassis.
Holding Your Radio
The radio has three microphones:
- A top front microphone for Simplex group, dispatcher, or private calls.
- A top back microphone for optional noise cancellation.
- A bottom microphone for Duplex, telephone-like calls.
- When using high audio, hold your radio vertically with the top microphone 5–10 cm away from your mouth.
- Speak into the top microphone.
- Listen through the speaker.
- Keep the antenna at least 2.5 cm away from your head and body.
![]()
Simplex Calls

- When using low audio, hold your radio as you would a telephone.
- Speak into the bottom microphone.
- Listen through the earpiece.
- Keep the antenna at least 2.5 cm away from your head and body.
![]()
Duplex Calls

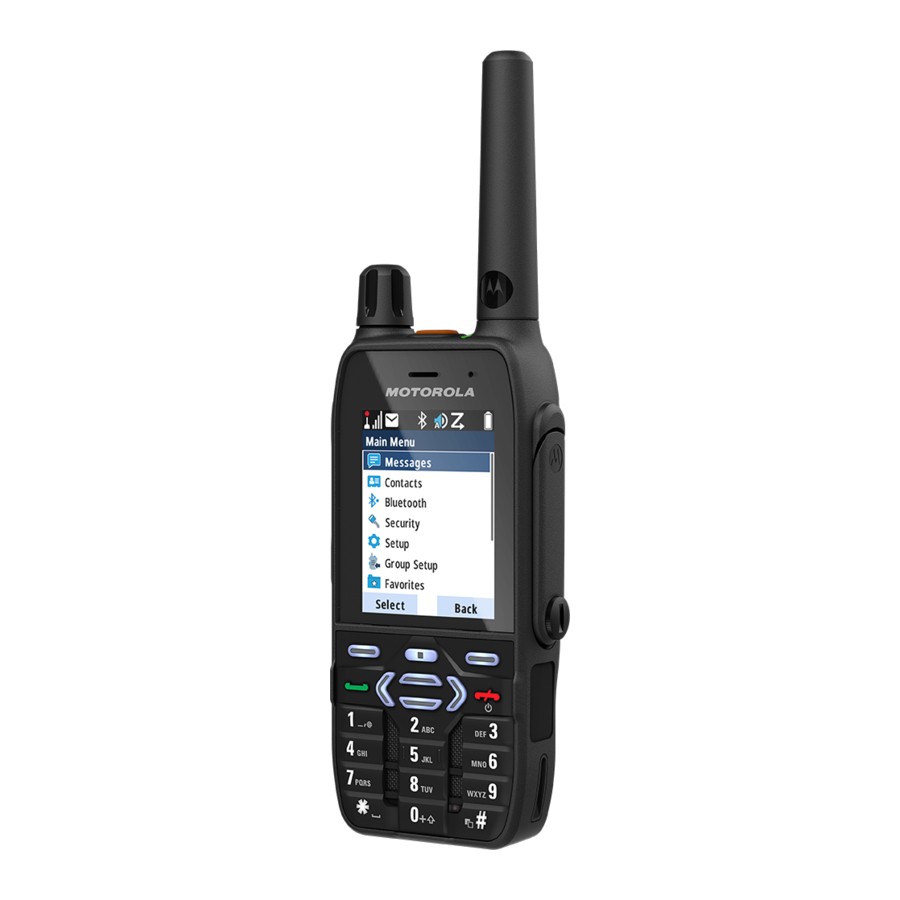
Device Overview

- Emergency Button
- LED Status Indicator
- GCAI-Mini Connector
- Antenna

- Rotary Knob
- Programmable Button
- Push-To-Talk Button (PTT)
- Soft Key
- Near-Field Communication Tag
- Send Key
- Bottom Microphone
- Backlight Sensor
- Keypad
- Speaker
- On/Off/End/Home Key
- Menu Key
- Display
- Top Microphone
- Earpiece

- Bottom Connector


Installing the Battery

- Insert the battery into the compartment at a high entry angle.
- Slide the battery under the two catches.
- Press down the battery until it clicks in place.
Removing the Battery

- Slide the battery latch to the right and hold it.
- Lift the battery.
- Remove the battery from the compartment.
Attaching the Antenna

- Turn off the radio before attaching the antenna.
- Insert the threaded base of the antenna into the terminal on top of the radio.
- Turn the antenna clockwise until snug. Do not force.
Turning the Radio On or Off
To turn the radio on or off, press and hold the On/Off key.
LED Status Indicator
| Indication | Status when Not Charging | Status when Charging | |
| Solid green | In use | Fully charged | |
| Blinking green | In TMO service or idle/ Switching from TMO to DMO | 90% charged | |
| Solid red | Out of service | Rapid charge | |
| Blinking red | Connecting to a network/ Switching from DMO to TMO | Faulty or invalid battery | |
| Solid orange | Radio is powering on/ Transmit Inhibit mode in service | Not applicable | |
| Blinking orange | Incoming private or phone call | Battery on standby to rapid charge | |
| No indication | Radio powered off/ Radio in covert mode | Not applicable | |
Battery Capacity Information
| Information | Description |
 | Full (80%–100% capacity) |
 | Middle (60%–80% capacity) |
 | Low (25%–60% capacity) |
 | Very low (5%–25% capacity) |
 | Less than 5% capacity |
Status Icons
| Icon | Description |
 | In Service (TMO) |
 | No Service (TMO) |
 | Signal Strength |
 | High RF Power |
 | Direct Mode (DMO) |
 | Emergency Mode |
 | Battery Strength |
 | Battery Charging |
 | All Ring Tones Off |
 | Simplex Ring Muted |
 | Duplex Ring Muted |
 | Scan |
 | Migration |
 | Low Audio |
 | High Audio |
 | Earpiece Connected |
 | New Message Has Arrived |
 | New Message In Inbox |
 | Packet Data |
 | Keys Locked |
 | GNSS |
 | Non-Formatted SD Card |
 | USB Connected |
 | Bluetooth Enabled |
 | Wi-Fi Strength |
 | Wi-Fi OTAP |
Unlocking the Radio
To unlock the radio after powering on, enter the code at the prompt. The default code is 0000. Your service provider may change this number before you receive your radio.
Unlocking or Locking the Keypad
To unlock or lock the keypad, press the Menu key followed by the * key.

Using the Radio Menu
To enter the menu, press the Menu key.
To scroll through the menu, press the Up or Down Navigation button.
To select a menu item, press the Select soft key or the Right Navigation key.
To return to the previous level, press Back or the Unlocking or Locking the Keypad key.
To exit the menu, press the Back key.
Selecting TMO or DMO
From the home screen, select Options → Trunked Mode or Direct Mode.
Making TMO or DMO Group Calls
- From the home screen, press the Navigation keys or turn the Rotary Knob to highlight the desired talkgroup.
- Press Select.
- Press and hold PTT.
- Wait for the Talk Permit Tone (if configured) and talk.
- To listen, release PTT.
Making TMO or DMO Emergency Group Calls
- Press and hold the Emergency button. The emergency alarm is sent automatically (if configured).
- Press and hold PTT.
- Wait for the Talk Permit Tone (if configured) and talk. Release PTT to listen. If using the Hot Mic feature, wait for the Emergency Mic On message to appear on the display, then talk without pressing PTT.
- To exit Emergency Mode, press and hold the Exit soft key.
Making Simplex Private Calls
In DMO
- From the home screen, dial a number.
- Press and hold PTT to make a call.
- Wait for the Talk Permit Tone (if configured) and talk. Release PTT to listen.
- To terminate the call, press the End key.
In TMO
- From the home screen, dial a number.
- Press PTT to make a call. Wait for the called party to pick up.
- When the call is connected, press and hold PTT to talk. Wait for the Talk Permit Tone (if configured). Release PTT to listen.
- To terminate the call, press the End key.
Making Duplex Private, Phone, or PABX Calls
- From the home screen, dial a number.
- Press the Send key. The ring tone sounds till the called party answers.
- To terminate the call, press the End key.
Sending Status Message
- From the home screen, press the Menu key.
- Select Messages → Send Status.
- Highlight the required status message and press the Send key.
- If the list is empty, enter a 5-digit status message number and press the Send key.
More Information on the Radio
Visit the Motorola Solutions Web site at: http://www.motorolasolutions.com/
Learning Experience Portal
User documentation available at: https://learning.motorolasolutions.com/
Open Source Software Legal Notices
Available in Customer Programming Software Plus (CPS Plus) DVD
This document is copyright protected. Duplications for the purpose of the use of Motorola Solutions products are permitted to an appropriate extent. Duplications for other purposes, changes, additions or other processing of this document are not permitted. Only this electronically-saved document is considered to be the original. Duplications are considered merely copies. Motorola Solutions, Inc., and its subsidiaries and affiliates do not vouch for the correctness of such kinds of copies.
MOTOROLA, MOTO, MOTOROLA SOLUTIONS and the Stylized M Logo are trademarks or registered trademarks of Motorola Trademark Holdings, LLC and are used under license. The Bluetooth® word mark and logos are registered trademarks owned by the Bluetooth SIG, Inc. and are used under license. All other trademarks are the property of their respective owners. © 2020 Motorola Solutions, Inc. All rights reserved.


Documents / Resources
References
Download manual
Here you can download full pdf version of manual, it may contain additional safety instructions, warranty information, FCC rules, etc.
Advertisement
Thank you! Your question has been received!


Need Assistance?
Do you have a question about the MXP600 that isn't answered in the manual? Leave your question here.