Advertisement
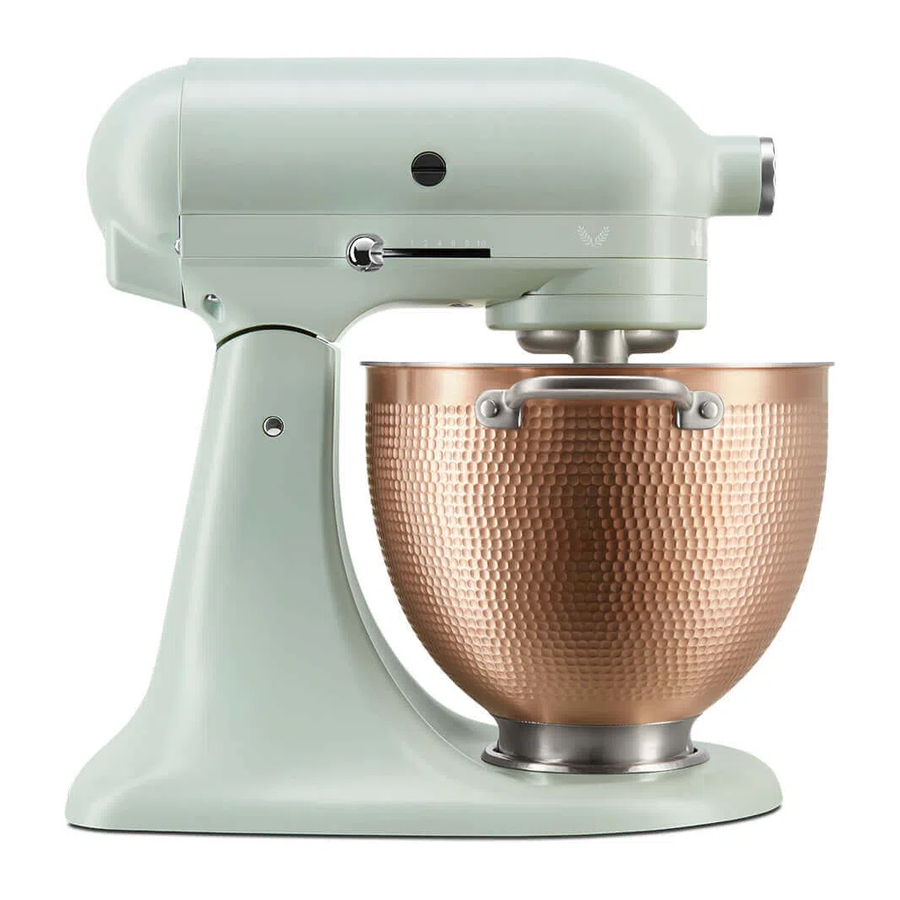
PARTS AND FEATURES

- Speed Control Lever
- Motor Head
- Attachment Hub
- Attachment Knob
- Motor Head Locking Lever (not shown)
- Beater Shaft
- Beater Height Adjustment Screw (not shown)
- Bowl
- Bowl Clamping Plate
- Stainless Steel Pastry Beater* and Nylon Scraper* **
- Stainless Steel Flat Beater*
- Stainless Steel Wire Whip*
- Stainless Steel Dough Hook*
*Also available as an optional accessory.
**Can also be used to scrape your bowl.
PRODUCT SAFETY
Your safety and the safety of others are very important.
We have provided many important safety messages in this manual and on your appliance. Always read and obey all safety messages.
This is the safety alert symbol.
This symbol alerts you to potential hazards
All safety messages will follow the safety alert symbol and either the word "DANGER" or "WARNING." These words mean:

You can be killed or seriously injured if you don't immediately follow instructions.

You can be killed or seriously injured if you don't follow instructions.
IMPORTANT SAFEGUARDS
When using electrical appliances, basic safety precautions should always be followed, including the following:
- Read all instructions.
![shock hazard]() To protect against risk of electrical shock, do not put Stand Mixer in water or other liquid.
To protect against risk of electrical shock, do not put Stand Mixer in water or other liquid.- This appliance is not intended for use by persons (including children) with reduced physical, sensory, or mental capabilities, or lack of experience and knowledge, unless they are closely supervised and instructed concerning use of the appliance by a person responsible for their safety. Close supervision is necessary when any appliance is used by or near children. Children should be supervised to ensure that they do not play with the appliance.
- Turn the appliance to "0" (OFF), then unplug from the outlet when not in use, before assembling or disassembling parts, and before cleaning. To unplug, grasp the plug and pull from the outlet. Never pull from the power cord.
- Avoid contacting moving parts. Keep hands, hair, and clothing, as well as spatulas and other utensils, away from beater during operation to reduce the risk of injury to persons and/or damage to the Stand Mixer.
- Do not operate any appliance with a damaged cord or plug, or after the appliance malfunctions, or is dropped or damaged in any manner. Return appliance to the nearest Authorized Service Facility for examination, repair, or electrical or mechanical adjustment.
![burn hazard]()
![shock hazard]()
The use of accessories or attachments not recommended or sold by the manufacturer may cause fire, electric shock or injury.- Do not use the Stand Mixer outdoors.
- Do not let the cord hang over the edge of table or counter.
- Remove the Flat Beater, Wire Whip, Pastry Beater, or Dough Hook from the Stand Mixer before washing.
- Allow the appliance to cool completely before putting on or taking off parts, and before cleaning the appliance.
 To protect against risk of electrical shock, do not put Stand Mixer in water or other liquid.
Important Security Measures required for compliance with regulations in Mexico:
- If the power cord is damaged, it must be replaced by the manufacturer or its service agent or by qualified personnel to avoid any risk.
- The appliance is not intended for use by persons (including children) who suffer from reduced physical, sensory or mental capabilities or who lack the necessary experience or knowledge unless such persons are supervised or trained by a person authorized to operate the appliance.
- Children must be supervised to ensure that they do not use the appliance as a toy.
- Do not touch hot surfaces. The surface of the heating element is subject to residual heat after use. Use handles/knobs/buttons.
![shock hazard]() To protect against the risk of electric shock, do not immerse the cord, plug/socket, or appliance in water or other liquids.
To protect against the risk of electric shock, do not immerse the cord, plug/socket, or appliance in water or other liquids.- Do not use the device for any other use other than that for which it was designed. Improper use of the appliance may lead to possible personal injury.
- Unplug the appliance from the outlet when not in use and before cleaning. Let the appliance cool down before adding or removing components and before cleaning.
- This appliance is intended for use in the home and for similar applications, such as the following:
- By kitchen staff in retail areas, offices and other work environments;
- Country houses;
- By clients in hotels, motels or other residential-type settings;
- Bedroom or dining room settings.
- Do not use the appliance for any other use other than that for which it was designed. It could lead to possible injury.
SAVE THESE INSTRUCTIONS
This product is designed for household use only.
ELECTRICAL REQUIREMENTS


Electrical Shock Hazard
Plug into a grounded 3 prong outlet.
Do not remove ground prong.
Do not use an adapter.
Do not use an extension cord.
Failure to follow these instructions can result in death, fire, or electrical shock.
KSM180LELB
Voltage: 120 V~
Frequency: 60 Hz
Wattage: 325 W
NOTE: The power rating for your Stand Mixer is printed on the serial plate.
Do not use an extension cord. If the power supply cord is too short, have a qualified electrician or service technician install an outlet near the appliance.
The maximum rating is based on the attachment that draws the greatest load (power). Other recommended attachments may draw significantly less power.
GETTING STARTED
CHOOSING THE RIGHT ACCESSORY
| ACCESSORY | USE TO MIX | SUGGESTED ITEMS |
| Flat Beater* | Normal to heavy mixtures | Cakes, creamed frostings, candies, cookies, biscuits, pie pastry, meatloaf, mashed potatoes. |
| Pastry Beater* | Cut butter into flour | For pie dough, biscuits and other pastries, mashing fruits and vegetables, and shredding meats. |
| Wire Whip* | Mixtures that need air incorporated | Eggs, egg whites, heavy cream, boiled frostings, sponge cakes, mayonnaise, some candies. |
| Dough Hook* | Mixing and kneading yeast doughs | Breads, rolls, pizza dough, buns. |
NOTE: Nylon Scraper assists in cleaning the Pastry Beater*. It may also be useful in scraping ingredients from the bowl.
*Also available as an optional accessory.
SPEED CONTROL GUIDE
| SPEED | ACTION | ACCESSORY | DESCRIPTION |
| STIR | STIR | Flat Beater* | For starting all mixing procedures, slow stirring, and combining. |
| 1 | |||
| 2 | STIR | Pastry Beater* | Cut butter into flour to make pastry dough; Mash fruits and vegetables. |
| SLOW MIXING | Flat Beater* | For slow mixing, mashing, and faster stirring. | |
| Dough Hook* | To mix and knead yeast doughs, heavy batters, and candies; mix thin or splashy batters. | ||
| 4 | MIXING, BEATING | Flat Beater* | For mixing semi-heavy batters, such as cookies, or to combine sugar and shortening. Medium speed for cake mixes. |
| Pastry Beater* | For shredding meats. | ||
| Wire Whip* | For adding sugar to egg whites for meringues. | ||
| 6 | BEATING, CREAMING | Flat Beater* | For medium-fast beating (creaming), or whipping. Use to finish mixing cake, doughnut, and other batters. High speed for cake mixes. |
| Wire Whip* | For medium-fast whipping of ingredients requiring incorporation of air, such as egg whites. | ||
| 8 | FAST BEATING, WHIPPING | Wire Whip* | For whipping cream, egg whites, and boiled frostings. |
NOTE: The Speed Control Lever can be set to obtain speeds 1, 3, 5, 7 and 9 if a finer adjustment is required. To move the Speed Control Lever with ease, lift up slightly as you move it across the settings in either direction.

Do not exceed Speed 2 when preparing yeast doughs as this may cause damage to the Stand Mixer.
PRODUCT ASSEMBLY
- Turn the Stand Mixer "0" (OFF) and unplug.

- Unlock and lift the Motor Head. Then, lock** the head to keep it lifted.


*Also available as an optional accessory.
**Locking option is available on select models.
- Place the Bowl on the Clamping Plate and twist to lock in place.

- Slide and rotate the accessory, aligning over the pin on the shaft.

- Unlock the Motor Head and move it down. Then, lock* the head to keep it down. Before mixing, test lock by attempting to raise the Motor Head.

(OPTIONAL) To adjust Beater to Bowl Clearance: Tilt back and lock* the Motor Head. Turn the screw slightly counterclockwise (left) to raise the beater, or clockwise (right) to lower it.
NOTE: If you overadjust the screw, the locking lever may not lock into place.


*Locking option is available on select models.
PRODUCT USAGE

Electrical Shock Hazard
Plug into a grounded 3 prong outlet.
Do not remove ground prong.
Do not use an adapter.
Do not use an extension cord.
Failure to follow these instructions can result in death, fire, or electrical shock.
- Plug it into a grounded 3 prong outlet. Start with lower speed to avoid splashing, and increase speed gradually. Refer to the "Speed Control Guide".


Injury Hazard
Unplug mixer before touching beaters.
Failure to do so can result in broken bones, cuts, or bruises
- Do not scrape the Bowl while operating. Scraping the Bowl once or twice during mixing is usually sufficient.


PRODUCT DISASSEMBLY
- Turn the Stand Mixer "0" (OFF) and unplug.

- Unlock and lift the Motor Head. Then, lock* the head to keep it lifted.

- Press the accessory upward, turn it and pull it away from the Beater Shaft.

- Twist to unlock the Bowl from the Clamping Plate.


*Locking option is available on select models.
OPTIONAL ATTACHMENTS
KitchenAid offers a wide range of optional attachments such as the Spiralizer, Pasta Cutters, or Food Grinder that may be attached to the Stand Mixer attachment power hub as shown here.
- Turn the Stand Mixer "0" (OFF) and unplug.

- Remove the Attachment Hub cover.

- Insert attachment into Attachment Hub, making certain that attachment power shaft fits into the square Attachment Hub socket.

- Tighten the Attachment Knob by turning it clockwise until the attachment is secured to the Stand Mixer.


DOUGH SCRAPER USAGE
- Turn the Stand Mixer "0" (OFF) and unplug. Remove dough from the Bread Bowl with the help of Nylon Scraper.


*Also available as an optional accessory.
CARE AND CLEANING
Do not immerse the Stand Mixer body in water or other liquids. Allow the appliance to cool completely before putting on or taking off parts, and before cleaning the appliance.
- Turn the Stand Mixer "0" (OFF) and unplug.

- Dishwasher-safe parts, top rack only: Stainless Steel Flat Beater*, Stainless Steel Pastry Beater* and Nylon Scraper** *, Stainless Steel Wire Whip*, and Stainless Steel Dough Hook*. Or, clean them thoroughly in hot sudsy water and rinse completely before drying. Do not store beaters on shaft.

- Wipe the Stand Mixer body with a soft, damp cloth.


NOTE: Stainless steel accessories are dishwasher-safe.
*Also available as an optional accessory.
**Can also be used to scrape your bowl.
CLEANING THE COPPER BOWL
Before first use, wash with warm soapy water.
![]()
Do not wash the Copper Bowl in the dishwasher. Copper Bowl is hand washable only.

- Copper Bowl Care:
Copper Exterior:
Copper is a natural material. Variation in color after use is expected, and this patina finish will vary for each bowl. If using a commercial copper cleaner to polish, follow manufacturer's directions and buff with a soft dry cloth.


- Scrubbing too hard may scratch the copper finish.
- Avoid harsh or abrasive detergents.
- Do not use steel wool or steel scouring pads.
TROUBLESHOOTING GUIDE

Electrical Shock Hazard
Plug into a grounded 3 prong outlet.
Do not remove ground prong.
Do not use an adapter.
Do not use an extension cord.
Failure to follow these instructions can result in death, fire, or electrical shock.
| PROBLEM | SOLUTION |
If Stand Mixer warms up during use | Under heavy loads with extended mixing time periods, you may not be able to comfortably touch the top of the unit. This is normal. |
If the Flat Beater hits the bowl | Stop the Stand Mixer. See the "Product Assembly" section and adjust the beater to bowl clearance. |
| If Speed Control Lever does not move smoothly or easily: | To move the Speed Control Lever with ease, lift up slightly as you move it across the settings in either direction. |
| If your Stand Mixer should fail to operate, please check the following: | Is the Stand Mixer plugged in? |
| Is the fuse in the circuit to the Stand Mixer in working order? If you have a Circuit Breaker Box, be sure the circuit is closed. | |
| Turn off the Stand Mixer for 10-15 seconds, then turn it back on. If the Stand Mixer still does not start, allow it to cool for 30 minutes before turning it back on. | |
If the problem cannot be corrected | See the "Warranty and Service" section. Do not return the Stand Mixer to the retailer; retailers do not provide service. |

Documents / ResourcesDownload manual
Here you can download full pdf version of manual, it may contain additional safety instructions, warranty information, FCC rules, etc.
Advertisement
Thank you! Your question has been received!


Need Assistance?
Do you have a question about the KSM180LELB that isn't answered in the manual? Leave your question here.