
Related Manuals for tau K206MA

Summary of Contents for tau K206MA
- Page 1 GUIDA ALL’INSTALLAZIONE INSTALLATION GUIDE INSTALLATIONSANLEITUNG NOTICE D’INSTALLATION GUÍA PARA LA INSTALACIÓN GUIA DE INSTALAÇÃO K206MA IT - Istruzioni originali...
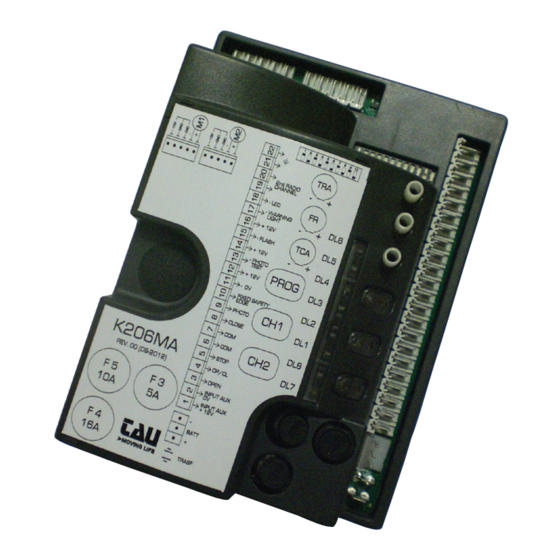
- Page 2 SCHEMA CABLAGGIO K206MA / K206MA WIRING DIAGRAM / SCHALTPLAN DER K206MA LUXE RBLO Dip-switches LUXE-M Trimmer: 9 10 11 12 USED K206MA PROG FIXED SAFETY EDGE PHOTO CLOSE STOP OPEN/CLOSE OPEN 3.15A ERRORS DL7 BATT TRAS...
- Page 3 SCHÉMA CÂBLAGE K206MA / ESQUEMA DEL CABLEADO K206MA / ESQUEMA DE LIGAÇÕES K206MA Aerial tches 9 10 11 12 Flashing Photocells 2nd radio light channel 0 11 12 18V DC - 0 V 1 2 3 4 5 Bar Led (White) Vandal-proof max.
-
Page 4: Installation
This manual is designed to assist qualified installation personnel only. It contains no information that may be of interest to final users. This manual is attached to the K206MA control unit mounted on the LUXE or RBLO(X) automatic bar, therefore it may not be used for different products! Important warnings: Disconnect the mains power supply to the board before accessing it. -
Page 5: Technical Characteristics
INTRODUCTION The K206MA board has two working modes, selectable through the J6 jumper (see wiring diagram). J6 Jumped: standard mode, i.e. the control unit is powered all the time; J6 Not jumped: low-energy mode, i.e. the control unit is switched off after each operation and on after each command (mode where power is supplied by other energy sources, ex. - Page 6 N.C. photocell input - it cuts in during the closing. Bridge the connectors if not used. (7= COM - 9= FOT) Note: the photocell transmitter must always be supplied by termi- 7 - 9 nals no. 12 and no. 13, since the safety system test (phototest) is PHOTOCELLS carried out on it.
- Page 7 Terminals 23-24 must be used in parallel to 28-29 in the case of LUXE automatic barriers (you have to observe the same polarity between the 2 outputs). Terminals 25-26-27 are available if the circuit present on the K206MA relative to the en- coder, terminals 30-31-32, is faulty IMPORTANT: Do not connect auxiliary relays or other devices tot he 18 V DC output (terminals 11 –...
- Page 8 9-10-11 Selection of barrier model and bar lenght Dip 9 Dip 10 Dip 11 Modello LUXE-S bar ≥ 2 m ≤ 2,5 m LUXE-S bar > 2,5 m ≤ 3,5 m - RBLO-R 24 Vdc LUXE-S bar (with FPL) > 3,5 m ≤ 4 m LUXE-M bar >...
-
Page 9: Obstacle Detection
7. K206MA CHARACTERISTICS TIMER-OPERATED OPENING AND CLOSING CYCLES The opening/closing of the automation can be controlled by means of a timer that has a free N.O. output contact (relay). The timer must be connected to terminals 4 - 6 (OPEN/CLOSE button) and can be programmed so that, at the desired opening time, the relay contact closes until the desired closing time (when the timer’s relay contact opens, enabling the automatic closing of the gate). - Page 10 alternate flashing: saving to be performed; (red/green) learning process; fast flashing: (yellow) phototest error 1 flash: (red) Disable phototest (dip-switch 6 OFF), check the operation of the photocells and their connection; unknown status, next operation REALIGNMENT; 1 flash: (yellow) obstacle for motor; 2 flashes: (red) Check there are no obstacles on the path of the bar and its balancing;...
- Page 11 9. ABSORPTION CHECK FUNCTION (from 5.17 release onwards) This function allows to monitor the absorption during a complete cycle in order to value the motor stress. To activate this function press and hold for 2 seconds simultaneously CH1, PROG, CH2 and them start the motor (OP/CL contact, remote, PROG button).
-
Page 12: Memory Capacity
7_ to exit the learning mode without memorising a code, press button CH1 or CH2 briefly. If the maximum number of radio controls is reached (30), the LED DL8 will begin to flash rapidly for about 3 seconds but without performing memorisation. REMOTE PROGRAMMING BY MEANS OF T-4RP, K-SLIM-RP, S-2RP AND S-4RP (V 4.X) With the new version of software V 4.X it is possible to carry out the remote self-learning of the new version of transmitters T-4RP, K-SLIM-RP, S-2RP and S-4RP (V 4.X), that is without pressing the receiver’s program-... - Page 13 23 - 24 (if used). GUARANTEE: GENERAL CONDITIONS TAU guarantees this product for a period of 24 months from the date of purchase (as proved by the sales document, receipt or invoice). This guarantee covers the repair or replacement at TAU’s expense (ex-works TAU: packing and trans- port at the customer’s expense) of parts that TAU recognises as being faulty as regards workmanship...
- Page 14 Declares under its sole responsibility, that the product: Electronic control unit designed for automatic movement of: Road barriers for use in a: General environment complete with: Radioreceiver and battery charger board Model: K206MA Type:K206MA Serial number: see silver label Commercial name: Control panel for automatic barriers Has been produced for incorporation on an access point (automatic barrier) of for assembly with other devices used to move such an access point, to constitute a machine in accordance with the Machinery Directive 2006/42/EC.
- Page 15 Via Enrico Fermi, 43 - 36066 Sandrigo (VI) - Italy Tel +39 0444 750190 - Fax +39 0444 750376 info@tauitalia.com - www.tauitalia.com Foglietto illustrativo CARTA - Raccolta differenziata. Segui le indicazioni del tuo comune. (N.B.: togliere i punti metallici) Instruction leaflet PAPER - Waste separation.