Advertisement
Notes on use
Before operating the product, please read this manual thoroughly and retain it for future reference.
- Only the rechargeable battery pack(s) NP-FZ100 can be used. For camera models compatible with this unit, visit the website at: https://www.sony.net/dics/c4em/
![]()
- Using this unit with products from other manufacturers may affect its performance, leading to accidents or malfunction.
- To avoid the risk of a fire or an electric shock, observe the following:
- Do not disassemble or alter this unit.
- Do not use this unit with wet hands.
- Do not allow ingress of water or foreign matters (metal, flammable substances, etc.) to this unit.
- Do not use this unit in a place subject to water splashes, high humidity, dust, oil fumes, and steam.
- To avoid the risk of damage or a malfunction, observe the following:
- This unit is precision equipment. Do not drop the unit, hit it, or subject it to a strong physical impact.
- Do not touch the electrical contacts on this unit with bare hands.
- Do not use or store this unit in a place subject to high temperatures and humidity.
- When using this unit outdoors, keep the unit from exposure to rain or seawater.
- For interior inspection and repair of this unit, contact your Sony dealer or local authorized Sony service facility.
- This unit is designed for use from 0°C to 40°C (32°F to 104°F).
- When charging the battery pack, make sure that the ambient temperature is within the range from 10°C to 30°C (50°F to 86°F).
- This unit is designed to be dust and moisture-resistant, but is not waterproof or splash-proof. When you use the product in rainy conditions, do not let the product get wet.
- When attaching this unit to the camera, detaching this unit from the camera or storing this unit separately, be sure to remove the battery pack(s) from this unit.
- When attaching a tripod to the unit, use one with a screw no longer than 5.5 mm. The unit cannot be firmly fastened to a tripod if its screw is longer than 5.5 mm. Attempting to do so will damage the unit.
- When attaching this unit to the camera or replacing the battery pack(s), do not connect the USB cable to the camera.
- To clean the unit, use a soft cloth and lightly wipe off any dirt. Never use cleaners that contain organic solvents, such as paint thinners or benzene.

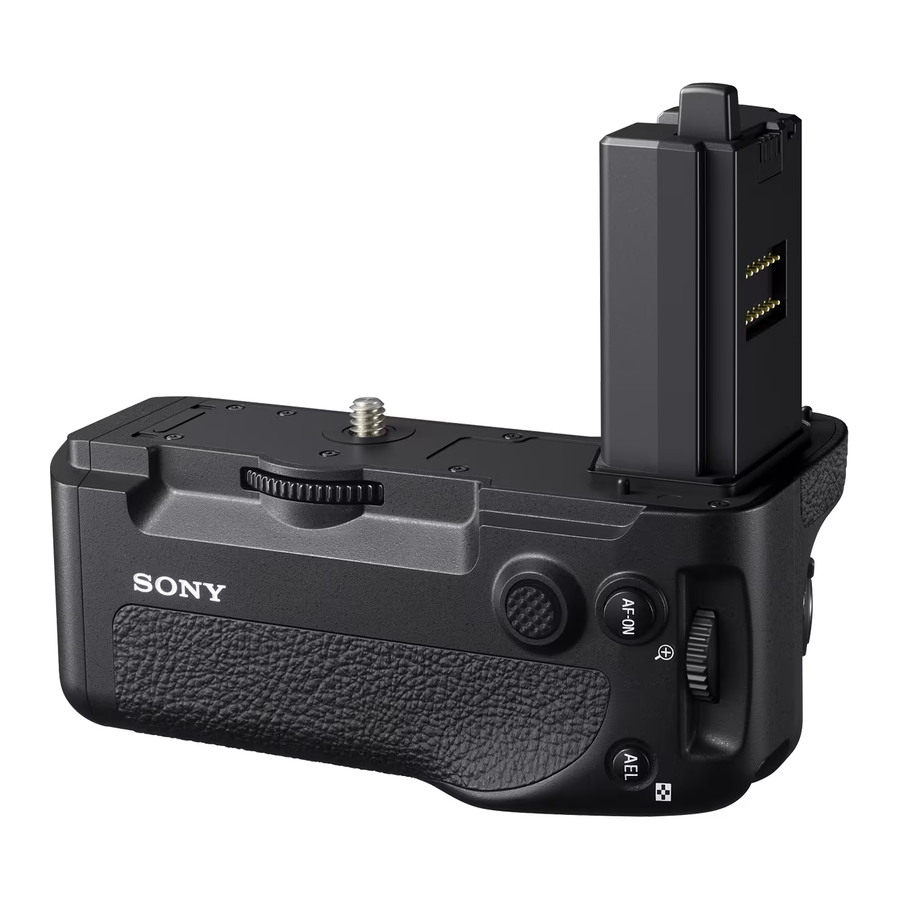
Identifying the Parts

- Electrical contacts
- Guide bar
- C2 button (Custom button 2)
- Strap hook
- C1 button (Custom button 1)
- Shutter button
- Grip control LOCK switch
- Front control dial
- Battery pack tray
- Attachment screw
- Battery pack tray OPEN/CLOSE knob
- Battery cover slot
- While shooting: AF-ON (AF On) button
While playing: (Zoom-in) button - Rear control dial
- While shooting: AEL button While playing: (List) button
- Multi-selector
- Tripod receptacle
For more information, refer to the operating instructions supplied with your camera.
Attaching this unit to the camera

- Set the POWER switch of the camera to OFF.
- Remove the battery pack(s) from the camera, then detach the battery cover.
- Attach the battery cover of the camera firmly to the battery cover slot as illustrated.
- When you do not use this unit, be sure to attach the battery cover to the camera.
- If the battery pack(s) is in this unit, remove the battery pack(s) from this unit.
- Align the following part to attach this unit to the camera.
- [This unit] Guide bar
![]() [Camera] Battery insertion slot [
[Camera] Battery insertion slot [ - This unit] Attachment screw
![]() [Camera] Tripod socket hole
[Camera] Tripod socket hole
- [This unit] Guide bar
- Rotate the attachment screw to lock it.
- Periodically confirm that the attachment screw is not loose while in use.
- After attaching this unit to the camera, make sure that all parts are securely in place.
 [Camera] Battery insertion slot [
Inserting the battery packs

Battery pack NP-FZ100 (1 or 2 required)
- When replacing the battery pack(s) with this unit attached to the camera, set the POWER switch of the camera to OFF.
- Rotate the battery pack tray OPEN/CLOSE knob in the direction of the arrow pointing to OPEN, and then pull out the battery pack tray.
- Attach the battery pack(s) to the battery pack tray according to the display on the battery pack tray.
- When attaching a battery pack, attach it to either side.
- Attach the battery pack NP-FZ100 only to the battery pack tray. Do not attach the other battery pack(s).
- Inset the battery pack tray and rotate the battery pack tray OPEN/CLOSE knob.
- Rotate the battery pack tray OPEN/CLOSE knob properly to the position as illustrated.
Charging the battery pack(s)
Charge the battery pack(s) while this unit is attached to the camera.
Note that this unit itself is not capable of charging the battery pack(s).
- Set the POWER switch of the camera to OFF.
- Connect the camera to the computer using the USB cable (supplied with the camera).
- When two battery packs are inserted, the one that has less power remained is first charged.
- While battery charge is in progress, the charge indicator lamp lights on the camera.
- For more information, refer to the operating instructions supplied with your camera.
Shooting vertical images
The operations of the unit's dials and buttons are same as those for the camera main body.
When using this unit, also refer to the operating instructions supplied with your camera.
When using this unit in vertical orientation, align the grip control LOCK switch with  .
.
- The grip control LOCK switch enables/disables the dial and button functions.
- Regardless of the position of the grip control LOCK switch, the operating button on the camera always operates.
- Switch the power ON and OFF with the POWER switch of the camera.
The grip control LOCK switch cannot switch the power ON and OFF.
Remaining battery power indicator
When you insert the two battery packs (NP-FZ100) into this unit, the following indicator is displayed on the LCD monitor of the camera. (The position of the battery power indicator varies depending on the mode of the camera.)
LCD monitor (example)

Of the two battery packs, the one that has less power will be used first.
Notes relating to the lens mount adaptor
- This unit is not designed for concurrent attachment with the lens mount adaptor LA-EA2/EA4. If this unit and the adaptor are concurrently attached to your camera, the space between this unit and the lens mount adapter will not be wide enough for gripping this unit.
- When you use this unit and a lens mount adapter at the same time, it may not be possible to attach the tripod to the tripod screw hole of the lens adapter. In that case, attach the tripod to the tripod receptacle of this unit.
When you attach the lens with the tripod-mounting collar to your camera or the lens mount adaptor, rotate the tripod-mounting collar to a position that allows the grip to be used or remove all removable attachments. Also, if you use the tripod, attach the tripod to the tripodmounting collar of the lens. - When you use the lens mount adaptor to attach the lens with the tripod-mounting collar to the camera, the following lens switches may not operate at the vertical shooting. Before vertical shooting, set them at the horizontal position.
- Focus-mode switch
- DMF-mode switch
- Focus-range limiter
Troubleshooting
| Symptom | Remedy |
| The camera does not work even after the unit is attached to the camera, the battery pack(s) are inserted into the unit and the camera POWER switch is set to ON. |
|
| Shutter button or other operating buttons do not work. |
|
| "Incompatible battery. Use correct model." is displayed even though genuine Sony battery pack(s) are being used. |
|
Specifications
| Rated Voltage | NP-FZ100 7.2 V |
| Dimensions (Approx.) | 128.8 mm × 108.9 mm × 67 mm (w/h/d) (5 1/8 in. × 4 3/8 in. × 2 3/4 in.) |
| Mass | Approx. 290 g (10.2 oz) (including the battery pack tray, excluding the battery packs) |
| Operating temperature | 0°C to 40°C (32°F to 104°F) |
| Storage temperature | –20°C to +55°C (–4°F to +131°F) |
| Included items | Vertical grip (1), Set of printed documentation |
Design and specifications are subject to change without notice.
 is a trademark of Sony Corporation.
For Customers in the U.S.A.
For question regarding your product or for the Sony Service Center nearest you, call 1-800-222-SONY (7669).
Supplier's Declaration of Conformity
Trade Name: SONY Model: VG-C4EM
Responsible Party: Sony Electronics Inc.
Address: 16535 Via Esprillo, San Diego, CA 92127 U.S.A.
Telephone Number: 858-942-2230
This device complies with part 15 of the FCC rules. Operation is subject to the following two conditions:
- This device may not cause harmful interference, and
- this device must accept any interference received, including interference that may cause undesired operation.

Documents / Resources
References
Download manual
Here you can download full pdf version of manual, it may contain additional safety instructions, warranty information, FCC rules, etc.
Advertisement
Thank you! Your question has been received!


Need Assistance?
Do you have a question about the VG-C4EM that isn't answered in the manual? Leave your question here.