Motorola A920 Reference Manual
Multimedia handset
Hide thumbs
Also See for A920:
- Service manual (131 pages) ,
- Instruction manual (106 pages) ,
- Service manual (59 pages)
Table of Contents
Advertisement
Quick Links
Download this manual
See also:
Service Manual
Welcome
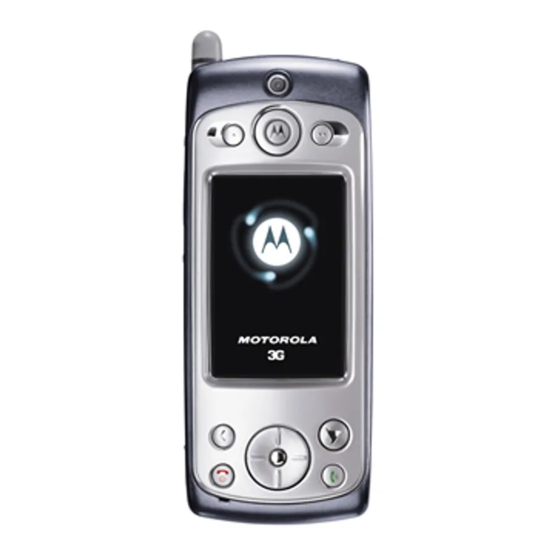
This reference guide describes the many features in your A920
multimedia handset.
Game Key A
Speakerphone
Key
Volume
Up/Down
Voice Key
Shortcut Key
Press to go to
favourite
application
(default: Home).
Power/End Key
Press & hold to
turn on & off.
Press & release
to end calls.
Camera
Microphone
Status Light
Earpiece
Game Key B
Touchscreen
Navigation Key
Press arrows to
move through
items.
Press centre to
select highlighted
item.
3 Key
Press to use
features from 3.
Send Key
Press to make &
answer calls.
Welcome - 1
Advertisement
Table of Contents

Related Manuals for Motorola A920


Summary of Contents for Motorola A920
-
Page 1: Welcome
Welcome This reference guide describes the many features in your A920 multimedia handset. Game Key A Speakerphone Volume Up/Down Voice Key Shortcut Key Press to go to favourite application (default: Home). Power/End Key Press & hold to turn on & off. - Page 2 Motorola products may not be modified, reverse-engineered, distributed, or reproduced in any manner to the extent allowed by law. Furthermore, the purchase of the Motorola products shall not be deemed to grant either directly or by implication, estoppel, or otherwise, any license under the copyrights, patents, or patent...
-
Page 3: Table Of Contents
Contents Welcome ......... . 1 Safety and General Information . - Page 4 Moving Entry to a Different Folder ....31 Adding, Renaming, and Deleting Folders ... . 31 Status Indicators .
- Page 5 Making Another Call While a Call is Active ... 46 Switching Between Calls ......47 Joining Calls in a Grouptalk .
- Page 6 Saving Sender’s Address as a Contact ....65 Messaging Folders ....... 66 Finding Messages .
- Page 7 Adding Entries ....... . . 85 Marking Tasks as Complete..... . . 87 Finding Entries.
- Page 8 Managing Music Playlists ......99 Playing a Music Playlist ......101 Setting Playlist to Shuffle Mode .
- Page 9 Connecting to a Computer......118 Installing A920 Desktop Suite ....118 Setting up the Connection .
-
Page 10: Safety And General Information
RF energy. When you communicate with your phone, the system handling your call controls the power level at which your phone transmits. Your Motorola phone is designed to comply with local regulatory requirements in your country concerning exposure of human beings to RF energy. -
Page 11: Phone Operation
Motorola may exceed RF energy exposure guidelines. If you do not use one of the body-worn accessories approved or supplied by Motorola, and are not using the phone held in the normal use position, ensure the phone and its antenna are at least 1 inch (2.5 centimetres) from your body when... -
Page 12: Medical Devices
facilities that may be using equipment that is sensitive to external RF energy. Aircraft When instructed to do so, turn off your phone when on board an aircraft. Any use of a phone must be in accordance with applicable regulations per airline crew instructions. Medical Devices Pacemakers Pacemaker manufacturers recommend that a minimum separation... -
Page 13: Use While Driving
Use While Driving Check the laws and regulations on the use of phones in the area where you drive. Always obey them. When using your phone while driving, please: • Give full attention to driving and to the road. • Use hands-free operation, if available. •... -
Page 14: Blasting Caps And Areas
(short circuit) and become quite hot. Exercise care in handling any charged battery, particularly when placing it inside a pocket, bag, or other container with metal objects. Use only Motorola original batteries and chargers. Your battery or phone may contain symbols, defined as follows: Symbol Definition Important safety information will follow. -
Page 15: Repetitive Motion Injuries
or playing video games. These seizures or blackouts may occur even if a person never had a previous seizure or blackout. If you have experienced seizures or blackouts, or if you have a family history of such occurrences, please consult with your doctor before playing video games on your phone or enabling a blinking- lights feature on your phone. - Page 16 European Union Directives Conformance Statement Hereby, Motorola declares that this product is in compliance with • The essential requirements and other relevant provisions of Directive 1999/5/EC • All other relevant EU Directives IMEI: 350034/40/394721/9 Type: MC2-41H14 The above gives an example of a typical Product Approval Number.
-
Page 17: Getting Started
• 3 welcome package (may not be available in all countries) • Vehicle power adapter (may not be available in all countries) Note: The in-box items of the A920 multimedia handset may vary by country. Contact 3 for more details. -
Page 18: About This Guide
Contact your service provider for availability. Optional Accessories Features marked with this label require an optional Motorola Original™ accessory. Installing the USIM Card Your USIM (Universal Subscriber Identity Module) card contains your phone number, service details, and memory for storing phone numbers and messages. - Page 19 Caution: Do not bend or scratch your USIM card, and avoid exposing it to static electricity, water, or dirt. Do This 1 Push down release latch, slide back cover down, and remove. 2 Slide USIM card door to the left and lift open.
-
Page 20: Installing The Memory Card
Do This 4 Close USIM card door and slide to right to lock. Installing the Memory Card The memory card lets you store multimedia files, such as audio clips, pictures, and video clips. Do This 1 If back cover is on, remove it as described in “Installing the USIM Card”... -
Page 21: Installing The Battery
Installing the Battery You must install and charge the battery to use your handset. Use only Motorola Original batteries and accessories. Store batteries in their protective cases when not in use. Do This 1 Remove the battery from its protective clear plastic case. -
Page 22: Charging The Battery
Caution: To prevent injuries or burns, do not allow metal objects to contact or short-circuit the battery terminals. To maximise your battery’s performance: • Always use Motorola Original™ batteries and battery chargers. The warranty does not cover damage caused by using non-Motorola batteries and/or battery chargers. -
Page 23: Turning Your Handset On
• New batteries or batteries stored for a long time may require a longer charge time. • Charge the battery at or near room temperature. • Do not expose batteries to temperatures below -10° C (14° F) or above 45° C (113° F). Always take your handset with you when you leave your vehicle. -
Page 24: Setting Up Your Handset
Setting up Your Handset When you turn on the handset for the first time, it prompts you to: • Select language • Calibrate the screen for accurate screen taps • Enter current time and date See “Customising Handset Settings” on page 75 for other ways to customise your handset. -
Page 25: Answering A Call
Do This 2 To dial one of the displayed phone numbers, press C (up and down arrows) to highlight the number and press C (centre key) to select the desired number. To dial a different phone number, use the provided stylus to tap Keypad dialling keypad displays. -
Page 26: Using Your Handset
Using Your Handset See page 1 for a description of your handset’s components. Handset Screen Application Shows six icons that allow easy access Selector Bar to commonly used applications. Menu Bar Shows menus for the open application. Application Shows the open application. Space Button Bar Shows buttons you can select in the... -
Page 27: Using Touchscreen Control
Status Bar Shows handset status information. Using Touchscreen Control You can use all of the features by tapping on icons, text, and on- screen buttons with the provided stylus. One tap selects an item. The stylus fits in a storage compartment on the back of the handset. -
Page 28: Using 3 Key
Using 3 Key The 3 key ( E ) provides access to unique features from 3. See the 3 welcome package for more about these features. Using Game Keys The handset has two Game keys. You can use these keys to play games that you install on the handset. - Page 29 You can open an application in the following ways: • Select one of the icons in the Application Selector bar at the top of the screen. These shortcuts are always visible on the screen. • Select . The Application Launcher displays, showing icons of all of your handset’s applications.
-
Page 30: Folders
Video (see page 108) Home (see page 37) Pictures (see page 112) Folders Many applications include a group of folders. The current folder name appears on the right side of the menu bar at the top of the screen. You can use folders to organise your entries. For example, you can create separate folders for business and personal entries. -
Page 31: Switching Folders
Switching Folders Tap the current folder name and select the desired folder from the list. If you want to view every entry in every folder, select Filing New Entry in Folder Do This 1 In the application, select the desired folder. 2 Create a new entry. -
Page 32: Status Indicators
Status Indicators The status bar at the bottom of the screen shows the following status indicators: Alert Mode Clock Keyboard Launcher Clock – Shows the current time. Keyboard Launcher – Tap to display the on-screen keyboard. (The keyboard displays only when the cursor is in a text-entry field.) Alert Mode –... - Page 33 displays when you have a new voice message and no active call. Message – Shows that you have a new message and what type: Email: multimedia message: If an multimedia message or text message sender’s phone number is in your Contact list, the indicator is white. If the message sender’s phone number is not in your Contact list, the indicator is amber.
-
Page 34: Status Light
Status Light The top of the handset has a 3-colour light that shows the network status and when you have an incoming call or message. State Any incoming call or message In Service and no message In Service and message waiting No Service and no message No Service and... -
Page 35: Handwriting Recognition
Handwriting Recognition You can use the stylus as a pen to write letters, numbers, and punctuation directly on the touchscreen. To write with the stylus, tap in the status bar. The handwriting pad or the keyboard appears (depending on which you used last). If the keyboard appears, tap again, and then tap menu. -
Page 36: Virtual Keyboard
Virtual Keyboard You can use an on-screen keyboard to type text. To activate the keyboard, tap in the status bar. The handwriting pad or the keyboard appears (depending on which you used last). If the handwriting pad appears, tap again, and then tap Roman in the popup menu. -
Page 37: Home
Home The home screen shows a variety of content. This could be a summary of your appointments, messages, and personal links to content such as news, entertainment and sports. Displaying Home Home displays after the startup sequence when you turn on the handset. -
Page 38: Personalising Home
Information Snacks – Shows the three most recently received information snacks (headlines). Tap a snack to go to a Web page with more information. Note: See the 3 welcome package for information about information snacks. Personal Information – Shows the number of new emails, voicemails, multimedia messages, text messages, upcoming appointments, and active tasks. -
Page 39: Calling Features
Calling Features Opening Phone Application Use the Phone application to make voice and video phone calls. You can open this application in the following ways: • Press B . When the Phone application opens, a list of the most recently dialled calls displays. •... -
Page 40: Displaying Your Phone Number
Displaying Your Phone Number Your phone number must be programmed on your USIM card to use this feature. Tap phone number. Making a Voice Call Dialling with Keypad Do This 1 Use stylus to tap phone number on keypad. If you make a mistake while dialling, tap delete last digit. -
Page 41: Dialling Stored Phone Numbers
Do This 3 Tap and hold # key. Dialling Stored Phone Numbers You can automatically dial stored phone numbers. See “Communicating with Contacts” on page 72. Redialling Failed Voice Calls If a voice call fails (busy or not answered), a displays. -
Page 42: Dialling Stored Phone Numbers
Do This 2 Use stylus to tap phone number on keypad. If you make a mistake while dialling, tap delete last digit. Tap and hold displayed digits. 3 Tap Dialling Stored Phone Numbers You can automatically place video calls to stored phone numbers. See “Communicating with Contacts”... -
Page 43: Making An Emergency Call
To turn on Automatic Redial: Do This 1 Tap > Settings Call Control 2 On the tab, check the Basic Making an Emergency Call Your service provider may program one or more emergency phone numbers, such as 999, that you can call under any circumstances, even when your handset is locked or the USIM card is not inserted. -
Page 44: Answering Calls
Answering Calls When you receive an incoming voice or video call, the handset rings or vibrates (unless set to Silent mode). Do This Press B or tap Answer If you do not want to accept the call, press A or tap to reject it. -
Page 45: Using Speakerphone
Speakerphone Key Volume Key Using Speakerphone Your handset has a built-in speakerphone that allows hands-free use. Press the Speakerphone key on the side of the handset to turn the speakerphone on and off. If you want to answer an incoming call using the speakerphone, press the Speakerphone key while the handset is ringing or vibrating. -
Page 46: Putting A Call On Hold
Putting a Call on Hold In the call screen, tap the button changes to Hold Transferring a Call You can transfer an active call or a call on hold to another phone number. Do This 1 In the call screen, tap The Transfer screen displays. -
Page 47: Switching Between Calls
Do This 3 Press B . If the call succeeds, one call is active and one call is on hold. The screen displays both calls: Switching Between Calls To switch between an active call and a call on hold, tap active call is put on hold and the call on hold becomes active. -
Page 48: Adding Calls To A Grouptalk
Adding Calls to a Grouptalk You can join up to five calls in a Grouptalk. To add each call to the Grouptalk: Do This 1 In the Grouptalk screen, tap 2 Tap the number of the party you want to add. 3 Press B . -
Page 49: Making Calls From The History List
To view the call history list: Do This 1 Tap History A list of your most recently dialled calls displays on tab. Dialled 2 To view your most recently missed (unanswered) calls, tap the Missed 3 To view your most recently answered calls, tap the tab. -
Page 50: Switching Lines
In Aeroplane mode, you cannot connect to the network to make phone calls or send messages. Also, GPS Location service is not available. Do This 1 Tap the Network indicator ( 2 In the Connection Mode box, select 3 Tap Done indicator appears, indicating the handset is now in Aeroplane mode. -
Page 51: Hiding Your Caller Id
If caller ID information is not available for an incoming call, the screen displays Unknown Hiding your Caller ID If you subscribe to the calling line identity restriction (CLIR) feature, you can prevent your number from showing when you call another number. To hide your caller ID for the next phone call, tap Using Call Waiting If you subscribe to the call waiting feature, the screen... - Page 52 To turn on call diverting: Do This 1 Tap > Settings Call Control 2 Tap the tab. Forwarding 3 Select the type of incoming calls for which you want to specify forwarding options: Voice or Data. 4 Check the small box next to the type of calls you want to forward: All calls only), or...
-
Page 53: Using Call Barring
Do This 5 Enter the forwarding number for the selected call type(s) in one of the following ways: • To enter the number manually, tap the long box next to the call type. Tap the number on the displayed keypad, and tap •... -
Page 54: Monitoring Phone Use
To change your barring password: Do This 1 On the tab, tap Barring 2 Enter your old barring password and tap 3 Enter a new password (4 - 10 characters) and tap Done Monitoring Phone Use Setting In-Call Timer Options Do This 1 Tap >... -
Page 55: Resetting Call Timers
Do This 2 Tap the tab. The following information displays: Timers – Elapsed time of your last dialled or received Last Call call. – Elapsed time of all dialled calls since last reset. Outgoing – Elapsed time of all received calls since last Incoming reset. -
Page 56: Messages And Email
Messages and Email You can create, send, and receive the following types of messages: email, MMS (Multimedia Message Service), and SMS (Short Message Service). You can send stored audio, video, and picture files with your email and multimedia messages. See the “News and Entertainment” section for how to download and store these files in the handset. - Page 57 Do This 4 Enter the following: – Enter a name for this account. Account name – Select the type of network this Connection type account uses to connect to the Internet. Your service provider supplies this information. 5 Tap Advanced 6 On the tab, enter the following: Server...
- Page 58 Do This 8 On the tab, if your account uses a proxy server, Proxy check the Use proxy server computer that stores copies of Web pages so that you can retrieve them faster or more securely than you could from their original location(s). To use a proxy server, specify the proxy server address and port number, which are available from your service provider.
- Page 59 Do This 3 On the tab, enter the following: Basic – Enter a name for this account. Account name – Enter the name that you want to appear on Your name outgoing emails. – Enter the address provided by your Email address service provider.
-
Page 60: Multimedia Message And Text Message
Do This 6 On the Advanced Secure connection provider tells you that you have a secure connection. A secure connection means that all information (including your username, password, and all messages) is encrypted to maximise security while you are connected to the Internet. Outgoing mail port not need to change these settings. -
Page 61: Opening Messaging Application
Opening Messaging Application Use the Messaging application to create, send, and receive messages. To open this application: Do This in the Application Selector bar or Application Launcher. When the Messaging application opens, it shows a list of your established accounts: Creating and Sending Messages Email and text message To write and send an email or text message:... -
Page 62: Multimedia Message
Do This 2 Tap > Message 3 In the field, enter the recipient’s address (email) or phone number (text message) with the stylus or virtual keyboard. To enter a stored address or phone number from Contacts, tap To enter several addresses or phone numbers, enter a comma between each. - Page 63 Do This 2 Tap > Message The first slide of the message displays: 3 In the field, enter the recipient’s phone number or email address. (The recipient must also subscribe to multimedia messaging.) To enter a stored number from Contacts, tap To enter several phone numbers, enter a comma between each.
- Page 64 Do This 5 Tap to add an image. You can then select a stored image file. You can add the following types of stored image files to an multimedia message: BMP, WBMP, GIF, PNG, JPEG, and TIFF. 6 Tap the text area to place a cursor in the text area. Enter text with stylus or virtual keyboard.
-
Page 65: Receiving And Reading Messages
Receiving and Reading Messages When the handset receives a new message, a message indicator displays in the status bar. See “Status Indicators” on page 32. Do This 1 Tap message indicator in Status bar. The Messaging application opens, showing a list of established accounts. -
Page 66: Messaging Folders
Messaging Folders The following folders are preset in Messaging: • – Contains received messages. You can reply to, Inbox forward, and delete these messages, but you cannot edit them. • – Contains messages that are ready to send. Outbox To send messages from the Outbox, select the messages you want to send by tapping to the left of them. -
Page 67: Setting Email Preferences
Setting Email Preferences You can set the following email preferences: • Always attach your card always attached to all emails that you send. See “Creating Owner Card” on page 73. If you choose not to automatically attach your owner card, you can still attach it to individual emails. -
Page 68: Contact List
Contact List Use the Contacts application to store details such as names, phone numbers, and email addresses in an alphabetical list of entries. You can quickly call or send a message to any stored contact from this list. Opening Contacts Application in the Application Selector bar or Application Launcher. -
Page 69: Adding Contacts
To see each contact’s preferred phone number next to their name, > and select the Edit Preferences Adding Contacts Do This 1 Open the folder in which you want to save the contact. To store the contact on your USIM card, open the USIM folder. - Page 70 Do This 3 Enter contact name, phone numbers, email address, and other information. Note: If you enter more than one phone number for a contact (for example, a work and home number), you can select which number displays in the contact list as the preferred phone number.
-
Page 71: Finding Contacts
Do This 8 When you have entered all contact information, tap The contact now displays in the alphabetical list of contact names. Sample contact pictures are provided on the CD-ROM supplied with the handset. Finding Contacts To find a particular contact in a list: Do This 1 Tap >... -
Page 72: Communicating With Contacts
Communicating with Contacts You can easily phone, email, or send messages to your stored contacts. Do This 1 In the list of contact entries, tap the contact name. The contact’s defined phone numbers and email addresses display: A phone number or email address might have additional icons next to it, depending on its defined communication method. -
Page 73: Sending Contact Details
Do This 2 To place a voice call, tap the phone number. To place a video call, tap number. To send an email, tap the email address. To send an multimedia message, tap phone number or email address. To send a text message tap number. -
Page 74: Sorting Contacts
To create your own card: Do This 1 Tap > Contacts 2 Enter your contact information, as described in “Adding Contacts” on page 69. 3 Tap > Contacts Set as owner card Sorting Contacts Do This 1 Tap > Edit Preferences 2 Select the manner in which you want the contacts sorted. -
Page 75: Customising Handset Settings
Customising Handset Settings You can adjust handset settings to suit your needs. Setting Wallpaper Image You can select an image to display in the background of the Application Launcher. Do This 1 Open Application Launcher ( 2 Tap > View Wallpaper 3 Tap Change... -
Page 76: Setting System Sounds
Setting System Sounds To set volume levels for the sounds of screen taps, button presses, system alerts (for example, incoming call alert), and system notices (for example, low battery notice): Do This 1 Open Control Panel application ( 2 Tap Sounds 3 Select desired sound settings: Off, Quiet, or Loud. -
Page 77: Choosing Ringtunes For Calls
Notes: See Alert Mode on page 32 for how to view and set the alert mode. Personalised ringtunes that you assign to stored contacts override the ringtunes you select here. See “Adding Contacts” on page 69 for how to assign personalised ringtunes. Choosing Ringtunes for Calls Do This 1 Open the Phone application (... -
Page 78: Choosing Vibrate Pattern
Choosing Vibrate Pattern When you set the alert mode to vibrate, the handset vibrates to indicate an incoming call or message. You can select from the different vibrate patterns provided. Note: See Alert Mode on page 32 for how to view and set the alert mode. -
Page 79: Installing Audio Files As Ringtunes
Installing Audio Files as Ringtunes You can install an audio file as a ringtune by downloading it from the Web or opening it as an email attachment. When the file opens, a dialog box appears that enables you to install the file. Installing Saved Audio Files as Ringtunes To install previously saved audio files as ringtunes: Do This... -
Page 80: Personal Organiser Features
Personal Organiser Features Calendar Use Calendar to schedule and organise events such as appointments and meetings. You can review your schedule of events for the day, week, or month, and have the handset play a reminder alarm for specific events. Note: Ensure that the correct time and date are set before using Calendar. - Page 81 Do This 2 Tap > Calendar The Calendar Entry form displays: 3 Use stylus or virtual keyboard to enter a description. 4 Select the type of entry. 5 Enter the date, time, and location of the event. 6 Tap the box if you want the handset to sound a Alarm reminder alarm for this entry.
-
Page 82: Switching Calendar Views
Do This 10 Tap to save the entry. Switching Calendar Views You can see your Calendar entries in several views: Day, Week, or Month. When you first open Calendar, the Day view displays. To switch to Week view, tap To switch to Month view, tap To switch back to Day view, tap To return to the current day in the selected view, tap To see the details of an entry, tap the entry. -
Page 83: Deleting Entries
Finding Entries Do This 1 Tap > Calendar Find 2 Enter text for which you want to search. 3 In the box, select whether you want to search Where? through future entries, past entries, or everywhere (all entries). 4 Tap Find A list of entries containing the specified text displays. -
Page 84: Moving Entries To The To Do Application
Moving Entries to the To Do Application You can move Calendar entries to the To Do application, which lists tasks you need to complete. See “To Do” on page 85. Do This 1 Open the entry. 2 Tap > Calendar Move to To Do Note: To Do entries do not have repeats, times, or locations, so Calendar entries that you move to To Do lose this information. -
Page 85: To Do
Do This 2 On the tab, you can set the following options: General – Sets the hours you see in Day view View hours in day (for example, from 10:00 to 18:00 pm). Standard time intervals day divides in Day view. For example, enter 00:30 for half-hour divisions. - Page 86 Do This 2 Tap > To do The To Do entry form displays: 3 Use stylus or virtual keyboard to enter a description. 4 Select a priority (1-9, with 1 highest) for the task. 5 Tap the Due date date. The current date displays next to the select a different due date, tap the date and select a date from the displayed calendar.
-
Page 87: Marking Tasks As Complete
Do This 8 To add a note to the entry, tap 9 Tap to save the entry. Marking Tasks as Complete When you open To Do, a list of tasks and their due dates displays. To mark a task as completed, tap the box next to it. The due date disappears, indicating the task is completed. -
Page 88: Moving Entries To Calendar
Moving Entries to Calendar You can schedule To Do entries on your calendar by moving them to the Calendar application. See “Calendar” on page 80. Do This 1 Open the entry. 2 Tap > To do Move to Calendar Note: If you do not set a due date for the To Do entry, the handset uses the current date for the new Calendar entry. -
Page 89: Notes
Do This 2 You can set the following options: – Select this option to display due Display due dates dates in the list of entries. Due dates are coloured red if they are overdue. – Select this option to display Display completed completed entries in the list of entries. -
Page 90: Using Paste
Using Paste To create a new note from text or sketches copied from another application, tap > Edit sketch, the original is deleted. Finding Notes Do This 1 Tap > Notes Find 2 Enter text for which you want to search. 3 Tap Find A list of notes containing the specified text displays. -
Page 91: Time
Time Use Time to set the current date and time, and to set alarms you do not want to include in your Calendar or To Do list. Setting Time and Date If you have not already set the current time and date: Do This 1 Open Time ( 2 Tap... -
Page 92: Setting Location
Setting Location Time can display time and date information for two locations: • – The place where you are at the moment. Time shows Current the time and date of your current location in the top half of the screen. •... -
Page 93: Responding To Alarms
To set an alarm: Do This 1 Tap one of the alarm slots. 2 Set the following alarm details: – Select the time of day you want the alarm to Time sound. – Select how often you want the alarm to sound: When only once, in the next 24 hours, daily, on workdays only, or weekly. -
Page 94: Calculator
Calculator To open the calculator, tap Use the calculator by tapping the on-screen keys. The calculator has the following memory keys: Description Tap to store a number in memory. Tap to subtract a number from the number in memory. Tap once to retrieve a number from memory and enter it into the display. -
Page 95: News And Entertainment
News and Entertainment Web Browser The Web browser lets you open Web pages and use Web-based applications (such as on-line banking, shopping, and games) on your handset. Setting Up Internet Account Before you can use the Web browser, you must set up an Internet account. -
Page 96: Viewing Recently Visited Web Pages
If you get a message that a Web page cannot display, tap (Reload). Viewing Recently Visited Web Pages You can view recently visited Web pages in the following ways: • To return to the last page viewed, tap • To view a page viewed before tapping •... -
Page 97: Downloading Audio, Video, And Pictures
Downloading Audio, Video, and Pictures You can download audio files, video clips, and pictures from the Web. To download a file, follow the instructions on the Web page. When the download completes, the file opens in the browser or in another handset application (depending on the file type). -
Page 98: Music
Music Use Music to listen to the following types of audio files: AU, AMR, MIDI, MP3, and WAV. You can listen to audio files that you downloaded from the Web or received as an email attachment, or stored on the removable memory card. Opening Music in the Application Launcher. -
Page 99: Playing An Audio Track
Media Files\Audio\Rock Media Files\Audio\Unfiled Playing an Audio Track Do This 1 In the list of tracks, tap the track you want to play. Information about the track displays (artist, album, etc.) and the track begins to play. 2 While the track plays, you can tap the following buttons at the bottom of the screen: Tap and hold down to rewind the track. - Page 100 Do This 2 Tap to switch to Playlist view. 3 Tap > Edit Edit Playlist The Reorder Playlist screen displays: 4 To arrange the sequence in which the tracks will play, tap a track and then tap the arrows to move it up or down in the sequence.
-
Page 101: Playing A Music Playlist
Playing a Music Playlist Do This 1 Open the desired folder. 2 Tap to switch to the Playlist view: 3 Tap Music starts playing the tracks in the sequence you selected. News and Entertainment - 101... -
Page 102: Setting Playlist To Shuffle Mode
Do This 4 While the playlist plays, you can tap the following buttons at the bottom of the screen: Tap and release to start playing from the beginning of the current track or to jump to the beginning of the previous track in the playlist (if already at the start of the current track). -
Page 103: Setting Music Preferences
Setting Music Preferences You can select which types of audio files Music plays. Do This 1 Tap > Edit Preferences A list of all available audio file types displays. 2 Select the file types you want to play. 3 Tap Done Saving Audio Files When you download an audio file from the Web or open an audio... -
Page 104: Sending Audio Files
Do This 3 Tap > Music Delete Sending Audio Files You can send audio files by email or multimedia message. Do This 1 Open the folder with the audio file you want to send. 2 In the list of tracks, tap the track you want to send. 3 Tap >... -
Page 105: Opening Camera Application
Opening Camera Application in the Application Launcher. When the Camera application opens, a camera viewfinder displays. The viewfinder displays the image viewed by the camera lens. Positioning the Camera Lens You can position the camera lens so that it faces towards the front or back of the handset. -
Page 106: Taking Still Pictures
Taking Still Pictures Do This 1 Tap to place camera in Still mode. 2 Point the camera lens at the subject. 3 Press C (centre key) to take the picture. The picture displays in the viewfinder. 4 If you want to save the picture, press C (centre key). If you want to delete the picture without saving it, press C (right arrow). -
Page 107: Using Self-Timer
Do This 2 Point the camera lens at the subject. 3 Press C (centre key) to start recording the video. The video image displays in the viewfinder. 4 To stop recording, press C (centre key) again. The video is saved to the currently selected folder. Using Self-Timer The camera has a self-timer that automatically takes a picture (single or sequence) or records a video clip 5 seconds after you... -
Page 108: Switching To Pictures
Switching to Pictures When the Camera is in Still mode, you can quickly switch to Pictures to view, edit, and send the pictures you have taken. See “Pictures” on page 112. To switch to Pictures, tap Switching to Video When the Camera is in Video mode, you can quickly switch to Video to watch and send the video clips you have recorded. -
Page 109: Playing A Video Clip
Media Files\Video\ For example, you can store video files in any of the following directories: Media Files\Video\Movie Trailers Media Files\Video\Home Media Files\Video\Unfiled Playing a Video Clip Do This 1 In the list of video clips, tap the clip you want to play. The video begins to play in portrait (vertical) view: News and Entertainment - 109... -
Page 110: Switching To Landscape View
Do This 2 While the video plays, you can tap the following buttons at the bottom of the screen: pause mode. Tap to stop the video and return to the beginning. Tap to open the Camera application. Tap to return to the list of video tracks. Note: The C key also controls video play: left = rewind, right = fast forward, centre = play/pause. -
Page 111: Viewing Clip Information
Viewing Clip Information You can view information about a clip (title, author, etc.) while it is playing in Portrait mode. Do This 1 Tap > Video Clip info 2 Tap to return to the video. Done Saving Video Clips When you download a video clip from the Web or open a video email attachment, the clip begins playing in Video. -
Page 112: Sending Video Clips
Sending Video Clips You can send video clips by email or multimedia message. Do This 1 In the list of video clips, tap the clip you want to send. 2 Tap > Video Send as 3 Select the method by which you want to send the video clip. -
Page 113: Viewing Pictures
Media Files\Image\ For example, you can store pictures in any of the following directories: Media Files\Image\Kids Media Files\Image\Vacation Media Files\Image\Unfiled Viewing Pictures Do This 1 Tap the thumbnail picture or file name you want to view. The picture displays. If the original picture is larger than the display area, it reduces... -
Page 114: Viewing Slideshow
Do This 2 While viewing the picture, you can tap the following buttons at the bottom of the screen: Tap to see previous picture. Tap to see next picture. Tap to open the Camera application. Tap to return to the list or thumbnails of pictures. Viewing Slideshow You can view all of the pictures in a folder as a slideshow. -
Page 115: Viewing Picture Information
Viewing Picture Information You can view information about a picture (file name, size, etc.) while you are viewing it. Do This 1 Tap > Pictures Image info 2 Tap to return to the picture. Done Rotating Pictures To rotate a picture, tap clockwise. -
Page 116: Adding Stamps To Pictures
Adding Stamps to Pictures Do This 1 Tap > Edit Add stamp A row of available stamps displays below the picture. 2 Tap the stamp you want to add. 3 Tap the location on the picture where you want to place the stamp. -
Page 117: Sorting Pictures
Sorting Pictures You can sort pictures in list view or thumbnail view by name, date, or file size. Do This 1 Tap Setting 2 Tap the sorting method you want to use. Sending Pictures You can send pictures by email or multimedia message. Do This 1 Tap the thumbnail picture or file name you want to send. -
Page 118: Getting More Out Of Your Handset
Once you have connected your handset with the computer, launch A920 Desktop Suite from your desktop. Note: Refer to the A920 Desktop Suite online help for more information about using the program. 118 - Getting More Out of Your Handset... -
Page 119: Remote Synchronisation
Remote Synchronisation A920 enables you to synchronise Calendar, To Do, and Contact entries while you are on the go. You accomplish this by remotely synchronising over the air with the synchronisation server. Setting Up Your Account To perform remote synchronisation, you need an account with your service provider, who supplies you with an account that includes a server address, server databases, user name, and a password. -
Page 120: Installing Applications On The Handset
Installing Applications on the Handset You can add new software by downloading and installing application files with a "3 certified" .SIS extension. Uncertified applications can't be loaded on the handset. You can download applications to your handset in the following ways: •... -
Page 121: Downloading Application From Computer
1 Establish a link between your handset and the computer, as described in “Connecting to a Computer” on page 118. 2 Start the A920 Desktop Suite program on the computer. 3 Follow the A920 Desktop Suite online instructions to transfer the .SIS application file to the handset. -
Page 122: Downloading Application From Memory Card
Downloading Application from Memory Card Do This 1 Ensure that a memory card is installed in handset, as described in “Installing the Memory Card” on page 20. 2 Open the Application Launcher ( 3 Tap > Launcher Install 4 Tap the name of the application you want to install. 5 Tap Install Installation begins. -
Page 123: Security
Security Locking and Unlocking handset You can lock the handset so that the touchscreen and keys do not work. When you lock the handset, you can still use the A and B keys to answer and hang up incoming phone calls. To lock the handset: •... - Page 124 Do This 4 If you want the password entry screen to display owner information: a Check the box. b In the Owner Information want to appear. 5 Tap Set password 6 Enter password and tap 7 Confirm the password and tap The password is now set.
-
Page 125: Troubleshooting
Troubleshooting Check these questions first if you have problems with your handset: Question Is your battery charged? Do you have a valid USIM card inserted in the handset? Does the handset have a network signal? Is the earpiece volume too low? Is the other party unable to hear you? - Page 126 126 - Troubleshooting Answer Dropping your handset, getting it wet, or using a non-Motorola battery charger can damage the handset. The handset’s limited warranty does not cover damage caused from using non-Motorola accessories. Solution...
- Page 127 Problem I cannot make or answer calls. My handset has poor reception and drops calls. The screen says: Data Calls Only. I cannot hear others on my handset. I cannot open my inbox. How do I see the calls that I made or received? Solution Make sure you have a network signal.
- Page 128 Problem My handset’s screen is too light or dark. What can I do to extend battery life? Why are my audio files not appearing in the Music application? Why are the audio, video, or image files on the Memory card not appearing in the Music, Video, or Pictures application.
-
Page 129: Specific Absorption Rate Data
Specific Absorption Rate Data This model handset meets international standards for exposure to radio waves Your mobile handset is a radio transmitter and receiver. It is designed and manufactured not to exceed limits for exposure to radio frequency (RF) energy. These limits are part of comprehensive guidelines and establish permitted levels of RF energy for the general population. - Page 130 ** CENELEC is a European Union standards body. *** Additional related information includes the Motorola testing protocol, assessment procedure, and measurement uncertainty range for this product. 130 - Specific Absorption Rate Data...
-
Page 131: Warranty Information
[1] year from date of purchase of the Product(s) (Warranty Term). You must inform Motorola of the lack of conformity to the applicable specifications of any of the Products within a period of two (2) -
Page 132: How To Get Warranty Service
In no event shall Motorola be liable for damages nor loss of data in excess of the purchase price nor for any incidental special or consequential damages* arising out of the use or inability to use the Product, to the full extent such may be disclaimed by law. - Page 133 Motorola. Motorola does not warrant the installation, maintenance or service of the products, accessories, batteries or parts. Motorola will not be responsible in any way for problems or damage caused by any ancillary equipment not furnished by Motorola which is attached to or used in connection with the Products, or for operation of Motorola equipment with any ancillary equipment and all such equipment is expressly excluded from this warranty.
-
Page 134: What Is Not Covered By The Warranty
What is not covered by the warranty This warranty is not valid if the defects are due to damage, misuse, tampering, neglect or lack of care and in case of alterations or repair carried out by unauthorised persons. 1 Defects or damage resulting from use of the Product in other than its normal and customary manner. - Page 135 Note: The talk-time, stand-by time and total life cycle of a Motorola rechargeable battery for your Personal handset will depend on usage conditions and network configurations. As a consumable product, the specifications indicate that you should be able to obtain optimum performance for your Motorola Personal handset within the first six months from date of purchase and up-to (200) charges.
-
Page 136: Index
Index Numerics 3 key 28 3G 33 A920 Desktop Suite 118 accessories 17 accounts email 58 Internet 56 multimedia message 60 text message 60 adding folders 31 Aeroplane mode status bar indicator 33 turning on and off 33, 49 alarms... - Page 137 cache size 97 calculator 94 Calender adding an entry 80 alarm, setting 81 assigning colours to folders deleting entries 83 entry types 80 finding entries 83 moving entries to To Do 84 private entries 81 recurring entries 81 sending entries 84 views 82 calibrate screen 24 call barring 53...
- Page 138 preferred phone number 69 ring tone, assigning 70 saving message sender 65 saving to USIM card 69 sending messages to 72 sorting 74 cookies 97 date, setting 91 day view 82 deleting audio files 103 folders 31 pictures 117 video clips 111 dialling special characters 40 stored numbers 72...
- Page 139 folders 30 Calender 82 messages 66 forwarding calls 51 Game keys 28 GPRS 33 GPS 32, 50 grouptalk calls 47 GSM 33 handset answering calls 25, 44 dialling with keypad 40 displaying own number 40 keypad display 39 making video calls 41 making voice calls 24, 40 monitoring use 54 opening application 39...
- Page 140 Navigation 1, 27 Power 1, 23 Send 1 Shortcut 1 Speakerphone 1, 45 Voice 1 Volume 1, 44 landscape view 110 language selecting 24 LED. See status light lines, switching 50 location service status bar indicator 32 turning on and off 32 location, setting 92 locking handset 123 making a call 24...
- Page 141 sending files 104 setting preferences 103 shuffle mode 102 mute microphone 45, 48 status bar indicator 32 Navigation key 1, 27 network status bar indicator 33 Notes drawing sketches 89 finding notes 90 sending notes 90 writing notes 89 opening applications 28 optional accessories, defined optional features, defined 18 outbox 66...
- Page 142 preferences email 67 Music 103 To Do 88 Web browser 97 private Calender entries 81 To Do entries 86 proxy server 58 recording video clips 106 redialling automatic 42 video calls 42 voice calls 41 reminders 80 ringing choosing tunes 76 turning off 32, 50 ringtunes assigning to contacts 70...
- Page 143 sorting pictures 117 sounds, system 76 speakerphone key 1 using 45 star character 40 status bar 27, 32 status light 1, 34 storing email address 70 phone numbers 70 streaming video 110 stylus 27 switching between calls 47 switching folders 31 synchronisation remote 119 with computer 118...
- Page 144 saving files 111 sending clips 112 video calls blocking video 48 dialling with keypad 41 positioning camera 105 retrying failed calls 42 video clips playing 109 recording 106 virtual keyboard 36 voice calls 40 Voice key 1 voice message indicator 32 volume adjusting 44 key 1, 44...