Advertisement
Introduction
This instruction manual explains how to use lenses. Precautions common to all lenses such as notes on use are found in the separate "Precautions before using". Be sure to read both documents before using your lens.
This lens is designed for E-mount cameras. You cannot use it on A-mount cameras.
The FE C 16-35mm T3.1 G is compatible with the range of a 35mm format image sensor. A camera equipped with a 35mm format image sensor can also be set to shoot at APS-C size. For details on how to set your camera, refer to its instruction manual.
For further information on compatibility, visit the web site of Sony in your area, or consult your dealer of Sony or local authorized service facility of Sony.
For Customers in the U.S.A.
For question regarding your product or for the Sony Service Center nearest you, call 1-800-222-SONY (7669).
Supplier's Declaration of Conformity
Trade Name: SONY
Model: SELC1635G
Responsible Party: Sony Electronics Inc.
Address: 16535 Via Esprillo, San Diego, CA 92127 U.S.A.
Telephone Number: 858-942-2230
This device complies with part 15 of the FCC rules.
Operation is subject to the following two conditions:
- This device may not cause harmful interference, and
- this device must accept any interference received, including interference that may cause undesired operation.
Notes on Use
- Do not leave the lens exposed to the sun or a bright light source. Internal malfunction of the camera body and lens, smoke, or a fire may result due to the effect of light focusing. If circumstances necessitate leaving the lens in sunlight, be sure to attach the lens caps.
- When shooting against the sun, keep the sun completely out of the angle of view. Otherwise, solar rays may be concentrated at a focal point inside the camera, causing smoke or a fire. Keeping the sun slightly out of the angle of view may also cause smoke or a fire.
- This lens contains and comes with some small components. Be sure to keep them out of reach of small children to avoid accidental swallowing. If swallowed, immediately seek medical advice.
- When carrying a camera with the lens attached, always firmly hold both the camera and the lens.
- This lens is not water-proof, although designed with dust-proofness and splash-proofness in mind. If using in the rain etc., keep water drops away from the lens.
- AF illuminator of the camera may be blocked by the lens. We recommend that you set the AF illuminator to OFF.
- When recording movies, zoom operation sound may be recorded depending on the camera or shooting conditions. Use of an external microphone can help reducing the zoom operation sound being recorded.
- When using the lens support bracket, secure the camera with a tripod or an equivalent as well.
Vignetting
- When using the lens, the corners of the screen become darker than the center. To reduce these phenomena (called vignetting), close the aperture by 1 to 2 stops.
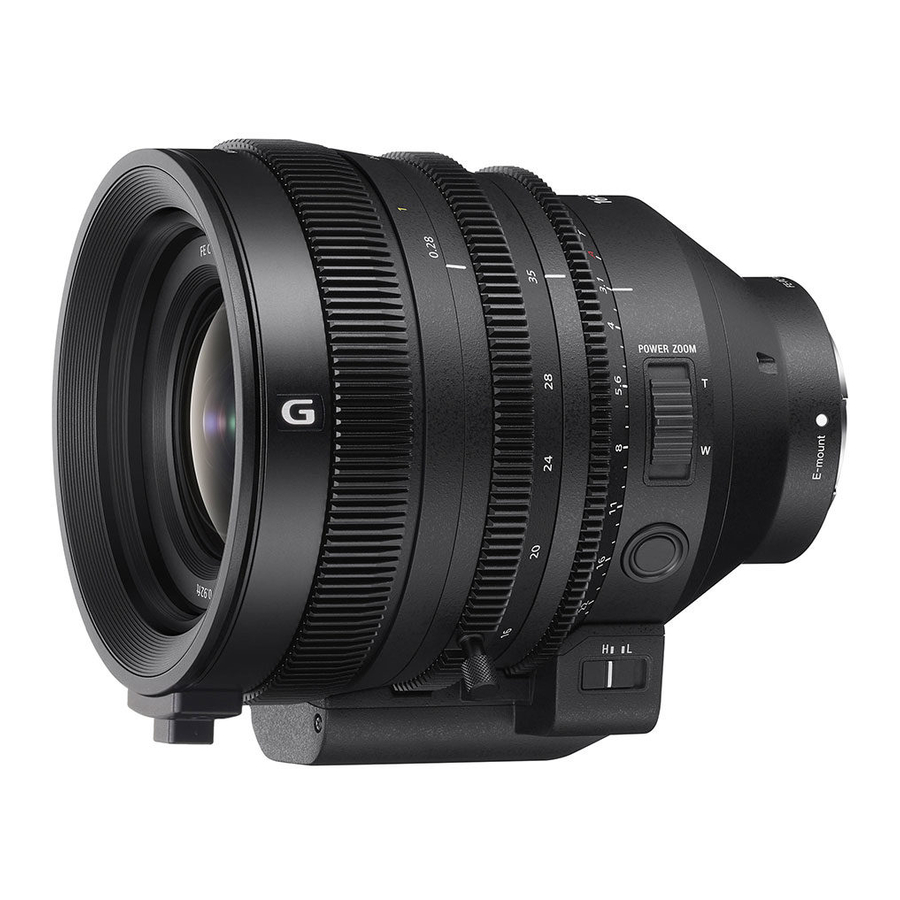
Identifying the Parts

- Focusing ring
- Zoom ring
- Iris ring
- Lens contacts*¹
- Aperture index
- Focal-length inde
- Distance index
- IRIS LOCK switch
- Iris click switch
- Servo zoom unit
- ZOOM switch
- Lens hood
- Distance scale
- Focal-length scale
- Aperture scale
- POWER ZOOM lever
- Mounting index
- Focus hold button
- Zoom speed switch
- Lens support bracket*²
- Hood-locking knob
*¹ Do not touch the lens contacts.
*² The lens support (not supplied) compatible with the 1/4-20 UNC screw can be attached.
Attaching/Detaching the Lens

The following procedure is provided as an example. For detailed instructions, refer to the instruction manual provided with your camera or its Help Guide (online instruction manual).
To attach the lens
- Remove the rear and front lens caps and the camera body cap.
- Align the white dot on the lens barrel with the white dot on the camera (mounting index), carefully insert the lens, and slowly turn the lens lock ring counterclockwise to secure the lens.
- Do not mount the lens at an angle.
To remove the lens
- Release the lens lock ring stopper (
![]() ), and turn the lens lock ring clockwise while firmly supporting the lens.
), and turn the lens lock ring clockwise while firmly supporting the lens. - Pull the lens out in the forward direction.
 ), and turn the lens lock ring clockwise while firmly supporting the lens.
Attaching the Lens Hood

It is recommended that you use a lens hood to reduce flares and ensure the maximum image quality.
Loosen the hood-locking knob on the lens hood (1), and then put the lens hood over the front of the lens (2). Make sure that the lens hood is not slanted and is fully engaged, and then tighten the hood-locking knob.
Zooming

Using the POWER ZOOM lever
- Set the ZOOM switch to "SERVO."
- Move the POWER ZOOM lever to adjust the focal distance (zoom position).
- Move the POWER ZOOM lever toward T (Telephoto) to zoom in.
Move the POWER ZOOM lever toward W (Wide) to zoom out.
- To change the maximum zoom speed by operating the POWER ZOOM lever on the lens, set the zoom speed switch to "H" (High speed) or "L" (Low speed).
Using the zoom ring
- Set the ZOOM switch to "MANUAL."
- Rotate the zoom ring to adjust the focal distance (zoom position).
When you do not intend to use the POWER ZOOM lever, you can choose to remove the servo zoom unit from the lens.
Use a commercially available hex key (2.5 mm) to remove the three screws. After you remove the servo zoom unit, it is recommended that you attach the supplied servo zoom unit receptacle cover ( ) for protection. When attaching the servo zoom unit back into place, make sure that the serial numbers on both the servo zoom unit and the lens are identical, and then fit the servo zoom unit aligning the three screw holes together. When tightening the screws, apply the specified tightening torque (0.15 - 0.25 Nm). (See illustration
  -a.)
-a.)
To change the rotation direction of the zoom ring operation
You can use the service for changing the rotation direction of the zoom ring operation.
For details, visit the web site at:
https://www.sony.net/dics/c1635g/

Focusing

AF/MF mode
To place the lens into AF/MF mode, set the focusing ring to the position  .
.
While the lens is in AF/MF mode and the camera is in AF mode, autofocus shooting is available. While the camera is in MF mode, you must manually adjust the focus.
- When autofocusing is used, image angle variation (breathing) may be apparent during focusing depending on the state of the subject. In such a case, adjust the focus manually.
FULL MF mode
To place the lens into FULL MF mode, set the focusing ring to the position  .
.
While the lens is in FULL MF mode, you can manually adjust the focus apart from whether the camera is in AF or MF mode.
The rotation range of the focusing ring is limited and the focus is adjusted in accordance with the distance scale movement.
- The distance scale is only a rough guide.
- When you move the focus ring from AF/MF mode
![]() to FULL MF mode
to FULL MF mode ![]() , focus is adjusted to the distance indicated on the distance scale.
, focus is adjusted to the distance indicated on the distance scale.
Adjusting the Aperture

IRIS LOCK switch
LOCK: You can lock the iris ring at "A" on the aperture scale, or rotate it between t/3.1 and t/25.
RELEASE: You can rotate the iris ring between "A" and t/25 on the aperture scale.
When you align "A" on the aperture scale to the aperture index, the camera is set to auto iris mode and the exposure is set by the camera. And you can adjust the amount of light manually between t/3.1 and t/25 by rotating the iris ring.
The aperture values indicated on the camera are F values.
Notes
Set the iris click switch to "OFF" when shooting movies. (See illustration  -a.)
-a.)
If you change the aperture value while shooting a movie with the iris click switch set to "ON," the sound of the iris ring will be recorded.
Using the Focus Hold Button

By pressing and holding the focus hold button during an AF operation, you can suspend the operation, while you hold the button, to fix the focus. Release the focus hold button to start AF again.
- Depending on the camera in use, the focus hold button can also be used as the assignable button or the custom button. For details, refer to the instruction manual provided with your camera.
- The focus hold button of this lens does not function with some camera models. For further information on compatibility, visit the web site of Sony in your area, or consult your dealer of Sony or local authorized service facility of Sony.
Specifications
| Name (Model name) | FE C 16-35mm T3.1 G SELC1635G |
| Focal length (mm) | 16-35 |
| 35mm equivalent focal length*¹ (mm) | 24-52.5 |
| Lens groups-elements | 13-16 |
| Angle of view 1*² | 107°-63° |
| Angle of view 2*² | 83°-44° |
| Minimum focus*³ (m (feet)) | 0.28 (0.92) |
| Maximum magnification (×) | 0.19 |
| Minimum aperture | t/25 (f/22) |
| Filter diameter (mm) | - |
| Dimensions (maximum diameter × height) (approx., mm (in.)) | 118.5 × 147 (4 3/4 × 5 7/8) |
| Mass (approx., g (oz)) | 1 390 (49.1) |
| SteadyShot | No |
*¹ This is the equivalent focal length in 35mm format when mounted on an Interchangeable Lens Digital Camera equipped with an APS-C sized image sensor.
*² Angle of view 1 is the value for 35mm cameras, and angle of view 2 is the value for Interchangeable Lens Digital Cameras equipped with an APS-C sized image sensor.
*³ Minimum focus is the distance from the image sensor to the subject.
- Depending on the lens mechanism, the focal length may change with any change in shooting distance. The focal lengths given above assume the lens is focused at infinity.
Included items
(The number in parentheses indicates the number of pieces.)
Lens (1), Front lens cap (1), Rear lens cap (1),
Lens hood (1), Lens case (1),
Servo zoom unit receptacle cover (2),
Spare screws for the servo zoom unit (3),
Set of printed documentation
Design and specifications are subject to change without notice.
 and
and  are trademarks of Sony Corporation.
http://www.sony.net
©2020 Sony Corporation
Printed in Thailand

Documents / Resources
References
Download manual
Here you can download full pdf version of manual, it may contain additional safety instructions, warranty information, FCC rules, etc.
Download Sony E-mount FE C 16-35mm T3.1 G - Interchangeable Lens Manual
Advertisement
Thank you! Your question has been received!


Need Assistance?
Do you have a question about the E-mount FE C 16-35mm T3.1 G that isn't answered in the manual? Leave your question here.