BLACK and DECKER RC503,RC503R - 3 Cup Rice Cooker Manual
- Use and care manual (28 pages) ,
- Use and care book manual (10 pages) ,
- Use and care manual (31 pages)
Advertisement
Thank you for your purchase!

Register online at www.prodprotect.com/applica

Rate and review your products at www.BlackAndDeckerAppliances.com

Share your pictures & stories with us online

Should you have any questions or concerns with your new product, please call our Customer Service Line at 1-800-231-9786 (US and Canada). Please do not return to the store.
WELCOME!
Congratulations on your purchase of the Black+Decker Rice Cooker. We have developed this use and care guide to ensure optimal performance and your satisfaction. Save this use and care book and register your appliance online at www.prodprotect.com/applica.
Please Read and Save this Use and Care Book.
IMPORTANT SAFEGUARDS
When using electrical appliances, basic safety precautions should always be followed to reduce the risk of fire, electric shock, and/or injury, including the following:
- Read all instructions.
- Do not touch hot surfaces. Use handles or knobs.
- To protect against electrical shock, do not immerse cord, plug or base unit in water or other liquid.
- Close supervision is necessary when any appliance is used by or near children.
- Do not operate appliance with a damaged cord or plug, or after the appliance malfunctions or has been damaged in any manner. Contact Consumer Support at the toll-free number listed in the warranty section.
- The use of accessory attachments not recommended by this appliance manufacturer may cause injuries.
- Do not use outdoors.
- Do not let cord hang over edge of table or counter, or touch hot surfaces.
- Do not place on or near a hot gas or electric burner, or in a heated oven.
- Extreme caution must be used when moving an appliance containing hot oil or other hot liquids.
- To disconnect, press the control switch upwards (the WARM indicator light will illuminate) and then remove the plug from the outlet.
- Do not use appliance for other than intended use.
- This appliance is not intended for use by persons (including children) with reduced physical, sensory or mental capabilities, or lack of experience and knowledge, unless they have been given supervision or instruction concerning use of the appliance by a person responsible for their safety.
- Unplug from outlet when not in use and before cleaning. Allow to cool before putting on or taking off parts.
- The appliance is not intended to be operated by means of an external timer or separate remote control system.
- Do not use this appliance on an unstable surface.
- Do not attempt to heat or cook nonfood items in this appliance.
- Children should be supervised to ensure that they do not play with the appliance.
-
Additional Safeguards:
- To prevent damage or shock hazard, do not cook directly in cooking base. Cook only in cooking bowl provided.
- This appliance generates heat and escaping steam during use. Lift off glass lid carefully to avoid scalding, and allow water to drip into cooking bowl.
- Never use the cooking bowl on a gas or electric cooktop or on an open flame.
- Do not cut foods directly in the cooking bowl to avoid scratching.
SAVE THESE INSTRUCTIONS.
This product is for household use only.
POLARIZED PLUG
This appliance has a polarized plug (one blade is wider than the other). To reduce the risk of electric shock, this plug is intended to fit into a polarized outlet only one way. If the plug does not fit fully into the outlet, reverse the plug. If it still does not fit, contact a qualified electrician. Do not attempt to modify the plug in any way.
TAMPER-RESISTANT SCREW
Warning: This appliance is equipped with a tamper-resistant screw to prevent removal of the outer cover. To reduce the risk of fire or electric shock, do not attempt to remove the outer cover. There are no user-serviceable parts inside. Repair should be done only by authorized service personnel. For service, repair or any questions regarding your appliance, please call our Customer Service Line at 1-800-231-9786 (US and Canada).
ELECTRICAL CORD
- A short power-supply cord is provided to reduce the risk resulting from becoming entangled in or tripping over a longer cord.
- Longer detachable power-supply cords or extension cords are available and may be used if care is exercised in their use.
- If a long detachable power-supply cord or extension cord is used:
- The marked electrical rating of the power cord or extension cord should be at least as great as the electrical rating of the appliance.
- The longer cord should be arranged so that it will not drape over the countertop or tabletop where it can be pulled on by children or tripped over unintentionally.
NOTE:
If the power cord is damaged, please contact the warranty department listed in these instructions.
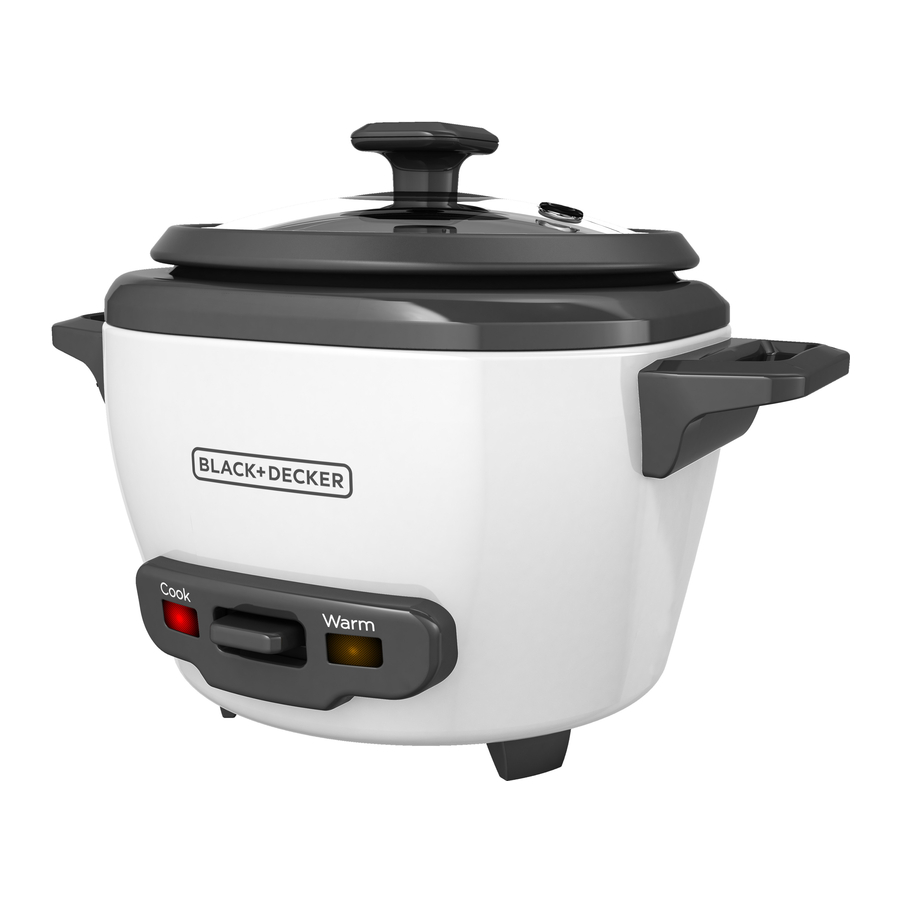
GETTING TO KNOW YOUR RICE COOKER

- Lid handle
- Tempered glass lid (Part# RC503-01)
- Cooking bowl (Part# RC503-02)
- Cool-touch side handles
- Rice measure (Part# RC514-04)
- Serving spoon (Part# RC514-05)
- Cooking base
- COOK indicator light
- CONTROL switch
- WARM indicator light
- Steam vent
- Lid hanger
GETTING STARTED
This appliance is intended for household use only.
- Remove all packing material, any stickers, and the plastic band around the power plug.
- Go to www.prodprotect.com/applica to register your product.
- Wash all removable parts as instructed in CARE AND CLEANING. Place the clean, dry cooking pot in the cooking base.
- Select a location where this unit is to be used. Place the unit on a stable, heat resistant surface, free from cloth, liquids and any other flammable materials. Ensure that the unit has enough space all the way around and above it to allow heat to flow without damage to cabinets or walls.
IMPORTANT INFORMATION ABOUT YOUR RICE COOKER
- It is not necessary to preheat the rice cooker before use.
- The cooking bowl gets hot. When in use, always use oven mitts or potholders when touching any outer or inner surface of the appliance.
- During the first few minutes of use you may notice smoke and a slight odor. This is caused by oil that may have been used during manufacturing of the unit and will not impact the performance.
- Do not try to stop the rice cooker from switching to the warm mode.
- As rice cooks, steam will escape through vent in lid. Place glass lid on the rice cooker so the steam vent is facing away from cabinets and walls. Do not place hand over steam vent while rice is cooking; the hot steam may burn.
- Use the plastic serving spoon (or a wooden spoon) to stir and remove rice. Do not use metal utensils that can scratch the nonstick cooking bowl.
- Do not fill the cooking bowl higher than highest water marking measurement.
OPERATING YOUR RICE COOKER
COOKING RICE
- Measure desired amount of rice with the provided measuring cup and add to the cooking bowl. The maximum amount of dry rice is 1 ½ rice cup measures.
NOTE:
When measuring uncooked rice; do not use a standard 1 cup (8 fluid oz.) measuring cup. A standard rice cup is ¾ cup (6 fluid oz.); the same size as the provided rice measuring cup. One rice cup measure of dry rice will yield 2 standard cups of cooked rice. - Rinse the rice with water to remove any excess starch and then drain.
- For white rice, fill the cooking bowl with water to the line that matches the number of rice cups being cooked. (A) Add butter, oil, or seasonings as desired. See cooking chart in the Helpful Hints section for additional details on water and rice measures for different types of rice.

- Place the cooking pot into the cooking base and then place the lid on the pot.
- Plug in the appliance; the warm indicator light will automatically illuminate. The appliance will start heating on warm as soon as the cord is plugged into the outlet.
- Push down the control switch. The cook indicator light will illuminate and the cooking will begin.
- When the rice is ready, the control switch will flip up and turn to warm.
- For best results, allow the rice to rest on warm for 15 minutes with the lid in place. This will help further steam the rice. Always stir the rice with the serving spoon before serving.
- Unplug the appliance when not in use and always allow the rice cooker to completely cool before cleaning.

COOKING SOUPS, STEWS, AND MORE
- Add ingredients into the cooking bowl.
- Place cooking bowl into the cooking base, then place the lid on the pot.
- Plug in the appliance; the warm indicator light will automatically illuminate. The appliance will start heating on warm as soon as the cord is plugged into the outlet.
- Push down the control switch. The cook indicator light will illuminate and the cooking will begin.
- If desired, set kitchen timer for cooking time. Manually switch the appliance to warm when the food is ready by pushing up the control switch.
NOTE:
The rice cooker will not switch to warm until all the liquids are boiled away. For best results, monitor cooking progress closely and do not leave the rice cooker unattended. - Unplug the appliance when not in use and always allow the rice cooker to completely cool before cleaning.
CLEANING AND CARE
This product contains no user serviceable parts. Refer service to qualified service personnel.
CLEANING

Never immerse cooking base in water or other liquids.
- Always unplug the rice cooker and allow to cool completely before cleaning.
- Wash cooking bowl and glass lid in warm, soapy water. If food sticks to the cooking bowl, fill with warm, soapy water and allow it to soak before cleaning with plastic scouring pad
NOTE:
Both the cooking bowl and glass lid are dishwasher safe.
- Rinse and dry thoroughly.
- Wipe interior and exterior of the cooking base with a soft, slightly damp cloth or sponge.
Never use abrasive cleansers or scouring pads to clean the cooking base, as they may damage the surfaces.
- If water accidentally gets into the switch area or onto the heating plate, allow the rice cooker to dry completely before using.
STORING
Make sure that the appliance is thoroughly cool and dry. Never wrap the cord tightly around the appliance; keep it loosely coiled. Placing the lid on upsidedown for storage can help save space.
HELPFUL HINTS AND TIPS
RICE TIPS
- If rice or other foods start to boil over, remove the lid and stir for a couple minutes. Leaving the lid off for a short period of time will allow some of the liquids to boil off and for the mixture to slightly cool. Place the lid back on the rice cooker and repeat if needed.
- Kosher salt has no impurities and dissolves faster than table salt. If using kosher salt, you may find you want to add a little more than if using table salt. About ¾ tsp. of kosher salt is recommended for each rice cup (6 fluid oz.) of uncooked rice.
- White rice can be stored in an airtight container in a cool dark place for up to one year.
- Brown rice can be stored in an airtight container in a cool dark place for up to six months. Refrigeration or freezing extends its shelf life.
- Try using broth, stock or reconstituted bouillon in place of water for additional flavor. If you do, no additional salt may be necessary.
- Do not keep small amounts of rice in the warm cycle for extended periods of time because it can dry out the rice.
- During cooking, a thin crust may develop on the rice at the bottom of the bowl. If you do not like rice with a crust, you can easily peel it off and discard it.
- Taste/hardness will vary depending on the quality/type of rice and length of time it is cooked. For softer, fluffier rice, add a little more water. For firmer, crunchier rice, use less water.
- For other types of grains not listed in the cooking chart, follow package directions
ADDITIONAL USES FOR YOUR RICE COOKER
Packaged foods: condensed and ready to serve soups, pastas, and stews
- Do not fill bowl above the largest water marking cup level on the cooking bowl.
- For even heating, stir occasionally.
- Always use a kitchen timer. Do not rely on the control switch on the cooker since it is not intended to be an indicator of cooking time for soups and stews.
- Use only boneless meats and poultry that are cut into cubes no larger than 1½ inches. It is not necessary to brown the meats before cooking.
- When cooking rice or pasta in the soup, add additional liquid in the recipe.
- Since most frozen vegetables cook very quickly, it is best to add them at the end of the cooking time. Stir them into the soup or stew and allow the mixture to cook an additional 5 to 10 minutes.
- Choose recipes that will cook in 1 hour or less.
Oatmeal or Hot Cereals
- Steel Cut Oats work best.
- Do not fill bowl more than half way with liquids, as the oatmeal will expand during the cooking process.
- For even heating, stir occasionally.
- When the oatmeal is done, the rice cooker will switch to warm. Please note that this is for well-done oatmeal. If you prefer a different consistency, monitor the cooking process to manually switch to warm for desired results.
- Choose recipes that will cook in 1 hour or less.
If desired, add seasonings and oil or butter with rice before adding water. Allow rice to rest on warm at least 15 minutes before serving.
| AMOUNT OF RICE | AMOUNT OF WATER |
APPROX. COOKING TIME |
YIELD (standard 8 oz. cups) |
| FOR WHITE LONG GRAIN, JASMINE, BASMATI, YELLOW, OR MEDIUM GRAIN RICE | |||
| ½ rice measure | to 0.5 mark | 18 to 23 minutes | 1 cup |
| 1 rice measure | to 1 mark | 19 to 24 minutes | 2 cups |
| 1 ½ rice measure | to 1.5 mark | 20 to 25 minutes | 3 cups |
| FOR BROWN RICE | |||
| ½ rice measure | 1 cup | 25 to 30 minutes | 1 cup |
| 1 rice measure | 1 ½ cups | 26 to 31 minutes | 2 cups |
For other types of grains not listed in the cooking chart, follow package directions.
TROUBLESHOOTING
| PROBLEM | POSSIBLE CAUSE | SOLUTION |
Some kernels of rice do not seem fully cooked |
|
|
Rice cooking bowl is not as clean as I would like. |
|
|
Rice boils over. |
|
|
Rice is too dry. |
|
|
Rice is gummy. |
|
|
If additional assistance is needed, please contact our consumer service team at 1-800-231-9786.
WARRANTY INFORMATION
For service, repair or any questions regarding your appliance, call the appropriate 800 number listed within this section. Please DO NOT return the product to the place of purchase. Also, please DO NOT mail product back to manufacturer, nor bring it to a service center. You may also want to consult the website listed on the cover of this manual.
Two-Year Limited Warranty
(Applies only in the United States and Canada)
What does it cover?
- Any defect in material or workmanship provided; however, Spectrum Brands, Inc.'s liability will not exceed the purchase price of product.
For how long?
- Two years from the date of original purchase with proof of purchase.
What will we do to help you?
- Provide you with a reasonably similar replacement product that is either new or factory refurbished.
How do you get service?
- Save your receipt as proof of date of sale.
- Visit the online service website at www.prodprotect.com/applica, or call toll-free 1-800-231-9786, for general warranty service.
- If you need parts or accessories, please call 1-800-738-0245.
What does your warranty not cover?
- Damage from commercial use
- Damage from misuse, abuse or neglect
- Products that have been modified in any way
- Products used or serviced outside the country of purchase
- Glass parts and other accessory items that are packed with the unit
- Shipping and handling costs associated with the replacement of the unit
- Consequential or incidental damages (Please note, however, that some states do not allow the exclusion or limitation of consequential or incidental damages, so this limitation may not apply to you.)
How does state law relate to this warranty?
- This warranty gives you specific legal rights. You may also have other rights that vary from state to state or province to province.
www.BlackAndDeckerAppliances.com
RC503 200 W 120 V ~ 60 Hz
RC503R 200 W 120 V ~ 60 Hz
BLACK+DECKER and the BLACK+DECKER Logo are registered trademarks of The Black & Decker Corporation, or one of its affiliates, and used under license.
Imported by:
RAYOVAC ARGENTINA S.R.L.
Humboldt 2495 Piso# 3
(C1425FUG) C.A.B.A. Argentina.
C.U.I.T No. 30-70706168-1

Videos3 Cup Rice Cooker Review Video
Documents / ResourcesDownload manual
Here you can download full pdf version of manual, it may contain additional safety instructions, warranty information, FCC rules, etc.
Download BLACK and DECKER RC503,RC503R - 3 Cup Rice Cooker Manual
Advertisement
Thank you! Your question has been received!


Need Assistance?
Do you have a question about the RC503 that isn't answered in the manual? Leave your question here.