Table of Contents
Advertisement
Available languages
Available languages
Quick Links
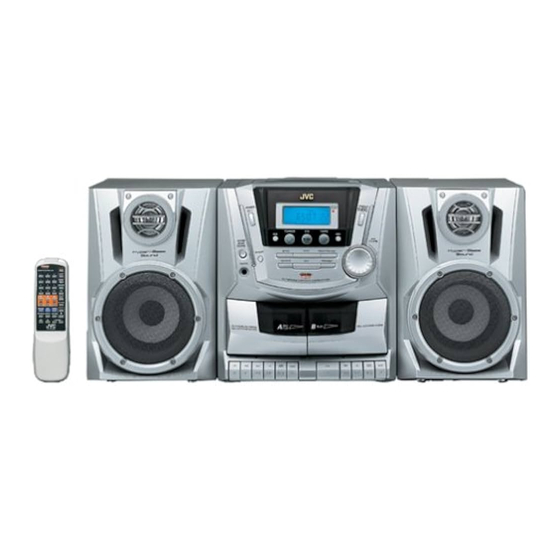
CD PORTABLE COMPONENT SYSTEM
CHAINE PORTABLE A LECTEUR CD
PC-X270
Consists of CA-PCX270 and SP-PCX270.
Composé du CA-PCX270 et SP-PCX270.
SP-PCX270
CA-PCX270
7
INSTRUCTIONS
MANUEL D'INSTRUCTIONS
SP-PCX270
POWER
1
2
3
4
5
6
7
8
9
0
+10
TUNER
TAPE
CD
PRESET/
PROGRAM
INTRO
REPEAT
FM MODE
RANDOM
HBS
EQ
VOL
For Customer Use:
Enter below the Model No. and Serial
No. which are located either on the rear,
bottom or side of the cabinet. Retain this
information for future reference.
Model No.
Serial No.
601-270000-021
LVT1093-002B
[C]
Advertisement
Chapters
Table of Contents

Related Manuals for JVC PC-X270


Summary of Contents for JVC PC-X270
- Page 1 CD PORTABLE COMPONENT SYSTEM CHAINE PORTABLE A LECTEUR CD PC-X270 Consists of CA-PCX270 and SP-PCX270. Composé du CA-PCX270 et SP-PCX270. SP-PCX270 SP-PCX270 CA-PCX270 POWER TUNER TAPE PRESET/ PROGRAM INTRO REPEAT FM MODE RANDOM INSTRUCTIONS For Customer Use: Enter below the Model No. and Serial MANUEL D’INSTRUCTIONS...
- Page 2 Warnings, Cautions and Others Mises en garde, précautions et indications diverses CAUTION CAUTION To reduce the risk of electrical shocks, fire, etc.: 1. Do not remove screws, covers or cabinet. RISK OF ELECTRIC SHOCK DO NOT OPEN 2. Do not expose this appliance to rain or moisture. CAUTION: TO REDUCE THE RISK OF ELECTRIC SHOCK, ATTENTION...
- Page 3 Introduction We would like to thank you for purchasing one of our JVC products. Before operating this unit, read this manual carefully and thoroughly to obtain the best possible performance from your unit, and retain this manual for future reference.
-
Page 4: Table Of Contents
Contents Location of the Buttons and Controls ....... 3 Front Panel ..............3 Remote Control ............5 Getting Started ............6 Unpacking ..............6 Putting the Batteries into the Remote Control ... 6 Connecting Speakers ..........6 Connecting Other Equipment ........7 Power Supply ............. -
Page 5: Location Of The Buttons And Controls
Location of the Buttons and Controls Become familiar with the buttons and controls on your unit. Front Panel – 3 –... - Page 6 Continued Display Window PROGRAM REPEAT RANDOM INTRO TAPE AUX CH TRACK MONO JAZZ CLASSIC STEREO FLAT ROCK Display window See pages in the parentheses for details. 1 CD play mode indicators Front Panel • PROGRAM, REPEAT, RANDOM and INTRO 1 Display window indicators 2 POWER 2 Main display...
-
Page 7: Remote Control
Remote Control Remote Control 1 POWER button (8) 2 Number buttons (10 – 12) 3 TUNER button (10) 4 TAPE button (14, 16) 5 4/¢ buttons (8, 10 – 12) 6 PRESET/REPEAT button (10, 13) POWER 7 FM MODE button (10) 8 HBS (HYPER BASS SOUND) button (9) 9 EQ (Equalizer) button (9) p CD 3¥8 button (11 –... -
Page 8: Getting Started
Getting Started Continued Unpacking Connecting Speakers After unpacking, check to be sure that you have all the Insert the L (left) and R (right) speaker cords into the following items. corresponding speaker terminals on the back of the unit. The number in the parentheses indicates the quantity of the pieces supplied. -
Page 9: Connecting Other Equipment
Use the System in a car properly You can connect an audio equipment — used only as a • Be sure to use the specified car adapter (JVC model CA-R120) to playback device. prevent mishaps or damage resulting from different polarity When you connect and use this equipment, refer also to its design. -
Page 10: Common Operations
Common Operations Turning On or Off the Power Selecting the Sources To turn on the unit, press POWER To listen to the FM/AM broadcasts, press TUNER. (See page 10.) To play back CD, press CD 3¥8. (See pages 11 – 13.) To turn off the unit (on standby), press POWER again. -
Page 11: Reinforcing The Bass Sound
Reinforcing the Bass Sound Ensuring Good FM and AM Reception The Hyper Bass Sound function provided for this unit can FM reception: Pull out the antenna and reorient it for better enhance the bass sound and reduce the bass sound distortion reception. -
Page 12: Listening To Fm And Am Broadcasts
Listening to FM and AM Broadcasts Tuning in a Station Press PROGRAM/SET. Press TUNER. The unit automatically tunes in the previously tuned station (either FM or AM). Press PRESET/REPEAT • Each time you press the button, the band alternates between FM and AM. to select a preset number. -
Page 13: Playing Back Cd
Playing Back CD Basic CD Operations This unit has been designed to play back the following CDs: Audio CD, CD-R, and CD-RW. While playing a CD, you can do the following operations. Continued use of irregular shape CDs (heart-shape, octagonal, etc.) can damage the unit. -
Page 14: Programming The Playing Order Of The Tracks - Program Play
Continued To stop during play, press STOP 7. Programming the Playing Order of the Tracks — Program Play To exit from Program play mode, press STOP 7 before or after play so that the unit enters another play mode. (The You can arrange the order in which the tracks play before you program you have made is stored in memory until you erase start playing. -
Page 15: Playing At Random - Random Play
Playing at Random — Random Play To cancel Repeat play, press PRESET/REPEAT repeatedly until the REPEAT indicator goes off from the display. The tracks of loaded CD will play at random. • To use Repeat play for Random play, press PRESET/ Playing Introductions —... -
Page 16: Playing Back Tapes
Playing Back Tapes To play the tapes in B and A cassette decks You can play back only type I (Normal) tapes. continuously Playing Back a Tape Set the cassette tapes in A and B decks. • If the tape direction is set wrong, remove the cassette. Press STOP/EJECT 7/0 for the deck you want to use. -
Page 17: Recording
Recording IMPORTANT: Recording a Tape on Deck A • It should be noted that it may be unlawful to re-record On the unit ONLY: pre-recorded tapes, records, or discs without the consent of the owner of copyright in the sound or video Press STOP/EJECT 7/0 for the deck A. -
Page 18: Dubbing Tapes
To record an AM station — Beat Cancel CD Direct Recording While recording an AM broadcast, beats may be heard Everything on the CD goes onto the tape in the order it is on (which are never heard when listening to the broadcast the CD, or according to the order you have made for Program without recording it). -
Page 19: Maintenance
Maintenance To get the best performance of the unit, keep your discs, tapes, and mechanism clean. Handling cassette tapes Handling discs • If the tape is loose in its cassette, take • Remove the disc from its case by up the slack by inserting a pencil in holding it at the edge while pressing the one of the reels and rotating. -
Page 20: Troubleshooting
Troubleshooting If you are having a problem with your unit, check this list for a possible solution before calling for service. If you cannot solve the problem from the hints given here, or the unit has been physically damaged, call a qualified person, such as your dealer, for service. - Page 21 Introduction Nous vous remercions d’avoir acheté un de nos produits JVC. Avant d’utiliser cet appareil, veuillez lire attentivement et entièrement ce mode d’emploi afin d’obtenir les meilleures performances possibles de cet appareil, puis conservez ce manuel à titre de référence.
- Page 22 Table des matières Emplacement des touches et des commandes ..3 Panneau avant ............. 3 Télécommande ............5 Pour commencer ............6 Déballage ..............6 Mise en place des piles dans la télécommande ..6 Connexion des enceintes ..........6 Connexion d’un autre appareil ........
-
Page 23: Emplacement Des Touches Et Des Commandes
Emplacement des touches et des commandes Familiarisez-vous avec les touches et les réglages de votre appareil. Panneau avant – 3 –... - Page 24 À suivre Fenêtre d’affichage PROGRAM REPEAT RANDOM INTRO TAPE AUX CH TRACK MONO STEREO FLAT JAZZ CLASSIC ROCK Référez-vous aux pages entre parenthèses pour plus de détails. Fenêtre d’affichage 1 Indicateur de mode de fonctionnement du lecteur CD Panneau avant •...
-
Page 25: Télécommande
Télécommande Télécommande 1 Touche POWER (8) 2 Touches numériques (10 – 12) 3 Touche TUNER (10) 4 Touche TAPE (14, 16) 5 Touches 4/¢ (8, 10 – 12) 6 Touche PRESET/REPEAT (10, 13) 7 Touche FM MODE (10) POWER 8 Touche HBS (HYPER BASS SOUND) (9) 9 Touche EQ (Égaliseur) (9) p Touche CD 3¥8 (11 –... -
Page 26: Pour Commencer
Pour commencer À suivre Déballage Connexion des enceintes Après le déballage, vérifiez que tous les éléments suivants Insérez les cordons d’enceinte L (gauche) et R (droit) dans les sont présents. prises d’enceintes correspondantes à l’arrière de l’appareil. Le nombre entre parenthèses indique la quantité de pièces fournie. -
Page 27: Connexion D'un Autre Appareil
• Assurez-vous d’utiliser l’adaptateur pour voiture spécifié (modèle uniquement comme un appareil de lecture. CA-R120 de JVC) pour éviter tout problème de branchement ou tout Pour la connexion et l’utilisation de cet appareil audio, dommage pouvant résulter d’un agencement différent des polarités. -
Page 28: Fonctionnement Commun
Fonctionnement commun Mise sous ou hors tension de l’appareil Sélection de la source Pour mettre l’appareil sous tension, appuyez Pour écouter des émissions FM/AM, appuyez sur TUNER. sur POWER (Voir page 10.) Pour la lecture d’un CD, appuyez sur CD 3¥8. (Voir pages Pour mettre l’appareil hors tension (attente), 11 –... -
Page 29: Renforcement Des Graves
Renforcement des graves Pour obtenir une bonne réception FM et AM La fonction HYPER BASS SOUND de cet appareil renforce Réception FM:Tirez l’antenne et réorientez-la pour obtenir les sons graves et réduit la distorsion des graves lors de une meilleure réception. l’écoute d’une source à... -
Page 30: Écoute D'une Station Fm Ou Am
Écoute d’une station FM ou AM Accord d’une station Appuyez sur PROGRAM/ SET. Appuyez sur TUNER. L’appareil accorde automatiquement la dernière station écoutée (FM ou AM). • Chaque fois que vous appuyez sur la touche, la bande alterne entre FM et AM. Appuyez sur PRESET/ REPEAT pour choisir un Démarrez la recherche des stations. -
Page 31: Lecture D'un Cd
Lecture d’un CD Fonctionnement de base du lecteur CD Cet a été conçu pour reproduire les CD suivants: CD audio, CD-R et CD-RW. Lors de la lecture d’un CD, vous pouvez réaliser les Une utilisation prolongée de CD à forme irrégulière (en cœur, opérations suivantes. -
Page 32: Programmation De L'ordre De Lecture Des Plages - Lecture Programmée
À suivre Pour arrêter la lecture en cours, appuyez sur STOP 7. Programmation de l’ordre de lecture des plages — Lecture programmée Pour quitter le mode de lecture programmée, appuyez sur STOP 7 avant ou après la lecture de façon que l’appareil Vous pouvez arranger l’ordre dans lequel vous souhaitez entre dans un autre mode de lecture. -
Page 33: Lecture Dans Un Ordre Aléatoire - Lecture Aléatoire
Lecture dans un ordre aléatoire — Lecture Pour annuler la lecture répétée, appuyez répétitivement sur PRESET/REPEAT jusqu’à ce que l’indicateur REPEAT aléatoire s’éteigne de l’affichage. Les plages du CD choisi sont reproduites aléatoirement. • Pour utiliser la lecture répétée pour la lecture aléatoire, appuyez Lecture des introductions des plages —... -
Page 34: Lecture D'une Cassette
Lecture d’une cassette Pour reproduire de façon continue les cassettes des Vous ne pouvez reproduire que des cassettes de type I platines B et A. (Normal). Placez des cassettes dans les platines A et B. Lecture d’une cassette • Si la direction de la bande est mal réglée, retirez la cassette. -
Page 35: Enregistrement
Enregistrement IMPORTANT Enregistrement d’une cassette sur la platine A • Notez qu’il peut être illégal de copier des cassettes Sur l’appareil UNIQUEMENT: préenregistrées, des disques ou des CD sans le consentement du propriétaire des droits d’auteur, dans Appuyez sur STOP/EJECT 7/0 pour la un enregistrement audio ou vidéo, une émission radio platine A. -
Page 36: Copie De Cassettes
Pour enregistrer une station AM — Annulation des Enregistrement direct de CD battements Tout le contenu du CD est enregistré sur la cassette dans Pendant l’enregistrement d’une émission AM, des battements l’ordre dans lequel il se trouve sur le CD, ou en fonction du peuvent être entendus (alors que vous ne les entendez pas programme que vous avez fait pour la lecture programmée. -
Page 37: Entretien
Entretien Pour obtenir les meilleures performances de votre appareil, gardez propre vos disques, cassettes et le mécanisme. Manipulation des cassettes Manipulation des disques • Si la bande est lâche dans la cassette, • Retirez les disques de leur boîte en les retirez le mou en insérant un stylo tenant par les côtés et en appuyant dans une des bobines et en tournant. -
Page 38: Guide De Dépannage
Guide de dépannage Si vous des problèmes avec votre appareil, cherchez d’abord une solution dans cette liste avant d’appeler un réparateur. Si vous ne pouvez pas résoudre le problème avec les conseils donnés ici, ou si l’appareil est physiquement endommagé, appelez une personne qualifiée, telle que votre revendeur, pour faire réparer l’appareil. - Page 39 VICTOR COMPANY OF JAPAN, LIMITED EN, FR 0503TMMMDWMTS © 2003 VICTOR COMPANY OF JAPAN, LIMITED...
Need help?
Do you have a question about the PC-X270 and is the answer not in the manual?
Questions and answers