Table of Contents
Advertisement
Quick Links
Farmer Invented. Farmer Tested. Farmer Proven.
®
RESIDUE MANAGEMENT UPGRADE KIT
INSTALLATION MANUAL
CASE-IH* 3000 & NEW HOLLAND* 98D SERIES
CORN HEADS
www.CalmerCornHeads.com
Weekdays 8-5 p.m. - Office (309) 629-9000
After Hours/Weekends - Marion's Cell (309) 368-1182
*Trademarks are not owned by, affiliated with, or under license to Calmer Corn Heads, Inc.
and used solely for the utility of Calmer Corn Head products mentioned herein.
Advertisement
Table of Contents

Related Manuals for Calmer BT Chopper Upgrade Kit

Summary of Contents for Calmer BT Chopper Upgrade Kit
- Page 1 Weekdays 8-5 p.m. - Office (309) 629-9000 After Hours/Weekends - Marion’s Cell (309) 368-1182 *Trademarks are not owned by, affiliated with, or under license to Calmer Corn Heads, Inc. and used solely for the utility of Calmer Corn Head products mentioned herein.
-
Page 2: Table Of Contents
Components List Step 1 – Disassembly of Current Components Step 2 – Replacing Stalk Roll Drive Coupler Step 3 – Modifying Stalk Rolls Step 4 – Installing Calmer BT Chopper ® Stalk Rolls Step 5 – Installing/Adjusting Calmer Stripper Plates Step 6 –... -
Page 3: Introduction
WARRANTY Calmer Corn Heads, Inc. has been in business since 2004 and has an excellent reputation for quality and workmanship. Please contact us (the manufacturer) if you feel a component has not lasted to your expectation. -
Page 4: Before Operation
THIS SYMBOL MEANS: ATTENTION! BECOME ALERT! YOUR SAFETY IS INVOLVED! Note the use of the signal words DANGER, WARNING and CAUTION with the safety messages. The appropriate signal word for each has been selected using the following guidelines: DANGER: Indicates an imminently hazardous situation that, if not avoided, will result in death or serious injury. -
Page 5: Components List
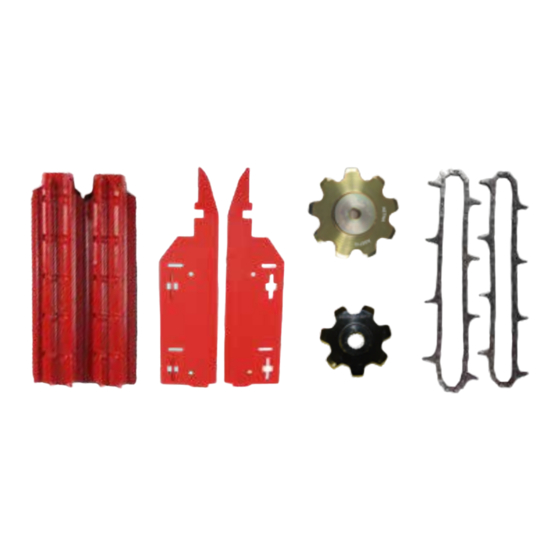
THE COMPLETE CALMER RESIDUE MANAGEMENT DELUXE UPGRADE KIT INCLUDES PER ROW: Your reference for Right and Left is as you are sitting in the combine cab looking at the corn. Case-IH 3000/New Holland 98d Upgrade Kit (2) BT Chopper Stalk Rolls (2) 9-Tooth Idler Sprockets ®... -
Page 6: Step 1 - Disassembly Of Current Components
Disassembly of Current Components STEP 1 DANGER: Ensure the corn head is secured properly, combine lift cylinder stops are in place, equipment is turned-off, and the parking brake is engaged before attempting any adjustments. Be sure to follow all manufacturer’s safety procedures when setting-up and working on the corn head. -
Page 7: Step 2 - Replacing Stalk Roll Drive Coupler
Replacing Stalk Roll Drive Coupler STEP 2 1. Remove bearing support bolts. See below. 2. Slide stalk roll shaft away from gearbox to remove shaft. 3. Remove stalk roll drive coupler. 4. Install new coupler. 5. Install roll pins to attach drive coupler to stalk roll shaft. 6. -
Page 8: Step 3 - Modifying Stalk Rolls
Modifying Stalk Roll Spirals STEP 3 1. To ensure cornstalks flow easily with Calmer BT Chopper’s “open-window” design, modify the ® spiral by removing (2) short sections of the helicoid on each stalk roll. This step is strongly suggested. BEFORE AFTER 2. -
Page 9: Step 4 - Installing Calmer Bt Chopper Stalk Rolls
STEP 4 Rolls are marked on the left (L) and right (R) spirals and must be installed as a set, from the same box, as packaged from Calmer Corn Heads. Important: Stalk rolls are to be installed from your perspective while sitting in the combine cab, looking at the corn head. - Page 10 1. Remove and discard 4 shipping bolts from each roll. Do not reuse these bolts! 2. From the top of the corn head, install 1 left half shell on the left stalk roll shaft and 1 right half shell on the right stalk roll shaft. Note: If persuasion is necessary, tap the rolls only between the blades and bolts over the bosses as shown using a suitable punch.
- Page 11 9. Ensure the shells are against the spiral, then torque the bolts to 55 ft. lbs., alternating from top to bottom of the corn head and middle to ends of the stalk rolls in order, as shown. *Tightening order: 1A, 1B, 2A, 2B, 3A, 3B, 4A, 4B, 5A, 5B TOP OF ROW UNIT BOTTOM OF ROW UNIT Weed knives for 30 corn heads can be set to 1/8”...
-
Page 12: Step 5 - Installing/Adjusting Calmer Stripper Plates
Installing/Adjusting Calmer Stripper Plates STEP 5 1. Install Calmer transition plate. OEM transition plate can no longer be used! CALMER TRANSITION PLATE 2. Install Calmer Stripper Plates Recommended Stripper Plate Adjustments: Begin with normal settings of 1 1/8” gap at the front and 1 3/16”... -
Page 13: Step 6 - Installing 7-Tooth Drive And 9-Tooth Idler
Idler Sprockets and Gathering Chains 1. Inspect chain guides & idler blocks for wear. Important: You must use stainless steel washers with Calmer’s 9-Tooth Idler. Some modification may be required when installing. (See below) 2. Disassemble the old idler sprocket. - Page 14 4. Reassemble the 9-tooth idler sprocket by inserting the plow bolt through the idler strap. Teeth beveled on 3 sides face up 5. Reinstall factory washer on plow bolt then 6. Install the 9-tooth idler sprocket with the teeth beveled on 3 sides facing up. install 2 stainless-steel washers (provided), below the sprocket.
- Page 15 Adding plastic paddles will also help in harvesting down corn. (See page 16) These oversized down corn plastic gathering chain paddles are available for purchase from Calmer Corn Heads. 13. Reinstall bolt and washer into top of gathering shaft to secure 7-tooth sprocket.
-
Page 16: Helpful Corn Head Settings And Adjustments
A properly adjusted corn head angle is critical to its performance. For optimum performance and to retain Calmer’s warranty on parts, the corn head angle MUST be set between 23-25 degrees in standing corn and 20 degrees in down/lodged corn. - Page 17 Reducing Ear Toss: 1. For minimal ear toss, the feeder house chain must be running at maximum speed. Adjust the corn head speed to conditions in the transmission or in the oil bath. 2. Cross auger should be horizontally adjusted rearward, as close to the feeder house chain and rear stripper/stripping tunnel as possible.
-
Page 18: Installing Calmer's Down Corn Plastic Gathering Chain Paddles
INSTALLING CALMER’S DOWN CORN PLASTIC GATHERING CHAIN PADDLES Follow the instructions for assembly of plastic gathering chain paddles and attach to every other lug on each gathering chain. (One orange paddle is used on the row left of the feeder house in front on the buddy seat for calibrating corn head speeds.) -
Page 19: Maintenance Record
MAINTENANCE RECORD ____________________________________________________ ____________________________________________________ ____________________________________________________ ____________________________________________________ ____________________________________________________ ____________________________________________________ ____________________________________________________ ____________________________________________________ ____________________________________________________ ____________________________________________________ ____________________________________________________ ____________________________________________________ ____________________________________________________ ____________________________________________________ ____________________________________________________ ____________________________________________________ ____________________________________________________ ____________________________________________________ ____________________________________________________ ____________________________________________________ ____________________________________________________ ____________________________________________________ ____________________________________________________ ____________________________________________________ ____________________________________________________ ____________________________________________________ ____________________________________________________ (309) 629-9000... - Page 20 What this means is that if the part breaks within the first season of use, we will replace the part with a new one without charge to you. Calmer pays for the shipping both ways as well. In the alternative, if you wish, we will refund to you all of the money you paid to Calmer for the part.