
Summary of Contents for Campden instruments 7000smz
- Page 1 www.campdeninstruments.com INSTRUCTION MANUAL Vibrating Blade Tissue Slicer NOVEMBER 2019 DCN 2389 Document Ref: 7000-v2.4 Eng...
-
Page 2: Table Of Contents
All rights reserved. The information contained in this manual is the property and copyright of Campden Instruments Limited. Except where explicitly stated, no part of this manual may be reproduced in any form or by any means (including photocopying or storing in any medium by... -
Page 3: Introduction
Experienced users of oscillating microtomes will no doubt be aware that large amplitudes and/or high oscillation frequencies can lead to excessive vibration and unstable tissue fluid. The 7000smz instrument benefits in this area by being built on a heavy, rigid cast base giving exceptional immunity to secondary vibration transmission. -
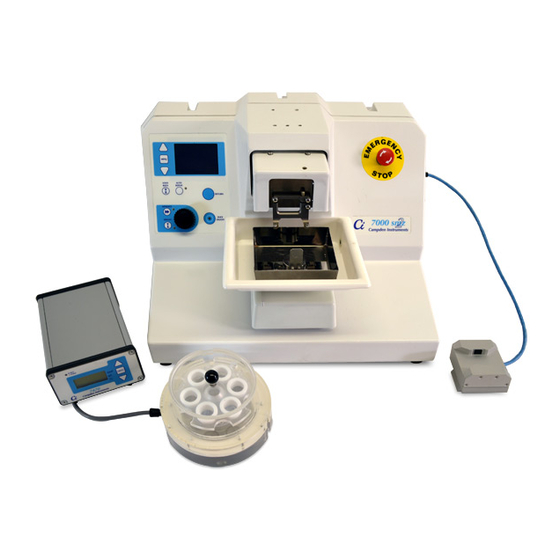
Page 4: Description Of The Instrument
Description of the instruments The 7000smz instrument features a removable cutting head mounted on a deep section parallel leaf spring assembly giving exceptional resistance to vertical (z axis) deflections and motion errors. Blade motion is by non-contact magnetic attraction giving a high degree of immunity from out-of-plane forces whilst allowing variable oscillation rates. - Page 5 The stereoscopic microscope, with magnification factors of between 10 and 40x allows close observation of the cutting procedure. 7000smz example with a stereoscopic microscope The light source incorporates focusable LEDs and allows concentrated, cold illumination to be directed selectively at the specimen being processed.
- Page 6 A lower power (2x) magnifying lens assembly can be fitted as an alternative to the microscope. 7000smz fitted with magnifying glass and cold light source...
-
Page 7: Microtome Blades
Further details are shown in Section 6.8 Fitting blades. The 7000smz instrument is supplied with fixed angle titanium blade holders suitable for the 7550-1-SS stainless steel and 7550-1-C ceramic blades. -
Page 8: Cleaning, Sterilizing And Autoclaving
Cleaning, Sterilizing and Autoclaving The blade holder can be fitted to or removed from the vibrating head using the Pozidriv screwdriver supplied. The blade holder may be autoclaved by normal methods. Replacement blade holders are available as spares should the original items be lost or damaged. -
Page 9: Installation
Installation The unit should be placed on a sturdy bench. Although the unit has a very high static mass to vibrating mass ratio and absorbent rubber feet, a rigid support bench will enhance immunity from secondary vibration transmission. If any accessories – microscope/magnifier attachment or light source - have been supplied with the instrument, reference should be made to the appropriate section of this manual for the fitting and setting up procedure. -
Page 10: Operation
Operation Edit an existing user name or registering a new user name When the instrument is switched on the display will be as shown, showing any personalised user slots. This screen can also be accessed from the main menu. Use the keys to scroll to the desired user name or to an unused position. - Page 11 position). Continue until the new user Press the MENU key - this will name is acceptable. highlight the new name. Use the keys to scroll to the line ‘CHANGE’ Press MENU to confirm the change. changes oscillating frequency, amplitude section thickness will be remembered under that user name so that when that user comes back to the instrument and...
- Page 12 Change the operating parameters: Frequency Amplitude Section thickness Press the MENU key to display the basic menu screen as shown: Use the keys to scroll to the desired parameter: Frequency – amplitude - section Press the MENU key to select that parameter and highlight the value.
- Page 13 Load or Unload the specimen bath Press the ‘LOAD BATH’ key (and hold for 2 seconds) and the display will change to that shown. The bath table will be moved to its lowest position to allow a specimen bath to be loaded (or an existing one removed).
- Page 14 Manual Operation When the instrument is first switched on, scroll to the desired user name and press MENU. All cutting parameters associated with that user will be recalled. If desired, make any changes as described in Section 6.2 and scroll to the ‘EXIT MENU’...
- Page 15 to raise the table by this amount. Press the ‘HEIGHT’ key. Press the ‘SLICE’ key to lower the Press the ‘LOAD BATH’ key to quickly table by this amount. Press the ‘AUTO REPEAT’ key to raise the table. Press again to stop. Press the ‘ADVANCE’...
- Page 16 Press the ‘SLICE ON/OFF’ key to ‘SLICE commence cut. ON/OFF’ key will now change to a red illumination. Use the rotary knob to control the advance speed as the blade moves through the tissue. (Note that, if desired, the advance speed can be reduced past zero and the cutting head moved in reverse).
- Page 17 Automatic operation – Slice Window Mode Once a cut has been taken as described in the manual slice procedure, the start point and end point of that slice operation is stored in memory. In slice window mode the user can slice between these points and the unit will automatically stop at the end point.
- Page 18 Automatic operation – Profile Repeat Mode Once a cut has been taken as described manual slice procedure, the speed profile of that cut is stored in memory and the instrument is able to repeat that profile under automatic conditions. All that is further required is for the number of sections to be entered.
- Page 19 The automatic slicing process may be halted prematurely by pressing the ‘SLICE ON/OFF’ key in which case the display will change to that shown. Follow the instructions on screen to CONTINUE or ABORT the procedure. Pressing ‘MENU’ at this stage will allow access menu...
- Page 20 Recovery from an Emergency Stop If the instrument has been halted by use of the Emergency Stop facility it must be reset before operations can continue: Twist the red Emergency Stop button clockwise to unlatch it. When the button is unlatched the instrument will revert to initial user select screen.
- Page 21 When fitting or removing blades, care must be taken as the blades supplied by Campden Instruments are very sharp. Always use the blade holding tool supplied. The blade tool has been designed so that the blade may be safely handled without the effective cutting length of the blade edge being exposed to possible damage or injuring the operator.
- Page 22 The blade should be fitted by loosening the two screws on the arms of the holder and sliding the blade under each washer and pushing it firmly back against the rear stops. The screws should not be over-tightened. See the illustration above. Note that the left hand screw has a left hand thread and should be turned counter- clockwise to tighten it.
- Page 23 Alignment of the blade with the axis of oscillation. The mechanism of the slicer controls the lateral oscillation of the blade within very fine tolerances. Owing to manufacturing variations and tolerances in blades, blade holder, etc., and inconsistencies in mounting the blade in its holder, the blade edge should be aligned with the lateral motion to ensure the best possible cut with least damage to the tissue.
- Page 24 When the ‘Opti-Cal’ calibration device is plugged into the instrument its presence will automatically be detected and it will take control of the amplitude and frequency settings, adjusting them to a magnitude that allows best adjustment of the blade alignment error. The alignment process also automatically moves the blade so that the cutting edge is in its optimal position relative to the calibration device for best alignment evaluation.
- Page 25 You must now choose which type of blade you want to calibrate. Scroll to the appropriate blade using the keys and press ‘MENU’ to select. ‘SLICE’ Press continue. instrument will now re-position the blade with respect to the alignment device ready for adjustment. The display will now change to that shown on the left.
- Page 26 Correct any problems and press ‘SLICE’ to retry.
- Page 27 6.10 Settings From the basic menu screen use the keys to scroll to the line ‘SETTINGS’ and press the MENU key. 1) The display screen may be adjusted for brightness and contrast to suit local conditions. Use the keys to scroll to line required and press the MENU key.
-
Page 28: Options
Options Light Source CL200 (optional) The 7000smz Instrument may be (optionally) supplied with an LED cold light source. The light source should be fixed to either the top of the covers of the instrument or (if you have the optional magnifier) to the mounting bracket for the magnifier. If the light... - Page 29 Magnifier (optional) The 7000smz Instrument may be (optionally) supplied with a low power magnifier (2x magnification). When fitting the magnifier, place the neoprene cushioning pad (supplied) between the magnifier mount and the instrument cover. The magnifier should then be fixed to the top of the instrument cover using the screws provided.
- Page 30 The Campden CL200 cold light source (see above) can be fitted directly to the top of the 7000smz-2 independently of the microscope. For ease of access you should fit the light source before fitting the microscope.
-
Page 31: Maintenance And Service
When the equipment has been in service for a number of years it may be advisable to have a comprehensive service, Campden Instruments or its local agents will be pleased to advise on this and we operate a fast turn around on equipment returned for service or repair. - Page 32 DECLARATION – I declare that the information given above is true and complete to the best of my knowledge and belief, and that I have taken all reasonable steps to ensure its accuracy. If there is any subsequent outbreak of an infectious agent in my laboratory I will inform Campden Instruments immediately.
-
Page 33: Technical Support
Technical support techsupport@campdeninstruments.com Should you have experience any problems with the instrument Campden Instruments has a Technical Support facility. Before you contact Technical Support it would be helpful to have the following information available so that your enquiry may be dealt with more efficiently. - Page 34 Code 3: Advance limit switch fault. If the error occurs repeatedly during normal use contact Technical Support for advice. Code 4: Table limit switch fault. Both limit switches flagged. Contact Technical Support for advice. Code 5: Advance drive overload. If the blade has collided with an obstruction, restart the instrument and carefully drive the blade away from the obstruction.
-
Page 36: Packing List
Packing List 7000smz Tissue slicer 1 off Blade holder 1 off (for 7550-1-SS & 7550-1-C blades) Blade guard 1 off Mains lead 1 off Tissue bath assembly 1 off Outer bath assembly 1 off Specimen holder 1 off Opti-Cal - optical Calibration unit... -
Page 37: Spare Parts And Accessories
Tissue bath assemblies Complete tissue bath assembly (inner bath + outer bath) 7000-3-1 For 7000smz prior to serial number 7000smz-078 and 5000mz prior to s/n 5000mz-1004 7000-3-1A For 7000smz serial number 7000smz-078 onwards and 5000mz s/n 5000mz-1004 onwards Inner tissue bath assembly... -
Page 38: Specifications
Maximum: +4.0 mm/sec (+1.00 during slicing) Cutting head retraction speed 4.0 mm/sec Maximum travel of cutting head 37 mm (nominal) Blade oscillation frequency 7000smz Minimum: 50 Hz Maximum: 120 Hz (amplitude dependent) Frequency step size 5 Hz Blade oscillation amplitude... - Page 39 EC DECLARATION OF CONFORMITY Name and address of Manufacturer: Campden Instruments Limited PO BOX 8148 Loughborough LE12 7XT Description of Instrument: OSCILLATING BLADE MICROTOME 7000smz-2 Model Type/Number: The instrument specified above complies with the relevant health and safety requirements of the following: 1.