
Related Manuals for Buffalo DriveStation Duo HD-WH4TU3R1


Summary of Contents for Buffalo DriveStation Duo HD-WH4TU3R1
- Page 1 DriveStation External Hard Drive HD-WHU3R1 HD-QHU3R5 User Manual Americas: www.buffaloamericas.com Europe: www.buffalo-technology.com 35020424-02 2016.01...
-
Page 2: Table Of Contents
Contents Overview .................3 Diagrams ...................3 Power On/Off ..................4 Specifications ..............6 Technical Specifications ..............6 HD-WHU3R1 ....................6 HD-QHU3R5 ....................6 Recommended Usage ..............7 Dismounting the DriveStation ............8 Windows ..................... 8 Mac ......................8 Troubleshooting ................9 I cannot see the DriveStation ..............9 I can see the DriveStation but I cannot access it ........ - Page 3 Regulatory Compliance Information ......19 The United States ................19 Europe .................... 19...
-
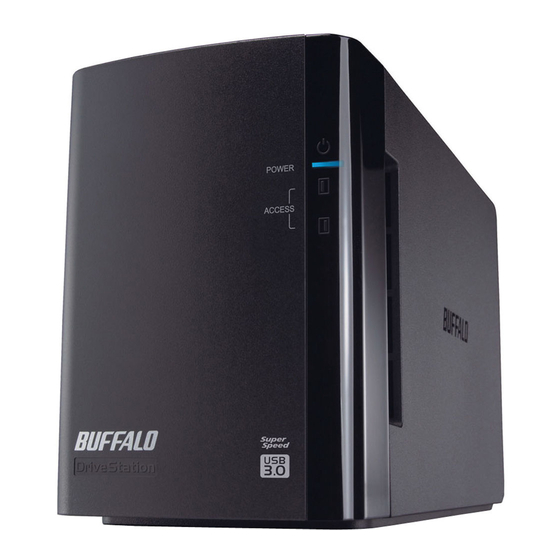
Page 4: Overview
Overview Diagrams HD-WHU3R1 HD-QHU3R5 Power LED Power On: blue RAID Maintenance: purple Access LEDs These indicate the status of the built-in hard drives. The top LED indicates the status for disk 1 and the bottom LED indicates the status for disk 2. (HD-WHU3R1) The number next to the LED corresponds to the hard drive number. -
Page 5: Power On/Off
Accessing: blinking green Error: red Rebuilding: blinking red Power Mode Switch See "Power On/Off ". RAID Mode Button This button can change RAID modes, confirm the current RAID mode, or rebuild the DriveStation. Refer to the manual on the utility CD for more details. USB Connector Connect to your computer with the included USB cable. - Page 6 HD-QHU3R5 Notes: • In Auto mode, after the computer is turned off, there may be a short delay before the DriveStation shuts down. • If the DriveStation is connected to a USB hub with its own power supply, it may not shut down automatically when the computer is turned off.
-
Page 7: Specifications
Specifications Check Buffalo website for information about the latest products or compatible models. Technical Specifications HD-WHU3R1 Interface USB 3.0 Transfer Speed 5 Gbps Maximum (USB 3.0)* External Dimensions 86 x 127 x 204 mm (Excluding protruding parts) Power Consumption 48 W (Max) -
Page 8: Recommended Usage
If a hard drive in the DriveStation malfunctions, replace it with a Internal Hard Drive Buffalo OP-HDQH series drive of the same capacity. *Connect the DriveStation to a USB 3.0 port for best transfer speeds. The DriveStation will function when connected to a USB 2.0 or USB 1.1 port, but data transfers will be slower. -
Page 9: Dismounting The Drivestation
• The maximum size of a file on a FAT32 hard drive is 4 GB. To use files that are 4 GB or larger, keep the default NTFS format. • To use the DriveStation with Mac OS, reformat with HFS+ (Mac OS extended). • If you use the DriveStation with multiple partitions, format each partition before use. -
Page 10: Troubleshooting
Troubleshooting I cannot see the DriveStation • If you're using the DriveStation with Windows XP, reformat the drive by building a RAID array with the RAID utility. Refer to the manual on the utility CD for the procedure. • Verify that the power LED is on. If it is not, then ensure that the power mode switch is in the on position. Check the cables. -
Page 11: Formatting
Formatting What is Formatting? Formatting is a process that creates a file system, allowing a drive to be usable with your computer. The DriveStation is formatted with NTFS by default. Windows Keep the default NTFS format. Refer to the procedure below to reformat with HFS+ (Mac OS extended). Notes • Never unplug, reset, or turn off the computer during the formatting process. - Page 12 Click Disk Management. Right-click the disk area assigned to the DriveStation and select Delete Volume. Notes: • Formatting will erase all data on the disk. Don't format the wrong disk! • If the disk assigned to the DriveStation appears as "Unallocated", proceed to step 6. Click Yes.
- Page 13 Right-click the unallocated space and select New Simple Volume. Click Next. If this screen opens Select Primary partition and click Next.
- Page 14 Leave the default (maximum size) setting as it is and click Next. Click Assign the following drive letter and specify a drive letter. Leave the other settings at their default values and click Next. Configure each setting as below. (1) Select Format this volume with the following settings (Format this partition with the following settings). (2) Select NTFS.
- Page 15 Note: If the DriveStation does not have any partitions, do not insert a check mark for Perform a quick format. If a check mark is inserted, the formatting process may not be completed normally. Click Finish. Formatting will begin.
-
Page 16: Formatting With Hfs+ (Mac)
If the formatting process completed normally, "Healthy" is displayed. If the message "The request cannot be completed because the volume is open or in use" is displayed The partition was created, but the format didn't complete. Click OK to format the partition as below. (1) Right-click the newly created partition and select Format. - Page 17 Note: Formatting will erase all data on the disk. Don't format the wrong disk! Configure each setting as below. (1) Click Partition. (2) Select 1 Partition. (3) Select the number of partitions that you want to create on the drive. (4) Click Options.
- Page 18 Select Apple Partition Map and click OK. Select Mac OS Extended (Journaled) and click Apply.
- Page 19 Click Partition. This completes the formatting process. Note: If "Do you want to use Volume_name to back up with Time Machine?" is displayed, you may click Use as Backup Disk and Time Machine will use the drive for backup. If you don't want to use it as a dedicated backup drive, click Cancel.
- Page 20 Regulatory Compliance Information Only use the cables and accessories that are included in the package. Don't use other accessories or cables unless specifically instructed to in the documentation. The United States FCC Statement This equipment has been tested and found to comply with the limits for a Class A digital device, pursuant to part 15 of the FCC Rules.