
Related Manuals for Frigidaire FNGE90HNPSG


Summary of Contents for Frigidaire FNGE90HNPSG
- Page 1 INSTRUCTIONS AND ADVICE FOR INSTALLING, USING AND SERVICING OF COOKERS Models: FNGE90HNPSG FNGE90HNPWG FNGD90HNPSG FNGD90HNPWG 461308239_000 05/2013...
- Page 2 The appliance was designed and made in accordance with the European standards listed below: => EN 30-1-1, EN 30-2-1 and EN 437 plus subsequent amendments (gas) => EN 60 335-1 and EN 60 335-2-6 (electrical) plus relative amendments The appliance complies with the prescriptions of the European Directives as below: =>...
-
Page 3: Table Of Contents
ASSISTANCE AND SPARE PARTS Before this appliance left the factory it was tested and fine-tuned by specialised expert personnel in order to guarantee its best functioning results. Any subsequent repairs or adjustments that may be necessary must be done with the maximum of care and attention by qualified personnel. -
Page 4: Important Notes And Precautions For Use
IMPORTANT NOTES AND PRECAUTIONS FOR USE removed from the outer surfaces and You have purchased one of our the various inner parts, thoroughly products for which we thank you. We check that the appliance is in perfect are confident that this new appliance, condition. - Page 5 IMPORTANT NOTES AND PRECAUTIONS FOR USE • The oven door glass and the temperature for two hours. This will accessible parts will become hot allow the protective coating on the when in use. To avoid burns and interior of the oven to be burnt off scalds young children should be and dissipate the associated smells.
- Page 6 IMPORTANT NOTES AND PRECAUTIONS FOR USE turn the appliance off and switch off • The appliance is not intended to be the electrical supply and do not tamper operated by means of an external with it. All repairs or adjustments must timer or separate remote-control be carried out with maximum care and system...
-
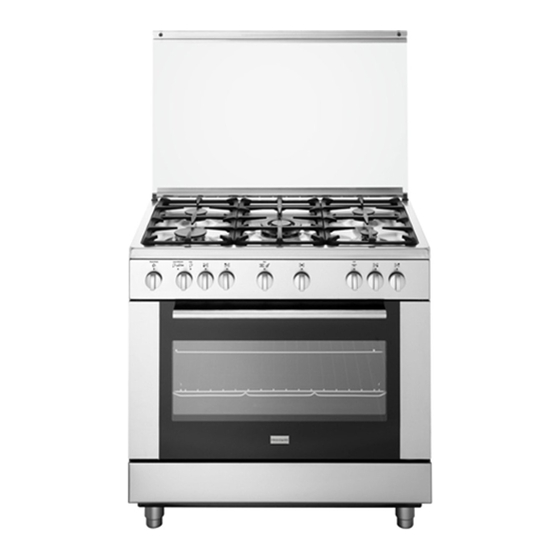
Page 7: Description Of The Appliance
DESCRIPTION OF THE APPLIANCE PRESENTATION This cooker is fitted of hob a gas and the of oven a Each knob on the front panel has a diagram printed above it showing to which burner it refers. The combination of the different sized burners offers the possibility of various types of cooking. - Page 8 DESCRIPTION OF THE APPLIANCE DESCRIPTION OF THE CONTROLS HOB GAS BURNER KNOB (A) By rotating the knob in an anticlockwise direction, the following symbols appear: = Closed position = “Full on” position = “Reduced rate” position GAS OVEN THERMOSTAT KNOB (B) By rotating the knob in an anticlockwise direction, the following functions appear: = Closed position...
-
Page 9: Instructions For The User
INSTRUCTIONS FOR THE USER HOB: GENErAL NOTES ON SAFETY LIGHTING THE BURNERS When a gas cooker is being used it produces heat N.B. Burners are equipped with safety and humidity in the room where it is installed. thermocouples and can only be ignited with the For this reason the room must be well ventilated, knob at the «Full on»... - Page 10 INSTRUCTIONS FOR THE USER OvEN: GENErAL SAFETY INSTrUCTIONS • Do not leave the oven unsupervised during use. Ensure that children do not play with the appliance. • Always keep the appliance lid open when using the oven, in order to prevent overheating. •...
- Page 11 INSTRUCTIONS FOR THE USER HOW TO USE GAS OVEN AND GRILL AUTOMATIC ELECTRICAL IGNITION OF GRILL BURNER The oven and grill burner are be fitted with a Open the oven door push and turn the oven knob safety thermocouple so, once the burner has clockwise to the grill position.
- Page 12 INSTRUCTIONS FOR THE USER USEFUL COOKING TIPS Meat: • If, when cooking meat, the time needed is more than 40 minutes, turn the oven off 10 minutes Cakes and bread: before the end of cooking time to exploit the • Heat the oven for at least 15 minutes before you residual heat (energy saving).
- Page 13 INSTRUCTIONS FOR THE USER COOKING/BAKING TABLE Weight Position of the oven shelf Temperature Cooking time FOODS from the bottom in °C in minutes CAKES Angel Cake Fruit Cake 35-40 Almond Cake 40-45 Chocolate Cake 30-40 PASTRIES Biscuits in general Brioches 190-220 25-35 Puff pastry...
- Page 14 INSTRUCTIONS FOR THE USER HOW TO CLEAN THE INNER OVEN DOOR GLASS CLEANING AND MAINTENANCE One of the features of our cookers is that the inner oven To keep the surface of the hob and the various door glass can be easily removed for cleaning without the components in pristine condition (grill, enamelled aid of specialized personnel.
- Page 15 INSTRUCTIONS FOR THE USER �� � � � � � � � OVEN SEAL � The oven seal guarantees the correct functioning of �� the oven. We recommend you: � • clean it, avoiding abrasive tools or products. � • check its state now and then. If the oven door seal has become hard or is damaged, contact our Service Centre and avoid using the oven until it has been repaired.
-
Page 16: Technical Features
TECHNICAL FEATURES BURNER DISPOSITION ON THE HOB Diameter Air Reg. Operating Heat Input BURNERS Rate Injectors Sleve BY-Pass Pressure Gas Sabaf Opening DENOMINATION mbar 1/100 mm “X”mm 1/100 mm GPL 30 3000 2 Rapid Complete Natural gas 20 117-Y 3000 GPL 30 1800 3 Semi-rapide... -
Page 17: Troubleshooting
TROUBLESHOOTING Some of the problems occur because of simple maintenance oversights or operation mistakes and can easily be resolved without having to call for technical assistance. PROBLEM rEMEDY The appliance is not working • Make sure the gas cock is open •... - Page 18 INSTRUCTIONS FOR THE INSTALLER VENTILATION The appliance should not be installed in a room of volume less than 20 m³. The quantity of air necessary is that required for a regular combustion of the gas and for the ventilation of the room.
- Page 19 INSTRUCTIONS FOR THE INSTALLER GAS CONNECTION • with a copper pipe in accordance with the standard, whose joints must be made using sealed fittings in Before connecting the appliance check that the data accordance with the standard. on the rating plate affixed to the cooker, correspond •...
- Page 20 INSTRUCTIONS FOR THE INSTALLER ADJUSTMENTS OvEN THErMOSTAT (fig. 22) Reduced rate adjustment should be carried out in • All seal must be replaced by the technician the following way: following any adjustment or regulation. • Remove the knob thermostat. • The adjustment of the reduce rate (simmer) •...
- Page 21 INSTRUCTIONS FOR THE INSTALLER OvEN BUrNEr (fig. 23) � � The burner is installed on the oven base and is covered by the bottom plate which must always remain in that position during oven operation, � To adjust the primary air, light the burner and, �...
- Page 22 INSTRUCTIONS FOR THE INSTALLER MAINTENANCE �� Prior to any maintenance work or changing parts, disconnect the appliance from the gas and �� electricity power sources. REPLACING THE TAPS AND THERMOSTAT Proceed in the following way when replacing a tap or the thermostat: •...
- Page 23 INSTRUCTIONS FOR THE INSTALLER ELECTRICAL CONNECTION CHANGING THE FLEXIBLE GAS HOSE In order to guarantee that the gas hose is always in The electrical connection must be carried out in excellent condition we strongly recommend changing accordance with the current standards and laws it on the date you will find printed on it.
- Page 24 SPACE FOR DATA LABEL 461308239_000 05/2013...