Sony DCR-TRV940 Operating Instructions Manual
Digital video camera recorder
Hide thumbs
Also See for DCR-TRV940:
- Service manual (265 pages) ,
- Adjustment manual (79 pages) ,
- Supplemental instructions (2 pages)
Table of Contents
Advertisement
Quick Links
Digital
Video Camera
Recorder
Operating Instructions
Before operating the unit, please read this manual thoroughly,
and retain it for future reference.
Owner's Record
The model and serial numbers are located on the bottom. Record the
serial number in the space provided below. Refer to these numbers
whenever you call upon your Sony dealer regarding this product.
Model No. DCR-TRV
Serial No.
DCR-TRV950
DCR-TRV940/TRV950
©2002 Sony Corporation
3-075-494-11 (1)
Model No. AC-
Serial No.
TM
SERIES
Advertisement
Table of Contents

Related Manuals for Sony DCR-TRV940


Summary of Contents for Sony DCR-TRV940
- Page 1 Owner’s Record The model and serial numbers are located on the bottom. Record the serial number in the space provided below. Refer to these numbers whenever you call upon your Sony dealer regarding this product. Model No. DCR-TRV Model No. AC- Serial No.
- Page 2 Welcome! Congratulations on your purchase of this Sony Handycam. With your Handycam, you can capture life’s precious moments with superior picture and sound quality. Your Handycam is loaded with advanced features, but at the same time it is very easy to use. You will soon be producing home video that you can enjoy for years to come.
- Page 3 “Memory Stick” For customers in CANADA This device complies with Part 15 of the FCC “Memory Stick” Rules. Operation is subject to the following two conditions: (1) This device may not cause This Class B digital apparatus complies with harmful interference, and (2) this device must Canadian ICES-003.
- Page 4 Main Features •Recording moving pictures on a tape (p. 26) Recording moving pictures •Recording still images on a tape or still images, and playing (p. 51) them back •Playing back a tape (p. 39) •Recording still images on a “Memory Stick” (p. 46, 135) •Recording moving pictures on a “Memory Stick”...
- Page 5 Main Features Accessing the Internet via a Bluetooth compliant device (DCR-TRV950 only) Accessing the Internet, sending/ receiving your e-mail. For details, refer to the Network Function Operating Instructions supplied with your camcorder. (DCR- TRV950 only) (p. 205) Other uses Functions for adjusting the exposure in the recording mode •BACK LIGHT (p.
-
Page 6: Table Of Contents
Table of contents Shooting with the zebra pattern ..65 Main Features ........4 Using the color bar ........ 66 Shooting with manual adjustment ..67 Quick Start Guide Using the PROGRAM AE ..... 67 – Recording on a tape ......8 Adjusting the shutter speed .. - Page 7 Table of contents Viewing images recorded on a “Memory Stick” Operations “Memory Stick” on your computer Using a “Memory Stick” – For Windows users ....199 – Introduction ....... 126 Connecting your camcorder to your Recording still images on a “Memory computer using the USB cable Stick”...
-
Page 8: Recording On A Tape
Quick Start Guide – Recording on a tape This chapter introduces you to the basic features to recorded pictures on tapes of your camcorder. See the page in parentheses “( )” for more information. Connecting the power cord (p. 19) Use the battery pack when using your camcorder outdoors (p. - Page 9 Recording a picture (p. 26) Remove the lens cap. POWER Set the POWER switch to CAMERA while pressing the small green button. MEMORY/ NETWORK Press START/STOP. POWER Your camcorder starts recording. To stop recording, press START/STOP again. MEMORY/ NETWORK Press OPEN to open the LCD panel.
-
Page 10: Recording On A "Memory Stick
Quick Start Guide – Recording on a “Memory Stick” This chapter introduces you to the basic features to record on a “Memory Stick” of your camcorder. See the page in parentheses “( )” for more information. Connecting the power cord (p. - Page 11 Recording a still image on a “Memory Stick” (p. 135) Press OPEN to open Remove the lens cap. the LCD panel. The picture appears on the screen. Set the POWER switch to POWER MEMORY/NETWORK (DCR-TRV950 only) while pressing the small green button.
-
Page 12: Getting Started
— Getting Started — Using this manual The instructions in this manual are for the two models listed in the table below. Before you start reading this manual and operating your camcorder, check the model number by looking at the bottom of your camcorder. The DCR-TRV950 is the model used for illustration purposes. - Page 13 Using this manual Note on TV color systems TV color systems differ depending on the country or region. To view your recordings on a TV, you need an NTSC system-based TV. Copyright precautions Television programs, films, video tapes, and other materials may be copyrighted. Unauthorized recording of such materials may be contrary to the copyright laws.
-
Page 14: Checking Supplied Accessories
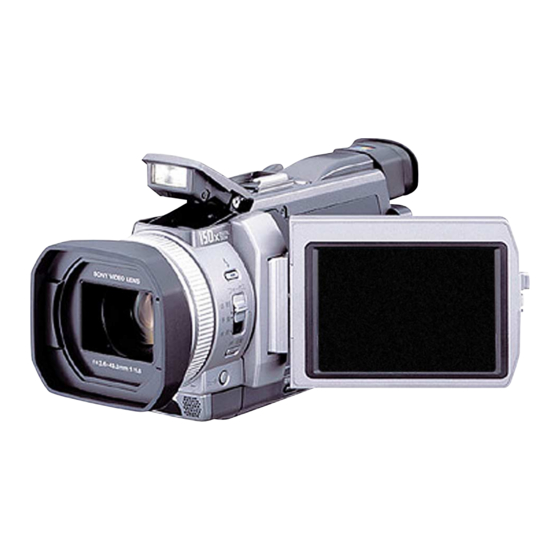
Checking supplied accessories Make sure that the following accessories are supplied with your camcorder. 1 AC-L10A/L10B/L10C AC power 7 Lens cap (1) (p. 26) adaptor (1), power cord (1) (p. 16) 8 “Memory Stick” (1) (p. 126) 2 NP-FM50 battery pack (1) (p. 15, 16) 9 USB cable (1) (p. -
Page 15: Step 1 Preparing The Power Supply
Step 1 Preparing the power supply Installing the battery pack (1) Lift up the viewfinder. (2) Slide the battery pack down until it clicks. To remove the battery pack (1) Lift up the viewfinder. (2) Slide the battery pack out in the direction of the arrow while pressing BATT down. -
Page 16: Charging The Battery Pack
Step 1 Preparing the power supply Charging the battery pack Use the battery pack after charging it for your camcorder. Your camcorder operates only with the “InfoLITHIUM” battery pack (M series). See page 231 for details of “InfoLITHIUM” battery pack. (1) Open the DC IN jack cover and connect the AC power adaptor supplied with your camcorder to the DC IN jack with the plug’s v mark facing up. - Page 17 Step 1 Preparing the power supply Note Prevent metallic objects from coming into contact with the metal parts of the DC plug of the AC power adaptor. This may cause a short-circuit, damaging the AC power adaptor. Remaining battery time indicator The remaining battery time indicator in the display window indicates the approximate recording time with the viewfinder.
- Page 18 This unit is compatible with the “InfoLITHIUM” battery pack (M series). Your camcorder operates only with the “InfoLITHIUM” battery. “InfoLITHIUM” M series battery packs have the mark. SERIES “InfoLITHIUM” is a trademark of Sony Corporation.
-
Page 19: Connecting To A Wall Outlet
DC IN jack, even when the power cord is not plugged into a wall outlet. Using a car battery Use Sony Car Battery Adaptor (optional). Refer to the operating instructions of the Car Battery Adaptor for further information. -
Page 20: Step 2 Setting The Date And Time
Step 2 Setting the date and time Set the date and time when you use your camcorder for the first time. “CLOCK SET” will be displayed each time that you set the POWER switch to CAMERA or MEMORY/ NETWORK (DCR-TRV950 only) unless you set the date and time settings. If you do not use your camcorder for about four months, the date and time may be cleared from memory (bars may appear) because the built-in rechargeable battery installed in your camcorder will have been discharged (p. - Page 21 Step 2 Setting the date and time SETUP MENU SETUP MENU STBY – –:– –:– – CLOCK SET CLOCK SET USB STREAM USB STREAM LTR SIZE LTR SIZE LANGUAGE LANGUAGE DEMO MODE DEMO MODE RETURN [ MENU ] : END [ MENU ] : END SETUP MENU STBY...
- Page 22 Step 2 Setting the date and time Simple setting of clock by a time difference You can easily set the clock to the local time by setting a time difference. Select AREA SET, DST SET* in the menu settings. See page 216 for more information. * Instead of DST, SUMMERTIME is displayed on the screen for some models.
-
Page 23: Step 3 Inserting A Cassette
Step 3 Inserting a cassette (1) Prepare the power supply. (2) Slide OPEN/Z EJECT in the direction of the arrow and open the lid. The cassette compartment automatically lifts up and opens. (3) Insert the cassette straight as far as possible into the cassette compartment with the window facing out and the write-protect tab facing upward. -
Page 24: Step 4 Using The Touch Panel
Step 4 Using the touch panel Your camcorder has operation buttons on the LCD screen. Touch the LCD screen directly with your finger or the supplied stylus (DCR-TRV950 only) to operate each function. This section describes how to operate the touch panel during recording or playing back images on a tape. - Page 25 Step 4 Using the touch panel Notes •When using the touch panel, press operation buttons with your thumb supporting the LCD panel from the back side of it or press those buttons lightly with your index finger. •Do not press the LCD screen with sharp-pointed objects other than the supplied stylus.
-
Page 26: Recording - Basics
— Recording – Basics — Recording a picture Your camcorder automatically focuses for you. (1) Remove the lens cap by pressing both knobs on its sides and pull the lens cap string to fix it. (2) Prepare the power supply and insert a cassette. See “Step 1” to “Step 3” for more information (p. - Page 27 Recording a picture Notes •Fasten the grip strap firmly. •The recording data (date/time or various settings when recorded) are not displayed while recording. However, they are recorded automatically on the tape. To display the recording data, press the DATA CODE button during playback you can also use the Remote Commander for this operation (p.
- Page 28 Recording a picture After recording (1) Set the POWER switch to OFF (CHG). (2) Close the LCD panel. (3) Eject the cassette. (4) Remove the battery pack. Adjusting the LCD screen The LCD panel can be opened up to 90 degrees. The LCD panel moves about 90 degrees to the viewfinder side and about 180 degrees to the lens side.
- Page 29 Recording a picture Adjusting the brightness of the LCD screen (1) Press FN and select PAGE2 while the POWER switch is set to CAMERA or MEMORY/NETWORK (DCR-TRV950 only). When you set the POWER switch to VCR, press FN to display PAGE1. (2) Press LCD BRT.
- Page 30 Recording a picture Adjusting the viewfinder If you record pictures with the LCD panel closed, check the picture with the viewfinder. Adjust the viewfinder lens to your eyesight so that the images in the viewfinder come into sharp focus. Lift up the viewfinder and move the viewfinder lens adjustment lever. The viewfinder lens adjustment lever Viewfinder backlight...
- Page 31 Recording a picture Using the zoom feature Move the power zoom lever a little for a slower zoom. Move it further for a faster zoom. Using the zoom sparingly results in better-looking recordings. W : Wide-angle (subject appears farther away) T : Telephoto (subject appears closer) To use zoom greater than 12×...
- Page 32 Recording a picture Shooting with the Mirror Mode This feature allows the camera subject to view him-or herself on the LCD screen. The subject uses this feature to check his or her own image on the LCD screen while you look at the subject in the viewfinder. Set the POWER switch to CAMERA or MEMORY/NETWORK (DCR-TRV950 only).
- Page 33 Recording a picture Indicators displayed in the recording Indicators are not recorded on tapes. Remaining battery time Cassette memory This appears when using a cassette with cassette memory. Recording mode STBY/REC 0:00:01 Time code/Tape counter 45min Remaining tape This appears after you insert a cassette and record or play back for a while.
-
Page 34: Shooting Backlit Subjects - Back Light
Recording a picture Shooting backlit subjects – BACK LIGHT When you shoot a subject with the light source behind the subject or a subject with a light background, use the backlight function. Press BACK LIGHT while the POWER switch is set to CAMERA or MEMORY/ NETWORK (DCR-TRV950 only). -
Page 35: Shooting Subjects Lit By Strong Light - Spot Light
Recording a picture Shooting subjects lit by strong light – SPOT LIGHT This function prevents people's faces, for example, from appearing excessively white when shooting subjects lit by strong light, such as in the theater. Press SPOT LIGHT while the POWER switch is set to CAMERA or MEMORY/ NETWORK (DCR-TRV950 only). -
Page 36: Self-Timer Recording
Recording a picture Self-timer recording Recording with the self-timer starts in 10 seconds automatically. You can also use the Remote Commander for this operation. (1) In the standby, press FN and select PAGE2. (2) Press SELFTIMER. (self-timer) indicator appears on the screen. (3) Press START/STOP. -
Page 37: Checking Recordings - End Search / Editsearch / Rec Review
Checking recordings – END SEARCH / EDITSEARCH / Rec Review You can use these buttons to check the recorded picture or shoot so that the transition between the last recorded scene and the next scene you record is smooth. EDITSEARCH END SEARCH You can go to the end of the recorded section after you record. - Page 38 Checking recordings – END SEARCH / EDITSEARCH / Rec Review Rec Review You can check the last recorded section. Press the – 7 side of EDITSEARCH momentarily in the standby. The section you have stopped most recently will be played back for a few seconds, and then your camcorder will return to the standby.
-
Page 39: Playback - Basics
— Playback – Basics — Playing back a tape You can monitor the playback picture on the screen. If you close the LCD panel, you can monitor the playback picture in the viewfinder. You can control playback using the Remote Commander supplied with your camcorder. (1) Prepare the power supply and insert the recorded tape. - Page 40 Playing back a tape When monitoring on the LCD screen You can turn the LCD panel over and move it back to the camcorder body with the LCD screen facing out. If you leave the power on for a long time Your camcorder gets warm.
-
Page 41: To Display The Screen Indicators - Display Function
Playing back a tape To display the screen indicators – Display function Press DISPLAY/TOUCH PANEL on your camcorder or DISPLAY on the Remote Commander supplied with your camcorder. The indicators disappear on the screen. To make the indicators appear, press DISPLAY/TOUCH PANEL or DISPLAY again. DISPLAY DATA CODE DISPLAY/... - Page 42 Playing back a tape To not display various settings Set DATA CODE to DATE in the menu settings (p. 216). The display changes as follows when you press DATA CODE : date/time y no indicator Various settings Various settings are your camcorder’s information when you have recorded. In the recording, the various settings will not be displayed.
- Page 43 Playing back a tape Various playback modes To operate video control buttons, set the POWER switch to VCR. To play back pause (viewing a still picture) Press X during playback. To resume normal playback, press N or X. To advance the tape Press M in the stop mode.
- Page 44 Playing back a tape In the various playback modes •Sound is muted. •The previous picture may remain as a mosaic image during playback. When the playback pause lasts for five minutes Your camcorder automatically enters the stop mode. To resume playback, press N. Slow playback The slow playback can be performed smoothly on your camcorder.
-
Page 45: Viewing The Recording On Tv
Viewing the recording on TV Connect your camcorder to your TV with the A/V connecting cable supplied with your camcorder to watch playback picture on the TV screen. You can operate the video control buttons in the same way as when you monitor playback pictures on the screen. When monitoring playback pictures on the TV screen, we recommend that you power your camcorder from a wall outlet using the AC power adaptor (p. -
Page 46: Advanced Recording Operations
— Advanced Recording Operations — Recording still images on a “Memory Stick” during tape recording You can record still images on a “Memory Stick” in the tape recording or tape recording standby. You can also record still images on a tape (p. 51). Before operation •Insert a “Memory Stick”... - Page 47 Recording still images on a “Memory Stick” during tape recording Image size of still images Image size is automatically set to 640 × 480. When you want to record still images in different size, use the Memory Photo recording (p. 135). When the POWER switch is set to CAMERA You cannot select image quality.
- Page 48 Recording still images on a “Memory Stick” during tape recording Recording images with the flash The flash pops up automatically. The default setting is auto (no indicator). To change the flash mode, press (flash) repeatedly until the flash mode indicator appears on the screen.
- Page 49 Recording still images on a “Memory Stick” during tape recording You cannot shoot images with the flash during the following operations: – Tape Recording – Shutter speed (1/30 or smaller) adjustment The flash does not fire even if you select auto (no indicator) and (auto red-eye reduction) during the following operations: –...
- Page 50 Recording still images on a “Memory Stick” during tape recording Self-timer recording You can record still images on a “Memory Stick” with the self-timer. You can also use the Remote Commander for this operation. Before operation •Insert a “Memory Stick” into your camcorder. •Set PHOTO REC in to MEMORY in the menu settings.(The default setting is MEMORY.)
-
Page 51: Recording Still Images On A Tape - Tape Photo Recording
Recording still images on a tape – Tape Photo recording You can record still images such as photographs on tapes. You can record about 510 images in the SP mode and about 765 images in the LP mode on a 60-minute tape. (1) In the standby, set PHOTO REC in to TAPE in the menu settings. - Page 52 Recording still images on a tape – Tape Photo recording Notes •During tape photo recording, you cannot change the mode or setting. •When recording a still image, do not shake your camcorder. If you do so, the image may flutter. •You cannot use PHOTO during the following operations: ( The indicator flashes on the screen.)
-
Page 53: Using The Wide Mode
Using the wide mode You can record a 16:9 wide picture to watch on a 16:9 wide-screen TV (16:9WIDE). If you connect a TV compatible with the ID-1/ID-2 system, the screen size is automatically selected. Black bands appear on the screen during recording in 16:9WIDE mode [a]. The picture during playback on a normal TV [b] or on a wide-screen TV [c] is compressed in the longwise direction. - Page 54 Using the wide mode In the wide mode You cannot select the following functions: – Recording still images on a “Memory Stick” in the tape recording or recording standby – BOUNCE – OLD MOVIE During recording You cannot select or cancel the wide mode. When you cancel the wide mode, set your camcorder to the standby and then set 16:9WIDE to OFF in the menu settings.
-
Page 55: Using The Fader
Using the fader You can fade in or out to give your recording a more professional appearance. STBY FADER M. FADER (mosaic) BOUNCE 1) 2) OVERLAP WIPE STBY MONOTONE When fading in, the picture gradually changes from black-and-white to color. When fading out, the picture gradually changes from color to black-and-white. - Page 56 Using the fader (1) When fading in [a] In the standby, press FADER until the desired fader indicator flashes. When fading out [b] In the recording, press FADER until the desired fader indicator flashes. The indicator changes as follows: FADER t M.
- Page 57 Using the fader When you set the POWER switch to MEMORY/NETWORK (DCR-TRV950 only) You cannot use the fader. While using BOUNCE, you cannot use the following functions: – Zoom – Picture effect – Shutter speed adjustment – Exposure – Flexible Spot meter –...
-
Page 58: Using Special Effects - Picture Effect
Using special effects – Picture effect You can digitally process images to obtain special effects like those in films or on TV. NEG. ART [a] : The color and brightness of the picture are reversed. SEPIA : The picture appears in sepia. B&W : The picture appears in monochrome (black-and-white). -
Page 59: Using Special Effects - Digital Effect
Using special effects – Digital effect You can add special effects to recorded pictures using the various digital functions. Sound is recorded normally. STILL You can record a still image so that it is superimposed on a moving picture. FLASH (FLASH MOTION) You can record still images successively at constant intervals. - Page 60 Using special effects – Digital effect (1) Press FN to display PAGE1 while the POWER switch is set to CAMERA. (2) Press DIG EFFT. The screen to select a desired digital effect appears. (3) Press a desired mode. In the STILL and LUMI. modes, the still image is stored in memory.
- Page 61 Using special effects – Digital effect Notes •The following functions do not work during digital effect: – Recording still images on a “Memory Stick” in the tape recording or recording standby – Tape photo recording – Fader – Shutter speed (1/30 or smaller) adjustment •The following functions do not work in the old movie: –...
-
Page 62: Presetting The Adjustment For Picture Quality - Custom Preset
Presetting the adjustment for picture quality – Custom preset You can preset the camcorder to record the picture with the desired picture quality. When presetting, adjust the picture by shooting a subject and checking the picture displayed on a TV (p. 45). (1) Press CUSTOM PRESET to display the CUSTOM PRESET menu while the POWER switch is set to CAMERA or MEMORY/NETWORK (DCR-TRV950 only). - Page 63 Presetting the adjustment for picture quality – Custom preset Items to be adjusted Item Meaning Adjustment value COLOR LVL Color intensity Decreases color intensity y Increases color intensity SHARPNESS Sharpness Softer y Sharper WB SHIFT Bluish y Reddish White balance AE SHIFT Brightness Dim y Brighten...
-
Page 64: Using The Guide Frame
Using the guide frame You can easily make the picture be on a horizontal line using the guide frame. The guide frame is not recorded in the tape or the “Memory Stick.” (1) Set GUIDE FRAME in to ON in the menu setting while the POWER switch is set to CAMERA or MEMORY/NETWORK (DCR-TRV950 only).