Table of Contents
Advertisement
Quick Links
Advertisement
Table of Contents

Related Manuals for Cisco 93180YC-EX


Summary of Contents for Cisco 93180YC-EX
- Page 1 Cisco Nexus 93180YC-EX ACI Mode Hardware Installation Guide First Published: 2016-05-23 Last Modified: 2017-10-25 Americas Headquarters Cisco Systems, Inc. 170 West Tasman Drive San Jose, CA 95134-1706 http://www.cisco.com Tel: 408 526-4000 800 553-NETS (6387) Fax: 408 527-0883...
- Page 2 Cisco and the Cisco logo are trademarks or registered trademarks of Cisco and/or its affiliates in the U.S. and other countries. To view a list of Cisco trademarks, go to this URL: /www.cisco.com/go/trademarks . Third-party trademarks mentioned are the property of their respective owners. The use of the word partner does not imply a partnership relationship between Cisco and any other company.
-
Page 3: Table Of Contents
Planning for Power Requirements Airflow Requirements Rack and Cabinet Requirements Clearance Requirements Installing the Switch Chassis C H A P T E R 3 Safety Installation Options with Racks and Cabinets Airflow Considerations Cisco Nexus 93180YC-EX ACI Mode Hardware Installation Guide... - Page 4 Requirements Specific to Standard Open Racks Requirements Specific to Perforated Cabinets Cable Management Guidelines System Specifications A P P E N D I X B Environmental Specifications Switch Dimensions Switch and Module Weights and Quantities Cisco Nexus 93180YC-EX ACI Mode Hardware Installation Guide...
- Page 5 A P P E N D I X D Accessory Kit Site Preparation and Maintenance Records A P P E N D I X E Site Preparation Checklist Contact and Site Information Chassis and Module Information Cisco Nexus 93180YC-EX ACI Mode Hardware Installation Guide...
- Page 6 Contents Cisco Nexus 93180YC-EX ACI Mode Hardware Installation Guide...
-
Page 7: Preface
Square brackets enclosing keywords or arguments separated by a vertical bar indicate an optional choice. {x | y} Braces enclosing keywords or arguments separated by a vertical bar indicate a required choice. Cisco Nexus 93180YC-EX ACI Mode Hardware Installation Guide... -
Page 8: Related Documentation
Web-Based Documentation • Cisco APIC Management Information Mode Reference • Cisco APIC Online Help Reference • Cisco APIC Python SDK Reference • Cisco ACI Compatibility Tool • Cisco ACI MIB Support List Cisco Nexus 93180YC-EX ACI Mode Hardware Installation Guide viii... - Page 9 • Cisco ACI System Messages Reference Guide • Cisco APIC Layer 4 to Layer 7 Services Deployment Guide • Cisco APIC Layer 4 to Layer 7 Device Package Development Guide • Cisco APIC Layer 4 to Layer 7 Device Package Test Guide •...
-
Page 10: Documentation Feedback
Subscribe to What's New in Cisco Product Documentation, which lists all new and revised Cisco technical documentation as an RSS feed and delivers content directly to your desktop using a reader application. The RSS feeds are a free service. -
Page 11: Overview
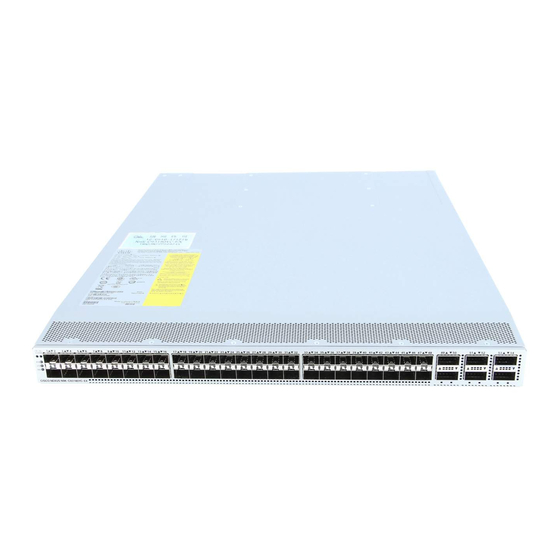
Overview, page 1 Overview The Cisco Nexus 93180YC-EX switch (N9K-C93180YC-EX) is a 1-RU, fixed-port switch designed for spine-leaf-APIC deployment in data centers. This switch has 48 10/25-Gigabit SFP+ Application Policy Infrastructure Controllers (APICs) facing ports that also support 1-Gigabit connections, and it has six fixed 40/100-Gigabit QSFP28 spine-facing ports. - Page 12 1 on the left and slot 2 on the right. Four fan modules with fan slot 1 on the left and USB port used for saving or copying functions fan slot 4 on the right Cisco Nexus 93180YC-EX ACI Mode Hardware Installation Guide...
- Page 13 If you locate the air intake in a hot aisle, the switch can overheat and shut down. The switch supports the Fabric Extenders (FEXs) listed at https://www.cisco.com/c/en/us/td/docs/switches/ datacenter/nexus9000/hw/interoperability/fexmatrix/fextables.html. Cisco Nexus 93180YC-EX ACI Mode Hardware Installation Guide...
- Page 14 Overview Overview Cisco Nexus 93180YC-EX ACI Mode Hardware Installation Guide...
-
Page 15: Preparing The Site
However, if the switch is located in an unusually humid location, you should use a dehumidifier to maintain the humidity within an acceptable range. Cisco Nexus 93180YC-EX ACI Mode Hardware Installation Guide... -
Page 16: Altitude Requirements
• Strong EMI, especially when it is caused by lightning or radio transmitters, can destroy the signal drivers and receivers in the chassis and even create an electrical hazard by conducting power surges through lines into equipment. Cisco Nexus 93180YC-EX ACI Mode Hardware Installation Guide... -
Page 17: Shock And Vibration Requirements
The switch includes two power supplies (1-to-1 redundancy with current sharing) in one of the following combinations: • Two 650-W AC power supplies (NEBS compliant) • Two 1200-W HVAC/HVDC power supplies • Two 930-W DC power supplies Cisco Nexus 93180YC-EX ACI Mode Hardware Installation Guide... - Page 18 • Ensure that the protective devices are rated not greater than 40A when the switch is powered with regular DC power supplies (rated 48-60VDC). • Ensure that the protective devices are rated not greater than 10A when the switch is powered with HVDC power supplies (rated 240-350VDC). Cisco Nexus 93180YC-EX ACI Mode Hardware Installation Guide...
-
Page 19: Airflow Requirements
• Solid-walled cabinets with a roof fan tray (bottom-to-top cooling) • Standard open four-post Telco racks Work with your cabinet vendors to determine which of their cabinets meet the following requirements or see the Cisco Technical Assistance Center (TAC) for recommendations: Cisco Nexus 93180YC-EX ACI Mode Hardware Installation Guide... -
Page 20: Clearance Requirements
For the clearances required for an installation of this chassis in a four-post rack, see the following figure. Cisco Nexus 93180YC-EX ACI Mode Hardware Installation Guide... - Page 21 Width of the front clearance area (this equals the width of the chassis with two rack-mount brackets attached to it) Note Both the front and rear of the chassis must be open to both aisles for airflow. Cisco Nexus 93180YC-EX ACI Mode Hardware Installation Guide...
- Page 22 Preparing the Site Clearance Requirements Cisco Nexus 93180YC-EX ACI Mode Hardware Installation Guide...
-
Page 23: Installing The Switch Chassis
Starting the Switch, page 23 Safety Before you install, operate, or service the switch, see the Regulatory, Compliance, and Safety Information for the Cisco Nexus 3000 and 9000 Series for important Safety Information. Statement 1071—Warning Definition Warning IMPORTANT SAFETY INSTRUCTIONS This warning symbol means danger. -
Page 24: Installation Options With Racks And Cabinets
• Ensure that the site power meets the power requirements for the switch. If available, you can use an uninterruptible power supply (UPS) to protect against power failures. Cisco Nexus 93180YC-EX ACI Mode Hardware Installation Guide... -
Page 25: Unpacking And Inspecting The Switch
(there must be a metal-to-metal connection to the earth ground). Step 1 Compare the shipment to the equipment list provided by your customer service representative and verify that you have received all items, including the following: • Accessory Kit Cisco Nexus 93180YC-EX ACI Mode Hardware Installation Guide... -
Page 26: Installing The Switch
Before You Begin • You have inspected the switch shipment to ensure that you have everything ordered. • Make sure that the switch rack-mount kit includes the following parts: ◦ Front rack-mount brackets (2) Cisco Nexus 93180YC-EX ACI Mode Hardware Installation Guide... - Page 27 (3 inches [7.6 mm] minimum) and module handles (1 inch [2.5 mm] minimum). Cisco Nexus 93180YC-EX ACI Mode Hardware Installation Guide...
- Page 28 (see the following figure). Tighten 12-24 screws to 30 in-lb (3.39 N·m) of torque and tighten 10-32 screws to 20 in-lb (2.26 N·m) of torque. Cisco Nexus 93180YC-EX ACI Mode Hardware Installation Guide...
- Page 29 Holding the switch with both hands, position the two rear rack-mount brackets on the switch between the rack or cabinet posts that do not have slider rails attached to them (see the following figure). Cisco Nexus 93180YC-EX ACI Mode Hardware Installation Guide...
- Page 30 Holding the chassis level, insert two screws (12-24 or 10-32, depending on the rack type) in each of the two front rack-mount brackets (using a total of four screws) and into the cage nuts or threaded holes in the vertical rack-mounting rails (see the following figure). Cisco Nexus 93180YC-EX ACI Mode Hardware Installation Guide...
-
Page 31: Grounding The Chassis
You can alternatively ground the chassis (this is required if the rack is not grounded) by attaching a customer-supplied grounding cable to the chassis grounding pad and the facility ground. Cisco Nexus 93180YC-EX ACI Mode Hardware Installation Guide... - Page 32 2 M4 screws used to secure the grounding lug to the chassis Grounding cable, with 0.75 in. (19 mm) of insulation stripped from one end, inserted into the grounding lug and crimped in place Cisco Nexus 93180YC-EX ACI Mode Hardware Installation Guide...
-
Page 33: Starting The Switch
Make sure that the connector clicks when fully pushed into the receptacle. b) Connect the other end of the power cable to a power source. Cisco Nexus 93180YC-EX ACI Mode Hardware Installation Guide... - Page 34 A setup utility automatically launches the first time that you access the switch and guides you through the basic configuration. For instructions on how to configure the switch and check module connectivity, see the appropriate Cisco Nexus 9000 Series configuration guide.
-
Page 35: Connecting The Switch To The Aci Fabric
93180YC-EX, 93180YC-FX, 9332PQ, 9348GC-FXP, 9372PX, 9372PX-E, 9372TX, 9372TX-E, 9396PX, and 9396TX switches) • Spine switches (Cisco Nexus 9336PQ, 9364C, 9504, 9508, and 9516 switches) As shown in the following figure, each APIC is connected to one or two leaf switches and each leaf switch should be connected to every spine switch in the same fabric. -
Page 36: Preparing To Connect To Other Devices
When preparing to connect the fabric devices, consider the following for each type of interface, and gather all of the required equipment before making the connections: • Cabling type required for each interface type • Distance limitations for each signal type • Additional interface equipment required Cisco Nexus 93180YC-EX ACI Mode Hardware Installation Guide... -
Page 37: Connecting Leaf Switches To Apics
Cisco equipment. In situations where long parallel cable runs cannot be separated by at least 3.3 feet (1 meter), we recommend that you shield any potential noise sources by housing them in a grounded metallic conduit. -
Page 38: Connecting Leaf Switches To Spine Switches
• For a Cisco 10GBASE-LR or -SR transceiver and cable, insert the transceiver into a downlink optical port on a leaf switch before connecting the cable to the transceiver. • For Cisco SFP+ Active Optical Cables, insert the transceiver on the cable into a downlink optical port on a leaf switch. - Page 39 (Cisco Nexus 9504, 9508, or 9516 switch) or on each Cisco Nexus 9336PQ spine switch. The number of line cards in a spine switch depends on the model of the spine switch (the Cisco Nexus 9504 supports four line cards, the Cisco Nexus 9508 supports up to eight line cards, and the Cisco Nexus 9516 supports up to 10 line cards in ACI-mode).
- Page 40 • If there are modular switches in the fabric, their ACI-mode line cards must already be installed. The line cards can be of the following types: ◦ 36-port 40-Gigabit (N9K-X9736PQ) ◦ 32-port 100-Gigabit (N9K-X9732C-EX) (supported by Cisco Nexus 9504 and 9508 modular switches) Cisco Nexus 93180YC-EX ACI Mode Hardware Installation Guide...
-
Page 41: Setting Up An Optional Console Interface
Insert the appropriate transceiver into an active uplink port on the leaf switch. Note For 1- or 10-Gigabit Ethernet on a Cisco Nexus 93108TC-EX or 93180YC-EX switch or a N9K-X9732C-EX, N9K-X9736PQ, or N9K-X9432PQ line card, insert a QSFP-to-SFP adapter (CVR-QSFP-SFP10G) before inserting an SFP+ transceiver. -
Page 42: Setting Up An Optional Management Connection
Setting Up an Optional Management Connection What to Do Next You can now perform the initial configuration for the switch (see the Cisco ACI Getting Started Guide). Setting Up an Optional Management Connection You can optionally set up an out-of-band management connection for monitoring and troubleshooting purposes. - Page 43 • Inspect routinely for dust and damage. If you suspect damage, clean and then inspect fiber ends under a microscope to determine if damage has occurred. Cisco Nexus 93180YC-EX ACI Mode Hardware Installation Guide...
- Page 44 Connecting the Switch to the ACI Fabric Maintaining Transceivers and Optical Cables Cisco Nexus 93180YC-EX ACI Mode Hardware Installation Guide...
-
Page 45: Replacing Components
If you are changing the airflow direction of all the modules in the chassis, you must shutdown the switch before replacing all the fan and power supply modules with modules using the other airflow direction. During operations, all of the modules must have the same direction of airflow. Cisco Nexus 93180YC-EX ACI Mode Hardware Installation Guide... -
Page 46: Removing A Fan Module
The switch requires two power supplies for redundancy. With one power supply providing the necessary power for operations, you can replace the other power supply during operations so long as the new power supply has the same airflow direction as the other modules in the chassis. Cisco Nexus 93180YC-EX ACI Mode Hardware Installation Guide... -
Page 47: Replacing An Ac Power Supply
• There must be an earth ground connection to the chassis that you are installing the replacement module. AC power supplies connected to AC power sources are automatically grounded through their power cable. Step 1 Remove an AC power supply as follows: Cisco Nexus 93180YC-EX ACI Mode Hardware Installation Guide... -
Page 48: Replacing A High Voltage (Hvac/Hvdc) Power Supply
• An HVAC/HVDC power source must be within reach of the power cable that will be used with the replacement power supply. If you are using n+n power redundancy, there must be a separate power source for each power supply installed in the chassis. Cisco Nexus 93180YC-EX ACI Mode Hardware Installation Guide... -
Page 49: Replacing A Dc Power Supply
LEDs indicate, see Power Supply LEDs, on page Replacing a DC Power Supply You can replace an DC power supply during operations so long as the other power supply provides power to the switch. Cisco Nexus 93180YC-EX ACI Mode Hardware Installation Guide... - Page 50 Verify that the power supply is operational by making sure that the power supply LED is green. For information on what the power supply LEDs indicate, see Power Supply LEDs, on page Cisco Nexus 93180YC-EX ACI Mode Hardware Installation Guide...
- Page 51 Replacing Components Replacing a DC Power Supply Cisco Nexus 93180YC-EX ACI Mode Hardware Installation Guide...
- Page 52 Replacing Components Replacing a DC Power Supply Cisco Nexus 93180YC-EX ACI Mode Hardware Installation Guide...
-
Page 53: Appendix A Rack Specifications
We do not recommend that you use racks that have obstructions (such as power strips), because the Note obstructions could impair access to field-replaceable units (FRUs). General Requirements for Cabinets and Racks The cabinet or rack must also meet the following requirements: Cisco Nexus 93180YC-EX ACI Mode Hardware Installation Guide... -
Page 54: Requirements Specific To Standard Open Racks
• The roof should be perforated with at least a 20 percent open area. • The cabinet floor should be open or perforated to enhance cooling. The Cisco R Series rack conforms to these requirements. Cable Management Guidelines To help with cable management, you might want to allow additional space in the rack above and below the chassis to make it easier to route all of the fiber optic or copper cables through the rack. -
Page 55: Appendix B System Specifications
Operating 0 to 13,123 feet (0 to 4,000 meters) Switch Dimensions Switch Width Depth Height Cisco Nexus 93180YC-EX 17.5 inches (44.5 cm) 22.5 inches (57.1 cm) 1.72 inches (4.4 cm) (1 RU) Cisco Nexus 93180YC-EX ACI Mode Hardware Installation Guide... -
Page 56: Switch And Module Weights And Quantities
Some power supplies might have UL listed capabilities that are greater than the maximum power Note requirements for a switch. To determine the power consumption characteristics for the switch, use the typical and maximum requirements listed in the following table. Cisco Nexus 93180YC-EX ACI Mode Hardware Installation Guide... -
Page 57: Power Specifications
Maximum hold-up time 12 ms at 650 W Power supply output voltage 12 VDC Power supply standby voltage 12 VDC Efficiency rating Climate Savers Platinum Efficiency (80Plus Platinum certified) Form factor RSP1 Cisco Nexus 93180YC-EX ACI Mode Hardware Installation Guide... -
Page 58: 1200-W Hvac/Hvdc Power Supply Specifications
Nominal range: -48 to -60 VDC nominal (Range: -40 to -60 VDC) Maximum DC input current 23 A at -48 VDC Maximum input W 1104 W Maximum output power per power 930 W supply Cisco Nexus 93180YC-EX ACI Mode Hardware Installation Guide... -
Page 59: 930-W Dc Power Supply (Port-Side Exhaust) Specifications
Form factor 930-W DC Power Supply Specifications These specifications apply to the following power supplies: Characteristic Specification DC input voltage range Nominal range: -48 to -60 VDC nominal (Range: -40 to -60 VDC Cisco Nexus 93180YC-EX ACI Mode Hardware Installation Guide... -
Page 60: Power Cable Specifications
250 VAC, 10 A, 3112 plug, 8.2 feet (2.5 m) Brazil CAB-250V-10A-BR 250 V, 10 A, 6.9 feet (2.1 m) European Union CAB-9K10A-EU 250 VAC, 10 A, CEE 7/7 plug, 8.2 feet (2.5 m) Cisco Nexus 93180YC-EX ACI Mode Hardware Installation Guide... -
Page 61: Hvac/Hvdc Power Cables Supported By Aci-Mode And Nx-Os Mode Switches
2-foot (0.6 m) cable with Saf-D-Grid and RT connector HVDC CAB-HVDC-3T-2M 6.6-foot (2.0 m) cable with Saf-D-Grid and three terminal connectors All except NO-POWER-CORD No power cord included with switch Argentina, Brazil, and Japan Cisco Nexus 93180YC-EX ACI Mode Hardware Installation Guide... -
Page 62: Dc Power Cable Specifications
Products should comply with CE Markings according to directives 2004/108/EC and 2006/95/EC. Safety • UL 60950-1 Second Edition • CAN/CSA-C22.2 No. 60950-1 Second Edition • EN 60950-1 Second Edition • IEC 60950-1 Second Edition • AS/NZS 60950-1 • GB4943 Cisco Nexus 93180YC-EX ACI Mode Hardware Installation Guide... - Page 63 • CNS13438 Class A EMC: Immunity • EN55024 • CISPR24 • EN300386 • KN 61000-4 series RoHS The product is RoH-6 compliant with exceptions for leaded-ball grid-array (BGA) balls and lead press-fit connectors. Cisco Nexus 93180YC-EX ACI Mode Hardware Installation Guide...
- Page 64 System Specifications Regulatory Standards Compliance Specifications Cisco Nexus 93180YC-EX ACI Mode Hardware Installation Guide...
-
Page 65: Leds
Temperature exceeds minor alarm threshold. Temperature exceeds major alarm threshold. The switch is not receiving power. Green Fans and power supply modules are operational. Amber At least one fan or power supply module is not operating. Cisco Nexus 93180YC-EX ACI Mode Hardware Installation Guide... -
Page 66: Fan Module Leds
Power supply warning—possibly one of the following conditions: amber • High voltage • High power • Low voltage • Power supply installed in chassis but not connected to a power source • Slow power supply fan Cisco Nexus 93180YC-EX ACI Mode Hardware Installation Guide... - Page 67 LEDs Power Supply LEDs Cisco Nexus 93180YC-EX ACI Mode Hardware Installation Guide...
- Page 68 LEDs Power Supply LEDs Cisco Nexus 93180YC-EX ACI Mode Hardware Installation Guide...
-
Page 69: Additional Kits
Console cable with DB-9F and RJ-45F connectors Ground lug kit 1 kit • Two-hole lug (1) • M4 x 8-mm Phillips pan-head screws Not applicable EAC Compliance document Not applicable Hazardous substances list for customers in China Cisco Nexus 93180YC-EX ACI Mode Hardware Installation Guide... - Page 70 Additional Kits Accessory Kit Note If you do not receive a part listed in this document, contact Cisco Technical Support at this URL: https:/ /www.cisco.com/warp/public/687/Directory/DirTAC.shtml. If you purchased this product through a Cisco reseller, you might receive additional contents in your kit, such as documentation, hardware, and power cables.
-
Page 71: Site Preparation And Maintenance Records
Your completion of each task ensures a successful switch installation. Planning Activity Verification Time and Date Space evaluation: Space and layout Floor covering Impact and vibration Lighting Physical access Maintenance access Environmental evaluation: Cisco Nexus 93180YC-EX ACI Mode Hardware Installation Guide... - Page 72 UPS for power failures Grounding: proper wire gauge and lugs Circuit breaker size Grounding evaluation: Data center ground Cable and interface equipment evaluation: Cable type Connector type Cable distance limitations Interface equipment (transceivers) EMI evaluation: Cisco Nexus 93180YC-EX ACI Mode Hardware Installation Guide...
-
Page 73: Contact And Site Information
Data center location Floor location Address (line 1) Address (line 2) City State/Provence Contact person ZIP/postal code Country Chassis and Module Information Use the following worksheet to record information about the switch. Contract number Cisco Nexus 93180YC-EX ACI Mode Hardware Installation Guide... - Page 74 Use the following worksheet to record information about the modules in the switch. Module Slot Module Type Module Serial Number Notes Fan module 1 Fan module 2 Fan module 3 Fan module 4 Power Supply 1 Power Supply 2 Cisco Nexus 93180YC-EX ACI Mode Hardware Installation Guide...