Yamaha SRT-1000 Owner's Manual
Tv surround system
Hide thumbs
Also See for SRT-1000:
- Owner's manual (194 pages) ,
- Owner's manual (30 pages) ,
- Owner's manual (26 pages)
Table of Contents
Advertisement
Available languages
Available languages
Quick Links
Advertisement
Chapters
Table of Contents

Related Manuals for Yamaha SRT-1000


Summary of Contents for Yamaha SRT-1000
- Page 1 TV Surround System 中文 Owner’s Manual Manual de Instrucciones...
- Page 2 • Secure placement or installation is the owner’s − Burning objects (i.e. candles), as they may cause responsibility. Yamaha shall not be liable for any fire, damage to this unit, and/or personal injury. accident caused by improper placement or −...
-
Page 3: Table Of Contents
Contents Supplied items ...............2 About this manual • This manual explains operations using the supplied remote control. Features ..................3 • Marks used in this manual NOTE Frequently asked questions..........3 This indicates precautions for use of the product and its feature limitations. HINT Part names and functions of the unit........4 This indicates supplementary explanations for better use. -
Page 4: Supplied Items
Supplied items Make sure you have received all of the following items. How to use the remote control Preparing the remote control Peel off the protection sheet before use. Unit Remote control Battery x 2 Optical cable (1.5 m [4.9 ft]) Operating range of the remote control (AAA, R03, UM4) Remain within the operating range shown below. -
Page 5: Features
Features Frequently asked questions Enjoy powerful and realistic sound from the unit. The unit is a home The following section covers popular functions and frequently asked questions about the unit. theater system which can be easily installed and connected to a TV and other devices. -
Page 6: Part Names And Functions Of The Unit
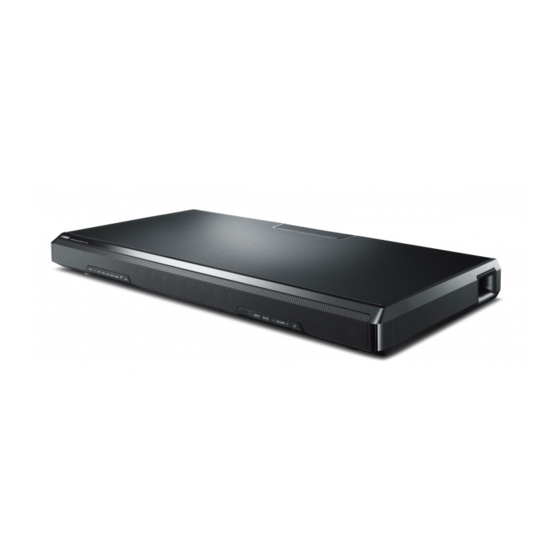
Part names and functions of the unit Front panel Rear panel Overhead view A Indicators Indicate the status of the unit. The indicators will dim automatically if no operations are performed for 5 seconds. Refer to “Operations” (p.8 to 9) for the main functions of the indicators. A SUBWOOFER OUT jack B Remote control sensor For connecting an external subwoofer with a monaural pin cable (p.16). -
Page 7: Connections
Connections Connect to a TV (or other peripheral device). Jack cover Cautions • Do not connect the power cable of the unit to the AC wall outlet before making connections. • Do not use excessive force when inserting the cable plug. Doing so may damage the Power cable cable plug or terminal. -
Page 8: Analog Connection Of An External Device (Game Console)
Analog connection of an external device (game Digital connection of an external device console) You can connect an external device that has a coaxial digital audio output, such as a DVD player, to the COAXIAL input jack of the unit. You can connect an external device, such as a game console or TV that does not have an optical output, to the ANALOG input jacks of the unit. -
Page 9: Installations
Installations Obtaining effective surround sound Optimizing the surround sound effect for effect the installation position To obtain effective surround sound effect, observe the The unit achieves surround sound by reflecting sound Place the unit on a flat surface such as on top of a TV following. -
Page 10: Operations
Operations ★: Keys that require pressing for more than 3 seconds BLUETOOTH STANDBY, AUDIO DELAY, SRT POSITION (L, C, R), CH LEVEL, LEARN Input keys Remote control Indicators signal transmitter Select an input source to be played back. The indicators on the front panel flash or light up, to Transmits infrared signals. - Page 11 ★ SRT POSITION (SRT position) keys (power) key CLEAR VOICE key Turns on or off (standby) the unit. Enables/disables the clear voice function. For optimum surround sound effect, select a When this function is enabled, you can enjoy clear preset position mode according to where the unit Green (turned on) voice sounds while watching movies, TV dramas, is installed (p.10).
-
Page 12: Setting A Surround Sound Effect For The Installation Position (Srt Position)
Select the surround mode key to enjoy realistic surround effects that closely resemble a movie theater, the middle of a music concert, or a sports field event, by Yamaha’s sound The surround sound is achieved by reflecting the sound beams off walls as shown in the field program, “CINEMA DSP.”... -
Page 13: Adjusting The Volume Level Of Each Channel (Ch Level)
While the test-tone is output from the channel to be adjusted, press Adjusting the volume level of each channel (CH the SUBWOOFER key (+ or –) to balance the volume level with the LEVEL) other channels. The surround effect is achieved using six channels (audio outputs) of the unit. While listening to a series of test-tones from the unit, you can adjust the volume level of each channel to balance the sound heard from your listening position. -
Page 14: Listening To The Sound From A Device
The operation varies depending on the device. Refer to the operation manual of the device. Select “SRT-1000 Yamaha” in the device list on the device. If a passkey (PIN) is required, enter the number “0000.” Perform the following steps to use a device with the unit. - Page 15 • Perform connection with the device and unit within 10 meters (33 ft) of each other. • It may be necessary to select “SRT-1000 Yamaha” in the device list again, in the event that a connection problem occurs. You may have to change the output setting to output audio to the unit, By installing the dedicated free application “HOME THEATER CONTROLLER”...
-
Page 16: Settings
Settings While pointing your TV’s remote control at the remote control sensor, hold down the mute key for more than 1 second twice or three times. Programming the unit with the TV’s remote control Approx. 30 cm (1 ft) (TV’s remote control learning function) Once you program the unit, you can control it with your TV’s remote control for functions TV’s remote control such as turning on/off the TV and unit simultaneously, or volume up/down and muting/... - Page 17 Teach the unit the “Volume (+)” code of the TV’s remote control. Clearing all learned operations Press VOLUME (+) on the front panel of the unit. With the unit turned off, hold down the LEARN key on the supplied remote control for more than 3 seconds (for entering the learning While pointing your TV’s remote control at the remote control sensor, hold mode).
-
Page 18: Using An External Subwoofer
Using an external subwoofer Making sound easy to listen at low volume The unit has dual built-in subwoofers; however you can connect an external subwoofer You can change the dynamic range to make sounds easy to hear at a low volume. when you want to enhance low frequency sound. -
Page 19: Setting The Auto Power Standby Function
Setting the auto power standby function Initializing the settings of the unit By enabling the auto power standby function, you can avoid forgetting to turn off the unit Follow the procedure below to initialize the unit. after use, or if you fall asleep while watching TV. Turn off the unit. -
Page 20: Troubleshooting
The unit is not The internal microcomputer is Hold down (power) on the front disconnect the power cable, and contact the nearest authorized Yamaha dealer or frozen, due to an external electric panel of the unit for more than 10 responding service center. - Page 21 No surround Stereo playback is selected. Select the surround mode key to Sound is coming Audio output is enabled on the Change the TV setting to disable the change for surround playback (p.10). TV speaker output. If a setting to effect.
- Page 22 Problem Cause Remedy Cannot make the is not selected as the Select as the input source. input source. unit paired with adaptor, etc., that you Use a adaptor, etc., whose device. want to pair with the unit has a password is “0000.” password other than “0000.”...
- Page 23 When surround effect is not enough How to install YRB-100 The unit outputs sound beams according to the “SRT position” settings (p.9) as shown in The unit achieves its surround sound effects by projecting sound beams which reflect off the following illustrations. walls.
-
Page 24: Specifications
45 Hz to 150 Hz Response Impedance 6 Ω Supported audio PCM (2ch) The “ ” logo and “Cinema DSP” are registered trademarks of Yamaha Corporation. Decoder signal (TV, BD/ Dolby Digital DVD) DTS Digital Surround Digital (Optical) 2 (TV, BD/DVD) “UniVolume”... - Page 25 • The speed of signal transfer and the distance at which communications is possible differs according to the distance between the communicating devices, the presence of obstacles, radio wave conditions and type of equipment. • Yamaha does not guarantee all wireless connections between this unit and devices compatible with function.
- Page 26 Aunque usted apague esta unidad con , esta humedad y/o frío. Para conseguir una ventilación lesiones a las personas. Yamaha no se hará las siguientes lugares: unidad no se desconectará de la fuente de adecuada, deje libres los siguientes espacios, como responsable de ningún daño debido al uso de este...
- Page 27 Índice Elementos suministrados............2 Acerca de este manual • Este manual explica las operaciones con el mando a distancia suministrado. Funciones ................3 • Indicaciones utilizadas en este manual NOTA Preguntas frecuentes ............3 Indica precauciones de uso del producto y sus limitaciones. SUGERENCIA Nombres de partes y funciones de la unidad ......4 Indica explicaciones complementarias para mejorar el uso.
-
Page 28: Elementos Suministrados
Elementos suministrados Compruebe que ha recibido todos los elementos siguientes. Utilización del mando a distancia Preparación del mando a distancia Retire la lámina de protección antes de usarlo. Unidad Mando a distancia Pilas x 2 Cable óptico (1,5 m) Rango operativo del mando a distancia (AAA, R03, UM4) No se aleje más allá... -
Page 29: Funciones
Funciones Preguntas frecuentes Disfrute de un sonido potente y realista desde la unidad. La unidad es un El siguiente apartado aborda las funciones más habituales y las preguntas más frecuentes sobre la unidad. sistema de cine en casa que puede instalarse y conectarse fácilmente a un TV y a otros dispositivos. -
Page 30: Nombres De Partes Y Funciones De La Unidad
Nombres de partes y funciones de la unidad Panel delantero Panel trasero Vista superior A Indicadores Indican el estado de la unidad. Los indicadores se atenúan automáticamente si no se realiza ninguna operación en 5 segundos. Consulte “Funcionamiento” (p.8 a 9) para obtener información sobre las principales A Toma SUBWOOFER OUT funciones de los indicadores. -
Page 31: Conexiones
Conexiones Conecte a un TV (o a otro dispositivo periférico). Tapa de las tomas Precauciones • No conecte el cable de alimentación de la unidad a la toma de corriente de CA antes de realizar las conexiones. • No emplee demasiada fuerza al insertar el conector del cable. Si lo hace, podría Cable de alimentación dañar el conector del cable o el terminal. -
Page 32: Conexión Analógica De Un Dispositivo Externo (Videoconsola)
Conexión analógica de un dispositivo externo Conexión digital de un dispositivo externo (videoconsola) Puede conectar un dispositivo externo con una salida de audio digital coaxial, como un reproductor de DVD, a la toma de entrada COAXIAL de la unidad. Puede conectar un dispositivo externo, como una videoconsola o un televisor sin salida óptica, a través de las tomas de entrada ANALOG de la unidad. -
Page 33: Instalaciones
Instalaciones Obtención de un efecto de sonido Optimización del efecto de sonido envolvente eficaz envolvente para la posición de instalación Para obtener un efecto de sonido envolvente eficaz, Coloque la unidad sobre una superficie plana, como en tenga en cuenta los siguientes puntos. La unidad logra el sonido envolvente mediante el reflejo el estante de un mueble para televisor, y a continuación de los haces sonoros en las paredes. - Page 34 Funcionamiento ★: Teclas que deben pulsarse durante más de 3 segundos BLUETOOTH STANDBY, AUDIO DELAY, SRT POSITION (L, C, R), CH LEVEL, LEARN Teclas de entrada Transmisor de señal Indicadores del mando a distancia Seleccione una fuente de entrada para su reproducción. Los indicadores del panel delantero parpadean o se Transmite señales infrarrojas.
- Page 35 ★ Teclas SRT POSITION (posición SRT) Tecla (encendido) Tecla CLEAR VOICE Enciende o apaga (espera) la unidad. Activa o desactiva la función de claridad de voz. Para conseguir el mejor efecto de sonido Cuando está función está activada, es más claro el envolvente, seleccione un modo de Verde (encendido) sonido de las voces de películas, series de TV,...
-
Page 36: Selección De Un Efecto De Sonido Envolvente Personalizado
SRT POSITION según la posición de instalación de la unidad. eventos deportivos, gracias al programa de campo de sonido de Yamaha “CINEMA DSP”. Puede seleccionar la tecla de modo envolvente que mejor se ajuste a la fuente Mantenga pulsada la tecla SRT POSITION, correspondiente a la que esté... -
Page 37: Ajuste Del Nivel Del Volumen De Cada Canal (Ch Level)
Mientras se emite el tono de prueba del canal que se quiere ajustar, Ajuste del nivel del volumen de cada canal (CH pulse la tecla SUBWOOFER (+ o –) para equilibrar el nivel del LEVEL) volumen con el resto de canales. Los efectos envolventes se logran usando seis canales (salidas de audio) de la unidad. -
Page 38: Escuchar El Sonido Desde Un Dispositivo
La operación varía en función del dispositivo. Consulte el manual de instrucciones del dispositivo. Seleccione “SRT-1000 Yamaha” en la lista de dispositivos del dispositivo. Si le pide una contraseña (PIN), introduzca el número “0000”. Siga los pasos descritos a continuación para utilizar un dispositivo con la unidad. - Page 39 • Establezca la conexión con el dispositivo y la unidad dejando una distancia entre ellos de no más de 10 metros. • Tal vez deba seleccionar “SRT-1000 Yamaha” en la lista de dispositivos otra vez en caso de que tenga problemas con la conexión. Quizá tenga que cambiar el ajuste de salida al audio de salida de la Si instala la aplicación gratuita “HOME THEATER CONTROLLER”...
-
Page 40: Ajustes
Ajustes Dirigiendo el mando a distancia del televisor hacia el sensor de mando a distancia, mantenga pulsada más de 1 segundo, dos o tres veces, la tecla de silencio. Programación de la unidad con el mando a Unos 30 cm distancia del televisor (función de memorización de mando a distancia de televisor) Mando a distancia del televisor... - Page 41 Memorice en la unidad el código de “Volumen (+)” del mando a distancia del televisor. Borrar todas las operaciones memorizadas Pulse VOLUME (+) en el panel delantero de la unidad. Con la unidad apagada, mantenga pulsada la tecla LEARN en el mando a distancia suministrado durante más de 3 segundos (para Dirigiendo el mando a distancia del televisor hacia el sensor de mando a distancia, entrar en el modo de memorización).
-
Page 42: Uso De Un Altavoz De Ultragraves Externo
Uso de un altavoz de ultragraves externo Disfrutar de buen sonido a bajo volumen La unidad dispone de dos altavoces de ultragraves incorporados; no obstante, es Es posible cambiar el rango dinámico para que los sonidos se escuchen bien a bajo posible conectar un altavoz de ultragraves externo si quiere mejorar aún más los volumen. -
Page 43: Configuración De La Función De Consumo En Espera Automática
Configuración de la función de consumo en espera Inicializar los ajustes de la unidad automática Realice el procedimiento siguiente para inicializar la unidad. Si activa la función de consumo en espera automática, no deberá preocuparse por si se Apague la unidad. le olvida apagar la unidad o por si se queda dormido mientras ve la tele. -
Page 44: Resolución De Problemas
(Si intenta encender la unidad en condiciones. Desenchufe el cable de con un centro Yamaha de atención al cliente o concesionario autorizado. estas condiciones, el indicador alimentación de la toma eléctrica de En primer lugar, compruebe lo siguiente: STATUS parpadeará.) - Page 45 No hay efecto Está seleccionada la Seleccione la tecla de modo La unidad no La tecla del mando a distancia del Mantenga la tecla pulsada más de reproducción en estéreo. envolvente para cambiar a la TV no se mantuvo pulsada el 1 segundo dos o tres veces (p.14).
- Page 46 No se produce La conexión de la Vuelva a realizar el proceso de unidad con el dispositivo se ha conexión (p.13). sonido o el Problema Causa Solución cancelado. sonido se interrumpe no está seleccionado Seleccione como fuente de No es posible no está...
- Page 47 Si el efecto envolvente no es suficiente Cómo instalar el YRB-100 La unidad emite haces sonoros según los ajustes de “Posición SRT” (p.9) tal como se La unidad logra efectos de sonido envolvente mediante la proyección de haces sonoros que se puede ver en las ilustraciones siguientes.
- Page 48 PCM (2 canales) Descodificador admitida (TV, BD/ Dolby Digital DVD) DTS Digital Surround El logotipo “ ” logo y “Cinema DSP” son marcas comerciales registradas de Yamaha Corporation. Digital (Óptica) 2 (TV, BD/DVD) Tomas de Digital (Coaxial) 1 (COAXIAL) entrada “UniVolume”...
- Page 49 • Yamaha no garantiza el funcionamiento de todas las conexiones inalámbricas entre esta unidad y otros dispositivos compatibles con...
- Page 50 注意:在操作本机之前请阅读此部分。 • 要确保最好的性能,请仔细阅读此 成人体伤害。 Yamaha 将不对由于在 • 请勿混用不同类型的电池 (例如碱 警告 手册。请将它保存在安全的地方以 本机上使用非规定电压而造成的任 性电池和锰电池) 。因为这些类型不 为了减小火灾或电击的风险,不要将 备将来参考。 何损害负责。 同的电池的形状和颜色可能相同, 本机暴露在雨中或放置在潮湿的地方。 所以请仔细阅读包装上的说明。 • 请将本音响系统安装在通风良好、阴凉、 • 为了避免雷击造成损坏,在雷电期 干燥、干净的位置— 远离直射阳光、热 间,将电源导线从墙壁上的电源插 • 电量耗尽的电池可能会漏液。如果电 只要本机连接在电源插座上,即使 源、振动、灰尘、潮湿和 / 或寒冷。为确 座拔下,也将天线从本机上拔下。 池漏液,请立即丢弃。请勿触摸漏出 您使用 按钮关闭了本机,机器与 保正常通风,至少需要以下空间 (本机 的液体,也不要让其接触衣物等。安...
- Page 51 目录 附带的物品................2 关于本手册 • 本手册介绍使用附带遥控器的操作。 功能 ..................3 • 本手册中使用的标记 注 常见问题 .................3 这表示与本产品的使用及其功能限制有关的注意事项。 主机部件名称和功能 ..............4 提示 这表示为方便使用而提供的补充说明。 连接 ..................5 外部装置 (游戏机)的模拟连接 ..............6 外部装置的数字连接..................6 安装 ..................7 操作 ..................8 设定安装位置的环绕声效果 (SRT 位置)..........10 选择满意的环绕声效果.................. 10 调节各声道音量 (CH LEVEL)..............11 聆听来自 装置的声音......... 12 设置...
-
Page 52: 附带的物品
附带的物品 确保您收到了以下所有物品。 如何使用遥控器 准备遥控器 使用前撕下保护膜。 主机 遥控器 电池 x 2 光纤缆线 (1.5 m) 遥控器的操作范围 (AAA,R03,UM4) 保持在以下所示的操作范围内。 6 m 以内 使用说明书 (本说明书)... -
Page 53: 常见问题
功能 常见问题 以下章节介绍关于本机的常用功能和常见问题。 欣赏本机给您带来的强劲而又逼真的音效。本机是一款家庭影院系统,安装方 便,还可以轻松连接电视机和其他设备。 本机上可以放置多大尺寸的电视机? 本机上可放置重量不超过 40 kg,底座宽度不超过 750 mm、厚度不 • 数字声音投射 超过 340 mm 且屏幕不超过 55 英寸的平板电视机。 将多个小扬声器集成,从而优化了独立的声束。通过房间墙壁对声束的反 射,增强了环绕声效果 (第 10 页) 。 是否可以使用电视机的遥控器操作本机? 在电视机和本机的遥控器之间切换不方便。 • 环绕声模式 是。通过 “ 电视机的遥控学习 ” 功能可以使用电视机的遥控器控制本 欣赏逼真的环绕声效果。从以下五种环绕声模式中选择一种 (电影、音 机 (第 14 页) 。 乐、体育、游戏、电视节目)作为要播放音源的环绕声模式... -
Page 54: 主机部件名称和功能
主机部件名称和功能 前面板 后面板 顶视图 A指示灯 指示本机的状态。如果 5 秒钟未执行任何操作,指示灯将自动变暗。 有关指示灯的主要功能,请参阅 “ 操作 ” (第 8 至 9 页) 。 B遥控传感器 ASUBWOOFER OUT 插孔 接收本机的遥控器的红外线信号 (第 2 页) 。 用于单声道针脚插头缆线 (第 16 页)连接外部超低音扬声器。 CINPUT 键 BANALOG 输入插孔 选择要播放的输入源 (第 8 页) 。 用于... - Page 55 连接 连接到电视机 (或其他外部装置) 。 插孔盖 注意 • 在连接之前,请勿将本机的电源线连接到交流电源插座。 • 插入缆线插头时切勿用力过大。否则可能损坏缆线插头或端 电源线 子。 至交流电源插座 主机 (背面) 顶视图 取下本机顶部面板上的插孔盖。 使用光纤缆线 (附带)连接电视机和本机。 取下光纤缆线的盖帽,然后检查插头的方向。 将本机的电源线连接到交流电源插座。 按如下所示设置电视机。 • 将电视机音量设定至最小。 • 禁用电视机内置扬声器输出 (如果可用) 。 提示 光纤缆线 安装插孔盖。 在以下情况下,用光纤缆线 (市售)将播放装置的光纤输出 光纤缆线 (市售) 连接到本机的 BD/DVD 输入, 然后按遥控器上 BD/DVD 键选 择输入源。...
-
Page 56: 外部装置 (游戏机)的模拟连接
外部装置 (游戏机)的模拟连接 外部装置的数字连接 可以将没有光纤输出的外部装置 (如游戏机或电视机)连接到本机的 可以将具有同轴数字音频输出的外部装置 (如 DVD 播放机)连接到本机的 ANALOG 输入插孔。 COAXIAL 输入插孔。 主机 (背面) 主机 (背面) 顶视图 顶视图 同轴数字缆线 (市售) RCA 立体声缆线 (等) (市售) 同轴数字 音频输出 (橙色) 游戏机 (等) 注 注 • 确保正确连接左 (L)和右 (R)声道。 • 按遥控器上 COAXIAL 键选择输入源。 •... - Page 57 安装 获得显著的环绕声效果 优化安装位置的环绕声效果 若要获得显著的环绕声效果,请遵守以下要点。 本机是通过反射墙壁的声束来实现环绕声效果。通 过根据本机的安装位置设定 SRT 位置而获得卓越 将本机放在平坦表面 (如电视机柜上面) ,然后将 环绕声效果。打开本机后,按住与安装位置对应的 电视机放在本机上。 SRT POSITION 键超过 3 秒。 有关详情,请参阅 “ 设定安装位置的环绕声效果 (SRT 位置) ” (第 10 页) 。 注意 在以下环境中可能无法实现有效的环绕声效果。 • 声束被家具等障碍物阻挡。 • 房间大小不在以下尺寸范围内: 宽度:3 米至 7 米 深度:3 米至 7 米 高度:2 米至...
- Page 58 操作 ★: 需要按住超过 3 秒的键 BLUETOOTH STANDBY, AUDIO DELAY, SRT POSITION (L, C, R), CH LEVEL, LEARN 输入键 指示灯 选择要播放的输入源。 遥控器信号发射器 前面板上的指示灯闪烁或点亮,表示操作和设置状 发出红外线信号。 所选输入源的指示灯点亮。 态。 (示例:选择电视机时) TV.....电视音频 BD/DVD ..连接到BD/DVD 输入插孔的 ★ 装置输出的音频 COAXIAL ..连接到 COAXIAL 输入插孔 的装置输出的音频 在本说明书中,使用一排 9 个指示灯的图示进行说 ANALOG ..连接到...
- Page 59 ★ (电源)键 CLEAR VOICE 键 SRT POSITION (SRT 位置)键 打开或关闭 (待机)本机。 启用 / 禁用语音清晰功能。 为了使环绕声达到卓越效果,请根据本机的 启用此功能后,您可在观看电影、电视剧、 安装位置选择一个预设位置模式 绿色 (打开) (第 10 页) 。 新闻节目或体育节目时欣赏到清晰的语音。 红色 ( 待机) (第 13 页) 熄灭 (关闭) 闪烁 3 次 (已启用) ,闪烁 1 次 (已禁用) 解码器指示...
-
Page 60: 设定安装位置的环绕声效果 (Srt 位置
设定安装位置的环绕声效果 (SRT 位置) 选择满意的环绕声效果 如下图所示,通过墙壁反射声束实现环绕声。为了获得卓越环绕声效果,请打 选择环绕声模式键,通过 Yamaha 声场程序 “CINEMA DSP”,欣赏酷似电影 开本机,并根据本机的安装位置选择 SRT POSITION 键。 院、音乐会现场或体育赛事等逼真环绕声效果。可以从 MOVIE、 MUSIC、 SPORTS、 GAME 或 TV PROGRAM 中选择一个最适合音源的环绕声模式键。 按住与本机安装位置对应的 SRT POSITION 键 3 秒以上。 播放音源。 前面板上的指示灯根据设定的位置而闪烁。 按一个环绕声模式键(MOVIE、MUSIC、SPORTS、GAME 或 TV 左 PROGRAM) 。 中 前面板上的 SURROUND 指示灯将点亮。... -
Page 61: 调节各声道音量 (Ch Level
在要调节的声道正在输出测试音调的情况下,按 SUBWOOFER 键 调节各声道音量 (CH LEVEL) (+ 或 -) ,使音量与其他声道保持平衡。 使用本机的六个声道 (音频输出)实现环绕声效果。听着本机发出的一系列测 试音调,即可调节各声道的音量,使从听者位置听到的声音达到平衡。 (当本 机处于立体声播放模式时,无法进行各声道的音量调整。 ) 按住遥控器上的 CH LEVEL 键 3 秒以上。 在音量调节过程中,测试音调的循环停止。完成当前声道音量调节后,松 开 + 或 - 键,稍等片刻后即恢复测试音调循环。通过指示灯点亮情况即可 查看音量。 在输出测试音调时, STATUS 指示灯闪烁绿色。测试音调按照以下顺序循 环通过各个声道。测试音调从各个声道轮流输出两秒钟。通过指示灯的闪 调节完成后,再次按 CH LEVEL 键。 烁,即可确认哪个声道正在播放测试音调。 测试音调停止。 提示 测试音调流程... - Page 62 置的 “ 配对 ”,以后与该装置的连接将无需 “ 配对 ”。 按附带遥控器上的 BLUETOOTH 键, 选择 作为输入源。 可以从智能手机或数字音乐播放机等 装置以无线的方式播放。 更多详情,还请参阅 装置的使用说明书。 前面板上的 BLUETOOTH 指示灯将点亮绿色。 装置 点亮 打开要配对装置的 功能,执行配对。 操作视装置而异。请参阅装置的使用说明书。 在装置上 装置列表中选择 “SRT-1000 Yamaha”。 如果需要密码 (PIN) ,请输入数字 “0000”。 执行以下步骤将 装置与本机配合使用。 对于首次 连接 对于随后的 连接 完成配对时,装置上出现 或完成消息。 注 将 装置 与本机配对...
- Page 63 连接时,将打开本机并准备播放来自该装置的声音。 关机联动功能 (当本机打开时) 注 终止 装置上的 连接时,将关闭本机。 (仅当选择 • 请在彼此相距 10 米范围内执行装置与本机的 连接。 BLUETOOTH 作为输入源时。 ) • 如果发生连接问题,可能需要再次选择 装置列表中的 “SRT-1000 Yamaha”。可能必须更改输出 设置才能将音频输出到本机,具体取决于您使用的 装置。 • 根据需要调节 装置的音量。 使用 HOME THEATER CONTROLLER 应用程序 • 如果已有 装置连接到本机,请终止该 连接,然后建立与新装置的连接。 通过将专用的免费应用程序 “HOME THEATER CONTROLLER” 安装到...
-
Page 64: 使用电视遥控器对本机编程 (电视遥控器学习功能
设置 4-2 将电视遥控器对准遥控传感器,同时按住静音键 1 秒以上两次或三次。 使用电视遥控器对本机编程 (电视遥控器学习功 约 30 cm 能) 电视遥控器 一旦对本机编程,即可使用电视遥控器控制本机,操作同时打开 / 关闭电视机 和本机、或调高 / 调低本机的音量和使本机静音 / 取消静音等功能。 • 此功能仅当电视遥控器使用 IR (红外线)信号时可用。 • RF (射频)遥控器将不起作用。 • 如果想要使用有线电视或卫星机顶盒的遥控器操作本机,请使用原始电视机的 IR (红外线)遥控器对本 机编程,然后使用机顶盒的遥控器进行操作。 • 如果改变本机的音量时,电视机的音量也改变,请将电视机的音量设定为最小或禁用扬声器输出。 按住 放开 按住 放开 (1 秒以上) (1 秒以上)... - Page 65 教本机获得电视遥控器的 “ 音量 (+) ” 代码。 清除所有已学习的操作 6-1 按本机前面板上的 VOLUME (+) 。 本机关闭时, 按住附带遥控器上的 LEARN 键 3 秒以上 (进入学习模 式) 。 6-2 将电视遥控器对准遥控传感器,同时按住音量 (+)键 1 秒以上两次或三 当本机进入学习模式后,前面板上的指示灯将按如下所示闪烁。 次。 测定结果 哔哔声 / 嗡嗡声 指示灯 学习成功 一次 点亮 学习失败 按住本机前面板上的 INPUT 3 秒以上。 * 从步骤...
-
Page 66: 使用外部超低音扬声器
使用外部超低音扬声器 使声音在低音量情况下也容易听清 本机内置双超低音扬声器,但如果想要增强低音效果,也可以连接一个外部超 您可以更改动态范围,使声音在低音量情况下也容易听清。 低音扬声器。将超低音扬声器连接到本机的 SUBWOOFER OUT 插孔。 关闭本机。 按住所需模式键 5 秒以上。 返回 Normal 设置为 Standard 设置为 Maximum 主机 (背面) 本机按所选择的设置打开。 顶视图 有三种设置可供使用 (见下方) 。 本机开启时,可以通过指示灯的亮灯情况确认设置状态。 超低音扬声器的插头缆线 (市售) 设置 说明 指示灯 根据音源的音量自动调节动态范围。 Normal 绿色点亮 Standard 压缩动态范围,以适合现场房间等环境。 单声道输入 橙色点亮 注 Maximum 不压缩动态范围。... -
Page 67: 设置自动电源待机功能
设置自动电源待机功能 初始化本机的设置 通过启用自动电源待机功能,可以避免忘记在使用后,或看着电视睡着的情况 按照下列步骤初始化本机。 下关闭本机。 关闭本机。 注 按住本机前面板上的 (电源) 3 秒以上。 • 当自动电源待机功能启用且满足以下一种条件时,本机将自动关闭。 − 8 小时未操作 − 当 BLUETOOTH 选择作为输入源时, 20 分钟没有音频输入和任何操作。 闪烁 (初始化完成) 本机关闭时, 按住本机遥控器上的 MUTE 键 5 秒以上启用 / 禁用自动 电源待机功能。 打开本机时,您可通过 BD/DVD 指示灯查看自动电源待机功能的状态。 熄灭 (已启用) ,点亮 (已禁用) 提示... -
Page 68: 故障排除
(第 20 页) 。 突然停止工作。 在,请将电源线从交流电源插座中断 本机离另一个数字或高频装置太 将这些装置从本机旁移走。 可听见噪音。 开,然后重新插入。 ) 近。 已激活了保护电路。 (本机前面板 确认所有连接正确建立后,重新打开本 上的 STATUS 指示灯闪烁。 ) 机。如果电源经常突然关闭,请从交流 电源插座中拔出电源线插头,然后联络 距离您最近的 Yamaha 授权的经销商 或服务中心。 当 待机模式启用时, 禁用 待机模式 设备上的 连 (第 13 页) 。 接终止。 已连续三次激活了保护电路。 (如 出于保护产品的目的,您将无法打开电 无法打开电源。... - Page 69 遥控器 问题 原因 解决措施 问题 原因 解决措施 本机不在操作范围内。 请在操作范围内使用遥控器 未选择 作为输入源。 选择 作为输入源。 使用遥控器无法控 本机无法与 (第 2 页) 。 制本机。 装置配 要与本机配对的 适配器 使用密码为 “0000” 的 适配 对。 电池电力微弱。 更换新电池 (第 2 页) 。 等的密码不是 “0000”。 器等。 本机的遥控传感器暴露在直射阳光 调节光线角度或重新摆放本机。 本机和装置离得太远。 将装置移到距本机更近的地方。...
- Page 70 环绕声效果不足时 如何安装 YRB-100 本机如下图所示,根据 “SRT 位置 ” 设置 (第 9 页)输出声束。 本机是通过投射墙壁反射的声束来实现环绕声效果。由于家具等物体处于声束 通过的路径上,或因房间的形状等原因,造成声束没有反射到听者位置。在此 在声束的经过路径上安装 YRB-100。 情况下,声音可能会不平衡。 表示建议的安装位置。 FL:左前 FR:右前 SL:左环绕声 SR:右环绕声 图 1. 理想情况 SRT 位置:中 图 2. 因没有墙壁,环绕声 (右)声束未能反射。 声束反射正确,且环绕声效果平衡。 环绕声 (右)比环绕声 (左)弱,或环绕声 (右)处 于正确位置的前面。 如果声束未能反射到听者位置 (图 2) ,您可以通过安装选购的声音反射板 (YRB-100)进行调节。...
- Page 71 150 Hz 至 22 kHz * 规格若有变更,恕不另行通知。 阻抗 6 Ω 类型 低音反射型 8.5 cm 锥体非磁屏蔽型 x 2 驱动单元 ” 标志和 “Cinema DSP” 是 Yamaha Corporation 的注册商标。 “ 超低音扬声器 45 Hz 至 150 Hz 频率响应 6 Ω 阻抗 “UniVolume” 是 Yamaha Corporation 的商标。...
- Page 72 装置的影响时,这种影响可能会降低通信速度或缩短通信距离,有时候会干 扰通信。 • 根据通信装置之间的距离、存在的障碍物、无线电波状态和设备类型而定, 信号传输速度和可通信距离会有不同。 • Yamaha 不保证本机与兼容 功能的装置之间的所有无线连接。 ■ 使用频率:2400 ~ 2483.5MHz ■ 等效全向辐射功率 (EIRP)<= 10mW ■ 容限:+-75kHz • 不得擅自更改发射频率、加大发射功率 (包括额外加装射频功率放大器) , 不得擅自外接天线或改用其它发射天线; • 使用时不得对各种合法的无线电通信业务产生有害干扰;一旦发现有干扰 现象时,应立即停止使用,并采取措施消除干扰后方可继续使用; • 使用微功率无线电设备,必须忍受各种无线电业务的干扰或工业、科学及 医疗应用设备的辐射干扰; • 不得在飞机和机场附近使用。 © 2014 Yamaha Corporation Printed in Indonesia ZQ11890...