
Related Manuals for D-Link DCH-B112A1


Summary of Contents for D-Link DCH-B112A1
- Page 1 Door/Window Sensor DCH-B112A1 User Manual 07/17/2019 Hardware: A1 Manual Version: 1.00...
- Page 2 Manual Overview D-Link reserves the right to revise this publication and to make changes in the content hereof without obligation to notify any person or organization of such revisions or changes. Information in this document may become obsolete as our services and websites develop and change.
-
Page 3: Table Of Contents
Safety ....................4 Before you Begin ................4 Wireless Installation Considerations ........5 mydlink App Device Setup ............6 Using the mydlink App ............10 Controlling Your Device ............10 Device .....................11 Troubleshooting ..............13 Technical Specifications ..........14 Regulatory Information ..........16 D-Link DCH-B112A1 User Manual... -
Page 4: Product Overview
Section 1 - Product Overview Product Overview Package Contents DCH-B112A1 || Door/Window Sensor Double-sided Tape Pieces CR2 Battery Quick Installation Guide If any of the above items are missing, please contact your reseller. Note: Using a battery with a different voltage rating than recommended for this product will cause damage and void the warranty for this product. -
Page 5: Introduction
Introduction The D-Link DCH-B112A1 Door/Window Sensor is a wireless sensor that connects to a DCS-8330LH Smart Full HD Wi-Fi Camera with built-in smart home hub, as well as other mydlink Smart DIY devices with built-in hub functionality. You can install any- where you want to detect the opening or closing of a door or window. -
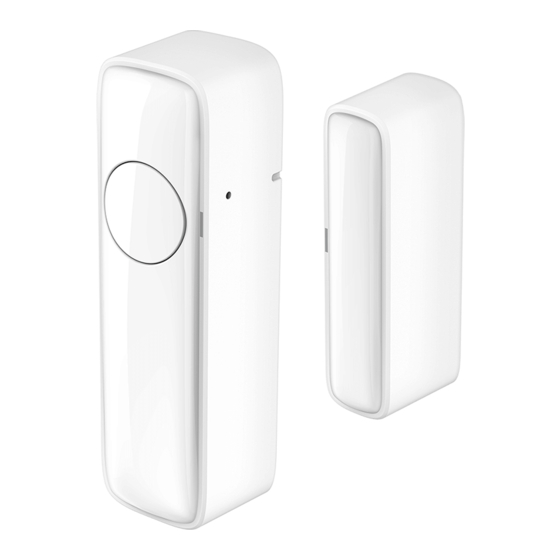
Page 6: Hardware Overview
Reset / Bypass button until the LED blinks red in order to reset the sensor to factory default settings. Alignment notch Use these notches to align both the Main Sensor Unit and the Magnetic Trigger during mounting. D-Link DCH-B112A1 User Manual... -
Page 7: Installation
• Verify that your device is within wireless range of a mydlink Smart DIY hub device. • Mount both the Main Sensor Unit and the Magnetic Trigger with the alignment notches aligned. • Make sure that they are firmly mounted and won't fall off. D-Link DCH-B112A1 User Manual... -
Page 8: Wireless Installation Considerations
Wireless Installation Considerations The DCH-B112A1 Door/Window Sensor connects to your network using a wireless connection from virtually anywhere within the operating range of your mydlink Smart DIY hub device. Keep in mind that the number, thickness and location of walls, ceilings, or other objects that the wireless signals must pass through may limit the range. - Page 9 Please make sure that the sensor is not next to a magnetic area. Proper Placement: The Main Sensor Unit must be placed at most 0.79 in, approximately 3 / 4 in (20 mm), away from the Magnetic Trigger with the alignment notches aligned. 0.79 in max D-Link DCH-B112A1 User Manual...
-
Page 10: Mydlink App Device Setup
Launch the mydlink app and create a new account or sign in to your existing account. Note: On Android, if you are asked about allowing the app to access your location, select Allow. Make sure location services are turned on in your phone’s settings. D-Link DCH-B112A1 User Manual... - Page 11 After logging in, tap the Menu button in the top-left corner. Select Add New Device. Note: Ensure your mydlink smart DIY hub device is setup first. For more information on mydlink Smart DIY, please visit: dlink.com/SmartDIY D-Link DCH-B112A1 User Manual...
- Page 12 When asked to scan a Setup Code, select Yes or No. If you selected Yes: Scan the setup code on the bottom of the sensor. If you selected No: Select DCH-B112 from the sensor list, then press Next. D-Link DCH-B112A1 User Manual...
-
Page 13: Controlling Your Device
Note: If you experience issues registering this sensor with your mydlink account, or if you purchased an open box or resold unit, perform a hard reset by pressing and holding the reset button on the device until the status LED blinks red. D-Link DCH-B112A1 User Manual... -
Page 14: Using The Mydlink App
> Devices > Sensor > navigate to your sensor on the carousel > • From the home page, tap or tap on the sensor's icon. The device page contains several options for you to configure your sensor. D-Link DCH-B112A1 User Manual... - Page 15 Tap here to add, remove, or edit designated contacts that appear in Designated Contact the rich notification. Tap this button to remove this device from your mydlink account. Remove Device Note: To relink the device, reset it to factory default settings and run the setup process again. D-Link DCH-B112A1 User Manual...
-
Page 16: Troubleshooting
Why is my sensor not being triggered? The Main Sensor Unit must be placed at most 0.79 in, approximately 3 / 4 in (20 mm), away from the Magnetic Trigger with the alignment notches aligned. D-Link DCH-B112A1 User Manual... -
Page 17: Technical Specifications
Power Consumption • < 3 W Maximum Load • 1800 W Temperature • Operating: 32 to 104 °F • Storage: -4 to 149 °F Humidity • Operating: 10% to 90% non-condensing • Storage: 5% to 95% non-condensing D-Link DCH-B112A1 User Manual... - Page 18 Appendix A - Technical Specifications Certifications • FCC • cUL • IC • RoHS Compliance Order Information Part Number Description DCH-B112A1 Smart Door/Window Sensor D-Link DCH-B112A1 User Manual...
-
Page 19: Regulatory Information
Note The country code selection is for non-USA models only and is not available to all USA models. Per FCC regulations, all WiFi product marketed in the USA must be fixed to USA operational channels only. D-Link DCH-B112A1 User Manual... - Page 20 20cm between the radiator and any part of your body. Pour se conformer aux exigences de conformité CNR 102 RF exposition, une distance de séparation d'au moins 20 cm doit être maintenue entre l'antenne de cet appareil ettoutes les personnes. D-Link DCH-B112A1 User Manual...
- Page 21 Max. Output Power (EIRP) Frequenzband Max. Output Power Fréquence bande(s) Consommation d’énergie max. Bandas de Frecuencia Potencia máxima de Salida Frequenza/e Potenza max. Output Frequentie(s) Max. Output Power 2.4 G 2.4 – 2.4835 GHz 100 mW D-Link DCH-B112A1 User Manual...
- Page 22 υλικολογισμικό του προϊόντος είναι διαθέσιμα για λήψη από τη σελίδα του προϊόντος στην τοποθεσία www.dlink. com. Par les présentes, D-Link Corporation déclare que ce produit, ces accessoires et ce logiciel sont conformes aux Français [French] directives 2014/53/UE.Le texte complet de la déclaration de conformité de l'UE et le icroprogramme du produit sont disponibles au téléchargement sur la page des produits à...
- Page 23 2014/53/EU. Pełen tekst deklaracji zgodności UE oraz oprogramowanie sprzętowe do produktu można pobrać na stronie produktu w witrynie www.dlink.com. Desta forma, a D-Link Corporation declara que este produto, os acessórios e o software estão em conformidade Português [Portuguese] com a diretiva 2014/53/UE. O texto completo da declaração de conformidade da UE e do firmware...
- Page 24 Appendix B - Regulatory Information Hér með lýsir D-Link Corporation því yfir að þessi vara, fylgihlutir og hugbúnaður eru í samræmi við tilskipun Íslenska [Icelandic] 2014/53/EB. Sækja má ESB-samræmisyfirlýsinguna í heild sinni og fastbúnað vörunnar af vefsíðu vörunnar á www.
- Page 25 Access Points unterstützen die Funktionen DFS (Dynamic Frequency Selection) und TPC (Transmit Power Control) wie erforderlich bei Betrieb auf 5 GHz innerhalb der EU. • Bitte schlagen Sie im Handbuch oder Datenblatt nach nach, ob Ihr Gerät eine 2,4 GHz und / oder 5 GHz Verbindung nutzt. D-Link DCH-B112A1 User Manual...
- Page 26 5 Ghz dentro de la UE. • Por favor compruebe el manual o la ficha de producto para comprobar si el producto utiliza las bandas inalámbricas de 2.4 GHz y/o la de 5 GHz. D-Link DCH-B112A1 User Manual...
- Page 27 Toegangspunten ondersteunen DFS (Dynamic Frequency Selection) en TPC (Transmit Power Control) functionaliteit zoals vereist bij gebruik in 5 GHz binnen de EU. • Raadpleeg de handleiding of de datasheet om te controleren of uw product gebruik maakt van 2.4 GHz en/of 5 GHz. D-Link DCH-B112A1 User Manual...
- Page 28 • Halten Sie das Produkt von Heizkörpern und anderen Quellen fern, die Wärme erzeugen. • Trennen Sie das Produkt immer von der Stromzufuhr, bevor Sie es reinigen und verwenden Sie dazu ausschließlich ein trockenes fusselfreies Tuch. D-Link DCH-B112A1 User Manual...
- Page 29 • Mantenga el producto alejado de los radiadores y de otras fuentes de calor. • Desenchufe siempre el producto de la alimentación de red antes de limpiarlo y utilice solo un paño seco sin pelusa. D-Link DCH-B112A1 User Manual...
- Page 30 • Houd het product uit de buurt van radiators en andere warmtebronnen. • U dient het product steeds los te koppelen van de stroom voordat u het reinigt en gebruik uitsluitend een droge pluisvrije doek. D-Link DCH-B112A1 User Manual...
- Page 31 D-Link designs and builds its products to be as environmentally friendly as possible, by using recyclable, low toxic materials in both products and packaging. D-Link recommends that you always switch off or unplug your D-Link products when they are not in use. By doing so you will help to save energy and reduce CO2 emissions.
- Page 32 D-Link et l’environnement Chez D-Link, nous sommes conscients de l'impact de nos opérations et produits sur l'environnement et nous engageons à le réduire. Pour limiter cet impact, D-Link conçoit et fabrique ses produits de manière aussi écologique que possible, en utilisant des matériaux recyclables et faiblement toxiques, tant dans ses produits que ses emballages.
- Page 33 D-Link zijn producten zo milieuvriendelijk mogelijk, door het gebruik van recycleerbare producten met lage toxiciteit in product en verpakking. D-Link raadt aan om steeds uw D-Link producten uit te schakelen of uit de stekker te halen wanneer u ze niet gebruikt. Door dit te doen bespaart u energie en beperkt u de CO2-emissies.
- Page 34 D-Link a životní prostředí Ve společnosti D-Link jsme si vědomi vlivu našich provozů a výrobků na životní prostředí a snažíme se o minimalizaci těchto vlivů. Proto své výrobky navrhujeme a vyrábíme tak, aby byly co nejekologičtější, a ve výrobcích i obalech používáme recyklovatelné a nízkotoxické materiály.
- Page 35 D-Link produkter som er så miljøvennlig som mulig, ved å bruke resirkulerbare, lav-toksiske materialer både i produktene og forpakningen. D-Link anbefaler at du alltid slår av eller frakobler D-Link-produkter når de ikke er i bruk. Ved å gjøre dette hjelper du å spare energi og å redusere CO2-utslipp.
- Page 36 D-Link sine produkter, så de er så miljøvenlige som muligt, ved at bruge genanvendelige materialer med lavt giftighedsniveau i både produkter og emballage. D-Link anbefaler, at du altid slukker eller frakobler dine D-Link-produkter, når de ikke er i brug. Ved at gøre det bidrager du til at spare energi og reducere CO2-udledningerne.
- Page 37 D-Link och miljön På D-Link förstår vi och är fast beslutna att minska den påverkan våra verksamheter och produkter kan ha på miljön. För att minska denna påverkan utformar och bygger D-Link sina produkter för att de ska vara så miljövänliga som möjligt, genom att använda återvinningsbara material med låg gifthalt i både produkter och förpackningar.