
Related Manuals for Motorola Avigilon H5 Pro Series


Summary of Contents for Motorola Avigilon H5 Pro Series
- Page 1 Installation Guide Avigilon™ H5 Pro High Definition Professional IP Camera Models: 61C-H5PRO-B, 40C-H5PRO-B, 26C-H5PRO-B, 16C-H5PRO-B and 8C-H5PRO-B...
- Page 2 Important Safety Information This manual provides installation and operation information and precautions for the use of this device. Incorrect installation could cause an unexpected fault. Before installing this equipment read this manual carefully. Please provide this manual to the owner of the equipment for future reference. This Warning symbol indicates the presence of dangerous voltage within and outside the product enclosure that may result in a risk of electric shock, serious injury or death to persons if proper precautions are not followed.
- Page 3 Use only UL-listed mounting bracket suitable for the mounting surface and minimum 0.5 kg (1.1 lb) weight, plus the weight of the attached lens. Avoid leaving the image sensor exposed for extended periods of time. Always cover the image sensor with either a lens or a dust cap. Do not allow dust, moisture or any other foreign debris to enter the lens mount.
- Page 4 This symbol means that according to local laws and regulations your product should be disposed of separately from household waste. When this product reaches its end of life, take it to a collection point designated by local authorities. Some collection points accept products for free. The separate collection and recycling of your product at the time of disposal will help conserve natural resources and ensure that it is recycled in a manner that protects human health and the environment.
- Page 5 Legal Notices © 2020, Avigilon Corporation. All rights reserved. AVIGILON, the AVIGILON logo, AVIGILON CONTROL CENTER, and ACC are trademarks of Avigilon Corporation. ONVIF is a trademark of Onvif, Inc. Other names or logos mentioned herein may be the trademarks of their respective owners. The absence of the symbols ™ and ®...
-
Page 6: Table Of Contents
Table of Contents Overview Front View Rear View Installation Required Tools and Materials Camera Package Contents Installation Steps Mounting and Aiming Video Analytics Cameras Mounting the Lens Mounting the Camera Connecting Cables Initializing a Camera Username and Password Assigning an IP Address Accessing the Live Video Stream Aiming and Focusing the Camera (Optional) Configuring Onboard Storage... -
Page 7: Overview
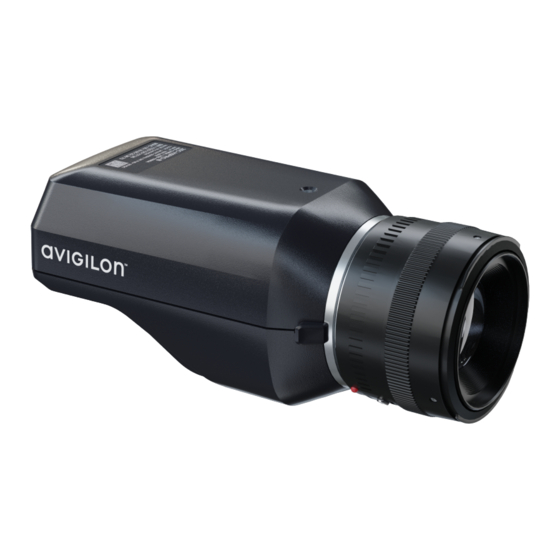
Overview Front View 1. Lens mount Accepts EF and EF-S lenses. 2. Lens release button Releases the lens that is mounted on the camera. 3. EF-S mount index A white mark on the lens mount to help you align an EF-S lens to the camera. 4. -
Page 8: Rear View
Rear View 1. SD card slots Accepts up to two microSD cards for onboard storage. 2. Power connector block Accepts a terminal block with either an AC or DC power connection. DC input can be either polarity. Only required when Power over Ethernet is not available. 3. - Page 9 Accepts an SFP optical fiber connection to the network. This port can be used instead of the Ethernet port for network connection. Server communication and image data transmission occurs over this connection. Ethernet communication is disabled when an SFP module is installed. 8.
-
Page 10: Installation
Installation Required Tools and Materials Small slotted screwdriver with 5/64” or 2 mm blade width — for connecting power when not using Power over Ethernet. Mounting bracket, enclosure or tripod. EF or EF-S mount lens Camera Package Contents Ensure the package contains the following: Avigilon™... - Page 11 imaging capabilities. To avoid poor image quality caused by incorrect lens selection, only use lenses that are recommended by Avigilon for use with this camera model. For a list of lenses recommended for use with this camera model, contact your Avigilon dealer or representative. Note: If the lens includes a collar, the collar must be used to prevent damage to the lens mount on the camera.
-
Page 12: Mounting The Camera
To detach a lens, complete the following steps: 1. Disconnect power from the camera. 2. While pressing the lens release button, turn the lens counterclockwise until it stops. 3. Remove the lens from the camera. Immediately mount another lens or a dust cap on the lens mount to prevent contamination. - Page 13 To connect the cables required for proper operation, complete the following: 1. If external input or output devices are part of the installation (for example: door contacts, relays, etc.), connect the devices to the I/O connector block. 2. If an external microphone or speaker is required, connect the devices to the audio connector. 3.
-
Page 14: Initializing A Camera Username And Password
Tip: If the expected camera bandwidth will be near 80 Mbps or more, Avigilon recommends connecting the camera to a Gigabit Ethernet connection. The Link LED indicator will turn on once a network link has been established. 5. Check that the Connection Status LED indicator indicates the correct state. For more information, see Connection Status LED Indicator on page 13. -
Page 15: Accessing The Live Video Stream
Note: If the camera cannot obtain an IP address from a DHCP server, it will use Zero Configuration Networking (Zeroconf) to choose an IP address. When set using Zeroconf, the IP address is in the 169.254.0.0/16 subnet. The IP address settings can be changed using one of the following methods: Camera's web browser interface: http://<camera IP address>/ Network video management software application (for example, Avigilon Control Center (ACC)™... -
Page 16: (Optional) Configuring Onboard Storage
1. If available, adjust the zoom using the appropriate ring on the lens. 2. If the lens has an auto focus (AF) mode, set the lens switch to the AF position to allow the camera web interface or ACC Client to control the camera’s focus. a. -
Page 17: Cable Connections
Cable Connections Connecting External Power If PoE is not available, the camera needs to be powered through the removable power connector block. Refer to the diagrams in this guide for the location of the power connector block. The power consumption information is listed in the product specifications. To connect power to the power connector block, complete the following steps: 1. - Page 18 1. Ground 2. RS-485B 3. RS-485A 4. Relay input 5. Relay output 6. +5 VDC, 200 mA max. output for relay drive 0 — External device * — Relay ** — Switch Note: The 5 V connection can be used to energize a relay coil with up to 200 mA. If more than 200 mA is required, an external power supply up to 25 VDC at 120 mA can be used.
-
Page 19: Connection Status Led Indicator
Connection Status LED Indicator Once connected to the network, the Connection Status LED indicator will display the progress in connecting to the Network Video Management software. The following table describes what the LED indicator shows: Connection State Connection Status Description LED Indicator Obtaining One short flash... -
Page 20: Resetting To Factory Default Settings
Resetting to Factory Default Settings If the device no longer functions as expected, you can choose to reset the device to its factory default settings. Use the firmware revert button to reset the device. The firmware revert button is shown in the following diagram: 1. -
Page 21: Setting The Ip Address Using The Arp/Ping Method
Setting the IP Address Using the ARP/Ping Method Complete the following steps to configure the camera to use a specific IP address: 1. Locate and copy down the MAC Address (MAC) listed on the Serial Number Tag for reference. 2. Open a Command Prompt window and enter the following commands: a. -
Page 22: Cleaning
Cleaning Image Sensor The image sensor is protected from contamination by protective glass. However, the protective glass can be contaminated by dust and other debris. To clean the protective glass, perform the following steps: 1. Remove the lens or dust cap. 2. -
Page 23: Limited Warranty And Technical Support
Limited Warranty and Technical Support Avigilon warranty terms for this product are provided at avigilon.com/warranty. Warranty service and technical support can be obtained by contacting Avigilon Technical Support: avigilon.com/contact. Limited Warranty and Technical Support...