
Related Manuals for Makita GRM03


Summary of Contents for Makita GRM03
- Page 1 Job Site Radio Instruction manual ESMX Radio de Trabajo Manual de instrucciones GRM03...
- Page 2 8 9 10 11...
-
Page 4: Lcd Display
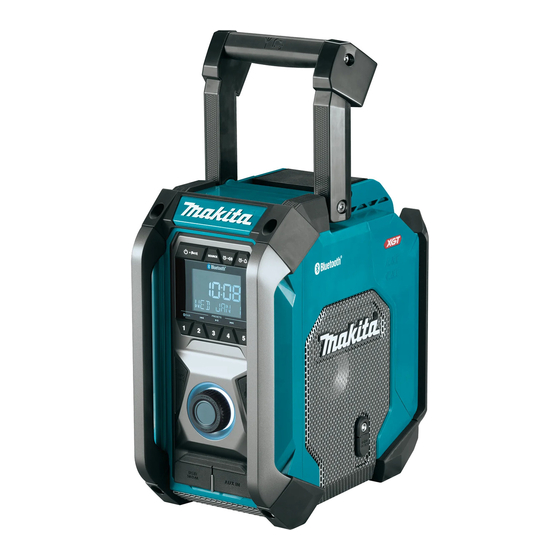
ENGLISH LCD DISPLAY A. Radio alarm (Original Instruction) B. Buzzer alarm C. Stereo symbol EXPLANATION OF GENERAL D. Low battery indicator VIEW (Fig. 1) E. Clock F. Frequency 1. Handle/Built-in antenna (FM) G. RDS (Radio data system) 2. Battery compartment locker H. - Page 5 6. A battery operated radio with integral batteries or a be supervised to ensure that they do not play with the separate battery pack must be recharged only with product. Store the product out of the reach of children. the specified charger for the battery. A charger that SAVE THESE INSTRUCTIONS may be suitable for one type of battery may create a risk of fire when used with another battery.
- Page 6 ● Replace only with the same or equivalent type. antenna or the device could result in the device ● Only use genuine Makita batteries. Use of non- exceeding the RF exposure requirements and void genuine Makita batteries, or batteries that have user’s authority to operate the device.
-
Page 7: Operating Time
OPERATING TIME * The suitable battery packs for this radio listed as the following table. * The following table indicates the operating time on a single charge. AT SPEAKERS OUTPUT Battery cartridge voltage = 100mW Unit: Hour (Approximately) Battery capacity LXT(14.4V) LXT(18V) Radio/AUX... -
Page 8: Installation And Power Supply
Indicating the remaining battery INSTALLATION AND POWER capacity (Fig. 6-8) SUPPLY 1. Indicator lamps 2. Check button CAUTION: Press the check button on the battery cartridge to indicate ● Be careful not to pinch your fingers when opening the remaining battery capacity. The indicator lamps light and closing the battery cover. -
Page 9: Listening To The Radio
● Use the AC power adapter supplied with the product or the units. specified by Makita only. ● Do not hold the power supply cable and plug by your LISTENING TO THE RADIO mouth. -
Page 10: Miscellaneous Settings
7. Rotate the Tuning control knob to adjust the sound a. Station name Displays the name of the station being level as required. listened to. Note: b. Program type Displays the type of station being ● While adjusting the volume, make sure the FM/AM listened to such as Pop, Classic, is NOT flashing on the screen. - Page 11 2. Rotate the Tuning control knob until “CLOCK xxH” automatically according to the RDS data received. appears on the display and press the Tuning control Note: ● The radio clock time will be valid for 5 days each time knob to enter the setting. You will see the time format begins to flash.
- Page 12 The alarm beep will sound shorter every 15 seconds 2. Keep holding the Power button and the Sleep Timer for one minute followed by one minute silence before options will start switching on the display. Stop until the repeating the cycle. desired Sleep Timer setting appears on the display.
-
Page 13: Listening To Music Via Bluetooth Streaming
4. Rotate the Tuning control knob to select your required the radio, then you need to manually reconnect your middle level. Press the Tuning control knob to enter the device again to the radio. ● If ‘MR006G’ shows in your Bluetooth device list but “TREBLE”... -
Page 14: Auxiliary Input Socket
Disconnecting your Bluetooth device SPECIFICATIONS Press and hold the Bluetooth pairing button for 2-3 Power requirements seconds until “BT PAIR” is shown on the display or turn off Bluetooth on your Bluetooth device to disable the DC 12V 2.5A, center pin AC power adapter connection. -
Page 15: Pantalla Lcd
ESPAÑOL INSTRUCCIONES (Instrucciones originales) IMPORTANTES DE SEGURIDAD EXPLICACIÓN DE LA VISTA ADVERTENCIA: GENERAL (Fig. 1) Cuando utilice herramientas eléctricas, para reducir el riesgo de incendio, descarga eléctrica y lesiones 1. Asa/antena integrada (FM) personales, siga siempre las precauciones básicas de 2. - Page 16 12. Siga las regulaciones locales en lo relacionado a la eliminación de baterías. 13. Use las baterías solo con los productos especificados GUARDE ESTAS INSTRUCCIONES por Makita. La instalación de las baterías con productos no conformes podría resultar en un incendio, calor excesivo, explosión o fuga de REGLAS ESPECÍFICAS electrolitos.
- Page 17 Los cambios o modificaciones que no hayan sido equivalente. expresamente autorizados por la entidad responsable ● Use solo baterías originales Makita. El uso de por el cumplimiento de las regulaciones podrían anular baterías Makita no originales o de baterías que la autoridad del usuario de utilizar este equipo.
-
Page 18: Tiempo De Funcionamiento
TIEMPO DE FUNCIONAMIENTO * Las baterías adecuadas para esta radio se enumeran en la siguiente tabla. * La siguiente tabla indica el tiempo de uso con una sola carga. CON LA SALIDA DEL ALTAVOZ = 100 mW Tensión del cartucho de batería Unidad: hora Capacidad de la (aproximadamente) - Page 19 Indicación de la capacidad restante INSTALACIÓN Y de la batería (Fig. 6-8) ALIMENTACIÓN 1. Luces indicadoras 2. Botón de comprobación PRECAUCIÓN: Pulse el botón de comprobación del cartucho de la batería ● Tenga cuidado de no pellizcarse los dedos al abrir para indicar la capacidad restante de la batería.
- Page 20 El puerto USB está diseñado únicamente para cargar suministrado con el producto o especificado por dispositivos de bajo voltaje. Cuando no cargue un Makita. dispositivo de bajo voltaje, coloque siempre la cubierta ● No sujete el cable de alimentación y enchufe con la en el puerto USB.
-
Page 21: Escuchar La Radio
parpadeando, presione el control de sintonización ESCUCHAR LA RADIO para detener el parpadeo y gire el control de sintonización para ajustar el nivel de volumen. Sintonización AM/FM por escaneo 4. Gire el control de sintonización para sintonizar una Nota: emisora. 5. -
Page 22: Otros Ajustes
ajustes. El formato de la fecha comenzará a parpadear. FM estéreo (automático)/mono 6. Gire el control de sintonización para seleccionar el Si la emisora de radio FM que está escuchando tiene formato de fecha deseado. Presione el control de una señal débil, puede que escuche algunos silbidos. sintonización para confirmar su selección. - Page 23 Se activará un pitido cuando seleccione la alarma de Establecer la alarma zumbador HWS. La radio tiene dos alarmas que se pueden usar para El pitido de la alarma sonará menos tiempo cada 15 despertarle usando la radio AM, FM o un zumbador. Las segundos durante un minuto seguido de un minuto de alarmas pueden establecerse cuando la radio esté...
- Page 24 4. Para cancelar la posposición mientras la alarma está Modo del ecualizador Indicador LED suspendida, presione el botón de encendido. PLANO Blanco JAZZ Azul Apagado automático ROCK Rojo La radio puede configurarse para que se apague CLÁSICA Marrón automáticamente transcurrido un tiempo preestablecido. Rosa El apagado automático puede ajustarse a 60, 45, 30, 15, NOTICIAS...
- Page 25 Vincular su dispositivo Bluetooth por Reproducción de archivos de audio en vez primera el modo Bluetooth 1. Presione el botón de encendido para encender la radio. Cuando haya conectado su radio con el dispositivo Presione el botón de fuente para seleccionar el modo Bluetooth que haya elegido, ya podrá...
-
Page 26: Toma De Entrada Auxiliar
Borrar la memoria de dispositivos ESPECIFICACIONES Bluetooth vinculados Requisitos de alimentación Para borrar la memoria de todos los dispositivos Adaptador de alimentación DC 12V 2.5A, clavija vinculados, mantenga presionado el botón de vinculación central positiva Bluetooth durante más de 5 segundos hasta que "CLEARING"... - Page 27 Makita Corporation 3-11-8, Sumiyoshi-cho, Anjo, Aichi 446-8502 Japan GRM03-NA2-2012 www.makita.com 3A81e15Z10000...