Advertisement
Quick Links
Knowledge Base
ThumpBST Speaker Setup Guide
http://mackie.com/products/thump
In this document, we will walk through some basic steps of setting up two Thump15BST loudspeakers with one Thump18S, and
a ProFX8v2 mixer. This document will also go over connecting two input sources including a microphone and an iPad.
Cables Needed
For this set-up you will need the following cables:
4x XLR Male to XLR Female cables:
https://www.sweetwater.com/store/detail/XLR30
1x 1/8" TRS to TS "Y" cable:
https://www.sweetwater.com/store/detail/CMP153
4x IEC Power Cord (which should have been included when you bought your equipment):
https://www.sweetwater.com/store/detail/PWC148
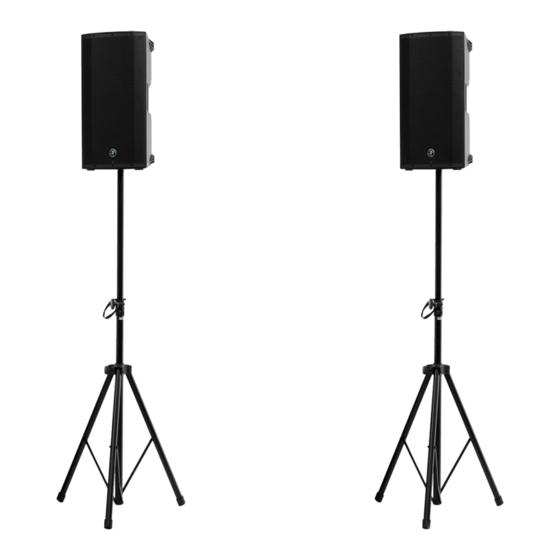
Set-Up
The first thing to do is to get your two Thump15BST loudspeakers and Thump18S in position for your gig, preferably close to
a reliable power source. There are a couple of ways you can set-up your Thump15BST loudspeakers. One way is to use your
Thump15BST loudspeakers with speaker tripod stands. In this example, we are only using one Thump18S subwoofer so we will
be using two speaker stands to mount our Thump15BST loudspeakers.
www.mackie.com
425.487.4333 •
800.898.3211
Page 1
PHONE:
TOLL-FREE:
Advertisement

Related Manuals for Mackie ThumpBST


Summary of Contents for Mackie ThumpBST
- Page 1 Knowledge Base ThumpBST Speaker Setup Guide http://mackie.com/products/thump In this document, we will walk through some basic steps of setting up two Thump15BST loudspeakers with one Thump18S, and a ProFX8v2 mixer. This document will also go over connecting two input sources including a microphone and an iPad.
- Page 2 Thump15BST loudspeakers above the Thump18S subwoofers. Before getting too far ahead of ourselves, you will want to look at the ThumpBST Owner’s Manual. It will go over using the onboard mixer, which you use to set the input and EQ levels on these loudspeakers. The ThumpBST Owner’s Manual you can get here: http://mackie.com/products/thump...
- Page 3 Knowledge Base ThumpBST Speaker Setup Guide http://mackie.com/products/thump Using two of the XLR cables patch from the XLR main outputs left and right on the back of the ProFX8v2 to one of the Thump15BST’s CH1 and CH2 inputs (this will be our “main” Thump Boosted). Left main from the ProFX will patch into input CH1 on the Thump15BST and Right main from the ProFX to input CH2 on the same Thump15BST.
- Page 4 Knowledge Base ThumpBST Speaker Setup Guide http://mackie.com/products/thump Now we will go ahead and connect the input sources, the microphone and iPad. For this, we will need one XLR cable and the 1/8” TRS to TS “Y”-cable. Connect the microphone to the mic input on channel 1 of the ProFX mixer using the XLR cable.
- Page 5 Knowledge Base ThumpBST Speaker Setup Guide http://mackie.com/products/thump Great! Now everything is connected. Before you go ahead and power everything up, set the Thump18S level knob at the center position (12 o’clock). We will need to power the Thump15BST speakers on before we can set the levels on them, but we do not want to do that quite yet.
- Page 6 Knowledge Base ThumpBST Speaker Setup Guide http://mackie.com/products/thump Connecting your Thump15BST Loudspeakers Together When using two Thump Boosted speakers together there are two ways you can connect them. You can either use an XLR cable to connect the two speakers physically or use the wireless function to link both units together. For more information on how to link two Thump Boosted speakers together via Bluetooth, see our document here: https://supportloudtech.netx.net/loud-public/#/asset/18238...