Advertisement
Quick Links
3-866-525-13(1)
A
A
1
2
AC Adaptor/Charger
3
4
Operating Instructions
Manual de instrucciones
Mode d'emploi
7
8
WARNING
BATTERY LIFE
TIME TO CHG
9
NORMAL FULL
h
0
B
AC-VQ11
Sony Corporation © 1999 Printed in Japan
1 1
4
Owner's Record
The model and serial numbers are located on the bottom of the unit.
Record the serial number in the space provided below.
Refer to these numbers whenever you call upon your Sony dealer
regarding this product.
Model No. AC-VQ11
Serial No.
To remove
WARNING
Para extraer
To prevent fire or shock hazard, do not
expose the unit to rain or moisture.
C
2
This symbol is intended to alert the user to the presence
of uninsulated "Dangerous voltage" within the
product's enclosure that may be of sufficient magnitude
to constitute a risk of electric shock to persons.
3
1
This symbol is intended to alert the user to the presence
of important operating and maintenance (servicing)
instructions in the literature accompanying the
appliance.
CAUTION
B
You are cautioned that any changes or modifications not expressly
5
A
approved in this manual could void your authority to operate this
equipment.
4
The Graphical Symbols with Supplemental Marking is located on the
bottom of the unit.
PRECAUTION
The nameplate is located on the bottom of the unit.
Note:
This equipment has been tested and found to comply with the limits for a
Class B digital device, pursuant to Part 15 of the FCC Rules. These limits
are designed to provide reasonable protection against harmful
interference in a residential installation. This equipment generates, uses,
and can radiate radio frequency energy and, if not installed and used in
accordance with the instructions, may cause harmful interference to radio
communications.
However, there is no guarantee that interference will not occur in a
particular installation. If this equipment does cause harmful interference
to radio or television reception, which can be determined by turning the
equipment off and on, the user is encouraged to try to correct the
interference by one or more of the following measures:
– Reorient or relocate the receiving antenna.
– Increase the separation between the equipment and receiver.
– Connect the equipment into an outlet on a circuit different from that to
which the receiver is connected.
– Consult the dealer or an experienced radio/TV technician for help.
NOTICE FOR THE CUSTOMERS IN THE UNITED KINGDOM
A moulded plug complying with BS 1363 is fitted to this equipment for
your safety and convenience.
Should the fuse in the plug supplied need to be replaced, a 5 AMP fuse
approved by ASTA or BSI to BS 1362, (i.e., marked with
or
mark)
must be used.
If the plug supplied with this equipment has a detachable fuse cover,
be sure to attach the fuse cover after you change the fuse. Never use
the plug without the fuse cover. If you should lose the fuse cover,
please contact your nearest Sony service station.
English
Thank you for purchasing the Sony AC adaptor/charger.
Specifications
Before operating the unit, please read this manual thoroughly and retain it
for future reference.
Power requirements
Power consumption
The AC-VQ11 AC adaptor/charger can be used as follows:
5
• To charge a lithium ion type battery pack of the "InfoLITHIUM" battery
pack (S series). Ni-Cd/Nickel hydrogen type batteries are not
rechargeable.
6
The following functions are available with the "InfoLITHIUM" battery
Output voltage
pack:
– Quickly charging
– Remaining charge time display
• To enable the power supply using the house current to the video
Application
equipment which is applied to the "InfoLITHIUM" battery pack (S
series), connection cord is included with this unit.
Operating temperature
Storage temperature
What is the "InfoLITHIUM"
Dimensions
The "InfoLITHIUM" is a lithium ion battery pack which can exchange data
with compatible electronic equipment about its battery consumption. Sony
qa
recommends that you use the "InfoLITHIUM" battery pack with electronic
Mass
equipment having the
mark.
qs
Supplied accessories
"InfoLITHIUM" is a trademark of Sony Corporation.
VCR/CAMERA
qd
Design and specifications are subject to change without notice.
m
WARNING
Use a commercially available AC plug adaptor, if necessary, depending on
the design of the wall outlet.
qf
To prevent fire or shock hazard, do not expose the unit to rain or moisture.
To avoid electrical shock, do not open the cabinet.
Refer servicing to qualified personnel only.
AC power cord must be changed only at the qualified service shop.
For the customers in Canada
CAUTION
3
TO PREVENT ELECTRIC SHOCK, MATCH WIDE BLADE OF PLUG TO
WIDE SLOT, FULLY INSERT.
Notes on Use
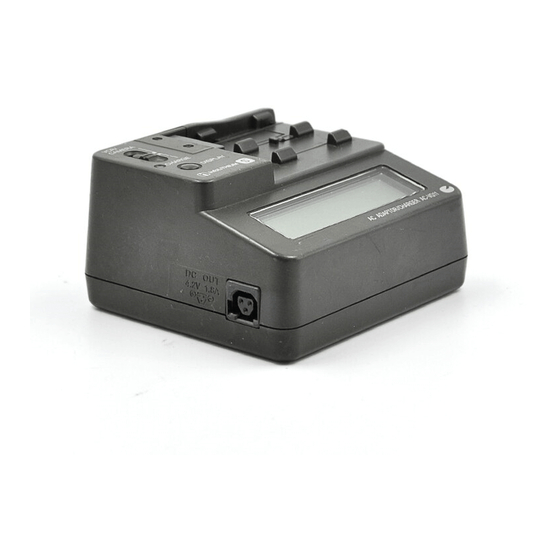
Identifying the parts
2
About the AC power cord plug
1 Mode change switch
The AC-VQ11 comes in two models, differentiated by the shape of the AC
2 CHARGE lamp
power cord plug.
3 DISPLAY CHANGE button
4 DC OUT connector
Model
Shape of the plug
5 Terminal shutter
Model for USA/Canada
Polarized
6 Display window
Model for other countries
Non polarized
Display window
The model for USA and Canada: One blade of the plug is wider than the
7 "InfoLITHIUM" indicator
other for the purpose of safety and will fit into the power outlet only one
8 WARNING indicator
way. If you are unable to insert the plug fully into the outlet, contact your
9 TIME TO CHG (charge) indicator
dealer.
0 Time indicator
qa BATTERY LIFE (battery remaining time) indicator
About the remaining battery time
qs VCR/CAMERA indicator
qd Full charge indicator
While charging the battery pack, this unit will show the remaining battery
time with your video equipment, etc. on the following conditions.
qf Remaining battery indicator
• Using the "InfoLITHIUM" battery pack
• Using the video equipment having the
mark
Make sure that you use the battery pack having the
mark.
To Charge the Battery Pack
Consult the operating instructions supplied with your video equipment if it
is applied to "InfoLITHIUM".
1 Set the mode change switch to CHARGE.
If you use the video equipment having the
mark, the remaining battery
2 Connect the power cord to this unit.
time display of the battery pack being charged corresponds to the video equipment
having the
mark which is last attached to the battery pack.
3 Connect the power cord to a wall outlet.
The beep sounds and the display window lights up.
Charging
4 Install the battery pack.
Charging begins. When the remaining battery indicator becomes
Use only a lithium ion type battery pack of the "InfoLITHIUM" battery
and the CHARGE lamp lights up, normal charge is completed. For full
pack (S series). This unit cannot be used to charge a Ni-Cd/Nickel
charge, which allows you to use the battery slightly longer than "normal
hydrogen type battery pack.
charge", leave the battery pack attached until the CHARGE lamp goes
• Attach the battery pack firmly.
out.
• Charge the battery pack on a flat surface without vibration.
Remove the battery pack when required. It can be used even if the
charging is not completed.
Charging temperature
The temperature range for charging is 0°C to 40°C (32°F to 104°F).
Remaining battery indicator
C
However, to provide maximum battery efficiency, the recommended
temperature range when charging is 10°C to 30°C (50°F to 86°F).
Normal charge
Others
• The nameplate indicating operating voltage, power consumption, etc. is
located on the bottom.
• The negligible amount of electric current will flow into the AC adaptor/
To Install the battery pack
charger as long as the AC adaptor/charger is plugged into the wall outlet.
• Unplug the unit from the wall outlet if it will not be used for extended
1 Place the battery pack on this unit with the b b b b b mark facing the
period of time. To disconnect the cord, pull it out by the plug. Never pull
the cord itself.
2 Slide the battery pack in the direction of the arrow.
• Do not operate the unit with a damaged cord or if it has been dropped or
damaged.
• Be sure that nothing metallic comes into contact with the metal parts of
the unit or connecting plate. If it does, a short may occur and the unit
Note
may be damaged.
• Always keep the metal contacts clean.
When you install the battery pack, be sure to not strike it to the terminal of
• Do not disassemble or convert the unit.
the AC adaptor/charger. The terminal of the AC adaptor/charger may
• Do not apply mechanical shock or drop the unit.
damage if you install the battery incorrectly.
• While the unit is in use, it gets warm. But this is normal.
• Keep the unit away from AM receivers, because it will disturb AM
reception.
Charging time
• Do not place the unit in a location where it is:
— Extremely hot or cold
The following table shows the charging time for the battery pack which is
— Dusty or dirty
discharged completely.
— Very humid
— Vibrating
Battery pack
If any difficulty should arise, unplug the unit and contact your nearest Sony
dealer.
NP-FS11
NP-FS21
NP-FS31
• Approximate minutes to charge an empty battery pack fully (Full charge).
• Approximate minutes in parentheses indicate the time when you charge
normally (Normal charge).
• To ascertain the battery life, refer to the instruction manual of the video
equipment which you use.
• The charging time may differ depending on the condition of the battery
pack or the temperature of the environment.
Notes
• When the mode change switch is set to VCR/CAMERA during charging,
charging stops.
100 - 240 V AC, 50/60 Hz
• If the CHARGE lamp does not light or flash, check that the battery pack is
14 W
correctly attached to the AC adaptor/charger. If it is not attached it will
Charge mode:
not be charged.
16 VA (100 V AC), 23 VA (240 V AC)
Operating mode:
When the CHARGE lamp flashes
18 VA (100 V AC), 25 VA (240 V AC)
DC OUT:
If a problem occurs during charging, the CHARGE lamp flashes and
4.2 V, 1.8 A in operating mode
WARNING appears on the display.
Battery charge terminal:
Check through the following chart.
4.2 V, 1.5 A in charge mode
Sony battery pack NP-FS11/FS21/FS31/F10/
Remove the battery pack from this unit, then install the same battery
F20/F30
pack again.
0°C to 40°C (32°F to 104°F)
–20°C to 60°C (–4°F to 140°F)
Approx. 85 45
79 mm (w/h/d)
If the CHARGE lamp flashes
If the CHARGE lamp lights and
(3
3
/
1
13
/
3
1
/
inches)
8
16
8
again:
does not flash again:
excluding projecting parts
Install another battery pack.
If the CHARGE lamp goes out
Approx. 170 g (6 oz)
because the charging time has
Connecting cord (DK-115) (1)
passed, there is no problem.
AC power cord (1)
If the CHARGE lamp flashes
If the CHARGE lamp lights and
again:
does not flash again:
The problem is with this unit.
If the CHARGE lamp goes out
Wall outlet
because the charging time has
passed, the problem is with the
AC-VQ11
battery pack first installed.
AC plug adaptor
Please contact your nearest Sony dealer in connection with the product
with the problem.
This mark indicates that this product is a genuine
accessory for Sony video products. When purchasing
To remove the battery pack
Sony video products, Sony recommends that you
purchase accessories with this "GENUINE VIDEO
Slide the battery pack in the direction of the arrow, then lift it straight out.
ACCESSORIES" mark.
To Check Charging
While charging, you can check the charging time on the display. After
starting charging in a minute, BATTERY LIFE lights up on the display.
See illustration A.
Press DISPLAY CHANGE while charging.
Each time you press DISPLAY CHANGE, the display changes as follows.
The remaining battery time
when the battery pack being
BATTERY LIFE
charged is attached to your
m
"InfoLITHIUM" video equipment
The time is not displayed when the
DISPLAY
remaining battery time is less than 5
CHANGE
minutes.
The remaining time until normal
charge is completed
TIME TO CHG
NORMAL
m
DISPLAY
CHANGE
The remaining time until full
charge is completed
TIME TO CHG
FULL
h
m
See illustration B.
DISPLAY
CHANGE
Notes
• The time display shows the approximate time when charging at 10°C -
30°C. The time display may differ from the actual charging time
depending on using conditions and circumstances.
• The time display may show "– – – –" in the following cases. However, the
unit is not malfunctioning.
– The remaining battery time is less than 5 minutes.
– There is a difference between the displayed time and actual charging
time. Even if this happens, continue charging.
• Full charge requires about 1 hour after normal charge is completed. If you
remove the battery pack between normal charge and full charge, the
charging time may not be displayed properly in the next charging.
• If the charging time is not displayed properly, fully charge the battery
pack. The charging time will be displayed properly.
• When you attach a fully charged battery pack to this unit, "TIME TO CHG
FULL 1h" may appear on the display. However, this is not a malfunction.
Full charge
• The remaining battery time may not be displayed depending on using
conditions and circumstances of your video camera recorder and of the
battery. See "About the remaining time" for more details.
• You may wait for a while after pressing DISPLAY CHANGE until the
display shows the time indication.
• To display the remaining battery time of a new battery, attach it to your
video camera recorder and use it for about 20 seconds. Then, charge the
battery with this unit.
terminal shutter.
Press the battery pack until the terminal shutter enters completely
To Operate Video Equipment
into this unit.
Use the nearest wall outlet in case a problem occurs and you need to
unplug this unit. If a problem occurs while you use this unit, you
immediately cut the supply of electricity by unplug this unit.
Use the supplied connecting cord.
For details of the connection, refer to the instruction manual of the video
equipment.
1 Set the mode change switch to VCR/CAMERA.
2 Connect the power cord to this unit.
3 Connect the power cord to a wall outlet.
Charging time
Battery pack
Charging time
4 Connect the connecting cord A to the DC OUT connector of this
unit.
110 (50)
NP-F10
105 (45)
NP-F20
5 Connect the connecting plateB to the video equipment.
150 (90)
135 (75)
When using the connecting cord
195 (135)
NP-F30
165 (105)
While pressing the connecting plate B , slide it up.
To remove the connecting plate, slide it down while pressing the battery
release lever C.
Notes
• If you set the mode change switch to CHARGE while operating the video
equipment, the power supply to the video equipment stops.
• You cannot charge the battery pack attached to this unit while supplying
the power to the video equipment.
• Keep this unit away from the video equipment if the picture is disturbed.
Español
Muchas gracias por la adquisición de este adaptador de CA/cargador Sony.
Especificaciones
Antes de utilizar la unidad, lea detenidamente este manual, y consérvelo
para futuras referencias.
Alimentación
Consumo
El adaptador de CA/cargador AC-VQ11 podrá utilizarse de la forma
siguiente:
• Para cargar una pila de tipo de iones de litio "InfoLITHIUM" (serie S).
Con esta unidad no podrán cargarse baterías de níquel-cadmio/níquel-
hidrógeno.
Tensión de salida
Cuando utilice una batería "InfoLITHIUM", estarán disponibles las
funciones siguientes:
– Carga rápida
– Visualización del tiempo de carga restante
Aplicación
• Con esta unidad se incluye un cable conector para poder alimentar un
equipo, que utilice una batería "InfoLITHIUM" (serie S), con la corriente
Temperatura de funcionamiento
de la red.
Temperatura de almacenamiento
¿Qué es "InfoLITHIUM"?
"InfoLITHIUM" es una batería que puede intercambiar datos con un
Dimensiones
equipo de electrónico compatible relacionados con el consumo de la misma.
Sony recomienda que utilice la batería "InfoLITHIUM" con equipos de
Masa
electrónico que posean la marca
.
Accesorios suministrados
"InfoLITHIUM" es marca comercial de Sony Corporation.
El diseño y las especificaciones están sujetos a cambio sin previo aviso.
Dependiendo del diseño del tomacorriente, si es necesario, utilice un
ADVERTENCIA
adaptador de enchufe de CA adquirido en un establecimiento del ramo.
Para evitar incendios o descargas eléctricas, no exponga la unidad a la
lluvia ni a la humedad.
AC-VQ11
Para evitar descargas eléctricas, no abra la unidad.
En caso de avería, solicite los servicios de personal cualificado solamente.
PRECAUCIÓN
La place de características se encuentra en la parte inferior de la unidad.
El cable de alimentación de CA solamente deberá ser cambiado en un
taller de reparaciones cualificado.
Identificación de partes
Notas sobre la utilización
1 Selector de modo
Acerca del enchufe del cable de alimentación
2 Lámpara indicadora de carga (CHARGE)
de CA
3 Botón de cambio de visualización (DISPLAY CHANGE)
4 Conector de salida de CC (DC OUT)
Existen dos modelos de AC-VQ11, que se diferencian por la forma del
5 Obturador de terminales
enchufe del cable de alimentación de CA.
6 Visualizador
Modelo
Forma del enchufe
Visualizador
Modelo para EE.UU./Canadá
Polarizado
7 Indicador "InfoLITHIUM"
8 Indicador WARNING
Modelo para otros países
No polarizado
9 Indicador TIME TO CHG (carga)
Modelo para EE.UU. y Canadá: Por motivos de seguridad, una cuchilla del
0 Indicador de tiempo
enchufe es más ancha que la otra, y encajará en el tomacorriente de un solo
qa Indicador BATTERY LIFE (tiempo restante de la batería)
sentido. Si no puede insertar completamente el enchufe en el
qs Indicador VCR/CAMERA
tomacorriente, póngase en contacto con su proveedor.
qd Indicador de carga completa
qf Indicador de batería restante
Acerca del tiempo restante de la batería
Durante la carga de la batería, esta unidad mostrará el tiempo restante de la
Para cargar la batería
misma con su equipo de vídeo, etc., en las condiciones siguientes.
• Cuando utilice una batería "InfoLITHIUM"
• Cuando utilice un equipo de vídeo que posea la marca
1 Ponga el selector de modo en CHARGE.
Cerciórese de utilizar una batería que posea la marca
Consulte
el manual de instrucciones de su equipo de vídeo para ver si utiliza baterías
2 Conecte el cable de alimentación a esta unidad.
"InfoLITHIUM".
3 Conecte el cable de alimentación a un tomacorriente de la red.
Si utiliza un equipo de vídeo que posea la marca
, la indicación
Sonará un pitido y se encenderá el visualizador.
del tiempo restante de la batería que esté cargando corresponderá al equipo
4 Instale la batería.
de vídeo que posea la marca
y con el que se haya utilizado por
Se iniciará la carga. Cuando el indicador de batería restante pase a ser
última vez la batería.
, y se encienda la lámpara CHARGE, habrá finalizado la carga
normal. Para realizar la carga completa, que le permitirá utilizar la
Carga
batería durante más tiempo que con la "carga normal", deje la batería
instalada hasta que se apague la lámpara CHARGE.
Utilice solamente una batería de tipo de iones de litio "InfoLITHIUM" (serie
Extraiga la batería cuando lo requiera.
S). Esta unidad no podrá utilizarse para cargar una batería de tipo níquel-
cadmio/níquel-hidrógeno.
Indicador de batería restante
• Fije firmemente la batería.
• Cargue la batería sobre una superficie plana exenta de vibraciones.
Carga normal
Temperatura de carga
La gama de temperaturas para carga es de 0 a 40°C. Sin embargo, para
obtener la máxima eficacia de la batería, la gama de temperaturas
recomendada para la carga es de 10 a 30°C.
Para instalar la batería
Otros
1 Coloque la batería en esta unidad con la marca b b b b b orientada hacia
el obturador del terminal.
• La placa de características en la que se indica la tensión de alimentación,
2 Deslice la batería en la dirección de la flecha.
el consumo, etc., se encuentra en la parte inferior.
Ejerza presión sobre la batería hasta que el obturador del terminal se
• Mientras el adaptador/cargador de CA esté enchufado en un
introduzca por completo en esta unidad.
tomacorriente, a través del mismo circulará cierta cantidad de corriente.
• Cuando no vaya a utilizar la unidad durante mucho tiempo, desenchúfela
del tomacorriente. Para desconectar el cable de alimentación, tire del
Nota
enchufe. No tire nunca del propio cable.
Cuando instale la batería, tenga cuidado de no golpearla contra los
See illustration C.
• No utilice la unidad con un cable dañado, cuando se haya caído, ni
terminales del adaptador de CA/cargador. Si instalase incorrectamente la
cuando esté dañada.
batería, el adaptador de CA/cargador podría dañarse.
• Cerciórese de que ningún objeto metálico entre en contacto con las partes
metálicas de la unidad ni con la placa conectora. En caso contrario podría
Tiempo de carga
producirse un cortocircuito y la unidad se dañaría.
• Mantenga siempre limpios los contactos metálicos.
En la tabla siguiente se muestra el tiempo de carga de una batería
• No desarme ni modifique la unidad.
completamente descargada.
• No golpee ni deje caer la unidad.
• Cuando utilice la unidad, se calentará. Sin embargo, esto es normal.
Batería
• Mantenga la unidad alejada de receptores de AM, porque podría
perturbarse la recepción de AM.
NP-FS11
• No coloque la unidad en un lugar:
NP-FS21
— Extremadamente cálido o frío
— Polvoriento o sucio
NP-FS31
— Muy húmedo
— Sometido a vibraciones
• Minutos aproximados para cargar completamente una batería vacía
Si tiene alguna dificultad, desenchufe la unidad y póngase en contacto con
(carga completa).
su proveedor Sony.
• Los minutos aproximados entre paréntesis indican el tiempo cuando la
cargue normalmente (carga normal).
• Para asegurar la duración útil de la batería, consulte el manual de
instrucciones del equipo de vídeo utilizado.
• El tiempo de carga puede diferir dependiendo de la condición de la
batería o de la temperatura ambiental.
Notas
• Si pone el selector de modo en VCR/CAMERA durante la carga, ésta se parará.
• Si la lámpara CHARGE no se enciende o parpadea, compruebe si la
batería está correctamente instalada en el adaptador/cargador de CA. Si
no está bien instalada, no se cargará.
Cuando parpadee la lámpara CHARGE
Si ocurre algún problema durante la carga, la lámpara CHARGE
parpadeará y en el visualizador aparecerá WARNING.
100 - 240 V CA, 50/60 Hz
14 W
Compruebe el organigrama siguiente.
Modo de carga:
Extraiga la batería de esta unidad y, a continuación, vuelva a instalar la
16 VA (100 V CA), 23 VA (240 V CA)
misma batería.
Modo de operación:
18 VA (100 V CA), 25 VA (240 V CA)
DC OUT:
4,2 V, 1,8 A en el modo de operación
Si la lámpara CHARGE
Si la lámpara CHARGE se ilumina y
vuelve a parpadear:
no vuelve a parpadear:
Terminal de carga de la batería:
4,2 V, 1,5 A en el modo de carga
Instale otra batería.
Si la lámpara CHARGE se apaga
Batería NP-FS11/FS21/FS31/F10/F20/F30/
porque ha transcurrido el tiempo
Sony
de carga, no hay problema.
0 a 40°C
Si la lámpara CHARGE
Si la lámpara CHARGE se ilumina y
–20 a 60°C
vuelve a parpadear:
no vuelve a parpadear:
Aprox. 85
45 79 mm (an/al/prf),
El problema reside en esta
Si la lámpara CHARGE se apaga
excluyendo partes y controles salientes
unidad.
porque ha transcurrido el tiempo de
Aprox. 170 g
carga, el problema reside en la batería
Cable conector (DK-115)
instalada en primer lugar.
Cable de alimentación de CA (1)
En relación con el producto averiado, póngase en contacto con su
proveedor Sony.
Tomacorriente
Para extraer la batería
Deslícela en el sentido de la flecha y después levántela directamente hacia
arriba.
Adaptador de enchufe de CA
Para comprobar la carga
Esta marca indica que este producto es genuino y está
Durante la cargue, podrá comprobar el tiempo de carga en el visualizador.
relacionado con productos de vídeo Sony. Cuando
Un minuto después de haber iniciado la carga, en el visualizador aparecerá
adquiera productos de vídeo Sony, Sony recomienda
BATTERY LIFE.
solicitar accesorios con la marca "GENUINE VIDEO
ACCESSORIES" (accesorios de vídeo genuinos).
Presione DISPLAY CHANGE durante la carga.
Cada vez que presione DISPLAY CHANGE, la visualización cambiará de la
forma siguiente.
Tiempo restante de la batería
cuando ésta esté instalada en
Consulte la ilustración A.
BATTERY LIFE
su equipo de vídeo para
m
baterías "InfoLITHIUM"
El tiempo no se visualizará cuando el
DISPLAY
tiempo restante de la batería sea
CHANGE
inferior a 5 minutos.
Tiempo restante hasta que
finalice la carga normal
TIME TO CHG
NORMAL
m
DISPLAY
CHANGE
Tiempo restante hasta que
finalice la carga completa
TIME TO CHG
FULL
h
m
DISPLAY
CHANGE
Notas
• La visualización del tiempo mostrará el tiempo aproximado cuando la carga
Consulte la ilustración B.
se realice a 10 - 30ºC. La visualización del tiempo puede diferir del tiempo
de carga real dependiendo de las condiciones y circunstancias de utilización.
• La visualización de tiempo puede mostrar "– – – –" en los casos siguientes.
Sin embargo, esto no significa que la unidad está funcionando mal.
– El tiempo de batería restante es inferior a 5 minutos.
– Existe una diferencia entre el tiempo visualizado y el tiempo de carga
real. Aunque suceda esto, continúe cargando.
• La carga completa requerirá aproximadamente 1 hora después de haber
finalizado la carga normal. Si extrae la batería entre la carga normal y la
carga completa, es posible que el tiempo de carga no se visualice
adecuadamente en la próxima carga.
• Si el tiempo de carga no se visualiza adecuadamente, cargue completamente
la batería. El tiempo de carga se visualizará apropiadamente.
• Cuando instale una batería completamente cargada en esta unidad, en el
visualizador puede aparecer "TIME TO CHG FULL 1h". Sin embargo,
esto no significa que la unidad está funcionando mal.
• El tiempo restante de la batería puede no aparecer en función de las
condiciones y circunstancias de uso de la videocámara y de la batería. Consulte
Carga completa
"Sobre el tiempo restante de la batería" para obtener más información.
• Es posible que tenga que esperar cierto tiempo hasta que el visualizador muestre
la indicación de tiempo después de haber presionado DISPLAY CHANGE.
• Para visualizar el tiempo restante de una batería nueva, fíjela a la
videocámara y utilícela durante unos 20 segundos. A continuación, cargue
la batería con esta unidad.
Para utilizar el equipo de vídeo
Consulte la ilustración C.
Utilice el tomacorriente más cercano por si se produce algún problema y
necesita desenchufar la unidad. Si ocurre algún problema cuando esté
utilizando esta unidad, corte inmediatamente su alimentación
desenchufándola del tomacorriente.
Utilice el cable conector suministrado.
Con respecto a los detalles sobre la conexión, consulte el manual de
instrucciones del equipo de vídeo.
1 Ponga el selector de modo en VCR/CAMERA.
2 Conecte el cable de alimentación a esta unidad.
3 Conecte el cable de alimentación a un tomacorriente de la red.
Tempo de carga
Batería
Tempo de carga
4 Conecte el cable conector A al conector DC OUT de esta unidad.
NP-F10
110 (50)
105 (45)
5 Conecte la placa conectora B al equipo de vídeo.
150 (90)
NP-F20
135 (75)
Para utilizar el cable conector
195 (135)
NP-F30
165 (105)
Manteniendo presionada la placa conectora B, deslícela hacia arriba.
Para extraer la placa conectora, deslícela hacia abajo manteniendo
presionada la palanca de liberación de la batería C.
Notas
• Si pone el selector de modo en CHARGE mientras esté utilizando el
equipo de vídeo, la fuente de alimentación de éste se cortará.
• Usted no podrá cargar la batería instalada en esta unidad mientras esté
alimentando el equipo de vídeo.
• Si las imágenes se ven con perturbaciones, mantenga esta unidad alejada
del equipo de vídeo.
Advertisement

Related Manuals for Sony AC-VQ11


Summary of Contents for Sony AC-VQ11
- Page 1 The model and serial numbers are located on the bottom of the unit. Record the serial number in the space provided below. The AC-VQ11 comes in two models, differentiated by the shape of the AC Refer to these numbers whenever you call upon your Sony dealer power cord plug.
- Page 2 8 Indicateur WARNING 9 Indicateur TIME TO CHG (charge) Le modèle AC-VQ11 existe en deux versions, dont la différence est la fiche 0 Indicateur de durée du cordon d’alimentation secteur. qa Indicateur BATTERY LIFE (autonomie résiduelle de la batterie) qs Indicateur VCR/CAMERA Modèle...