Table of Contents
Advertisement
Advertisement
Table of Contents

Related Manuals for Philips HD2151


Summary of Contents for Philips HD2151
- Page 1 HD2151 User Manual...
-
Page 3: Table Of Contents
Contents 1 Important 5 Recycling Power failure backup function Electromagnetic fields (EMF) 6 Guarantee and service 2 Your All-in-One cooker 7 Specifications What’s in the box Product overview 8 Troubleshooting Control panel overview 3 Using your All-in-One cooker Before first use Cooking program Preparations before cooking Pressure cooking ... -
Page 4: Important
• Never use any accessories or parts from • If the power cord set is damaged, it must other manufacturers or that Philips does be replaced by a cord set available from not specifically recommend. If you use the manufacturer. - Page 5 • Only use manufacturer’s spare parts in the guarantee becomes invalid and Philips accordance with the relevant model. In refuses liability for any damage caused. particular, use a body and a lid from the •...
-
Page 6: Power Failure Backup Function
• If the power supply is not resumed within 30 minutes, the appliance might not continue with the previous working process, but stay in standby mode. Electromagnetic fields (EMF) This Philips appliance complies with all applicable standards and regulations regarding exposure to electromagnetic fields. -
Page 7: Your All-In-One Cooker
Your All-in-One cooker Congratulations on your purchase, and welcome to Philips! To fully benefit from the support that Philips offers, register your product at www.Philips.com/welcome. What’s in the box Main unit Inner Pot Rice&Soup ladle Measuring cup Power cord Detachable inner lid... -
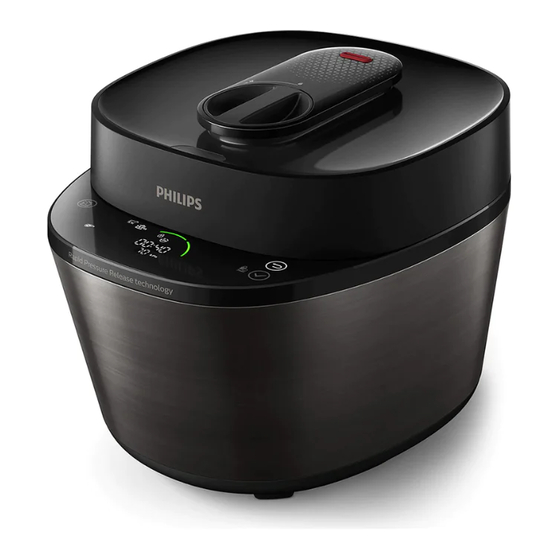
Page 8: Product Overview
Product overview Top lid Control panel Sealing ring Temperature controller Detachable inner lid Steam box Cap nuts Power socket Safety valve Lid open button Fixing nut Lid lock/unlock handle Floating valve Steam valve Inner pot Pressure regulator Water level indication... -
Page 9: Control Panel Overview
Control panel overview Lid locked indicator Pressure selection indicator Add ingredient button Delay start indicator Sauce thickening button Menu selection button My favourite button Menu selection button Meat cubes’ size selection button Confirm/Child lock button Child lock indicator Cancel button Timer selection indicator Lid unlocked indicator... -
Page 10: Using Your All-In-One Cooker
Using your All-in- One cooker Before first use Remove all packaging materials from the appliance. Take out all the accessories from the inner pot. Clean the parts of the All-in-One cooker thoroughly before using it for the first time (see chapter “Cleaning and Maintenance”). Note Make sure all parts are completely dry •... -
Page 11: Cooking Program
Cooking program Adjustable Default Cooking Sub cooking Default Adjustable pressure pressure function function cooking time cooking time regulating (kPa) range(kPa) 30 minutes 3-59 minutes 20-70 Beef ( 15 minutes 2-59 minutes 20-70 Poultry ( Duck ( 15 minutes 12-59 minutes 20-70 Pressure cooking Lamb (... - Page 12 Adjustable Default Cooking Sub cooking Default Adjustable pressure pressure function function cooking time cooking time regulating (kPa) range(kPa) Rice 14 minutes Fried rice 11 minutes Lentil/beans 20 minutes 20-59 minutes 20-70 Special recipes 15 minutes 15-59 minutes 20-70 Porridge Kaya 14 minutes 10-59 minutes 8 hours 6-12 hours...
-
Page 13: Preparations Before Cooking
Turn the lid lock/unlock handle counter Preparations before cooking clockwise to position. Warning Make sure that the detachable inner lid is • properly installed. Note Do not fill the inner pot with food and • liquid less than the minimum of the Press the lid open button to open the top water level indications, or more than the lid. -
Page 14: Pressure Cooking
Turn the handle clockwise to lock the top to select pressure cooking lid. ), tap confirm. to select one of the sub Put the plug into the power socket. menus. » The chosen cooking function lights up, the default pressure keeping time and pressure are displayed on the screen. -
Page 15: Slow Cooking
When the All-in-One cooker reaches the Follow the steps in “Preparations before cooking pressure, the pressure keeping cooking”. time starts countdown. select slow cooking ( When the pressure keeping time has confirm. elapsed, The All-in-One cooker steps into pressure release stage, the indicator lights up, the All-in-One cooker starts to release pressure at intervals. -
Page 16: Steam Cooking
When the All-in-One cooker reaches the Steam cooking cooking pressure, the pressure keeping time starts countdown. The All-in-One cooker is heating while exhausting steam. For cooking time and regulating range of During the cooking process, do not touch each sub menu, refer to Chapter “Functions the steam vent to avoid burning. - Page 17 The All-in-One cooker automatically to select one of the sub switches to keep warm mode after menus. pressure is released completely. You can » The chosen cooking function lights up, unlock and open the top lid. the default cooking time and pressure »...
-
Page 18: Sauté
Reheat Sauté Loosen the cooled food and evenly distribute it in the inner pot. Note Pour some water onto the food to prevent it from becoming too dry. The quantity of Keep the lid open when using the Sauté • the water depends on the amount of food. -
Page 19: Adjust The Cooking Time, Pressure And Delay Start
to confirm. Tap to set the Adjust the cooking time, pressure. pressure and delay start » The pressure indicator displays on the screen. » The cooking pressure blinks. Note You cannot adjust the cooking time for • Rice , Fried rice and Keep warm function. Pressure level is not adjustable for: Slow •... -
Page 20: Adding Ingredient
Adding ingredient Sauce thickening With this function, you can open the lid during pressure cooking process and add more Note ingredients. In standby mode, the Sauce thickening • function applies to all cooking functions. Note In keep warm mode, the Sauce thickening •... -
Page 21: Setting Up Child Lock
repeatedly until blinks on the Setting up child lock display screen. to select Steam cooking To protect your child from using the appliance, Duck ( ). Tap to confirm. or to avoid unexpected operations during cooking, you can set up the child lock function. After the cooking process starts, tap and hold for 3 seconds activate child lock. -
Page 22: Cleaning And Maintenance
Cleaning and Steam box Maintenance • Follow the above steps to disassemble the inner lid. • Disassemble the stem box from the inner lid as below: Note Unplug the All-in-One cooker before • starting to clean it. Wait until the All-in-One cooker has cooled •... -
Page 23: Floater
Floater Pressure regulator • Hold the rubber ting around the floater, • Hold the handle of pressure regulator and and pull outwards to remove it from pull it out gently. Rinse it under tap water the top lid. Clean it regularly with water to remove food residues inside, or use a and make sure there’s no food residue toothpick. -
Page 24: Interior
• Place the reverse side of the detachable Interior inner lid on the sealing ring. Inside of the outer lid and the main body and the heating element: • Wipe with damp cloth. • Make sure to remove all the food residues stuck to the All-in-One cooker. -
Page 25: Recycling
Guarantee and service If you need service or information, or if you have a problem, visit the Philips website at www.philips.com or contact the Philips Customer Care Center in your country. You can find its phone number in the worldwide guarantee leaflet. -
Page 26: Troubleshooting
Troubleshooting If you encounter problems when using this appliance, check the following points before requesting service. If you cannot solve the problem, contact the Philips Consumer Care Center in your country. Problem Solution The inner lid is not well assembled. Make sure the inner lid is well •... - Page 27 (2) Carry-in service. Carry your product into the Philips Service care. (3) Onsite service. Contact us and we’ll help you arrange a Philips- authorized repair for your product, at no additional charge.
- Page 28 © 2021 Philips Domestic Appliances Holding B.V. All rights reserved. 660.8000.0800.8 (12/11/2021)