Advertisement
Quick Links
(Moving) Clowns out of a cannon : Assembly Instructions
h t t p : / /w w w. c a n o n .c o m / c- pa rk /
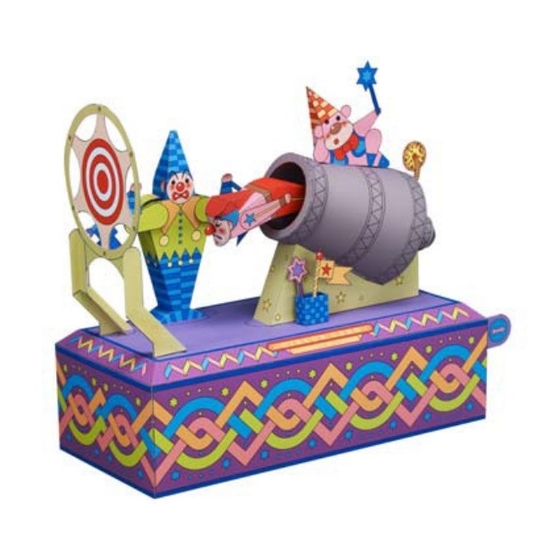
View of completed model
Assembly Instructions : Fifteen A4 sheets (No. 1 to No. 15)
* Build the model by carefully reading the Assembly Instructions, in the parts sheet page order.
*Hint: Trace along the folds with a ruler
and an exhausted pen (no ink) to get a sharper, easier fold.
Assembly Instructions
Mountain fold(dotted line)
Make a mountain fold.
Valley fold(dashed and dotted line)
Make a valley fold.
Scissors line(solid line)
Cut along the line.
Cut in line(solid line)
Cut along the line.
Scissors, set square, glue(We recommend stick glue), pencil, used
Tools and materials
ballpoint pen, toothpicks, tweezers, (useful for handling small parts)
Before gluing, crease the paper along mountain fold and valley
Assembly tip
fold lines and make sure rounded sections are nice and stiff.
Glue, scissors and other tools may be dangerous to young children
Caution
so be sure to keep them out of the reach of young children.
Before starting assembly : Writing the number of each section on
its back side before cutting out the sections is highly recommended.
(* This way, you can be sure which section is which even after
cutting out the sections.)
* When you pull the lever on
the right, a clown shoots out of
the cannon. It is a fun craft.
Glue
The glue spot(colored dot)
shows where to apply the glue.
Glue spot(Red dot)
Glue parts with the same number together.
Glue spot(Green dot)
Glue within the same part.
Glue spot(Blue dot)
Glue to the rear of the other part.
Round bar : Use to give parts a curved surface.
Tweezers : Useful in working with fine parts.
Indicates where sections should be glued together.
Indicates where to insert sections.
Do not glue the sections together.
Indicates the order for assembling parts.
Be sure to build
this model carefully.
Firmly form the shape as you
glue to prevent distortion.
Parts 1 and 2
Advertisement

Related Manuals for Canon CREATIVE PARK (Moving) Clowns out of a cannon


Summary of Contents for Canon CREATIVE PARK (Moving) Clowns out of a cannon
- Page 1 (Moving) Clowns out of a cannon : Assembly Instructions Indicates where sections should be glued together. Before starting assembly : Writing the number of each section on its back side before cutting out the sections is highly recommended. Indicates where to insert sections. Do not glue the sections together.
- Page 2 (Moving) Clowns out of a cannon : Assembly Instructions Glue one side of the shaft (Part 11), and then check if the Parts 1 Spread glue in a thin, + 2 go through the center even layer before gluing of the rectangular hole surfaces together.
- Page 3 (Moving) Clowns out of a cannon : Assembly Instructions Slightly shift the edges of Push and pull the lever the slit to the left and right. to check the movement.
- Page 4 (Moving) Clowns out of a cannon : Assembly Instructions Parts 14 and 15 Curl the section of Part 14 that will form a cylinder with a round bar. Roll Part 17 tightly, insert into Parts 14 +15 and then unroll. Glue together to the pasting margins of Parts 14 and 17.
- Page 5 (Moving) Clowns out of a cannon : Assembly Instructions Parts 14, 15 and 17 Insert the tip of Part 14 into Part 16 and glue. Parts 14 to 19...
- Page 6 (Moving) Clowns out of a cannon : Assembly Instructions Parts 14 to 19 Glue the cannon battery (Part 21) to the pasting margins on both sides of Part 10. Then, glue the semi-circular pasting margins in the front and rear. Prepare part 4 in the same way.
- Page 7 (Moving) Clowns out of a cannon : Assembly Instructions Glue the 4 corners of the top board of the base. Work on a flat surface to prevent distortion of the base. Parts 1 to 12 and 14 to 19 and 24 Glue 3 sides of the base (rear, right and left sides).
- Page 8 (Moving) Clowns out of a cannon : Assembly Instructions Firmly form the shape as you glue to prevent distortion. For the clown’s head, glue in the order of the hair, hat, chin and nose. Parts 22 and 23 Pull the lever and glue the clown’s legs (front) to Part 1.
- Page 9 (Moving) Clowns out of a cannon : Assembly Instructions Prepare 2 strings. Length: 30cm: 1 string 10cm: 1 string Tightly knot the 2 strings at around 5 to 6cm from the top. Glue only the bellows section. Approx. 4cm Note : Do not glue this part.
- Page 10 (Moving) Clowns out of a cannon : Assembly Instructions Pass the triangular prism through the hole in the arm and attach so that the arm covers the shoulder. Parts 37 and 39 Parts 34 to 36 Parts 38 and 39...
- Page 11 (Moving) Clowns out of a cannon : Assembly Instructions Parts 34 to 39 Glue both sides of the face. Glue both sides of the body and then glue the shoulders. Pass the string coming out of the clown’s feet through the square hole on the base. Then, glue the clown’s feet on the base.
- Page 12 (Moving) Clowns out of a cannon : Assembly Instructions Bend the hands and arms slightly forward so that they are in front of the face. Attach flags (Parts 42 and 43) to both hands of the clown and move the hands to cover the clown’s eyes. (For flags assembling, see P.14) Lead the string passing through the base to the 2 columns as...
- Page 13 (Moving) Clowns out of a cannon : Assembly Instructions Parts 32 and 33 Parts 30 to 33 Parts 32 and 33 Prepare part 30 in the same way.
- Page 14 (Moving) Clowns out of a cannon : Assembly Instructions Prepare parts 42 and 43 in the same way. Prepare part 41 in the same way. Parts 44 to 46...
- Page 15 (Moving) Clowns out of a cannon : Assembly Instructions Finished! Parts 30 to 33 Parts 44 to 46...