AEG HG995440XB User Manual
Hide thumbs
Also See for HG995440XB:
- User manual (72 pages) ,
- User manual (21 pages) ,
- User manual (52 pages)
Table of Contents
Advertisement
Available languages
Available languages
Quick Links
Advertisement
Chapters
Table of Contents

Related Manuals for AEG HG995440XB


Summary of Contents for AEG HG995440XB
- Page 1 EN User manual HG995440XB IT Istruzioni per l’uso...
-
Page 2: Table Of Contents
9. TECHNICAL INFORMATION ..........14 FOR PERFECT RESULTS Thank you for choosing this AEG product. We have created it to give you impeccable performance for many years, with innovative technologies that help make life simpler –... -
Page 3: Safety Information
ENGLISH 1. SAFETY INFORMATION Before the installation and use of the appliance, careful- ly read the supplied instructions. The manufacturer is not responsible if an incorrect installation and use cau- ses injuries and damages. Always keep the instructions with the appliance for future reference. 1.1 Children and vulnerable people safety WARNING! Risk of suffocation, injury or permanent disability. -
Page 4: Safety Instructions
• Never try to extinguish a fire with water, but switch off the appliance and then cover flame e.g. with a lid or a fire blanket. • Do not store items on the cooking surfaces. • Do not use a steam cleaner to clean the appliance. - Page 5 ENGLISH • Make sure not to cause damage to the • Do not put cutlery or saucepan lids on mains plug (if applicable) or to the the cooking zones. They become hot. mains cable. Contact the Service or an • Set the cooking zone to “off” after electrician to change a damaged use.
-
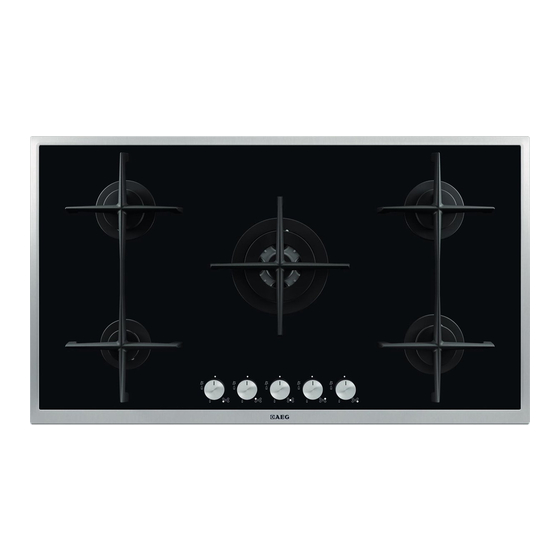
Page 6: Product Description
• The use of a gas cooking appliance re- • Clean regularly the appliance to pre- sults in the production of heat and vent the deterioration of the surface moisture. Provide good ventilation in material. the room where the appliance is instal- •... -
Page 7: Daily Use
ENGLISH 3.2 Control knobs Symbol Description Symbol Description minimum gas supply no gas supply / off po- sition ignition position / maximum gas supply 4. DAILY USE WARNING! Refer to the Safety chapters. 4.1 Ignition of the burner WARNING! Be very careful when you use open fire in kitchen environment. -
Page 8: Helpful Hints And Tips
WARNING! The spark generator can start au- Do not keep the control knob tomatically when you switch on pushed for more than 15 sec- the mains, after installation or a onds. power cut. It is normal. If the burner does not light after 15 seconds, release the control 4.2 Turning the burner off... -
Page 9: Care And Cleaning
ENGLISH Do not put unstable or damaged pots WARNING! on the rings to prevent from spill and in- Liquids spilt during cooking can jury. cause the glass to break WARNING! Do not use a flame diffuser. 6. CARE AND CLEANING WARNING! Removing the dirt: Refer to the Safety chapters. -
Page 10: Troubleshooting
10 www.aeg.com 7. TROUBLESHOOTING Problem Possible cause Remedy There is no spark when • There is no electrical • Make sure that the lighting the gas supply unit is connected and the electrical supply is switched on. • Control the fuse. If the... -
Page 11: Installation
ENGLISH MOD. MOD. MOD. TYPE PROD.NO. 230V-50Hz PROD.NO. PROD.NO. 0049 SER.NO. IP20 SER.NO SER.NO 03 IT DATA DATA MADE IN ITALY MODEL MODEL Stick it on Guarantee Card and send Stick it on instruction booklet this part (if applicable) Stick it on Guarantee Card and keep this part (if applicable) 8. - Page 12 12 www.aeg.com Liquid gas 8.3 Adjustment of minimum level Use the rubber pipe holder for liquid gas. Always engage the gasket. Then To adjust the minimum level of the burn- continue with the gas connection. ers: The flexible pipe is prepared for apply Light the burner.
- Page 13 ENGLISH • There is a risk of fire when the appli- 8.5 Replacement of the ance is in connection with an exten- connection cable sion cable, an adapter or a multiple connection. Make sure that the To replace the connection cable use on- ground connection agrees with the ly H05V2V2-F T90 or equivalent type.
-
Page 14: Technical Information
14 www.aeg.com 9. TECHNICAL INFORMATION Hob dimensions Hob recess dimensions Width: 896 mm Width: 880 (0 / +2) mm Length: 516 mm Length: 490 (0 / +2) mm Heat input Triple Crown burner: 3.8 kW Semi-Rapid burner: 1.9 kW Auxiliary burner: 1.0 kW... - Page 15 ENGLISH 10. ENVIRONMENT CONCERNS Recycle the materials with the appliances. Do not dispose symbol . Put the packaging in appliances marked with the symbol applicable containers to recycle it. with the household waste. Return the Help protect the environment and product to your local recycling human health and to recycle waste facility or contact your municipal...
- Page 16 9. DATI TECNICI ............. 29 PER RISULTATI PERFETTI Grazie per aver scelto di acquistare questo prodotto AEG. Lo abbiamo creato per fornirvi prestazioni impeccabili per molti anni, grazie a tecnologie innovative che vi semplificheranno la vita - funzioni che non troverete sui normali elettrodomestici.
-
Page 17: Informazioni Per La Sicurezza
ITALIANO 1. INFORMAZIONI PER LA SICUREZZA Leggere attentamente le istruzioni fornite prima di in- stallare e utilizzare l'apparecchiatura. Il produttore non è responsabile se un'installazione ed un uso non corret- to dell'apparecchiatura provocano lesioni e danni. Te- nere sempre le istruzioni a portata di mano in caso di necessità... -
Page 18: Istruzioni Di Sicurezza
18 www.aeg.com • Non utilizzare un timer esterno o un sistema di con- trollo remoto distinto per mettere in funzione l'appa- recchiatura. • Non lasciare mai il piano di cottura incustodito duran- te la preparazione di cibi in quanto olio e grassi po- trebbero provocare un incendio. - Page 19 ITALIANO ra e il cassetto superiore, sia sufficien- matici, fusibili (quelli a tappo devono te per il ricircolo d'aria. essere rimossi dal portafusibile), sgan- ciatori per correnti di guasto a terra e • La base dell'apparecchiatura può sur- relè. riscaldarsi. Si consiglia di prevedere un pannello divisorio in materiale non in- fiammabile al di sotto dell'apparec- Collegamento gas...
- Page 20 20 www.aeg.com • Non utilizzare l'apparecchiatura come ra per altri scopi come per esempio il superficie di lavoro o come piano di riscaldamento di un ambiente. appoggio. • Un'apparecchiatura per cottura a gas • Se la superficie dell'apparecchiatura produce calore e umidità. Provvedere...
-
Page 21: Descrizione Del Prodotto
ITALIANO • Contattare le autorità locali per riceve- • Tagliare il cavo di rete e smaltirlo. re informazioni su come smaltire cor- • Appiattire i tubi del gas esterni. rettamente l'apparecchiatura. • Staccare la spina dall'alimentazione elettrica. 3. DESCRIZIONE DEL PRODOTTO 3.1 Disposizione della superficie di cottura Bruciatore semi rapido Bruciatore ausiliario... - Page 22 22 www.aeg.com Se il bruciatore non si accende AVVERTENZA! dopo alcuni tentativi, controllare Non tenere la manopola di rego- che la corona e lo spartifiamma lazione premuta per oltre 15 se- siano correttamente posizionati. condi. Se il bruciatore non si accende...
-
Page 23: Consigli E Suggerimenti Utili
ITALIANO 5. CONSIGLI E SUGGERIMENTI UTILI AVVERTENZA! Fare riferimento ai capitoli sulla sicurezza. 5.1 Per risparmiare energia • Se possibile, coprire sempre le pento- le con il relativo coperchio. AVVERTENZA! Assicurarsi che i manici delle • Quando il liquido inizia a bollire, ab- bassare la fiamma per provocare una pentole non si trovino al di sopra lenta ebollizione del liquido. - Page 24 24 www.aeg.com AVVERTENZA! Come eliminare lo sporco: Disattivare l'apparecchiatura e la- – Togliere immediatamente: plasti- sciarla raffreddare prima di pro- ca fondente, pellicola in plastica, e cedere con la pulizia. Scollegare alimenti contenenti zucchero. l'apparecchiatura dalla presa – Spegnere l'apparecchio e la-...
-
Page 25: Risoluzione Dei Problemi
ITALIANO 7. RISOLUZIONE DEI PROBLEMI Problema Causa possibile Soluzione Quando si accende il • L’alimentazione elettri- • Verificare che la spina gas, non viene prodotta ca manca dell'unità sia inserita e alcuna scintilla che vi sia corrente elettrica. • Verificare il fusibile. Se il fusibile è... -
Page 26: Installazione
26 www.aeg.com MOD. MOD. MOD. TYPE PROD.NO. 230V-50Hz PROD.NO. PROD.NO. 0049 SER.NO. IP20 SER.NO SER.NO 03 IT DATA DATA MADE IN ITALY MODEL MODEL Attaccarla sul Foglietto di garanzia Attaccarla sul libretto di istruzioni ed inviare questa parte (ove prevista) - Page 27 ITALIANO 8.3 Regolazione del livello minimo Per regolare il livello minimo dei brucia- tori: Accendere il bruciatore. Ruotare la manopola al minimo della fiamma. Togliere la manopola. Estremità dell'albero con dado Regolare la vite di by-pass con un cacciavite sottile. Rondella Gomito (se necessario) Collegamento rigido:...
- Page 28 28 www.aeg.com • Non tirare il cavo di alimentazione per 8.5 Sostituzione del cavo di scollegare l’apparecchiatura. Tirare so- collegamento lo la spina. Per sostituire il cavo di collegamento • Vi è il rischio di incendio quando l'ap- usare solo H05V2V2-F T90 o un tipo parecchiatura è...
-
Page 29: Dati Tecnici
ITALIANO Mobile da incasso con forno 30 mm LIl collegamento elettrico del piano di cottura e del forno devono essere ese- min 20 mm guiti separatamente per questioni di si- (max 150 mm) curezza oltre che per consentire una faci- 60 mm le rimozione del forno dall'unità. - Page 30 30 www.aeg.com Bruciatori a gas per GAS NATURALE G20 20 mbar POTENZA NORMALE BRUCIATORE ini. 1/100 mm Ausiliario Semi rapido Tripla corona Bruciatori a gas GPL (Butano/Propano) G30/G31 - 28-30/37 mbar POTENZA 28-30 ini. 1/100 37 mbar BRUCIATORE NORMALE mbar...
- Page 31 ITALIANO...
- Page 32 www.aeg.com/shop...