Table of Contents
Advertisement
Available languages
Available languages
Quick Links
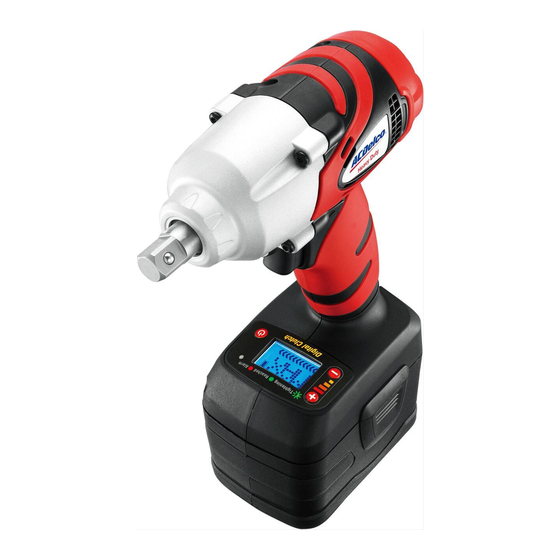
ARI2064 / ARI2064B
IMPACT WRENCH
THIS MANUAL CONTAINS IMPORTANT INFORMATION REGARDING SAFETY,
OPERATION, MAINTENANCE AND STORAGE OF THIS PRODUCT.
CE MANUEL CONTIENT DES INFORMATIONS IMPORTANTE CONCERNANT LA
SECURITE, L'OPERATION, LA MAINTENANCE ET LE STOCKAGE DE CE
PRODUIT.
ESTE MANUAL CONTIENE INFORMACIÓN IMPORTANTE ACERCA DE LA
SEGURIDAD, FUNCIONAMIENTO, MANTENIMIENTO Y ALMACENAMIENTO DE
ESTE PRODUCTO.
DO NOT ATTEMPT TO OPERATE THE TOOL UNTIL YOU HAVE READ AND UNDERSTOOD ALL
INSTRUCTIONS AND SAFETY RULES CONTAINED IN THIS MANUAL. FAILURE TO COMPLY
MAY RESULT IN ACCIDENTS INVOLVING FIRE, ELECTRIC SHOCK, OR SERIOUS PERSONAL
INJURY. SAVE THIS OWNER'S MANUAL FOR FUTURE REFERENCE AND REVIEW IT
FREQUENTLY FOR SAFE OPERATION.
NE PAS TENTER D'OPERER L'OUTIL TANT QUE VOUS N'AVEZ PAS LU ET COMPRIS TOUTES
LES INSTRUCTIONS ET REGLES DE SECURITE CONTENUES DANS CE MANUEL. SINON VOUS
RISQUEZ DES ACCIDENTS TELS QU'UN INCENDIE, UNE ELECTROCUTION, OU DES
BLESSURES CORPORELLES GRAVES. CONSERVEZ CE MODE D'EMPLOI EN CAS DE BESOIN ET
RELISEZ-LE SOUVENT POUR UTILISER VOTRE OUTIL EN TOUTE SECURITE.
NO UTILICE ESTA HERRAMIENTA HASTA HABER LEÍDO Y COMPRENDIDO TODAS LAS
INSTRUCCIONES Y NORMAS DE SEGURIDAD CONTENIDAS EN ESTE MANUAL. SI NO LO
HACE PODRÍA PROVOCAR ACCIDENTES CON FUEGO, DESCARGA ELÉCTRICA O LESIONES
PERSONALES SERIAS. GUARDE ESTE MANUAL DE INSTRUCCIONES PARA SU CONSULTA EN
EL FUTURO Y REVÍSELO FRECUENTEMENTE PARA UN USO SEGURO.
40732340-NA
PRODUCT INFORMATION MANUAL
Manuel informations du produit
Manual información del producto
English
Français
Español
Advertisement
Table of Contents

Related Manuals for ACDelco ARI2064


Summary of Contents for ACDelco ARI2064
- Page 1 ARI2064 / ARI2064B IMPACT WRENCH PRODUCT INFORMATION MANUAL Manuel informations du produit Manual información del producto English Français Español THIS MANUAL CONTAINS IMPORTANT INFORMATION REGARDING SAFETY, OPERATION, MAINTENANCE AND STORAGE OF THIS PRODUCT. CE MANUEL CONTIENT DES INFORMATIONS IMPORTANTE CONCERNANT LA SECURITE, L'OPERATION, LA MAINTENANCE ET LE STOCKAGE DE CE PRODUIT.
- Page 2 1English1 THANKS FOR CHOOSING THIS PRODUCT ACDelco provides you with products at an affordable price, and we would like you to be fully satisfied with this product and our technical support. If any help or advice is needed, please kindly contact us.
-
Page 3: Warning Label Identification
1English1 WARNING LABEL IDENTIFICATION Read Manuals Before Operating Product. Wear Eye Protection. Wear Hearing Protection. Wear Dust Mask. Wear Respiratory Protection. Power tools can vibrate in use. Do not carry the tool by the cord. Keep body stance balanced and firm. Do not overreach when operating this tool. -
Page 4: Work Area
1English1 WORK AREA WARNING Keep work area clean and well lit. Cluttered and dark areas invite accidents. Do not operate power tools in explosive atmospheres, such as in the presence of flammable liquids, gases or dust. Power tools create sparks which may ignite the dust or fumes. - Page 5 1English1 TOOL USE AND CARE CAUTION Use clamps or other practical way to secure and support the workpiece to a stable platform. Holding the work by hand or against your body is unstable and may lead to loss of control. Do not force tool.
- Page 6 1English1 BATTERY TOOL USE AND CARE CAUTION Ensure the switch is in the off position before inserting battery pack. Inserting the battery pack into power tools that have the switch on invites accidents. Recharge only with the charger specified by the manufacturer. A charger that is suitable for one type of battery pack may create a risk of fire when used with another battery pack.
-
Page 7: Specific Safety Rules And Symbols
1English1 SPECIFIC SAFETY RULES AND SYMBOLS CAUTION Hold tool by insulated gripping surfaces when performing an operation where the cutting tool may contact hidden wiring. Contact with ’live’ wire will also make exposed metal parts of the tool ’live’ and shock the operator. Be aware that this tool is always in an operating condition, because it does not have to be plugged into an electrical outlet. -
Page 8: Functional Description
1English1 FUNCTIONAL DESCRIPTION CONTROLS AND COMPONENTS: 1. Aluminum Gearbox Housing 2. Anvil 3. Built-in LED light 4. Forward / Reverse Control Button 5. Variable Speed Switch 6. Anti-slip Soft Grip 7. LCD Panel 8. Battery Pack Release Button 9. Battery Pack English... -
Page 9: Specifications
LCD PANEL COMPONENTS: 10. Power On 11. LED Indicating Lamp 12. Reduce Torque Range Button 13. Increase Torque Range Button 14. LCD Display SPECIFICATIONS Model Number ARI2064 ARI2064B Voltage 18 Vdc Drive 1/2” Square Max. Tightening Torque 300 ft-lbs (400 Nm) Max. - Page 10 1English1 ASSEMBLY INSTALLING OR REMOVING BATTERY PACK TO REMOVE BATTERY PACK: Depress the battery pack release button (8) and pull the battery pack (9) out of tool. TO INSTALL BATTERY PACK: Push the battery pack (9) onto tool until it locks in place.
-
Page 11: Operation
1English1 OPERATION FUNCTIONS & DISPLAY: 1. There are 4 stages of battery capacity gauge on LCD. 2. When pressing VSR switch, then the illuminative LED will be on at the same time. 3. There are 5 stages of torque clutches and one “MAX” stage. Max stage of torque clutch REFERENCE TORQUE VALUES OF EACH TORQUE CLUTCH STAGE Stage 1: average value: 60 ft/lbs (80 Nm) - Page 12 1English1 LED INDICATING LAMP SIGNAL & MESSAGE ON LCD DURING OPERATION: 1. During Operation: LCD will show the setting stage of digital clutch. 2. Designated Torque Reached: LED indicating lamp will stay on in green and LCD will show the setting stage of digital clutch. 3.
- Page 13 1English1 Bolt Size: Larger bolt diameters generally require higher fastening torque. Fastening torque will also vary according to length, grade, and torque coefficient. Material: The type of material and surface finish of the material will affect fastening torque. Fastening Time: Longer fastening time results in increased fastening torque. Using a longer fastening time than recommended could cause the screws to be overstressed, stripped or damaged.
-
Page 14: Maintenance
ACDelco, ACDelco Emblem and the ACDelco related graphics are General Motors Trademarks used under license to Mobiletron Electronics Co., Ltd. -
Page 15: Utilisation Prévue
1Français1 MERCI D'AVOIR CHOISI CE PRODUIT ACDelco offre des produits à des prix abordables et nous espérons que ce produit ainsi que notre assistance technique vous satisferont pleinement. Si vous avez besoin d'assistance, n'hésitez pas à nous contacter. UTILISATION PRÉVUE Cet outil est uniquement prévu pour une utilisation personnelle. -
Page 16: Règles Importantes De Sécurité
1Français1 IDENTIFICATION D'ÉTIQUETTE D'AVERTISSEMENT Lisez les manuels avant d'utiliser le produit. Port de protection oculaire. Port d'une protection auditive. Port d'un masque anti-poussière Port de protection respiratoire. Les outils vibrent lorsque vous les utilisez. Ne transportez pas l'outil en le tenant par le cordon. Positionnez votre corps de manière bien équilibrée et stable. -
Page 17: Espace De Travail
1Français1 ESPACE DE TRAVAIL AVERTISSEMENT Gardez votre espace de travail propre et bien éclairé. Le désordre et le manque d'éclairage sont des conditions propices aux accidents. N'utilisez pas les outils électriques dans des atmosphères explosives, comme en présence de liquides inflammables, de gaz ou de poussière. Les outils électriques génèrent des étincelles risquant d'enflammer la poussière ou la fumée. -
Page 18: Sécurité Personnelle
1Français1 SÉCURITÉ PERSONNELLE AVERTISSEMENT Restez attentif, faites attention à ce que vous faites et utilisez votre bon sens lorsque vous manipulez l'outil électrique. N'utilisez pas un outil électrique quand vous êtes fatigué ou sous l'influences de drogue, d'alcool ou de médicaments. -
Page 19: Utilisation Et Entretien De L'outil
1Français1 UTILISATION ET ENTRETIEN DE L'OUTIL ATTENTION Utilisez des clames ou d'autres méthodes pratiques pour fixer et supporter la pièce de fabrication sur une plateforme stable. Le maintien de la pièce avec votre main ou contre votre corps n'est pas stable et risque de vous faire perdre le contrôle. Ne forcez pas l'outil. -
Page 20: Utilisation Et Entretien De La Batterie
1Français1 UTILISATION ET ENTRETIEN DE LA BATTERIE ATTENTION Vérifiez que l'interrupteur est sur la position d'arrêt avant d'installer la batterie. L'installation d'une batterie dans un outil allumé risque de causer des accidents. Rechargez la batterie uniquement avec le chargeur spécifié par le fabricant. Un chargeur adapté... - Page 21 1Français1 RÈGLES ET SYMBOLES SPÉCIFIQUES DE SÉCURITÉ ATTENTION Maintenez l'outil par les surfaces antidérapantes isolantes quand vous effectuez une tâche ou l'outil de coupe risque d'entrer en contact avec des câbles électriques cachés. Le contact avec des câbles sous tension mettra les pièces métalliques exposées de l'outil également sous tension et électrocutera l'operateur.
-
Page 22: Description Fonctionnelle
1Français1 DESCRIPTION FONCTIONNELLE COMMANDES ET COMPOSANTS: Coque de la boîte de vitesse en aluminium Carré d'entraînement Lampe à DEL intégrée Bouton de commande marche avant / arrière Interrupteur à vitesse variable Poignée anti-dérapante Écran LCD Bouton de libération de la batterie Batterie Français... -
Page 23: Spécifications
COMPOSANTS DU PANNEAU LCD: Marche Voyant lumineux Bouton de réduction de plage de couple Bouton d'augmentation de plage de couple Écran LCD SPÉCIFICATIONS Numéro de modèle ARI2064 ARI2064B 18 Vcc Tension 1/2” Carré Entraînement 300 ft-lbs (400 Nm) Couple de serrage max. -
Page 24: Montage
1Français1 MONTAGE INSTALLER OU RETIRER LA BATTERIE POUR RETIRER LA BATTERIE : Appuyez sur le bouton de libération de la batterie (8) et sortez la batterie (9) de l'outil. POUR INSTALLER LA BATTERIE : Poussez la batterie (9) dans l'outil jusqu'à ce qu'elle s'enclenche correctement. - Page 25 1Français1 FONCTIONNEMENT FONCTIONS ET AFFICHAGE : 1. Il y a 4 niveaux de jauge de capacité de la batterie sur l'écran LCD. 2. Lorsque vous appuyez sur le commutateur VSR, la LED s'allume. 3. Il y a 5 niveaux de limiteur de couple et un niveau « MAX ». Niveau Max de limiteur de couple VALEURS DE COUPLE DE REFERENCE DE CHAQUE NIVEAU DE LIMITEUR DE COUPLE...
- Page 26 1Français1 SIGNAL PAR VOYANT LED ET MESSAGE SUR L'ECRAN LCD EN COURS DE FONCTIONNEMENT : 1. En cours de fonctionnement : L'écran LCD affichera le niveau de réglage de l'embrayage numérique. 2. Couple désigné atteint : Le voyant LED restera allumé en vert et l'écran LCD affichera le niveau de réglage de l'embrayage numérique.
- Page 27 1Français1 Tension : Une faible tension en raison d'une batterie presque déchargée réduira le couple de serrage. Taille de la douille : Si vous n'utilisez pas la bonne taille de douille, cela causera une réduction du couple de serrage. Interrupteur à vitesse variable: Si vous utilisez l'outil à une vitesse réduite, cela réduira le couple de serrage.
-
Page 28: Protection De L'environnement
ACDelco, l'emblème d’ACDelco et les illustrations associées à ACDelco sont des marques commerciales déposées de General Motors utilisées sous licence à Mobiletron Electronics Co., Ltd. - Page 29 1Español1 GRACIAS POR ELEGIR ESTE PRODUCTO ACDelco le ofrece productos a un precio asequible y nos gustaría que quedara completamente satisfecho con este producto y nuestro soporte técnico. Si necesita ayuda o consejo, contacte con nosotros. USO INTENCIONADO Esta herramienta es sólo para uso personal.
- Page 30 1Español1 IDENTIFICACIÓN DE LA ETIQUETA DE ADVERTENCIA Lea los manuales antes de utilizar el producto. Lleve protección para los ojos. Lleve protección para los oídos. Lleve máscara antipolvo. Lleve protección de respiración. Las herramientas con alimentación pueden vibrar al usarlas. No transporte la herramienta por el cable.
-
Page 31: Normas De Seguridad Importantes
1Español1 NORMAS DE SEGURIDAD IMPORTANTES PELIGRO Cuando utilice herramientas de corriente, evite siempre respirar y exponerse al polvo o partículas dañinas. ADVERTENCIA: El polvo creado por el lijado, serrado, pulido, taladrado y otras actividades de la construcción contiene químicos que provocan según el Estado de California cáncer, defectos de nacimiento u otros daños reproductivos. -
Page 32: Seguridad Eléctrica
1Español1 SEGURIDAD ELÉCTRICA ADVERTENCIA Evite el contacto del cuerpo con superficies conectadas a tierra como tuberías, radiadores, cocinas y neveras. Existe un mayor riesgo de descarga eléctrica si su cuerpo está en contacto con tierra. No exponga las herramientas de potencia a la lluvia o ambientes húmedos. Si entra agua en una herramienta de potencia aumentará... - Page 33 1Español1 USO Y CUIDADOS DE LA HERRAMIENTA PRECAUCIÓN Utilice abrazaderas u otros medios para asegurar y apoyar la pieza de trabajo en una plataforma segura. Si aguanta la pieza de trabajo con la mano contra su cuerpo, podría desestabilizarse y provocar la pérdida del control. No fuerce la herramienta.
- Page 34 1Español1 USO Y CUIDADOS DE LA BATERÍA DE LA HERRAMIENTA PRECAUCIÓN Asegúrese de que el interruptor esté apagado antes de insertar la batería. Si inserta la batería en herramientas de potencia con el interruptor encendido activado, podría tener accidentes. Recargar sólo con el cargador especificado por el fabricante. Un cargador apropiado para un tipo de batería puede suponer un riesgo si se utiliza con otra batería distinta.
- Page 35 1Español1 NORMAS Y SÍMBOLOS DE SEGURIDAD ESPECÍFICOS PRECAUCIÓN Sostenga la herramienta por sus superficies de agarre aisladas cuando realice una operación donde la herramienta de corte pueda contactar con el cableado oculto. El contacto con un cable ’vivo’ también expondrá las partes metálicas de la herramienta en ’vivo’...
- Page 36 1Español1 CONTROLES Y COMPONENTES: Carcasa de engranaje de aluminio Boquilla Luz LED incorporada Botón de control Adelante / Atrás Interruptor de velocidad variable Agarre suave antideslizante Indicador de batería Botón de liberación de la batería Batería Español...
-
Page 37: Especificaciones
LCD PANEL COMPONENTS: Power On LED Indicating Lamp Reduce Torque Range Button Increase Torque Range Button Pantalla LCD ESPECIFICACIONES Número de modelo ARI2064 ARI2064B Voltaje 18 Vdc Cuadrado de 1/2" Máx. Tightening Torque 300 ft-lbs (400 Nm) Máx. Reverse Torque 480 ft-lbs (640 Nm) Máx. -
Page 38: Montaje
1Español1 MONTAJE INSTALAR O QUITAR LA BATERIA PARA QUITAR LA BATERÍA: Suelte el botón de liberación de la batería (8) y tire de la batería (9) para sacarla. PARA INSTALAR LA BATERÍA: Introduzca la batería (9) en la herramienta hasta que quede bloqueada en su lugar. -
Page 39: Operación
1Español1 OPERACIÓN FUNCTIONS & DISPLAY: 1. There are 4 stages of battery capacity gauge on LCD. 2. When pressing VSR switch, then the illuminative LED will be on at the same time. 3. There are 5 stages of torque clutches and one “MAX” stage. Max stage of torque clutch REFERENCE TORQUE VALUES OF EACH TORQUE CLUTCH STAGE Stage 1: average value: 60 ft/lbs (80 Nm) - Page 40 1Español1 LED INDICATING LAMP SIGNAL & MESSAGE ON LCD DURING OPERATION: 1. During Operation: Durante la operación: la pantalla LCD mostrará la etapa de configuración del embrague digital. 2. Designated Torque Reached: LED indicating lamp will stay on in green and LCD will show the setting stage of digital clutch.
-
Page 41: Mantenimiento
1Español1 Tamaño del accesorio: Si no utiliza un accesorio con el tamaño correcto, provocará una reducción en el torque de agarre. Interruptor de disparo de velocidad variable: La utilización de la herramienta a una velocidad baja reducirá el torque de agarre. Tamaño del tornillo: Los tornillos de diámetro más grande generalmente necesitan un torque de agarre más alto. -
Page 42: Protección Del Medio Ambiente
ACDelco, el Emblema ACDelco y los gráficos relacionados con ACDelco son Marcas de General Motors usados bajo la licencia de Mobiletron Electronics Co., Ltd.