Table of Contents
Advertisement
Quick Links
Advertisement
Table of Contents

Related Manuals for Epson PowerLite Home Cinema 21000

Summary of Contents for Epson PowerLite Home Cinema 21000
- Page 1 ® PowerLite Home Cinema 21000 Home Theater Projector User’ s Guide...
- Page 2 Epson product. Epson is not responsible for any use of this information as applied to other products. Neither Seiko Epson Corporation nor its affiliates shall be liable to the purchaser of this product or third parties for damages, losses, costs, or expenses incurred by purchaser or third parties as a result of: accident, misuse, or abuse of this product or unauthorized modifications, repairs, or alterations to this product, or (excluding the U.S.) failure to...
-
Page 3: Table Of Contents
Contents Introduction Projector Parts Remote Control Optional Accessories Registration and Warranty Using This Manual Setting Up the Projector Choosing a Location Installing the Projector Connecting the Cables Connecting Video and Computer Equipment Making Other Connections Installing Batteries in the Remote Control Turning the Projector On and Off Turning On the Projector Turning Off the Projector... - Page 4 Making Detailed Adjustments Using the Menu System Changing How the Menus Display Adjusting the Picture Quality Input Brightness Settings Sharpness and Picture Quality Settings Color Settings Adjustments for Computer Images Selecting Memory Settings and Resetting the Projector Selecting Memory Settings Creating Memory Settings Renaming Memory Settings Deleting Saved Memory Settings...
- Page 5 Solving Remote Control Problems Solving Other Problems Where to Get Help Specifications General Lamp Remote Control Dimensions Electrical Environmental Safety Compatible Video Formats ESC/VP21 Command Codes Notices Important Safety Information FCC Compliance Statement Declaration of Conformity Epson America, Inc. Limited Warranty Index Contents...
-
Page 6: Introduction
10-bit with partial 12-bit color quality for unmatched color accuracy, with over a billion colors available ■ Epson AccuCinema ™ color management delivered by the built-in optical Cinema Filter blocks out excess light for an expanded, purer color range and sophisticated grayscale tracking ■... -
Page 7: Projector Parts
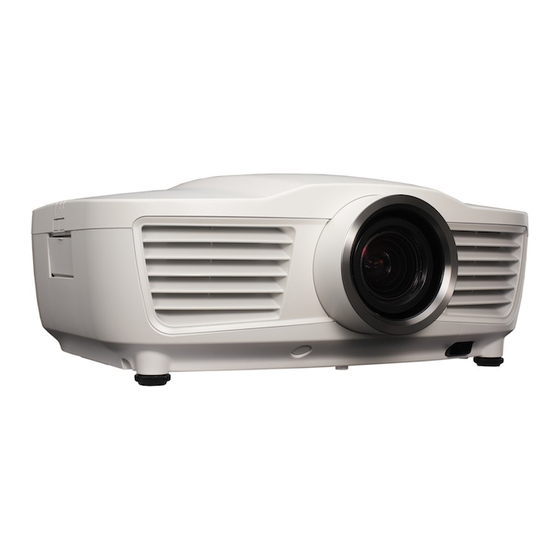
Projector Parts Front Infrared receiver (rear) Control panel (side) Lamp cover Ventilation slots Ventilation slots (intake) (exhaust) Lens cover Adjustable foot Infrared receiver (front) Back Video port Component video port Cable holders Kensington ® lock port PC port Control port AC power inlet (RS-232C) Main power switch... - Page 8 Bottom Air filter cover release Mounting bracket attachment points Optional cable cover attachment points Projector Control Panel Status lights (see page 57) Source button Power Switches the button video input source Esc button Menu button Exits the current Displays the menu item menus Enter button...
-
Page 9: Remote Control
Remote Control Power buttons Illumination button Turn projector on or off Lights the remote control buttons for easy viewing Source buttons Switch between equipment connected to the projector HDMI Link buttons Let you operate HDMI CEC compatible devices Lens Shift button Moves image up/down/left/right Zoom button Menu navigation buttons... -
Page 10: Optional Accessories
Home Service. In the unlikely event of an equipment failure, you won’t have to wait for your unit to be repaired. Instead, Epson will ship you a replacement unit anywhere in the United States, Canada, or Puerto Rico. See your Extra Care Home Service brochure for details. -
Page 11: Using This Manual
Note: Contains important information about your projector. Tip: Contains helpful projection tips. Need additional help? Take advantage of Epson’s automated support services 24 hours a day at www.epson.com/support (U.S.) or epson.ca/support (Canada). Use this site to view FAQs (Frequently Asked Questions) or product information and e-mail your questions to Epson support. -
Page 12: Setting Up The Projector
Setting Up the Projector Follow the instructions in this section to choose a location for the projector, connect the cables, and display an image. Choosing a Location You can install the projector for the viewing setups shown below, as well as rear projection. Center Side Ceiling... - Page 13 Ideally, keep the projector level and place it at a height so its lens is centered between the top and bottom of the screen, as shown below. If this is not possible, use the lens shift function to reposition the image (see page 23). As a rule of thumb, you can use lens shift to move the image up or down by nearly its full height, and left or right by about one-half its width (for details, see page 24).
- Page 14 The size of the image is determined by the distance from the projector’s lens to the screen. Depending on your display settings, the actual size may differ. Use these tables as a guide for projector placement: 16:9 aspect ratio Diagonal image size Projection distance (width ×...
- Page 15 To determine the exact image size when you know the projection distance (or the exact projection distance when you know the desired image size), you can use the Image Size Calculator. This program is available on the Epson website at epson.com/support (U.S.) or epson.ca/support (Canada).
-
Page 16: Installing The Projector
Installing the Projector To install the projector, you first need to determine the location, based on the size of your screen (maximum diagonal image size). Use the tables on page 14 as a guide to positioning the projector. To suspend the projector from a ceiling, you will need the optional projector mount designed for the projector. - Page 17 The following illustrations show the dimensions of the projector: Center of lens 17.3 in. (440 mm) 8.7 in. (220 mm) 7.3 in. 6.9 in. 185 mm 174 mm 3.6 in. 92 mm 0.138 in. 0.43 in. 3.5 mm 11 mm 12.3 in.
-
Page 18: Connecting The Cables
Connecting the Cables Connecting Video and Computer Equipment You can connect the projector to many types of video equipment, such as a Blu-ray ™ Disc /DVD player, digital tuner, cable or satellite box, video game console, camcorder, or ® ® digital camera. -
Page 19: Making Other Connections
For best results, connect your video equipment to the port, if possible. If your HDMI equipment doesn’t support HDMI, connect it to one of the following ports (highest quality listed first): (for component video), , or (for composite video). Component S-Video Video Connect video equipment... -
Page 20: Installing Batteries In The Remote Control
■ port outputs a 12-volt DC signal Trigger out when the projector is turned on. This lets a central control system monitor whether the projector is on or off, and can be used to raise or lower your projection screen automatically when the projector is in use. Depending on the setting you select (see page 44), it can also be used to operate an anamorphic lens. -
Page 21: Turning The Projector On And Off
Turning the Projector On and Off Turning On the Projector 1. Remove the lens cap. 2. Turn on any connected equipment you plan to use. 3. Turn on the main power switch on the back of the projector. 4. Press the Ppower button on the projector or the button on the remote control. -
Page 22: Turning Off The Projector
Turning Off the Projector 1. Turn off any equipment connected to the projector. 2. Press the Ppower button on the projector or the P button on the remote Standby control. When you see a confirmation message, press the button again to turn the projector off. -
Page 23: Positioning The Image
If you press the source button on the projector, you see a list of available sources. Press source button to move through the list and select the desired source. Note: If an image does not appear, see “Problem Solving” on page 57. To temporarily turn off the image and darken the screen, press the Blank button on the remote control. - Page 24 To use the lens shift, press the button on the remote control, then use the Lens Shift l r u d arrow buttons to adjust the image position. To return the lens to the center, press and hold any arrow button until the lens moves to the center and stops. Caution: Do not try to move the lens by hand, or you may damage the projector.
-
Page 25: Making Basic Adjustments
Making Basic Adjustments Follow the instructions in this chapter to make basic adjustments to the image shape, size, color, and quality. For further refinements, see “Making Detailed Adjustments” on page 31. Focusing and Zooming To focus the image, press the button on the remote control, then use the l and r Focus arrow buttons to adjust the picture. -
Page 26: Choosing The Aspect Ratio
CinemaScope ) when using a commercially available anamorphic lens (available from Epson—see page 10). Note: If you use this setting without an anamorphic lens, the image fills the screen vertically but not at the correct aspect ratio. Make sure Overscan is set to Off (100%), or the image won’t display correctly (see page 42). -
Page 27: Choosing The Color Mode
■ x.v.Color for the most natural color reproduction when viewing movies through HDMI. The built-in Epson Cinema Filter automatically improves color reproduction in a darkened room; it is used when you select Cinema x.v.Color... -
Page 28: Adjusting The Gamma Setting
Note: You can fine-tune these and other color and image quality settings using the projector’s menu system (see page 31). You can also save combinations of picture settings with the Memory feature for easy recall (see page 39). If you don’t like the settings you have selected on a particular menu screen, you can press the Default button to restore the factory settings. -
Page 29: Adjusting Rgbcmy
Adjusting RGBCMY Use this feature to adjust the hue, saturation, and brightness for each of the red (R), green (G), blue (B), cyan (C), magenta (M), and yellow (Y) color components. 1. Press the button. You see the following displayed on the screen: RBGCMY 2. - Page 30 3. Choose from these options: ■ Lens Lock disables the focus, zoom, and lens shift. If you try to use one of these functions, a lock icon appears on the screen. ■ Child Lock to disable the Ppower button on the projector’s control panel unless it is pressed for about 3 seconds.
-
Page 31: Making Detailed Adjustments
Making Detailed Adjustments You can use the projector’s on-screen menus to make detailed adjustments to the image quality—such as the brightness, contrast, sharpness, and color. You can also change the menu display, sleep mode settings, and other projector features. Using the Menu System You can access the menu system either from the remote control or the buttons on the projector’s control panel. -
Page 32: Changing How The Menus Display
3. Press the u, d, l, or r button to change settings as necessary. You may have to press the button to confirm your choice. Enter 4. When you’re finished, press the button to return to the previous menu or press the button to exit the menu system. -
Page 33: Input Brightness Settings
Input Brightness Settings If the signal from connected equipment is weak and images appear dark, you can adjust the Brightness and Contrast settings. You can adjust brightness and contrast for each image source and color mode. The Brightness setting controls how much light is produced by the projector, and the Contrast setting adjusts the difference between the bright and dark areas of the projected image. -
Page 34: Sharpness And Picture Quality Settings
■ HDMI Video Range Signal > Advanced > HDMI Video Range Note: This setting can be used only when EPSON Super White is turned off and a signal is being input through the HDMI 1 or HDMI 2 port. If your video equipment has an HDMI port and you’ve connected it to the projector using an HDMI cable, set the level of the projector to match that of the video equipment. - Page 35 ■ Sharpness Image > Sharpness Use this function to make lines and edges appear more distinct in the image. This setting is stored separately for each image source and color mode setting. You can select to adjust the sharpness of the entire image, or select to access the Standard Advanced...
-
Page 36: Color Settings
■ Mosquito NR Signal > Advanced > Mosquito NR Note: This setting cannot be used when the Color Mode is set to x.v.Color (see page 27) or with a signal input through the PC port. This setting reduces grainy noise that can appear around the edges of MPEG images. You can select from 3 levels. - Page 37 ■ Tint Image > Tint Note: This setting cannot be used when the Color Mode is set to x.v.Color (see page 27) or with a signal input through the PC port. Shifts the color balance between magenta and green. ■ Abs. Color Temp. Image >...
-
Page 38: Adjustments For Computer Images
■ RGBCMY Image > Advanced > RGBCMY Note: This setting cannot be used when the Color Mode is set to x.v.Color (see page 27). Use the RGBCMY settings to adjust the hue, saturation, and brightness of the six color components (red, green, blue, cyan, magenta, yellow). After adjusting each color, press to move to another menu option. -
Page 39: Selecting Memory Settings And Resetting The Projector
■ Auto Setup Signal > Auto Setup Leave this setting on so that the projector automatically adjusts the tracking, sync, and position of the image. ■ Tracking Signal > Tracking Adjust the tracking to eliminate vertical bands. It is easiest to adjust the tracking when the image contains a lot of fine detail (such as black text on a white background). -
Page 40: Creating Memory Settings
After a moment, the image appears on the screen using the retrieved settings. Certain settings may not be applied, depending on the input signal. Note: Because of the mechanical nature of the lens, you may need to fine-tune the adjustment after loading a saved lens position. -
Page 41: Deleting Saved Memory Settings
Deleting Saved Memory Settings You can clear all your memory settings at once. 1. Press the button on the remote control. Menu 2. Open the menu, then select Reset Reset Memory 3. Select , then press the button to delete the memory settings. Enter Note: You can delete memory settings one at a time with the Erase Memory setting under the Memory menu. -
Page 42: Customizing Projector Features
■ Select to clear all lens position memory settings. Reset Lens Position ■ Select to clear the lamp usage timer and reset it to zero. Reset Lamp Hours You should reset the lamp timer only when you install a new projector lamp. See page 55 for more information. -
Page 43: Screen Options
■ Zoom Caption Pos. Signal > Zoom Caption Pos. Lets you adjust the vertical position of the image so that subtitles are visible (available only if the aspect ratio has been set to ). Make sure is set to before Zoom Overscan using this function. - Page 44 ■ Direct Power On Settings > Operation > Direct Power On Sets projection to start when the main power switch is turned on, without pressing the P power button on the remote control or the projector. Note: When Direct Power On is enabled, restoration of power after a power outage can cause the projector to turn on.
- Page 45 ■ Sleep Mode Settings > Operation > Sleep Mode Turn off this setting if you don’t want the projector to enter sleep mode. (Sleep mode shuts the projector off automatically when there is no video signal.) Select , or as the length of time before shutoff; decreasing the time 5min.
-
Page 46: Using Hdmi Link
Using HDMI Link When you connect HDMI CEC-compatible devices to the projector with HDMI cables, you can control them using the HDMI Link buttons on the projector’s remote control. This lets you use just one remote control to operate many commonly used features on all your devices. In a typical configuration, your DVD player may be connected to the projector through an amplifier or home theater system. -
Page 47: Using Hdmi Link
Using HDMI Link 1. Press the button on the projector’s remote control. HDMI Link 2. Select . You see this screen: Device Connections 3. Use the u and d arrow buttons to select the device you want to operate, then press . - Page 48 Using HDMI Link...
-
Page 49: Maintenance
Maintenance Your projector needs little maintenance. All you need to do on a regular basis is keep the lens clean. You also may need to clean the air filter to prevent overheating. Warning: Before you clean any part of the projector, turn it off and unplug the power cord. Never open any cover on the projector, except the lamp and filter covers. -
Page 50: Cleaning The Projector Case
Cleaning the Projector Case Before you clean the case, turn off the projector and unplug the power cord. ■ To remove dirt or dust, wipe the case with a soft, dry, lint-free cloth. ■ To remove stubborn dirt or stains, moisten a soft cloth with water and a neutral detergent. - Page 51 If the dirt is difficult to remove or the filter is broken, replace it. You can purchase air filter part number V13H134A28 from an authorized Epson reseller. To find the nearest reseller, please call 800-GO-EPSON (800-463-7766). To purchase online, visit www.epsonstore.com (U.S.
-
Page 52: Replacing The Lamp
Turn off this product when not in use to prolong the life of the projector. You can purchase lamp part number V13H010L66 from an authorized Epson reseller. To find the nearest reseller, please call 800-GO-EPSON (800-463-7766). To purchase online, visit www.epsonstore.com (U.S. - Page 53 5. Use the screwdriver that came with the lamp (or a similar tool) to loosen the screw on the lamp cover. Then remove the cover as shown. 6. Loosen the two screws securing the lamp (they don’t come all the way out). 7.
- Page 54 8. Gently insert the new lamp and tighten its screws. Caution: Don’t touch the glass portion of the lamp assembly. Touching the glass could result in premature lamp failure. 9. Replace the lamp cover and tighten the screw. (The projector won’t work if the lamp cover is open or loose.) 10.
-
Page 55: Resetting The Lamp Usage Timer
Resetting the Lamp Usage Timer After replacing the lamp, plug the projector back in and turn on the main power switch on the back. Press the Ppower button on the projector or the button on the remote control. Then follow these steps to reset the lamp usage timer: 1. -
Page 56: Storing The Projector
Pack the projector in its original packaging or equivalent. Transporting the Projector Note: Epson shall not be liable for any damages incurred during transportation. The projector contains many glass and precision parts. When shipping the projector for repairs, use the original packaging material if possible. If you do not have the original packaging, use equivalent materials. -
Page 57: Problem Solving
Problem Solving This section explains how to interpret the projector’s status lights, solve problems with the picture and remote control, and contact technical support. What To Do When the Lights Come On or Flash The lights on the projector indicate the projector’s Lamp and temperature lights status and let you know when a problem occurs. - Page 58 There is a problem with the auto iris or cinema filter. Turn off the are flashing red power switch on the back of the projector, and unplug it from the electrical outlet. Then contact Epson for assistance (see page 63). Problem Solving...
-
Page 59: Solving Picture Problems
There is a fan or sensor problem. Turn off the power switch on light flashes red the back of the projector, and unplug it from the electrical outlet. Then contact Epson for assistance (see page 63). Solving Picture Problems You cannot turn on the projector. - Page 60 ■ Use the setting to reposition the image on the screen (see page 42). Position ■ If you’ve connected a computer and you see only half the image, make sure the computer’s Dual Display setting is turned off. If part of the image is cut off, reset the projector settings (see page 41).
- Page 61 Click here The picture is upside-down or reversed. Change the setting in the Settings menu (see page 43). Projection The picture isn’t rectangular. ■ If the image looks like , the projector has been placed off to one side of the screen and angled toward it.
-
Page 62: Solving Remote Control Problems
■ Make sure the lens is not fogged by condensation. If you’ve just moved the projector from a cold environment, wait a couple of minutes before using it. ■ Adjust the setting (see page 35) or turn on (see page 38). Sharpness Super-resolution ■... -
Page 63: Solving Other Problems
Speak to a Support Representative To use the Epson PrivateLine Support service, call (800) 637-7661 and enter the PIN on the Epson PrivateLine Support card that came with your projector. This is the fastest way of speaking to a live representative, and it’s free. - Page 64 Description of the problem Purchase Supplies and Accessories You can purchase screens, carrying cases, or other accessories from an authorized Epson reseller. To find the nearest reseller, call 800-GO-EPSON (800-463-7766). To purchase online, visit www.epsonstore.com (U.S. sales) or www.epson.ca (Canadian sales).
-
Page 65: Specifications
Specifications General Type of display Poly-silicon TFT active matrix Size of LCD panels 0.74 inch (18 mm) wide Lens F=2.5 to 3.7 Resolution (native format) 1920 × 1080 pixels, 1080p Brightness White light output 1200 lumens (ISO 21118 standard) Color light output 1200 lumens (Power Consumption mode: Normal) Dynamic contrast ratio 500000:1... -
Page 66: Dimensions
Dimensions Height 6.9 inches (175 mm), not including adjustable feet Width 17.3 inches (440 mm) Depth 14.6 inches (370 mm); not including lens protrusion Weight 19.8 lb (9.0 kg) Electrical Rated frequency 50/60 Hz AC Power supply 100 to 120 V AC, 2.9 A 200 to 240 V AC, 1.3 A Power consumption 100 to 120 V:... -
Page 67: Safety
Safety United States FCC Part 15B Class B (DoC) UL60950-1 Canada ICES-003 Class B CSA C22.2 No. 60950-1 ™ Pixelworks DNX ICs are used in this projector. Compatible Video Formats The projector supports analog video in NTSC, PAL, and SECAM formats, and it automatically adjusts to the incoming signal. - Page 68 Format/ Refresh rate (Hz) Signal Resolution HDTV 720p 50/60 1280 × 720 1080i 50/60 1920 × 1080 1080p 50/60 1920 × 1080 Analog RGB (computer display) Signal Refresh rate (Hz) Resolution 60/72/75/85 640 × 480 56/60/72/ SVGA 75/85 800 × 600 60/70/75/85 1024 ×...
- Page 69 HDMI Signal Refresh rate (Hz) Resolution 640 × 480 SDTV 480i 720 × 480 576i 720 × 576 480p 720 × 480 576p 720 × 576 HDTV 720p 50/60 1280 × 720 1080i 50/60 1920 × 1080 1080p 24/30/50/60 1920 × 1080 Specifications...
-
Page 70: Esc/Vp21 Command Codes
You can use an AV controller with a 9-pin null modem serial cable to control the projector. You can download the complete ESC/VP 21 Communication Manual for home theater projectors from the Epson website at www.epson.com/support. Following are some of the available codes: Item... -
Page 71: Notices
Notices Important Safety Information Follow these safety instructions when setting up and using the projector: ■ Never look into the projector lens when the lamp is turned on; the bright light can damage your eyes. Never let children look into the lens when it is on. ■... - Page 72 ■ The lamp(s) in this product contain mercury. Please consult your state and local regulations regarding disposal or recycling. Do not put in the trash. ■ Allow the lamp to cool for one hour before replacing it. ■ Unplug the projector during lightning storms or when not in use for extended periods. ■...
-
Page 73: Fcc Compliance Statement
FCC Compliance Statement For United States Users This equipment has been tested and found to comply with the limits for a Class B digital device, pursuant to Part 15 of the FCC Rules. These limits are designed to provide reasonable protection against harmful interference in a residential installation. -
Page 74: Declaration Of Conformity
(1) this device may not cause harmful interference, and (2) this device must accept any interference received, including interference that may cause undesired operation. Trade Name: Epson Type of Product: Projector Model: H358A Marketing Name: PowerLite Home Cinema 21000 Notices... -
Page 75: Epson America, Inc. Limited Warranty
Epson product for carry-in warranty service are your responsibility. Epson will pay for all freight charges if you choose to send your unit to Epson for repair. If a claimed defect cannot be identified or reproduced in service, you will be held responsible for costs incurred. - Page 76 To find the Epson Customer Care Center nearest you, please visit www.epson.com/support. To contact the Epson Connection , please call (800) 637-7661 + PIN or (562) 276-4394 in the U.S. and (905) 709-3839 in Canada or write to Epson America, Inc., P.O. Box 93012, Long Beach, CA 90809-3012. Notices...
-
Page 77: Index
Home Service, 10 Cleaning PrivateLine Support, 11, 63 air filter, 50 to 51 technical support, 11, 63 lens, 49 warranty, 10, 75 to 76 projector case, 50 EPSON Super White setting, 34 Codes, AV controller, 70 ESC/VP21 command codes, 70 Index... - Page 78 Image Size Calculator, 15 Info menu, 55 FCC Compliance Statement, 73 Installing projector, 16 Filter, see Air filter Interference, signal, 61 Flickering, 35, 61 Focus, 25, 39 Frame Interpolation, 36 Kensington anti-theft device, 7, 10 Gain, color, 37 Gamma, 27 to 28, 38 Lamp checking usage timer, 55 life, 65...
- Page 79 Menus Projector available settings, 32 to 45 checking status, 55 customizing display, 32 cleaning, 50 line menu, 9 control panel, 8 using, 31 to 32 dimensions, 17, 66 Message setting, 43 installing, 16 Mosquito NR, 36 lights, 44, 57 to 59 Mounting projector, 16 locking buttons, 29 Moving projector, 56...
- Page 80 Source buttons, 8, 9 Source, selecting image, 22 Specifications x.v.Color setting, 27 compatible video formats, 67 to 69 dimensions, 66 electrical, 66 environmental, 66 Zoom, 25, 39 general, 65 Zoom Caption Pos. setting, 43 lamp, 65 Zoom setting, 26 remote control, 65 Zoom Size setting, 42 Standby Confirmation setting, 43 Startup screen, selecting, 43...