Table of Contents
Advertisement
Quick Links
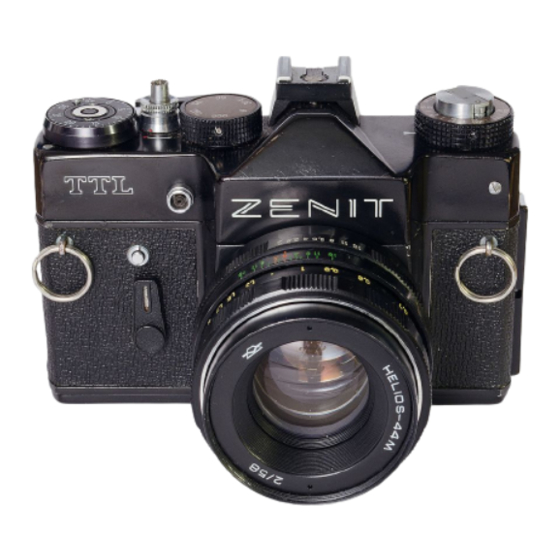
Zenith TTL
Handbook
posted 12-10-'02
For reference use on many Chinon manual focus and metering cameras
Venmo is @mike-butkus-camera
www.PayPal.me/butkus
This camera manual library is for reference and historical purposes, all rights reserved.
This page is copyright by
, M. Butkus, N.J.
This page may not be sold or distributed without the expressed permission of the producer
I have no connection with Chinon Co., Japan
If you find this manual useful, how about a donation of $3 to:
M. Butkus, 29 Lake Ave., High Bridge, NJ 08829-1701
and send your E-mail address too so I can thank you.
Most other places would charge you $7.50 for a electronic copy
or $18.00 for a hard to read Xerox copy.
This will allow me to continue to buy new manuals and maintain these pages.
It'll make you feel better, won't it?
If you use Pay Pal, use the link below. Use the above address for a check, M.O. or cash.
https://www.PayPal.me/butkus
To main Camera manual site
Advertisement
Table of Contents

Related Manuals for Zenith TTL

Summary of Contents for Zenith TTL
- Page 1 Zenith TTL Handbook posted 12-10-'02 For reference use on many Chinon manual focus and metering cameras Venmo is @mike-butkus-camera www.PayPal.me/butkus This camera manual library is for reference and historical purposes, all rights reserved. This page is copyright by , M. Butkus, N.J.
- Page 2 Introduction You can be justly proud that you have chosen the Zenith TTL*_ the latest and most advanced 35mm reflex camera from the U.S.S.R. * Through-the-lens metering offers many advantages over other metering systems. Close range pictures with the aid of bellows or extension tubes; using filters or teleconverters; taking pictures...
-
Page 3: Table Of Contents
You can build up as complete a system as you need at your own pace. To get the best possible results from your Zenith, study this book thoroughly to make sure that you are familiar with the essential features of the camera before you start taking pictures. Refer back to the book any time there is something you are not sure of. -
Page 4: Loading Your Camera
Loading your camera Precautions: (a) Your Zenith camera accepts any standard 35mm cassette, of color or black and white film. (b) Always load the film in subdued lighting conditions, If outdoors, look for a shady area or shield the camera from direct sunlight with your body or coat. - Page 5 strokes till no further movement is possible while applying light finger pressure to the back Sprocket wheel (24). The Sprocket should rotate in time with the lever action and not 'free-wheel. 3.Push up the Cassette Retaining Spindle (21) from inside the camera.
-
Page 6: Picture-Taking Technique
The first two of these are purely technical; the following sections, together with a little experience, will soon enable you to handle your Zenith with sufficient enough ease to leave you free to concentrate on the third aspect, composition, which is the artistic one. -
Page 7: Your Ttl Meter And How To Use It
4www.butkus.org Your TTL Meter and how to use Power Source The camera is supplied complete with a battery (PX 625). To check that the battery is fitted, use a small coin (half penny) to turn the battery compartment cover anti-clockwise for removal. - Page 8 (e.g. foray 64ASA film set it to 65 on the ASA scale, for a 25 ASA film set it to the click-stop setting between 1 6 and 32 ASA. 3.Match the Needle. While continuing to depress the Shutter Release slightly turn the Aperture Ring (14) or the Shutter Speed Dial (1) until the needle bisects the circle situated between the + and -- signs on the right-hand side of the...
-
Page 9: Setting Camera And Lens Controls
To take a time exposure with your Zenith set the Shutter Speed Dial (1) to 'B. At this setting the Shutter will remain open for as long as the Shutter Release Button (3) is pressed down. - Page 10 Apertures: The Hellos 44M,the standard lens supplied with the Zenith TTL camera, is designed to be used in Automatic or Manual mode. When the Auto/Manual Switch (23) is set to 'A, the aperture...
-
Page 11: Viewing And Focusing
Focusing Ring (11) towards the right for close distances or towards the left for far distances, until the subject is sharp and clear on the large ground-glass screen. The Zenith TTL camera has in addition in the center of its screen, two aids for speedier critical focusing, a microprism spot which is composed of literally hundreds of tiny prisms that distort and accentuate an out-of-focus image. -
Page 12: Depth Of Field
for the majority of subjects and conditions but for subjects lacking in contrast or color the fine ground-glass collar around the central spot is probably more helpful -- its quite handy when using long telephoto and wide angle lenses too. (Aim your camera at this instruction book from about 2 feet away and you'll see how these focusing aids work). - Page 13 The second method is to turn the Auto/Manual Switch (23) to the "M" position which has the effect of manually closing the aperture down to the selected lens opening --this is probably easier to master than the first method but you must remember to return the Switch after use to the "A" position ready for normal operation. Using the depth-of-field scale (13) The scale consists of the aperture numbers repeated each side of the Distance Index (10) and shows, at any given focus distance, the nearest limits and furthest limits of acceptable sharpness.
-
Page 14: Taking The Picture
Here we can see that the 10 meter focus setting is in fact the hyper focal distance for an aperture of f/8 which gives us the maximum depth- of-field possible from that lens, extending from half that distance (5 meters) to infinity. 4www.butkus.org Taking the picture Poor first-time results are largely attributable to camera shake, so its very important to hold the camera steady... -
Page 15: Removing Exposed Film
Taking flash pictures When the light is poor some form of auxiliary lighting will be required. This is why your Zenith has a built- in synchronizer which enables you to use an electronic flashgun. This can be one of the simpler battery powered, medium-range guns like the Helios 32 (detailed on p.44) or the more advanced type which can be powered by... -
Page 16: Using The Self-Timer
Using the self timer: • Your Zenith camera has a built-in self timer that trips the shutter after at least a 7 second delay thus enabling you to get into the picture yourself. Here is how to use it... 1.Support the camera on something firm, a tripod is best, but any stable surface such as a nearby table or shelf will do. -
Page 17: Changing Lenses
Changing lenses: • Your Zenith TTL camera is fitted with a Universal 42mm thread mount. A range of 42mm mount auto- diaphragm lenses, designed primarily for the Zenith, is available from your dealer. You are also able to choose from literally hundreds of lenses made both by other camera manufacturers and independent lens makers. - Page 18 (see illustration). All modern high-quality lenses such as that fitted to your Zenith camera are made from special grades of optical glass. During the manufacturing process small bubbles almost inevitably occur within the glass, but these have no adverse effect whatsoever on the functioning of the composite photographic lens.
- Page 19 The Zenith TTL camera can be carried outside its case if preferred (your dealer can supply an accessory neck strap which attaches to the body eyelets (6) and (15), but if it is; take extra care to guard it against bumps and jolts.
-
Page 20: Trouble-Shooting
Self-Timer is used. Timer is used. If anything should go wrong with your Zenith and the preceding chart has not got you out of trouble, NEVER attempt to mend it yourself--you could turn a minor adjust men into an expensive repair. - Page 21 Composition or...Taking better pictures Composition is concerned with what you put into your picture and where; its final control lies in your hands. A slight amount of extra thought and/or effort on your part can often turn what would have been an otherwise ordinary-looking photograph into one which is stunningly attractive.
- Page 22 Situation that your Zenith TTL (both from the USSR and a requires greater-than- normal area coverage, e.g. multitude of other sources) that we can only give...
- Page 23 (e.g. the microprism spot in the Zenith TTL viewfinder may not disappear entirely). Focusing is often easier if you first set the lens to its minimum distance setting, then...
- Page 24 Supplementary lenses, are easiest to use since they do not require any exposure increase -- not that this is a problem with the Zenith TTL, thanks to automatic meter compensation. A slight disadvantage is that because they add another glass-to-air surface they do impair the fine resolving power of the camera lens...
- Page 25 Since the exposure meter in your Zenith TTL automatically compensates for any exposure increase required, this disadvantage is reduced to nil, leaving these plus factors: (a) optical performance is not impaired in any way and (b) a greater and more varied magnification range is obtainable.
- Page 26 Since a filter absorbs extra light, compensation is normally made by increasing the aperture (f/stop) by the factor engraved on the filter mount. With the Zenith TTL, the CdS meter once again provides automatic compensation. For flash photography...
- Page 27 We are sure you'll find the preceding few brief pointers helpful in improving technique with your Zenith. Remember every time you raise your camera to your eye you have the potential of creating a genuinely great photograph. Subjects? -- the world is full of them --the rest is up to you...